欢迎关注『youcans动手学模型』系列
本专栏内容和资源同步到 GitHub/youcans
【YOLO5 项目实战】(1)YOLO5 环境配置与测试
【YOLO5 项目实战】(2)使用自己的数据集训练目标检测模型
【YOLO5 项目实战】(3)PCB 缺陷检测
【YOLO5 项目实战】(4)红外目标检测
1. 红外目标检测数据集
1. FLIR 红外数据集
FLIR 红外数据集是一个免费的红外图像数据集,包含来自FLIR红外相机的高质量图像,包括多种类型的红外图像。
官网链接:https://www.flir.com/oem/adas/adas-dataset-form/
2. VEDAI 遥感目标检测数据集
包含9种类型的遥感地物目标。每种数据包含rgb、nir2种图像,共4波段。
类别:9类(plane,boat,camping car,car,pick-up,tractor,truck,van,other)
下载地址:https://downloads.greyc.fr/vedai/
3. SUCT 远红外行人检测数据集
数据集类型:远红外行人检测数据集
数据集类别:walk person、ride person、squat person、people、person?、people?
Github:https://github.com/SCUT-CV/SCUT_FIR_Pedestrian_Dataset
4. 面向空地应用的红外时敏目标检测跟踪数据集
面向红外时敏目标检测跟踪应用,以车辆为探测目标,以地面场景为探测背景的图像序列数据集。
下载地址:http://www.doi.org/10.11922/sciencedb.j00001.00331
5. CTIR 红外道路数据集
在中国道路上收集了46个视频。
标注的11938 张红外热图像包含 34078 辆汽车(Car)、31035 个行人(Pedestrian/Ped)、16524个骑自行车人(Cyclist/Cyc)、2404 辆公共汽车(Bus)和 1886 辆卡车(Truck/Tru)。
下载地址:https://pan.baidu.com/s/1YvDR_GP_ThzWeE9tMuigSA 提取码:x6l6

2. 构建 YOLO 检测数据集
2.1 下载 CTIR 红外道路数据集
CTIR 红外数据集标注的11938 张红外热图像包含5个类别: 汽车(Car)、行人(Pedestrian)、自行车(Cyclist)、公共汽车(Bus)和 卡车(Truck)。
数据集下载地址:https://pan.baidu.com/s/1YvDR_GP_ThzWeE9tMuigSA 提取码:x6l6
| Image | 7161 | 2390 | 2387 | 11938 |
|---|---|---|---|---|
| Train | Val | Test | Total | |
| Car | 20505 | 6828 | 6745 | 34078 |
| Pedestrian | 18711 | 6136 | 6188 | 31035 |
| Cyclist | 9895 | 3359 | 3270 | 16524 |
| Bus | 1455 | 479 | 470 | 2404 |
| Truck | 1132 | 387 | 367 | 1886 |
2.2 数据集格式转换
CTIR 红外数据集 包括 Annotations 和 Images 两个目录,分别保存 标注文件和红外图像文件(.jpeg)。标注文件采用 .xml 格式。
将CTIR 红外数据集转换为 YOLOv5 训练所需的格式,包括 3个步骤:
- 将图片数据集随机划分为训练数据集,验证数据集和测试数据集;
- 将 .xml 格式的标注文件转化为 .txt 格式的标注文件;
- 按照训练集、验证集和测试集整理文件夹。
采用以下程序实现这些步骤。
【例程1】将图片数据集随机划分为训练数据集,验证数据集和测试数据集
运行该程序后,在 “…//DatasetCTIR//ImageSets” 文件夹生成 test.txt, train.txt, trainval.txt, val.txt 文件,分别保存各数据集所对应的图片序号。
import os
import random

ROOT = "..//DatasetCTIR//"  # IR 数据集

trainval_percent = 0.9
train_percent = 0.9
xmlfilepath = ROOT + "Annotations"  # 标注数据集文件夹
txtsavepath = ROOT + "ImageSets"  # 数据集索引文件夹
if not os.path.exists(txtsavepath):
    os.makedirs(txtsavepath)
# 获取该路径下所有文件的名称,存放在list中
total_xml = os.listdir(xmlfilepath)

num = len(total_xml)
list = range(num)
tv = int(num * trainval_percent)
tr = int(tv * train_percent)
trainval = random.sample(list, tv)
train = random.sample(trainval, tr)

ftrainval = open(ROOT + "ImageSets/trainval.txt", "w")  # 训练集验证集图片名称
ftrain = open(ROOT + "ImageSets/train.txt", "w")  # 训练集图片名称
ftest = open(ROOT + "ImageSets/test.txt", "w")  # 测试机图片名称
fval = open(ROOT + "ImageSets/val.txt", "w")  # 验证集图片名称

for i in list:
    # 获取文件名称中.xml之前的序号
    name = total_xml[i][:-4] + "\n"
    if i in trainval:
        ftrainval.write(name)
        if i in train:
            ftrain.write(name)
        else:
            fval.write(name)
    else:
        ftest.write(name)

ftrainval.close()
ftrain.close()
fval.close()
ftest.close()
【例程2】解析 .xml 标注文件,将其转化为YOLOv5 所需的 .txt 格式标注文件。
xml文件包含的边界框以及图片长宽大小等信息,并进行归一化,写入 txt文件
import xml.etree.ElementTree as ET  # xml解析包
import os


# 归一化
def convert(size, box):  # size:(原图w,原图h) , box:(xmin,xmax,ymin,ymax)
    dw = 1. / size[0]  # 1/w
    dh = 1. / size[1]  # 1/h
    x = (box[0] + box[1]) / 2.0  # 物体在图中的中心点x坐标
    y = (box[2] + box[3]) / 2.0  # 物体在图中的中心点y坐标
    w = box[1] - box[0]  # 物体实际像素宽度
    h = box[3] - box[2]  # 物体实际像素高度
    x = x * dw  # 物体中心点x的坐标比(相当于 x/原图w)
    w = w * dw  # 物体宽度的宽度比(相当于 w/原图w)
    y = y * dh  # 物体中心点y的坐标比(相当于 y/原图h)
    h = h * dh  # 物体宽度的宽度比(相当于 h/原图h)
    return (x, y, w, h)  # 返回 相对于原图的物体中心点的x坐标比,y坐标比,宽度比,高度比,取值范围[0-1]


# 将对应文件名的 xml文件转化为 txt 格式的标注文件
def convert_annotation(root, image_id):
    """
    每张图片文件对应一个xml文件,转换为一个 txt标注文件
    txt 文件中每行表示一个标注: class x y w h
    """
    # 对应的通过year 找到相应的文件夹,并且打开相应image_id的xml文件,其对应bund文件
    in_file = open(root + "Annotations/%s.xml" %
                   (image_id), encoding="utf-8")
    # 准备在对应的image_id 中写入对应的label,分别为
    # <object-class> <x> <y> <width> <height>
    out_file = open(root + "Labels/%s.txt" %
                    (image_id), "w", encoding="utf-8")
    # 解析xml文件
    tree = ET.parse(in_file)
    # 获得对应的键值对
    root = tree.getroot()
    # 获得图片的尺寸大小
    size = root.find("size")
    # 如果xml内的标记为空,增加判断条件
    if size != None:
        # 获得宽
        w = int(size.find("width").text)
        # 获得高
        h = int(size.find("height").text)
        # 遍历目标obj
        for obj in root.iter("object"):
            # 获得difficult
            if obj.find("difficult"):
                difficult = int(obj.find("difficult").text)
            else:
                difficult = 0
            # 获得类别 =string 类型
            cls = obj.find("name").text
            # 如果类别不是对应在我们预定好的class文件中,或difficult==1则跳过
            if cls not in classes or int(difficult) == 1:
                continue
            # 通过类别名称找到id
            cls_id = classes.index(cls)
            # 找到bndbox 对象
            xmlbox = obj.find("bndbox")
            # 获取对应的bndbox的数组 = ["xmin","xmax","ymin","ymax"]
            b = (float(xmlbox.find("xmin").text), float(xmlbox.find("xmax").text), float(xmlbox.find("ymin").text),
                 float(xmlbox.find("ymax").text))
            print(image_id, cls, b)
            # 带入进行归一化操作
            # w = 宽, h = 高, b= bndbox的数组 = ["xmin","xmax","ymin","ymax"]
            bb = convert((w, h), b)
            # bb 对应的是归一化后的(x,y,w,h)
            # 生成 calss x y w h 在label文件中
            out_file.write(str(cls_id) + " " +
                           " ".join([str(a) for a in bb]) + "\n")


if __name__ == "__main__":
    sets = ["train", "test", "val"]
    classes = ["Car", "Pedestrian", "Cyclist", "Bus", "Truck"]  # 修改为训练集类别

    ROOT = "..//DatasetCTIR//"  # IR 数据集
    if not os.path.exists(ROOT + "labels/"):  # 如果不存在 labels文件夹
        os.makedirs(ROOT + "Labels/")  # 则创建 labels文件夹

    # 遍历数据集中的所有图片文件
    for image_set in sets:
        """
        对所有的文件数据集进行遍历
        1.将所有图片文件都遍历一遍,并且将其所有的全路径都写在对应的txt文件中去 方便定位
        2.同时对所有的图片文件进行解析和转化,将其对应的 bundingbox 以及类别的信息全部解析写到 label 文件中去
        最后再通过直接读取文件 就能找到对应的 label 信息
        """
        # 读取 ImageSets 中的 train, test, val 等文件列表内容
        image_ids = open(ROOT + "ImageSets/%s.txt" %
                         (image_set)).read().strip().split()
        # 打开对应的.txt 文件,准备写入
        list_file = open(ROOT + "%s.txt" % (image_set), "w")
        for image_id in image_ids:
            # 写入对应的image_id以及路径
            list_file.write(ROOT + "Images/%s.jpg\n" % (image_id))
            # 解析xml文件的标注格式
            convert_annotation(root=ROOT, image_id=image_id)
        # 关闭文件
        list_file.close()
【例程3】按照训练集、验证集和测试集整理文件夹。
将原始数据集划分为训练集、测试集和验证集,并重新组织。
import argparse
import glob
from pathlib import Path
import random
import shutil
import os
from tqdm import tqdm
from concurrent.futures import ThreadPoolExecutor

NUM_THREADS = min(8, max(1, os.cpu_count() - 1))

def run(func, this_iter, desc="Processing"):
    with ThreadPoolExecutor(max_workers=NUM_THREADS, thread_name_prefix='MyThread') as executor:
        results = list(
            tqdm(executor.map(func, this_iter), total=len(this_iter), desc=desc)
        )
    return results

def split_dataset_into_train_val_test(
    dataset_dir,
    save_dir,
    train_ratio=0.8,
    val_ratio=0.1,
    test_ratio=0.1,
    im_suffix='jpg'
):
    if isinstance(dataset_dir, str):
        dataset_dir = Path(dataset_dir)
    image_files = []
    for suffix in im_suffix:
        image_files += glob.glob(str(dataset_dir / 'Images' / f"*.{suffix}"))
    total_images = len(image_files)
    random.shuffle(image_files)
    train_split = int(total_images * train_ratio)
    val_split = int(total_images * val_ratio)
    # test_split = int(total_images * test_ratio)

    if train_ratio + val_ratio == 1:
        train_images = image_files[:train_split]
        val_images = image_files[train_split:]
        test_images = []
    else:
        train_images = image_files[:train_split]
        val_images = image_files[train_split : train_split + val_split]
        test_images = image_files[train_split + val_split :]

    print('*'*25)
    print(
        "",
        f"Total images: {total_images}\n",
        f"Train images: {len(train_images)}\n",
        f"Val images: {len(val_images)}\n",
        f"Test images: {len(test_images)}"
    )
    print('*'*25)

    split_paths = [("train", train_images), ("val", val_images), ("test", test_images)]
    print(split_paths)

    for split_name, images in split_paths:
        split_dir = Path(save_dir) / split_name
        for dir_name in ['images', 'labels']:
            if not (split_dir / dir_name).exists():
                (split_dir / dir_name).mkdir(exist_ok=True, parents=True)

        args_list = [(image, dataset_dir, split_dir) for image in images]

        run(process_image, args_list, desc=f"Creating {split_name} dataset")

        print(f"Created {split_name} dataset with {len(images)} images.")

def process_image(args):
    image_file, dataset_dir, split_dir = args
    annotation_file = dataset_dir / 'labels' / f"{Path(image_file).stem}.txt"
    assert annotation_file.exists(), f'{annotation_file} 不存在!'
    if not has_objects(annotation_file):
        return
    shutil.copy(image_file, split_dir / "images" / Path(image_file).name)
    shutil.copy(annotation_file, split_dir / "labels" / annotation_file.name)

def has_objects(annotation_path):
    with open(annotation_path, "r") as f:
        lines = f.readlines()
    return len(lines) > 0

if __name__ == "__main__":
    ROOT = "..//DatasetCTIR//"  # IR 数据集

    parser = argparse.ArgumentParser()
    parser.add_argument('--data', default=ROOT)  # 数据集Images路径
    parser.add_argument('--save', default=ROOT)  # 保存路径
    parser.add_argument('--images_suffix', default=['jpg', 'png', 'jpeg'], help='images suffix')  # 图片后缀名

    opt = parser.parse_args()

    split_dataset_into_train_val_test(
        dataset_dir=opt.data,
        save_dir=opt.save,
        train_ratio=0.8,
        val_ratio=0.1,
        im_suffix=opt.images_suffix
    )
运行程序,生成如下目录,分别保存训练集、测试集和验证集的图像与标注。

2.3 数据集配置文件
YOLOv5 模型训练时,要调用数据集配置文件 YAML 文件( .yaml)。因此,需要创建自己的数据集配置文件 dataCTIR.yaml,内容如下:
train: ../DataSetCTIR/train/images
val: ../DataSetCTIR/val/images
test: ../DataSetCTIR/test/images  # option

# number of classes
nc: 5

# Class names
names: ["Car", "Pedestrian", "Cyclist", "Bus", "Truck"]
其中,train 表示训练集图像文件夹的路径,val 表示验证集图像文件夹的路径,test 表示测试集图像文件夹的路径。nc:5 表示类别数为 5,names 表示 3个类别的名称。
注意,nc 是由数据集的标注内容决定的,不能自行修改。
3. 训练红外目标检测模型
3.1 下载 YOLOv5 预训练模型
推荐从 YOLOv5 release下载 YOLOv5 预训练模型。
本文选择 YOLOv5s,参数约 7.2M。下载完成后,将下载的预训练模型文件 yolov5s.pt 放在 YOLOv5 项目路径。
3.2 修改 YOLOv5 模型配置
在 yolov5/models/ 目录下,打开模型配置文件 yolov5s.yaml,把文件中的类别数改为 5 ,另存为 /models/yolov5sCTIR.yaml。
# Ultralytics YOLOv5 🚀, AGPL-3.0 license

# Parameters
nc: 5 # number of classes
depth_multiple: 0.33 # model depth multiple
width_multiple: 0.50 # layer channel multiple
anchors:
  - [10, 13, 16, 30, 33, 23] # P3/8
  - [30, 61, 62, 45, 59, 119] # P4/16
  - [116, 90, 156, 198, 373, 326] # P5/32
...
3.3 YOLOv5 模型训练
1. 训练程序查看帮助
从 PyCharm 命令行输入“ python train.py -h” 可以查看帮助,也可以检查程序是否有错误。
输出如下:
(torch) PS C:\Python\PythonProjects\YOLOv5_PCB> python train2.py -h
usage: train.py [-h] [--weights WEIGHTS] [--cfg CFG] [--data DATA] [--hyp HYP] [--epochs EPOCHS] [--batch-size BATCH_SIZE] [--imgsz IMGSZ] [--rect] [--resume [RESUME]] [--nosave] [--noval] [--noautoanchor] [--noplots]
                [--evolve [EVOLVE]] [--evolve_population EVOLVE_POPULATION] [--resume_evolve RESUME_EVOLVE] [--bucket BUCKET] [--cache [CACHE]] [--image-weights] [--device DEVICE] [--multi-scale] [--single-cls]
                [--optimizer {SGD,Adam,AdamW}] [--sync-bn] [--workers WORKERS] [--project PROJECT] [--name NAME] [--exist-ok] [--quad] [--cos-lr] [--label-smoothing LABEL_SMOOTHING] [--patience PATIENCE]
                [--freeze FREEZE [FREEZE ...]] [--save-period SAVE_PERIOD] [--seed SEED] [--local_rank LOCAL_RANK] [--entity ENTITY] [--upload_dataset [UPLOAD_DATASET]] [--bbox_interval BBOX_INTERVAL]
                [--artifact_alias ARTIFACT_ALIAS] [--ndjson-console] [--ndjson-file]

optional arguments:
  -h, --help            show this help message and exit
  --weights WEIGHTS     initial weights path
  --cfg CFG             model.yaml path
  --data DATA           dataset.yaml path
  --hyp HYP             hyperparameters path
  --epochs EPOCHS       total training epochs
  --batch-size BATCH_SIZE
                        total batch size for all GPUs, -1 for autobatch
  --device DEVICE       cuda device, i.e. 0 or 0,1,2,3 or cpu
...
使用自己的数据集训练 YOLOv5 模型,,需要注意检查以下路径或参数值:
- weight,预训练模型权重文件,先选择下载的官方权重文件 yolov5s.pt。
- cfg,yolov5s 模型配置文件,选择修改的 models/yolov5sPCB.yaml。
- data,选择自己编写的数据集配置文件 DataSetYoloPCB/data.yaml。
- hyp HYP,超参数文件路径,可以修改模型训练参数,本文未涉及。
- epoch,整个数据集遍历训练次数,根据计算机性能和需要确定,默认值100,新手练习时可以设为 2。
- batch_size,每批读入的样本数量,根据计算机内存确定,默认值8,新手练习时可以设为 2。
- device,cuda 显卡设置,默认值为 0 表示使用 CPU训练,如有 GPU 显卡可以设为 1 或相应值。
2. 修改训练程序 train.py
对于新手,通过命令行直接输入模型训练参数比较麻烦,也可以直接对 YOLOv5 训练程序进行修改,设置模型训练的参数。
在 train.py 中对 weight,cfg,data 参数进行修改,另存为 train2.py:
    parser = argparse.ArgumentParser()
    parser.add_argument("--weights", type=str, default=ROOT / "yolov5s.pt", help="initial weights path")
    parser.add_argument("--cfg", type=str, default=ROOT / "models/yolov5sCTIR.yaml", help="model.yaml path")
    parser.add_argument("--data", type=str, default=ROOT / "data/dataCTIR.yaml", help="dataset.yaml path")
    parser.add_argument("--hyp", type=str, default=ROOT / "data/hyps/hyp.scratch-low.yaml", help="hyperparameters path")
    parser.add_argument("--epochs", type=int, default=5, help="total training epochs")
    parser.add_argument("--batch-size", type=int, default=4, help="total batch size for all GPUs, -1 for autobatch")
    ...
3. 运行训练程序 train2.py
通过命令行就可以运行 YOLOv5 训练程序 train2.py 。
如果计算机性能资源不足,可以设置较小的训练参数以便学习,例如:
python train2.py --weights yolov5s.pt --cfg models/yolov5sCTIR.yaml --data …/DataSetCTIR/dataCTIR.yaml --epoch 2 --batch-size 2
CPU 训练速度很慢,我做一次 epoch 大约要十几分钟。
使用 GPU训练,设置遍历次数 epoch=50,批次数 batch-size=32。
python train2.py --weights yolov5s.pt --cfg models/yolov5sCTIR.yaml --data …/DataSetCTIR/dataCTIR.yaml --epoch 50 --batch-size 32 --img 640 --device 1
经过100 epochs的训练,结果如下:
(torch) PS C:\Python\PythonProjects\YOLOv5_FLIR> python train2.py --weights yolov5s.pt --cfg models/yolov5sCTIR.yaml --data ../DataSetCTIR/dataCTIR.yaml --epoch 20 --batch-size 32 --img 640 --device 1
train2: weights=yolov5s.pt, cfg=models/yolov5sCTIR.yaml, data=../DataSetCTIR/dataCTIR.yaml, hyp=data\hyps\hyp.scratch-low.yaml, epochs=20, batch_size=32, imgsz=640, rect=False, resume=False, nosave=False, noval=False, noautoanchor=False, noplots=False, evolve=None, evolve_population=data\hyps, resume_evolve=None, bucket=, cache=None, image_weights=False, device=1, multi_scale=False, single_cls=False, optimizer=SGD, sync_bn=False, workers=8, project=runs\train, name=exp, exist_ok=False, quad=False, cos_lr=False, label_smoothing=0.0, patience=100, freeze=[0], save_period=-1, seed=0, local_rank=-1, entity=None, upload_dataset=False, bbox_interval=-1, artifact_alias=latest, ndjson_console=False, ndjson_file=False
github: skipping check (not a git repository), for updates see https://github.com/ultralytics/yolov5
YOLOv5  2024-7-29 Python-3.8.19 torch-2.3.1+cu121 CUDA:1 (NVIDIA GeForce RTX 3060, 12288MiB)


hyperparameters: lr0=0.01, lrf=0.01, momentum=0.937, weight_decay=0.0005, warmup_epochs=3.0, warmup_momentum=0.8, warmup_bias_lr=0.1, box=0.05, cls=0.5, cls_pw=1.0, obj=1.0, obj_pw=1.0, iou_t=0.2, anchor_t=4.0, fl_gamma=0.0, hsv_h=0.015, hsv_s=0.7, hsv_v=0.4, degrees=0.0, translate=0.1, scale=0.5, shear=0.0, perspective=0.0, flipud=0.0, fliplr=0.5, mosaic=1.0, mixup=0.0, copy_paste=0.0
Comet: run 'pip install comet_ml' to automatically track and visualize YOLOv5  runs in Comet
TensorBoard: Start with 'tensorboard --logdir runs\train', view at http://localhost:6006/

                 from  n    params  module                                  arguments
  0                -1  1      3520  models.common.Conv                      [3, 32, 6, 2, 2]
  1                -1  1     18560  models.common.Conv                      [32, 64, 3, 2]
  2                -1  1     18816  models.common.C3                        [64, 64, 1]
  3                -1  1     73984  models.common.Conv                      [64, 128, 3, 2]
  4                -1  2    115712  models.common.C3                        [128, 128, 2]
  5                -1  1    295424  models.common.Conv                      [128, 256, 3, 2]
  6                -1  3    625152  models.common.C3                        [256, 256, 3]
  7                -1  1   1180672  models.common.Conv                      [256, 512, 3, 2]
  8                -1  1   1182720  models.common.C3                        [512, 512, 1]
  9                -1  1    656896  models.common.SPPF                      [512, 512, 5]
 10                -1  1    131584  models.common.Conv                      [512, 256, 1, 1]
 11                -1  1         0  torch.nn.modules.upsampling.Upsample    [None, 2, 'nearest']
 12           [-1, 6]  1         0  models.common.Concat                    [1]
 13                -1  1    361984  models.common.C3                        [512, 256, 1, False]
 14                -1  1     33024  models.common.Conv                      [256, 128, 1, 1]
 15                -1  1         0  torch.nn.modules.upsampling.Upsample    [None, 2, 'nearest']
 16           [-1, 4]  1         0  models.common.Concat                    [1]
 17                -1  1     90880  models.common.C3                        [256, 128, 1, False]
 18                -1  1    147712  models.common.Conv                      [128, 128, 3, 2]
 19          [-1, 14]  1         0  models.common.Concat                    [1]
 20                -1  1    296448  models.common.C3                        [256, 256, 1, False]
 21                -1  1    590336  models.common.Conv                      [256, 256, 3, 2]
 22          [-1, 10]  1         0  models.common.Concat                    [1]
 23                -1  1   1182720  models.common.C3                        [512, 512, 1, False]
 24      [17, 20, 23]  1     26970  models.yolo.Detect                      [5, [[10, 13, 16, 30, 33, 23], [30, 61, 62, 45, 59, 119], [116, 90, 156, 198, 373, 326]], [128, 256, 512]]
YOLOv5sCTIR summary: 214 layers, 7033114 parameters, 7033114 gradients, 16.0 GFLOPs

Transferred 342/349 items from yolov5s.pt
AMP: checks failed , disabling Automatic Mixed Precision. See https://github.com/ultralytics/yolov5/issues/7908
optimizer: SGD(lr=0.01) with parameter groups 57 weight(decay=0.0), 60 weight(decay=0.0005), 60 bias
train: Scanning C:\Python\PythonProjects\DataSetCTIR\train\labels.cache... 9550 images, 0 backgrounds, 0 corrupt: 100%|██████████| 9550/9550 [00:00<?, ?it/s]
val: Scanning C:\Python\PythonProjects\DataSetCTIR\val\labels.cache... 1193 images, 0 backgrounds, 0 corrupt: 100%|██████████| 1193/1193 [00:00<?, ?it/s]

AutoAnchor: 5.26 anchors/target, 1.000 Best Possible Recall (BPR). Current anchors are a good fit to dataset
Plotting labels to runs\train\exp2\labels.jpg...
Image sizes 640 train, 640 val
Using 8 dataloader workers
Logging results to runs\train\exp2
Starting training for 20 epochs...

      Epoch    GPU_mem   box_loss   obj_loss   cls_loss  Instances       Size
       0/19      6.92G    0.06892    0.06228    0.02963        134        640: 100%|██████████| 299/299 [01:23<00:00,  3.57it/s]
                 Class     Images  Instances          P          R      mAP50   mAP50-95: 100%|██████████| 19/19 [00:07<00:00,  2.41it/s]
                   all       1193       8624      0.373      0.655      0.498      0.276

      Epoch    GPU_mem   box_loss   obj_loss   cls_loss  Instances       Size
       1/19       7.8G    0.05093    0.05178     0.0162        213        640: 100%|██████████| 299/299 [01:19<00:00,  3.78it/s]
                 Class     Images  Instances          P          R      mAP50   mAP50-95: 100%|██████████| 19/19 [00:08<00:00,  2.35it/s]
                   all       1193       8624       0.65      0.672      0.711      0.395


      ...


      Epoch    GPU_mem   box_loss   obj_loss   cls_loss  Instances       Size
      49/49       7.8G    0.02582    0.03787   0.003294        178        640: 100%|██████████| 299/299 [01:28<00:00,  3.37it/s]
                 Class     Images  Instances          P          R      mAP50   mAP50-95: 100%|██████████| 19/19 [00:08<00:00,  2.34it/s]
                   all       1193       8624      0.845      0.799      0.875      0.633

50 epochs completed in 1.367 hours.
Optimizer stripped from runs\train\exp3\weights\last.pt, 14.4MB
Optimizer stripped from runs\train\exp3\weights\best.pt, 14.4MB

Validating runs\train\exp2\weights\best.pt...
Fusing layers...
YOLOv5sCTIR summary: 157 layers, 7023610 parameters, 0 gradients, 15.8 GFLOPs
                 Class     Images  Instances          P          R      mAP50   mAP50-95: 100%|██████████| 19/19 [00:10<00:00,  1.83it/s]
                   all       1193       8624      0.847      0.822      0.883      0.634
                   Car       1193       3393      0.903      0.892      0.951      0.736
            Pedestrian       1193       3180      0.861      0.804      0.895      0.564
               Cyclist       1193       1619      0.886      0.876      0.931      0.625
                   Bus       1193        282       0.82       0.84      0.877      0.663
                 Truck       1193        150      0.766      0.698      0.762       0.58

Results saved to runs\train\exp3
其中,Epoch 为遍历次数,box_loss 为边界框损失值,obj_loss为置信度损失值,cls_loss 为分类损失值,Instances 为实例个数(矩形框个数),Size 为输入图像大小。Class 为类别名称,Images 为训练图像数量,Instances 为实例个数,P 为准确率,R为召回率,mAP50为IoU阈值0.5的平均精度均值,maP50-95表示在不同IoU阈值(0.5~0.95)的平均精度均值。
训练好的模型,保存在路径:“runs/exp/weights”,best.pt 是最好结果,last.pt 是最后结果。
3.4 模型训练结果
经过 20 轮遍历训练,训练过程及结果文件保存在目录 “runs”,如下图所示:

(1)损失函数下降曲线
YOLOv5 中定义的损失函数包括:
- 边界框定位损失(box_loss):计算预测边界框与标注边界框之间的误差(GIoU)
- 分类损失(cls_loss):计算预测类别与对应的标注类别是否正确
- 动态特征损失(dfl_loss):计算回归预测框与目标框之间距离的损失函数

(2)置信度曲线
- F1 置信曲线,F1得分随着置信度阈值的变化。F1得分是精确度和召回率的调和平均值,曲线的峰值表示给定置信度阈值下精确度和召回率的最佳平衡点。
- 精确度置信曲线,模型预测的精确度随着置信度阈值的变化。精确度是模型预测正确正例与预测为正例总数的比值。
- 精确度召回曲线(PR曲线),模型的精确度与召回率之间的关系。理想情况下,模型应在精确度和召回率之间保持良好的平衡。
- 召回置信度曲线,模型的召回率随置信度阈值的变化。召回率是模型正确预测的正例与实际正例总数的比值。

训练好的模型,保存在路径:“runs/exp/weights”,best.pt 是最好结果,last.pt 是最后结果。可以使用该文件进行模型推理,检测红外目标。
4. 模型推理
4.1 修改推理程序 detect.py
detect.py 程序使用PyTorch加载预训练的YOLOv5模型。程序解析从命令行传入的参数,这些参数包括输入文件的路径(可以是图像、视频或目录)、预训练模型的路径、输出文件的路径、置信度阈值等。具体用法如下:
detect.py 程序默认读取 data\images 路径的图片,结果默认保存到 runs/detect 文件夹中。
我们根据项目的配置,要对推理程序 detect.py 进行如下修改(也可以直接通过命令行参数设置):
def parse_opt():
    parser = argparse.ArgumentParser()
    parser.add_argument("--weights", nargs="+", type=str, default=ROOT / "weights/YOLOv5CTIR20.pt", help="model path or triton URL")
    parser.add_argument("--source", type=str, default=ROOT / "data/images", help="file/dir/URL/glob/screen/0(webcam)")
    parser.add_argument("--data", type=str, default=ROOT / "data/dataCTIR.yaml", help="(optional) dataset.yaml path")
...
注意:
- YOLOv5CTIR20.pt 是前面训练的 CTIR 红外检测模型的权重文件 “runs/exp/weights/best.pt”,已将其另存为 “weights/YOLOv5CTIR20.pt”。
- “data/images” 是保存 PCB 测试图片的路径,也可以使用其它图片或路径。
- dataFLIR.yaml 是前面修改的数据集配置文件,已另存为 “data/dataCTIR.yaml”。
4.2 运行推理程序检测 红外图像
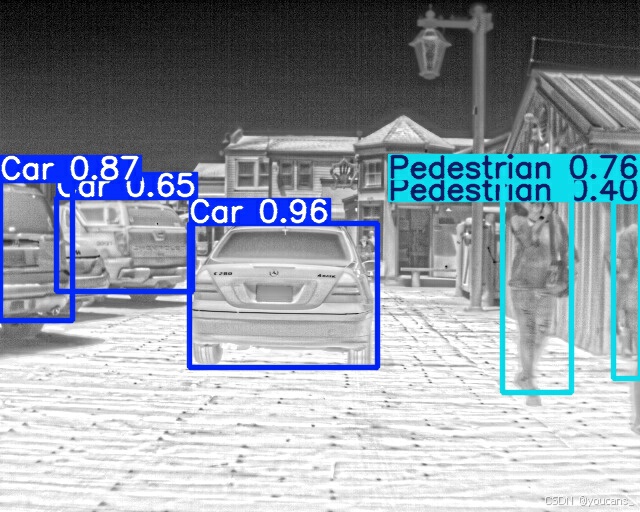
打开并运行 YOLOv5 项目中的 detect.py 程序,使用训练的 红外检测模型 “weights/YOLOv5CTIR20.pt” 进行 红外图像目标检测。
python detect.py
运行输出如下:
(torch) PS C:\Python\PythonProjects\YOLOv5_FLIR> python detect.py
detect: weights=weights\YOLOv5CTIR20.pt, source=data\images, data=data\dataCTIR.yaml, imgsz=[640, 640], conf_thres=0.25, iou_thres=0.45, max_det=1000, device=, view_img=False, save_txt=False, save_csv=False, save_conf=False, save_crop=False, nosave=False, classes=None, agnostic_nms=False, augment=False, visualize=False, update=False, project=runs\detect, name=exp, exist_ok=False, line_thickness=3, hide_labels=False, hide_conf=False, half=False, dnn=False, vid_stride=1
YOLOv5  2024-7-29 Python-3.8.19 torch-2.3.1+cu121 CUDA:0 (NVIDIA GeForce RTX 3060, 12288MiB)

Fusing layers...
YOLOv5sCTIR summary: 157 layers, 7023610 parameters, 0 gradients, 15.8 GFLOPs
image 1/3 C:\Python\PythonProjects\YOLOv5_FLIR\data\images\FLIR_09135.jpeg: 512x640 3 Cars, 3 Pedestrians, 66.0ms
image 2/3 C:\Python\PythonProjects\YOLOv5_FLIR\data\images\FLIR_09138.jpeg: 512x640 3 Cars, 2 Pedestrians, 4.0ms
image 3/3 C:\Python\PythonProjects\YOLOv5_FLIR\data\images\FLIR_09156.jpeg: 512x640 3 Cars, 2 Pedestrians, 4.0ms
Speed: 0.7ms pre-process, 24.7ms inference, 1.3ms NMS per image at shape (1, 3, 640, 640)
Results saved to runs\detect\exp3
检测结果保存在 “runs\detect\exp3”,结果如下。性能还是很好的。

5. 报错处理
(1)Pytorch没有下载成功:
报错内容:Module Not Found Error: No module named ‘torch’
解决方法:通过 Anaconda 或 miniconda 重新下载安装 Pytorch。
(2)PyYaml 版本错误:
报错内容:AttributeError: ‘yaml’ has no attribute ‘FullLoader’
解决方法:卸载高版本 PyYaml,安装 PyYaml 5.3 版本:
pip install pyyaml==5.3
(3)Git 执行发生错误
报错内容:ImportError: Bad git executable.
解决方法:按照报错信息找到git下的cmd文件,添加下方代码:
import os
os.environ["GIT_PYTHON_REFRESH"] = "quiet"
(4)Numpy 版本问题
报错内容:AttributeError: module ‘numpy’ has no attribute ‘float’.
解决方法:不再使用 np.float ,需要将其修改为 np.float64 。
报错内容:AttributeError: module ‘numpy’ has no attribute ‘int’.
解决方法:不再使用 np.in ,需要将其修改为 np.int32 。
【本节完】
版权声明:
欢迎关注『youcans动手学模型』系列
转发请注明原文链接:
【YOLO5 项目实战】(4)红外目标检测
Copyright 2024 youcans, XUPT
Crated:2024-08-20