YOLOv11震撼来袭
2024YOLO发展史
2024年可谓是YOLO历史性的一年,9月份的最后一天迎来了YOLO2024年的第三部巨作。2024年2月21日,继 2023 年 1 月 YOLOv8 正式发布一年多以后,YOLOv9 才终于到来了!YOLOv9提出了可编程梯度信息(Programmable Gradient Information,PGI)的概念,我们可以用它来获取完整的信息,从而使从头开始训练的模型能够比使用大型数据集预训练的 SOTA 模型获得更好的结果。通过多级辅助网络分支和通用高效层聚合网络(Generalized Efficient Layer Aggregation Network,GELAN)有效提升了YOLO检测器的信息提取能力。2024年5月25日,清华大学研究团队开发的最新版本:YOLOV10发布,通过紧凑的倒置瓶颈层(Compact Inverted Bottleneck,CIB)和有效的部分自注意力(Partial Self-attention,PSA)模块来增强模型能力,实现了更高效率和精度的实时目标检测。用于无 NMS 训练的一致双重分配策略,大大降低了计算开销。2024年9月30日,YOLOv11震撼来袭。
YOLOV11
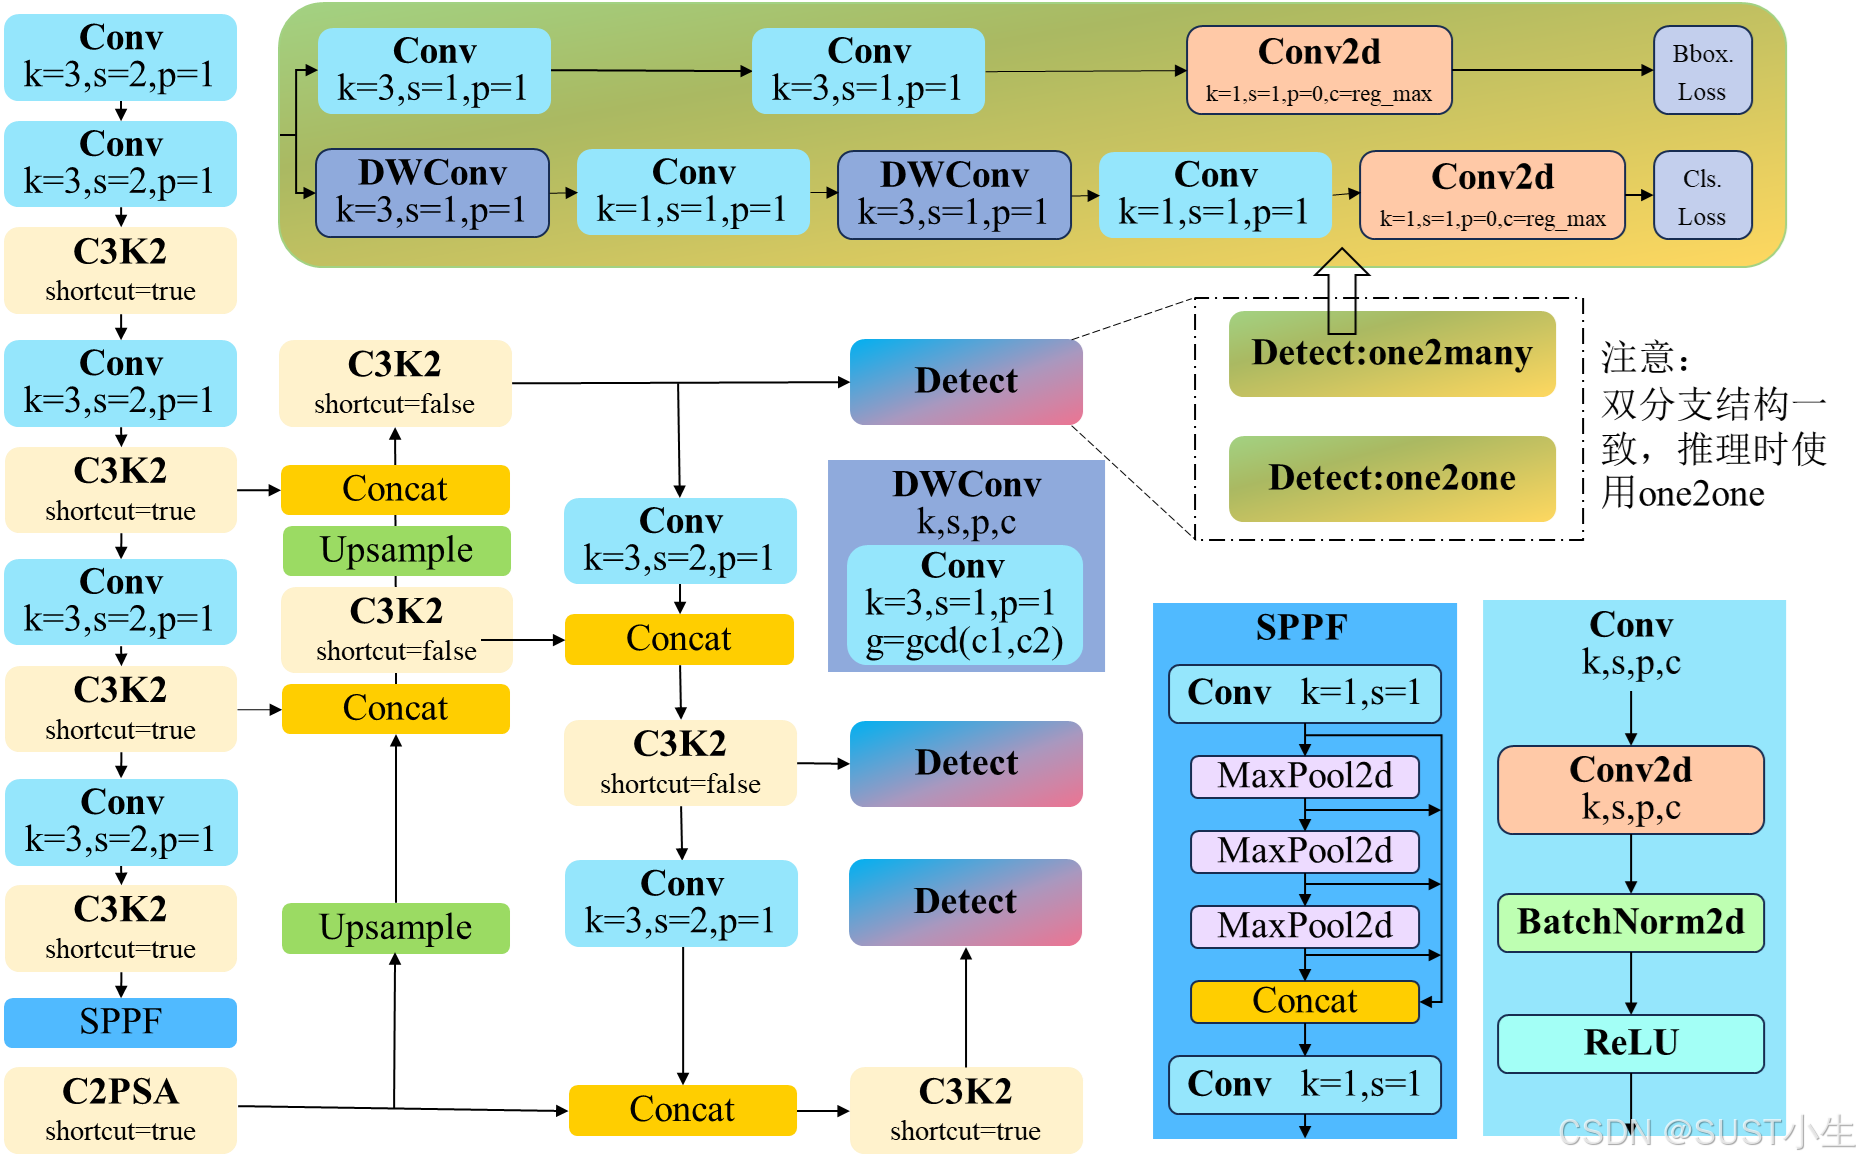
YOLOv11在以前 YOLO 版本的成功基础上,引入了C3k2和C2PSA两个全新模块,并延续了YOLOv10无NMS的训练策略,实现了端到端的目标检测能力,进一步提高了性能和灵活性。YOLOv11与YOLOv8一致提供了五个不同尺度大小的网络,仅在网络尺度上有所差异。YOLOv11的结构如下图所示,由于C3k2与C2PSA的结构相对复杂,在后面进行详细介绍。
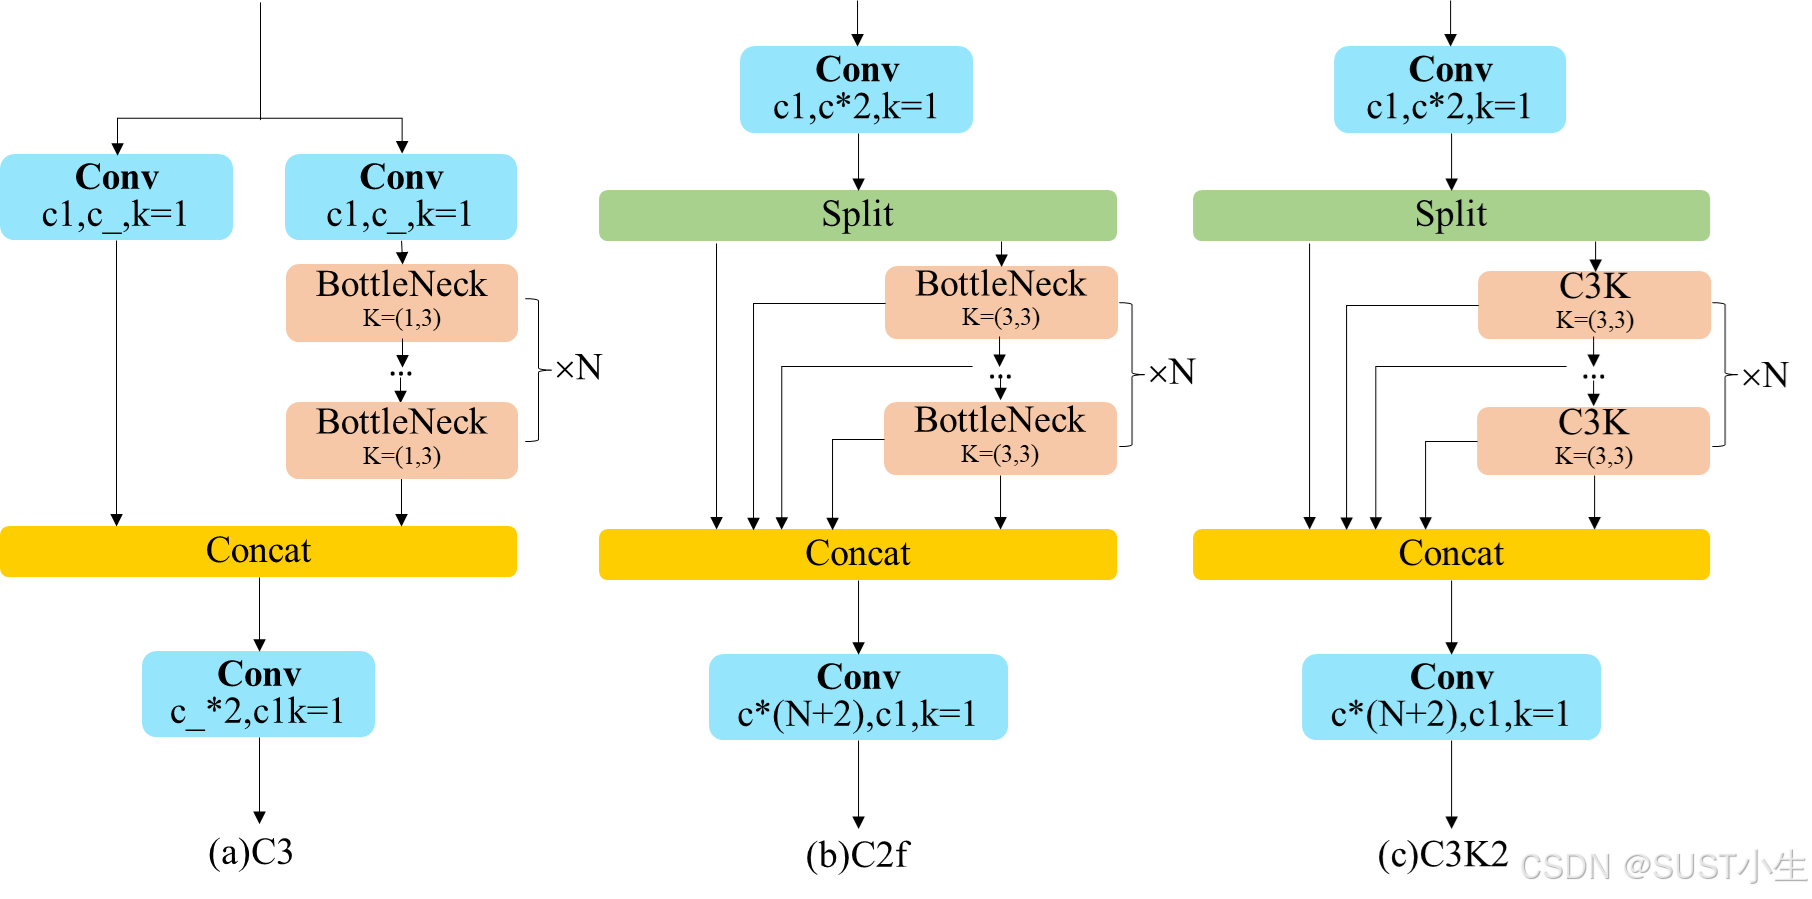
C3K2
C3K2模块的结构集成了C2f和C3模块的组合,外层由C2f结构主导,内层是一个C3的结构。C3K2结构中以C2f结构为基础,将其中的特征提取层由BottleNeck层替换为C3k层,C3k层与C3结构一致,不同之处在于将BottleNeck的卷积核大小进行了调整,转变为两个核大小为3的卷积层。具体的模型结构如下图所示,代码实现附后。
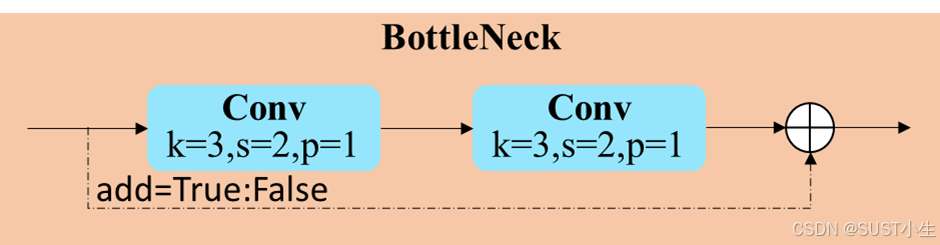
BottleNeck代码
class Bottleneck(nn.Module):
    """Standard bottleneck."""

    def __init__(self, c1, c2, shortcut=True, g=1, k=(3, 3), e=0.5):
        """Initializes a standard bottleneck module with optional shortcut connection and configurable parameters."""
        super().__init__()
        c_ = int(c2 * e)  # hidden channels
        self.cv1 = Conv(c1, c_, k[0], 1)
        self.cv2 = Conv(c_, c2, k[1], 1, g=g)
        self.add = shortcut and c1 == c2

    def forward(self, x):
        """Applies the YOLO FPN to input data."""
        return x + self.cv2(self.cv1(x)) if self.add else self.cv2(self.cv1(x))
C3代码
class C3(nn.Module):
    """CSP Bottleneck with 3 convolutions."""

    def __init__(self, c1, c2, n=1, shortcut=True, g=1, e=0.5):
        """Initialize the CSP Bottleneck with given channels, number, shortcut, groups, and expansion values."""
        super().__init__()
        c_ = int(c2 * e)  # hidden channels
        self.cv1 = Conv(c1, c_, 1, 1)
        self.cv2 = Conv(c1, c_, 1, 1)
        self.cv3 = Conv(2 * c_, c2, 1)  # optional act=FReLU(c2)
        self.m = nn.Sequential(*(Bottleneck(c_, c_, shortcut, g, k=((1, 1), (3, 3)), e=1.0) for _ in range(n)))

    def forward(self, x):
        """Forward pass through the CSP bottleneck with 2 convolutions."""
        return self.cv3(torch.cat((self.m(self.cv1(x)), self.cv2(x)), 1))
C2f代码
class C2f(nn.Module):
    """Faster Implementation of CSP Bottleneck with 2 convolutions."""

    def __init__(self, c1, c2, n=1, shortcut=False, g=1, e=0.5):
        """Initializes a CSP bottleneck with 2 convolutions and n Bottleneck blocks for faster processing."""
        super().__init__()
        self.c = int(c2 * e)  # hidden channels
        self.cv1 = Conv(c1, 2 * self.c, 1, 1)
        self.cv2 = Conv((2 + n) * self.c, c2, 1)  # optional act=FReLU(c2)
        self.m = nn.ModuleList(Bottleneck(self.c, self.c, shortcut, g, k=((3, 3), (3, 3)), e=1.0) for _ in range(n))

    def forward(self, x):
        """Forward pass through C2f layer."""
        y = list(self.cv1(x).chunk(2, 1))
        y.extend(m(y[-1]) for m in self.m)
        return self.cv2(torch.cat(y, 1))

    def forward_split(self, x):
        """Forward pass using split() instead of chunk()."""
        y = list(self.cv1(x).split((self.c, self.c), 1))
        y.extend(m(y[-1]) for m in self.m)
        return self.cv2(torch.cat(y, 1))
C3K代码
class C3k(C3):
    """C3k is a CSP bottleneck module with customizable kernel sizes for feature extraction in neural networks."""

    def __init__(self, c1, c2, n=1, shortcut=True, g=1, e=0.5, k=3):
        """Initializes the C3k module with specified channels, number of layers, and configurations."""
        super().__init__(c1, c2, n, shortcut, g, e)
        c_ = int(c2 * e)  # hidden channels
        # self.m = nn.Sequential(*(RepBottleneck(c_, c_, shortcut, g, k=(k, k), e=1.0) for _ in range(n)))
        self.m = nn.Sequential(*(Bottleneck(c_, c_, shortcut, g, k=(k, k), e=1.0) for _ in range(n)))
C3K2代码
class C3k2(C2f):
    """Faster Implementation of CSP Bottleneck with 2 convolutions."""

    def __init__(self, c1, c2, n=1, c3k=False, e=0.5, g=1, shortcut=True):
        """Initializes the C3k2 module, a faster CSP Bottleneck with 2 convolutions and optional C3k blocks."""
        super().__init__(c1, c2, n, shortcut, g, e)
        self.m = nn.ModuleList(
            C3k(self.c, self.c, 2, shortcut, g) if c3k else Bottleneck(self.c, self.c, shortcut, g) for _ in range(n)
        )
C2PSA
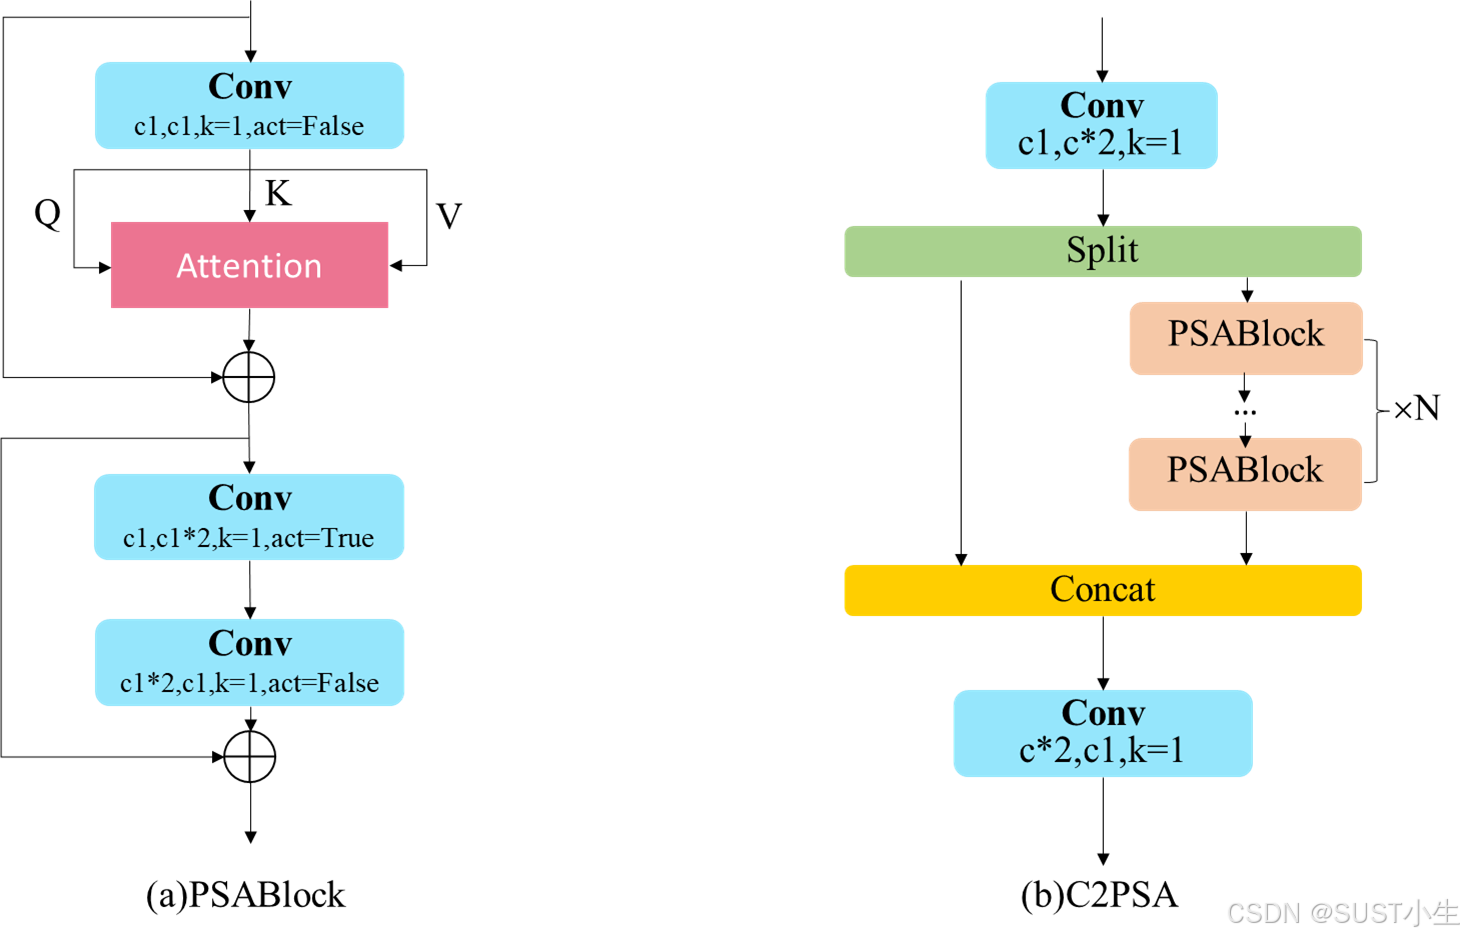
C2PSA模块是在C2f模块的基础上改进而来,其吸取了YOLOv10通过部分自注意力机制提升模型性能的经验,将多改进的多头注意力机制引入C2f结构中,替代BottleNeck层,并丢弃了中间层的输出结果,类似于C3的结构只输出最后一个特征提取层的结果,再与另一个分支进行拼接。 改进的多头注意力机制保留了多头注意力的结构,首先将LayerNorn层替换为一个核大小为且无激活层的卷积层,随后将MLP层使用两个卷积层进行代替,设计了PSABlock。C2PSA和PSABlock的结构如图所示,代码附后。
Attention
class Attention(nn.Module):
    """
    Attention module that performs self-attention on the input tensor.

    Args:
        dim (int): The input tensor dimension.
        num_heads (int): The number of attention heads.
        attn_ratio (float): The ratio of the attention key dimension to the head dimension.

    Attributes:
        num_heads (int): The number of attention heads.
        head_dim (int): The dimension of each attention head.
        key_dim (int): The dimension of the attention key.
        scale (float): The scaling factor for the attention scores.
        qkv (Conv): Convolutional layer for computing the query, key, and value.
        proj (Conv): Convolutional layer for projecting the attended values.
        pe (Conv): Convolutional layer for positional encoding.
    """

    def __init__(self, dim, num_heads=8, attn_ratio=0.5):
        """Initializes multi-head attention module with query, key, and value convolutions and positional encoding."""
        super().__init__()
        self.num_heads = num_heads
        self.head_dim = dim // num_heads
        self.key_dim = int(self.head_dim * attn_ratio)
        self.scale = self.key_dim**-0.5
        nh_kd = self.key_dim * num_heads
        h = dim + nh_kd * 2
        self.qkv = Conv(dim, h, 1, act=False)
        self.proj = Conv(dim, dim, 1, act=False)
        self.pe = Conv(dim, dim, 3, 1, g=dim, act=False)

    def forward(self, x):
        """
        Forward pass of the Attention module.

        Args:
            x (torch.Tensor): The input tensor.

        Returns:
            (torch.Tensor): The output tensor after self-attention.
        """
        B, C, H, W = x.shape
        N = H * W
        qkv = self.qkv(x)
        q, k, v = qkv.view(B, self.num_heads, self.key_dim * 2 + self.head_dim, N).split(
            [self.key_dim, self.key_dim, self.head_dim], dim=2
        )

        attn = (q.transpose(-2, -1) @ k) * self.scale
        attn = attn.softmax(dim=-1)
        x = (v @ attn.transpose(-2, -1)).view(B, C, H, W) + self.pe(v.reshape(B, C, H, W))
        x = self.proj(x)
        return x
PSABlock
class PSABlock(nn.Module):
    """
    PSABlock class implementing a Position-Sensitive Attention block for neural networks.

    This class encapsulates the functionality for applying multi-head attention and feed-forward neural network layers
    with optional shortcut connections.

    Attributes:
        attn (Attention): Multi-head attention module.
        ffn (nn.Sequential): Feed-forward neural network module.
        add (bool): Flag indicating whether to add shortcut connections.

    Methods:
        forward: Performs a forward pass through the PSABlock, applying attention and feed-forward layers.
    """

    def __init__(self, c, attn_ratio=0.5, num_heads=4, shortcut=True) -> None:
        """Initializes the PSABlock with attention and feed-forward layers for enhanced feature extraction."""
        super().__init__()

        self.attn = Attention(c, attn_ratio=attn_ratio, num_heads=num_heads)
        self.ffn = nn.Sequential(Conv(c, c * 2, 1), Conv(c * 2, c, 1, act=False))
        self.add = shortcut

    def forward(self, x):
        """Executes a forward pass through PSABlock, applying attention and feed-forward layers to the input tensor."""
        x = x + self.attn(x) if self.add else self.attn(x)
        x = x + self.ffn(x) if self.add else self.ffn(x)
        return x
C2PSA
class C2PSA(nn.Module):
    """
    C2PSA module with attention mechanism for enhanced feature extraction and processing.

    This module implements a convolutional block with attention mechanisms to enhance feature extraction and processing
    capabilities. It includes a series of PSABlock modules for self-attention and feed-forward operations.

    Attributes:
        c (int): Number of hidden channels.
        cv1 (Conv): 1x1 convolution layer to reduce the number of input channels to 2*c.
        cv2 (Conv): 1x1 convolution layer to reduce the number of output channels to c.
        m (nn.Sequential): Sequential container of PSABlock modules for attention and feed-forward operations.

    Methods:
        forward: Performs a forward pass through the C2PSA module, applying attention and feed-forward operations.

    Notes:
        This module essentially is the same as PSA module, but refactored to allow stacking more PSABlock modules.
    """

    def __init__(self, c1, c2, n=1, e=0.5):
        """Initializes the C2PSA module with specified input/output channels, number of layers, and expansion ratio."""
        super().__init__()
        assert c1 == c2
        self.c = int(c1 * e)
        self.cv1 = Conv(c1, 2 * self.c, 1, 1)
        self.cv2 = Conv(2 * self.c, c1, 1)

        self.m = nn.Sequential(*(PSABlock(self.c, attn_ratio=0.5, num_heads=self.c // 64) for _ in range(n)))

    def forward(self, x):
        """Processes the input tensor 'x' through a series of PSA blocks and returns the transformed tensor."""
        a, b = self.cv1(x).split((self.c, self.c), dim=1)
        b = self.m(b)
        return self.cv2(torch.cat((a, b), 1))
一致双重分配策略(Free NMS)
在训练时,YOLO 通常利用 TAL 为每个实例分配多个正样本。一对多的分配方式产生了丰富的监督信号,促进了优化并使模型实现了卓越的性能。然而,这需要 YOLO 依赖于 NMS 后处理,这导致了部署时次优的推理效率,引入了额外的推理开销。与一对多分配不同,一对一匹配对每个 ground truth 仅分配一个预测,避免 NMS 后处理。YOLOv10中作者结合了上述两种策略的优点。该研究为 YOLO 引入了另一个一对一 的检测 头。在训练过程中,两个 检测头联合优化,以提供丰富的监督信息;在推理过程中,YOLOv10 会丢弃一对多检测头并利用一对一 head 做出预测。这使得 YOLO 能够进行端到端部署,避免了非极大值抑制带来的后处理运算。
YOLOv11延续了这一优点,且使用了与YOLOv10相同的检测头结构。在位置回归分支,使用两个标准卷积进行特征融合,并通过一个单一卷积层进行位置预测;在分类分支,使用深度可分离卷积进行特征融合并使用逐点卷积进行通道间的信息交互,最后通过单一卷积层进行分类预测,并通过Softmax激活函数生成类别概率。检测 头的结构如图所示。

每一个检测 头都包含两个分支:one2many和one2one。在训练时,one2many分支使用多标签分配提供丰富的监督信号,使得特征提取层可以提取丰富的特征信息;one2one分支跟随one2many分支联合优化,使用唯一标签分配确定目标类别和位置。联合优化使得特征提取层可以更好的提取特征,one2one分支可以通过单一的检测目标分配策略,避免非极大值抑制的后处理过程。在实施过程中,通过在损失函数计算时分配不同的目标,one2one分支对每个真实目标仅分配一个预测。其检测损失由两个YOLOv8的损失共同构成,代码如下,YOLOv8的损失函数不再展示。
YOLOv11损失函数
class E2EDetectLoss:
    """Criterion class for computing training losses."""

    def __init__(self, model):
        """Initialize E2EDetectLoss with one-to-many and one-to-one detection losses using the provided model."""
        self.one2many = v8DetectionLoss(model, tal_topk=10)
        self.one2one = v8DetectionLoss(model, tal_topk=1)

    def __call__(self, preds, batch):
        """Calculate the sum of the loss for box, cls and dfl multiplied by batch size."""
        preds = preds[1] if isinstance(preds, tuple) else preds
        one2many = preds["one2many"]
        loss_one2many = self.one2many(one2many, batch)
        one2one = preds["one2one"]
        loss_one2one = self.one2one(one2one, batch)
        return loss_one2many[0] + loss_one2one[0], loss_one2many[1] + loss_one2one[1]
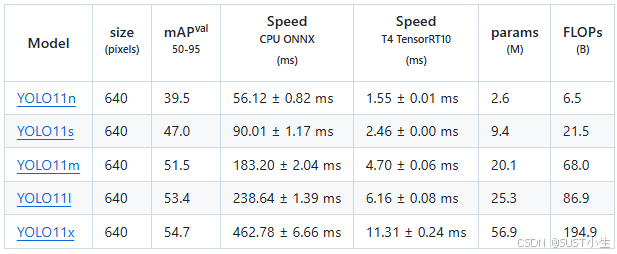
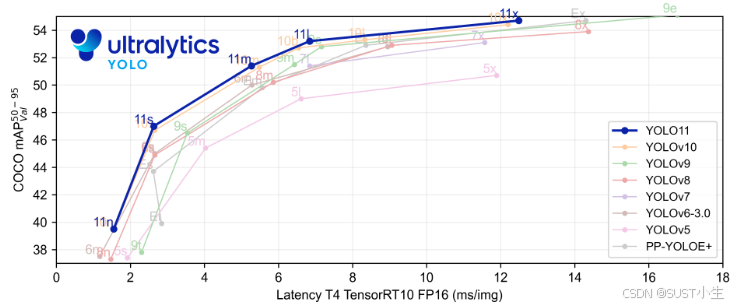
检测结果
YOLOv11模型更加轻便和强大,其在COCO数据集上的检测结果如下。