简单的sentinel学习笔记
1. 初识Sentinel
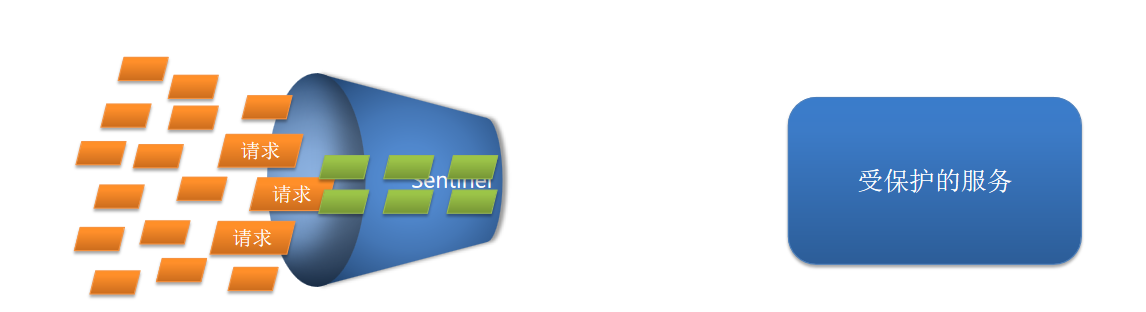
sentinel 的作用如下:
- 流量控制,
- 隔离和降级,
- 授权规则,
- 规则持久化
什么时候会使用sentinel呢,服务雪崩
1.1 雪崩问题
微服务调用链路中的某个服务故障,引起整个链路中的所有微服务都不可用,这就是雪崩,具体如下所示:

解决雪崩问题的常见方式有四种:
- 超时处理:设定超时时间,请求超过一定时间没有响应就返回错误信息,不会无休止等待
- 舱壁模式:限定每个业务能使用的线程数,避免耗尽整个tomcat的资源,因此也叫线程隔离
- 熔断降级:由断路器统计业务执行的异常比例,如果超出阈值则会熔断该业务,拦截访问该业务的一切请求。
- 流量控制:限制业务访问的QPS,避免服务因流量的突增而故障。
1.2 总结
什么是雪崩问题?
微服务之间相互调用,因为调用链中的一个服务故障,引起整个链路都无法访问的情况。
如何避免因瞬间高并发流量而导致服务故障?如何避免因瞬间高并发流量而导致服务故障?
流量控制
如何避免因服务故障引起的雪崩问题
超时处理
线程隔离
降级熔断
1.3 常见框架以及差别
服务保护技术对比
| Sentinel | Hystrix | |
|---|---|---|
| 隔离策略 | 信号量隔离 | 线程池隔离/信号量隔离 |
| 熔断降级策略 | 基于慢调用比例或异常比例 | 基于失败比率 |
| 实时指标实现 | 滑动窗口 | 滑动窗口(基于 RxJava) |
| 规则配置 | 支持多种数据源 | 支持多种数据源 |
| 扩展性 | 多个扩展点 | 插件的形式 |
| 基于注解的支持 | 支持 | 支持 |
| 限流 | 基于 QPS,支持基于调用关系的限流 | 有限的支持 |
| 流量整形 | 支持慢启动、匀速排队模式 | 不支持 |
| 系统自适应保护 | 支持 | 不支持 |
| 控制台 | 开箱即用,可配置规则、查看秒级监控、机器发现等 | 不完善 |
| 常见框架的适配 | Servlet、Spring Cloud、Dubbo、gRPC 等 | Servlet、Spring Cloud Netflix |
隔离策略区别:
线程池隔离会对每种隔离业务创建一个独立线程池,tomcat中的线程会成倍增长,隔离性会比较好,但是随着线程成倍增长,对cpu也会带来额外的上下文切换消耗资源。
信号量隔离是请求进入不会对其进行限制,而是统计当前业务占用多少个线程了,比如设置你只能使用10个,当统计到10个的时候,不允许你创建新的线程以及线程池,限制你的线程数量,在隔离的基础上没有影响性能
1.4 Sentinel简介
Sentinel是阿里巴巴开源的一款微服务流量控制组件。官网地址:https://sentinelguard.io/zh-cn/index.html
Sentinel 具有以下特征:
丰富的应用场景:Sentinel 承接了阿里巴巴近 10 年的双十一大促流量的核心场景,例如秒杀(即突发流量控制在系统容量可以承受的范围)、消息削峰填谷、集群流量控制、实时熔断下游不可用应用等。
完备的实时监控:Sentinel 同时提供实时的监控功能。您可以在控制台中看到接入应用的单台机器秒级数据,甚至 500 台以下规模的集群的汇总运行情况。
广泛的开源生态:Sentinel 提供开箱即用的与其它开源框架/库的整合模块,例如与 Spring Cloud、Dubbo、gRPC 的整合。您只需要引入相应的依赖并进行简单的配置即可快速地接入 Sentinel。
完善的 SPI 扩展点:Sentinel 提供简单易用、完善的 SPI 扩展接口。您可以通过实现扩展接口来快速地定制逻辑。例如定制规则管理、适配动态数据源等。
1.5 安装Sentinel控制台
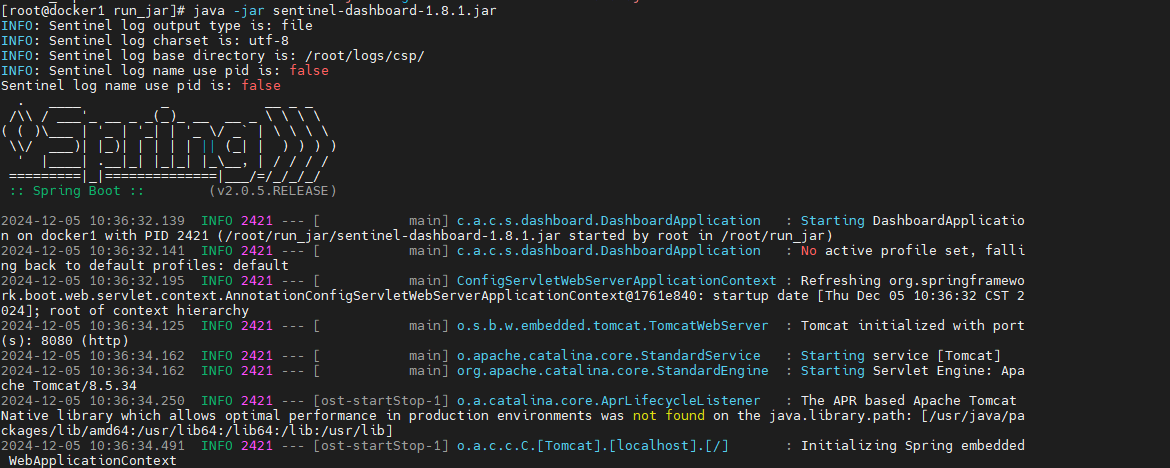
sentinel官方提供了UI控制台,方便我们对系统做限流设置。大家可以在GitHub下载,此处我们使用1.8.1版本。
java -jar sentinel-dashboard-1.8.1.jar
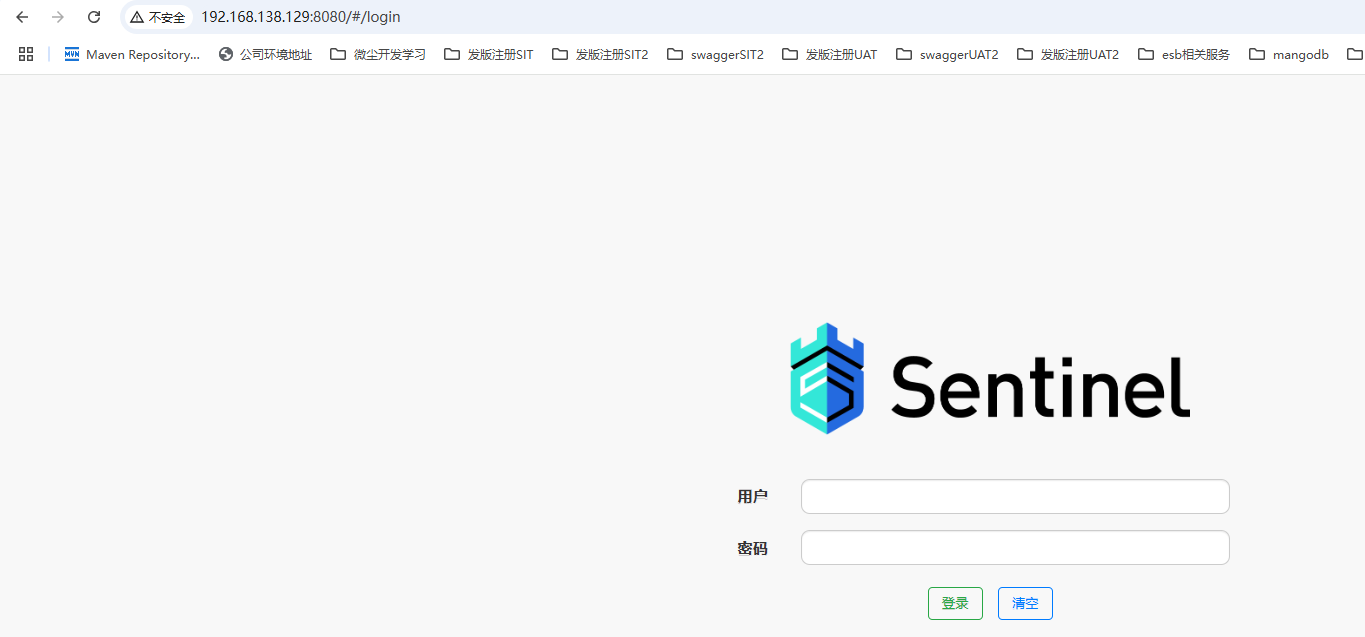
我们可以通过192.168.138.129:8080 访问,用户名密码都是 sentinel / sentinel

如果要修改Sentinel的默认端口、账户、密码,可以通过下列配置:
| 配置项 | 默认值 | 说明 |
|---|---|---|
| server.port | 8080 | 服务端口 |
| sentinel.dashboard.auth.username | sentinel | 默认用户名 |
| sentinel.dashboard.auth.password | sentinel | 默认密码 |
启动参数修改:java -jar sentinel-dashboard-1.8.1.jar -Dserver.port=8090
2. 测试环境搭建
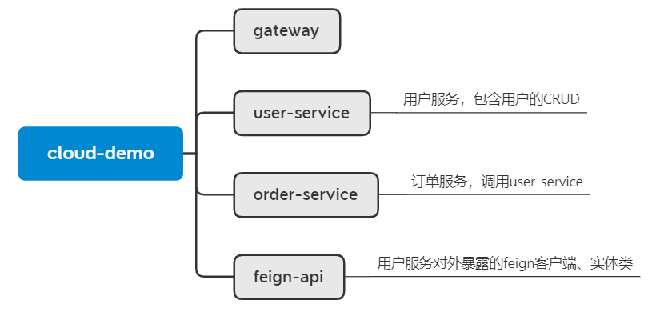
引入cloud-demo,要使用Sentinel肯定要结合微服务,这里我们使用SpringCloud实用篇中的cloud-demo工程,项目的工程的结构如下:
项目使用nacos作为注册中心,我们修改gateway,user-service以及order-service对应的nacos配置信息
gateway 配置文件
server:
  port: 10010
logging:
  level:
    cn.itcast: debug
  pattern:
    dateformat: MM-dd HH:mm:ss:SSS
spring:
  application:
    name: gateway
  cloud:
    nacos:
      username: nacos
      password: Nac0s#123456!
      discovery:
        server-addr: 3.1.19.155:8848
        namespace: SIT2_CUS
    gateway:
      routes:
      	# 路由标示,必须唯一
        - id: user-service
          # 路由的目标地址
          uri: lb://userservice
          # 路由断言,判断请求是否符合规则
          predicates:
          	# 路径断言,判断路径是否是以/user开头,如果是则符合
            - Path=/user/**
        - id: order-service
          uri: lb://orderservice
          predicates:
            - Path=/order/**
      default-filters:
        - AddRequestHeader=Truth,Itcast is freaking awesome!
order模块配置文件内容
server:
  port: 8088
spring:
  datasource:
  	# 数据库连接 URL
    url: jdbc:mysql://192.168.138.129:3306/test?useUnicode=true&characterEncoding=utf-8
    # 数据库用户名
    username: root
    # 数据库密码
    password: 101022
    driver-class-name: com.mysql.jdbc.Driver
  application:
    name: orderservice
  cloud:
    nacos:
      username: nacos
      password: Nac0s#123456!
      discovery:
        server-addr: 3.1.19.155:8848
        namespace: SIT2_CUS
      config:
        server-addr: 3.1.19.155:8848 # nacos的服务端地址
        file-extension: yml # 配置文件格式
        group: GIT_GROUP
        namespace: SIT2_CUS
        ext-config:
          - data-id: git-common-config-sit2.yml
            group: GIT_GROUP
            refresh: true
            namespace: SIT2_CUS
mybatis:
  type-aliases-package: cn.itcast.user.pojo
  configuration:
    map-underscore-to-camel-case: true
logging:
  level:
    cn.itcast: debug
  pattern:
    dateformat: MM-dd HH:mm:ss:SSS

# 负载均衡规则
userservice:
  ribbon:
    NFLoadBalancerRuleClassName: com.alibaba.cloud.nacos.ribbon.NacosRule
ribbon:
  eager-load:
  	# 开启饥饿加载
    enabled: true
    # 指定饥饿加载的服务名称
    clients:
      - userservice
feign:
  httpclient:
  	# 支持HttpClient的开关
    enabled: true
    # 最大连接数
    max-connections: 200
    # 单个路径的最大连接数
    max-connections-per-route: 50
user-server配置文件内容如下:
application.yml
server:
  port: 8081
spring:
  datasource:
    url: jdbc:mysql://192.168.138.129:3306/test?useUnicode=true&characterEncoding=utf-8  # 数据库连接 URL
    username: root  # 数据库用户名
    password: 101022  # 数据库密码
    driver-class-name: com.mysql.jdbc.Driver
mybatis:
  type-aliases-package: cn.itcast.user.pojo
  configuration:
    map-underscore-to-camel-case: true
logging:
  level:
    cn.itcast: debug
  pattern:
    dateformat: MM-dd HH:mm:ss:SSS
pattern:
  name: 本地环境local
bootstrap.yml
spring:
  application:
    name: userservice
  profiles:
    active: dev # 环境
  cloud:
    nacos:
      username: nacos
      password: Nac0s#123456!
      discovery:
        server-addr: 3.1.19.155:8848
        namespace: SIT2_CUS
      config:
        server-addr: 3.1.19.155:8848 # nacos的服务端地址
        file-extension: yml # 配置文件格式
        group: GIT_GROUP
        namespace: SIT2_CUS
        ext-config:
          - data-id: git-common-config-sit2.yml
            group: GIT_GROUP
            refresh: true
            namespace: SIT2_CUS
服务对应的数据初始化sql如下:
DROP TABLE IF EXISTS `tb_user`;
CREATE TABLE `tb_user` (
`id` bigint(20) NOT NULL AUTO_INCREMENT,
`username` varchar(100) CHARACTER SET utf8 COLLATE utf8_general_ci NULL DEFAULT NULL COMMENT '收件人',
`address` varchar(255) CHARACTER SET utf8 COLLATE utf8_general_ci NULL DEFAULT NULL COMMENT '地址',
PRIMARY KEY (`id`) USING BTREE,
UNIQUE INDEX `username`(`username`) USING BTREE
) ENGINE = InnoDB AUTO_INCREMENT = 109 CHARACTER SET = utf8 COLLATE = utf8_general_ci ROW_FORMAT = Compact;
-- ----------------------------
-- Records of tb_user
-- ----------------------------
INSERT INTO `tb_user` VALUES (1, '柳岩', '湖南省衡阳市');
INSERT INTO `tb_user` VALUES (2, '文二狗', '陕西省西安市');
INSERT INTO `tb_user` VALUES (3, '华沉鱼', '湖北省十堰市');
INSERT INTO `tb_user` VALUES (4, '张必沉', '天津市');
INSERT INTO `tb_user` VALUES (5, '郑爽爽', '辽宁省沈阳市大东区');
INSERT INTO `tb_user` VALUES (6, '范兵兵', '山东省青岛市');
DROP TABLE IF EXISTS `tb_order`;
CREATE TABLE `tb_order` (
`id` bigint(20) NOT NULL AUTO_INCREMENT COMMENT '订单id',
`user_id` bigint(20) NOT NULL COMMENT '用户id',
`name` varchar(100) CHARACTER SET utf8 COLLATE utf8_general_ci NULL DEFAULT NULL COMMENT '商品名称',
`price` bigint(20) NOT NULL COMMENT '商品价格',
`num` int(10) NULL DEFAULT 0 COMMENT '商品数量',
PRIMARY KEY (`id`) USING BTREE,
UNIQUE INDEX `username`(`name`) USING BTREE
) ENGINE = InnoDB AUTO_INCREMENT = 109 CHARACTER SET = utf8 COLLATE = utf8_general_ci ROW_FORMAT = Compact;
-- ----------------------------
-- Records of tb_order
-- ----------------------------
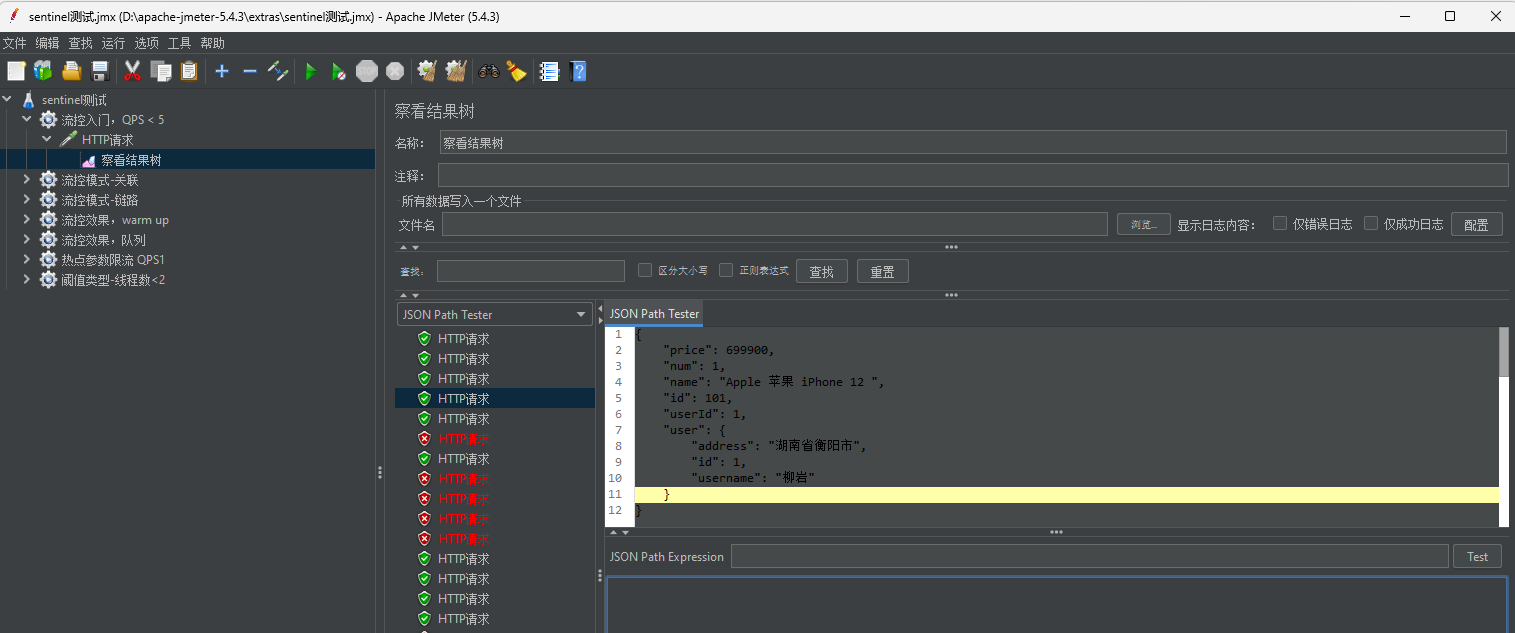
INSERT INTO `tb_order` VALUES (101, 1, 'Apple 苹果 iPhone 12 ', 699900, 1);
INSERT INTO `tb_order` VALUES (102, 2, '雅迪 yadea 新国标电动车', 209900, 1);
INSERT INTO `tb_order` VALUES (103, 3, '骆驼(CAMEL)休闲运动鞋女', 43900, 1);
INSERT INTO `tb_order` VALUES (104, 4, '小米10 双模5G 骁龙865', 359900, 1);
INSERT INTO `tb_order` VALUES (105, 5, 'OPPO Reno3 Pro 双模5G 视频双防抖', 299900, 1);
INSERT INTO `tb_order` VALUES (106, 6, '美的(Midea) 新能效 冷静星II ', 544900, 1);
INSERT INTO `tb_order` VALUES (107, 2, '西昊/SIHOO 人体工学电脑椅子', 79900, 1);
INSERT INTO `tb_order` VALUES (108, 3, '梵班(FAMDBANN)休闲男鞋', 31900, 1);
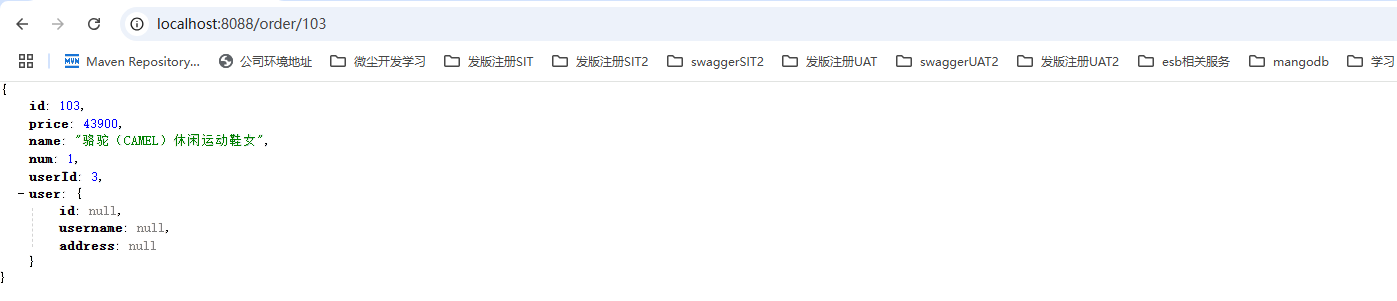
最后启动三个服务,发现服务都注册到nacos上面
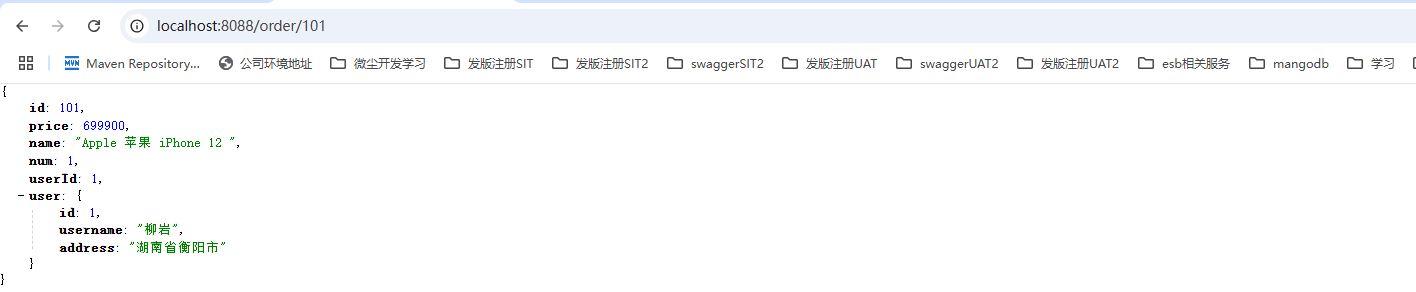
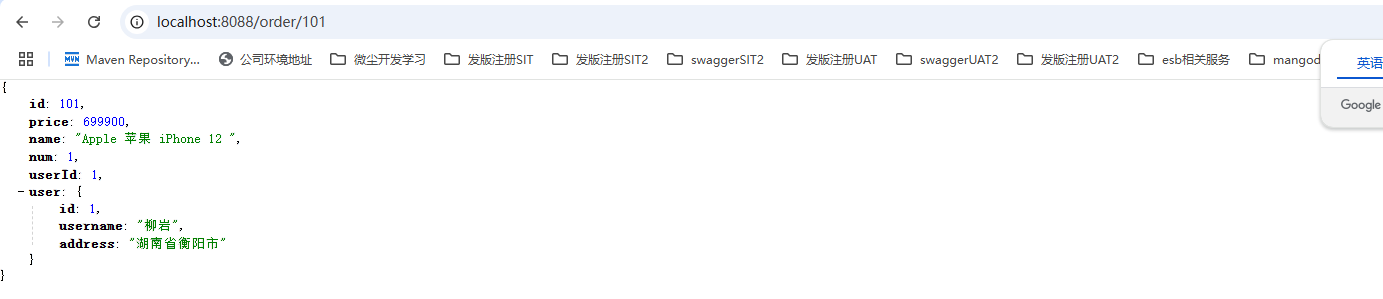
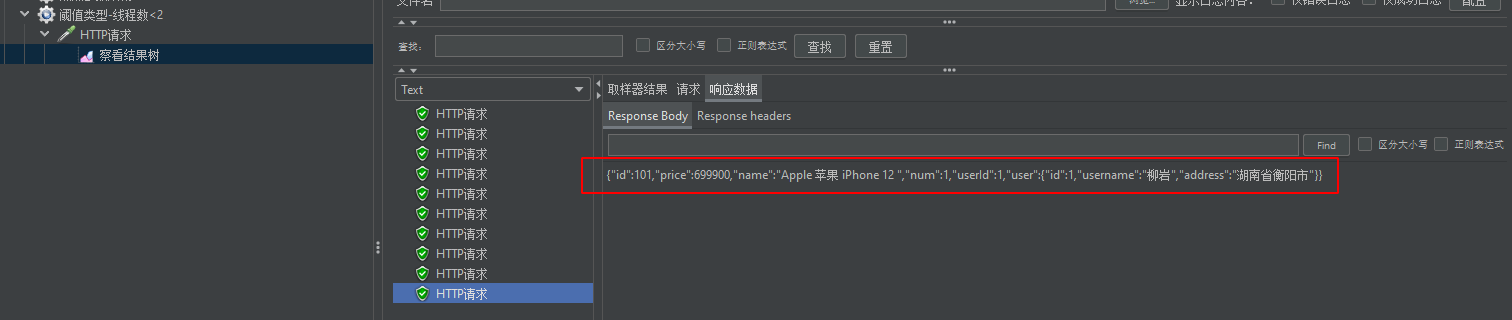
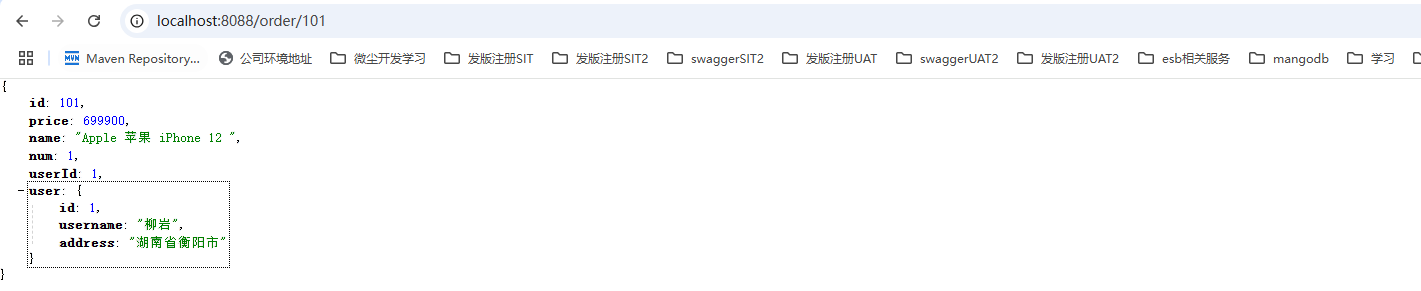
访问order接口,接口内实现了feign接口调用 ,发现正常返回数据 http://localhost:8088/order/101
2.1 微服务整合Sentinel
我们在order-service中整合Sentinel,并且连接Sentinel的控制台,步骤如下:
引入sentinel依赖:
<!--sentinel-->
<dependency>
    <groupId>com.alibaba.cloud</groupId>
    <artifactId>spring-cloud-starter-alibaba-sentinel</artifactId>
</dependency>
配置控制台地址:
spring:
  cloud:
    sentinel:
      transport:
        dashboard: 192.168.138.129:8080
访问任意端点
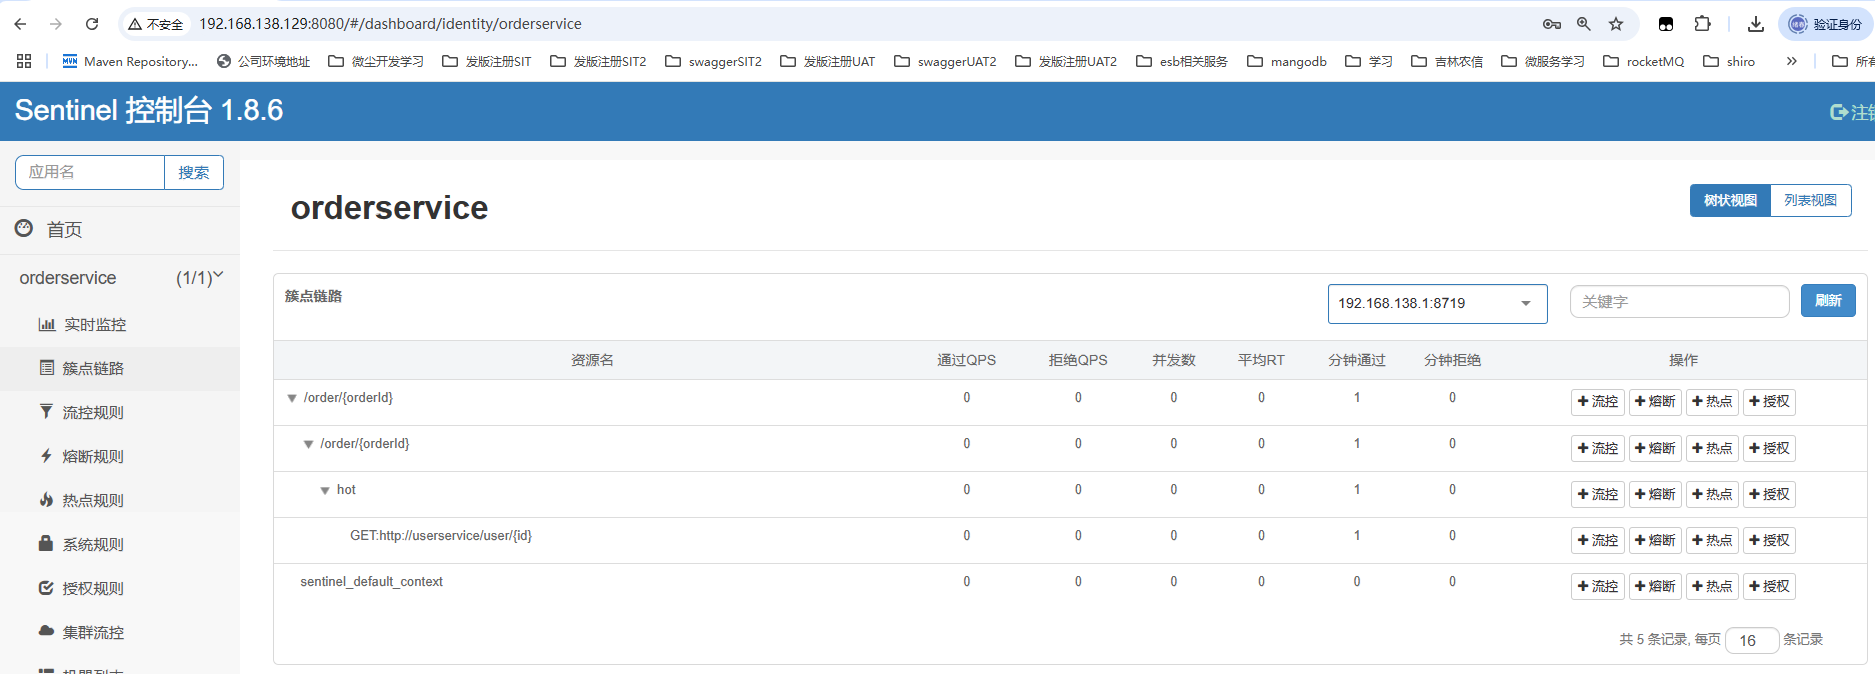
查看sentinel控制台,发现访问路径端点出现在控制台
3.限流规则
学习主要分为以下步骤:
- 快速入门
- 流控模式
- 流控效果
- 热点参数限流
3.1 快速入门
3.1.1 流控规则
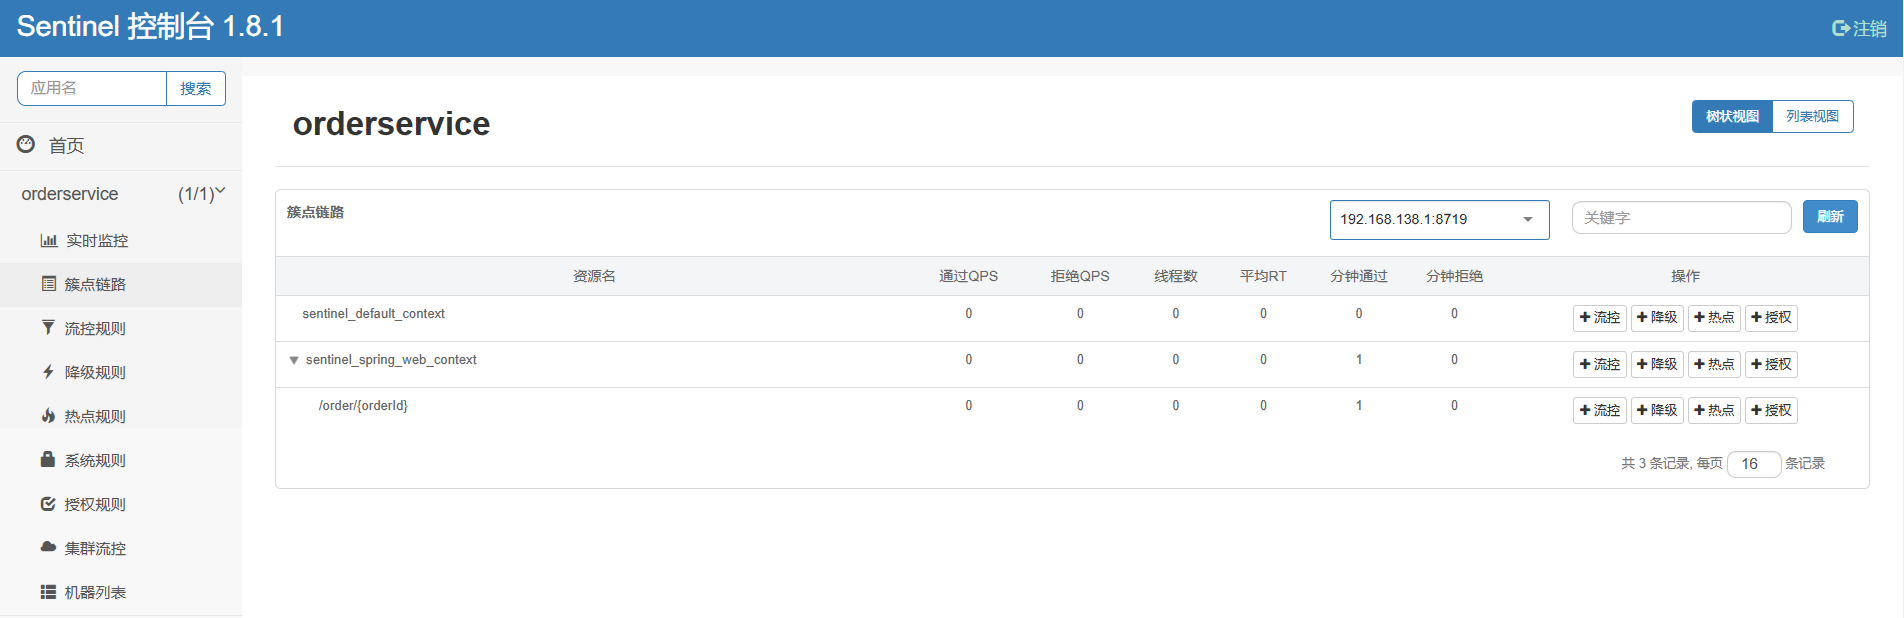
簇点链路:就是项目内的调用链路,链路中被监控的每个接口就是一个资源。默认情况下sentinel会监控SpringMVC的每一个端点(Endpoint),因此SpringMVC的每一个端点(Endpoint)就是调用链路中的一个资源。如果想要mapper或者service方法被监控,那么需要使用sentinel注解进行配置。
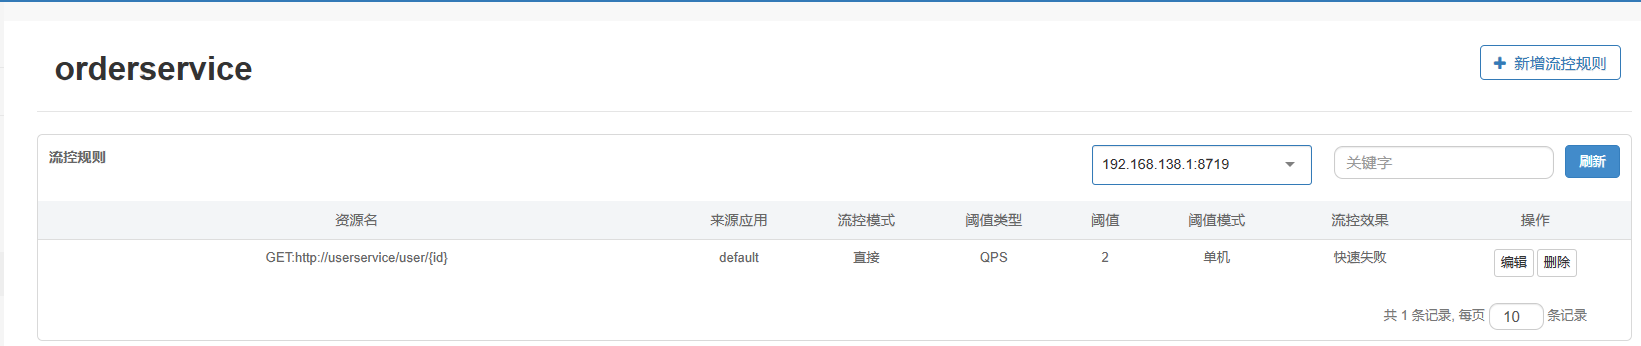
流控、熔断等都是针对簇点链路中的资源来设置的,因此我们可以点击对应资源后面的按钮来设置规则:
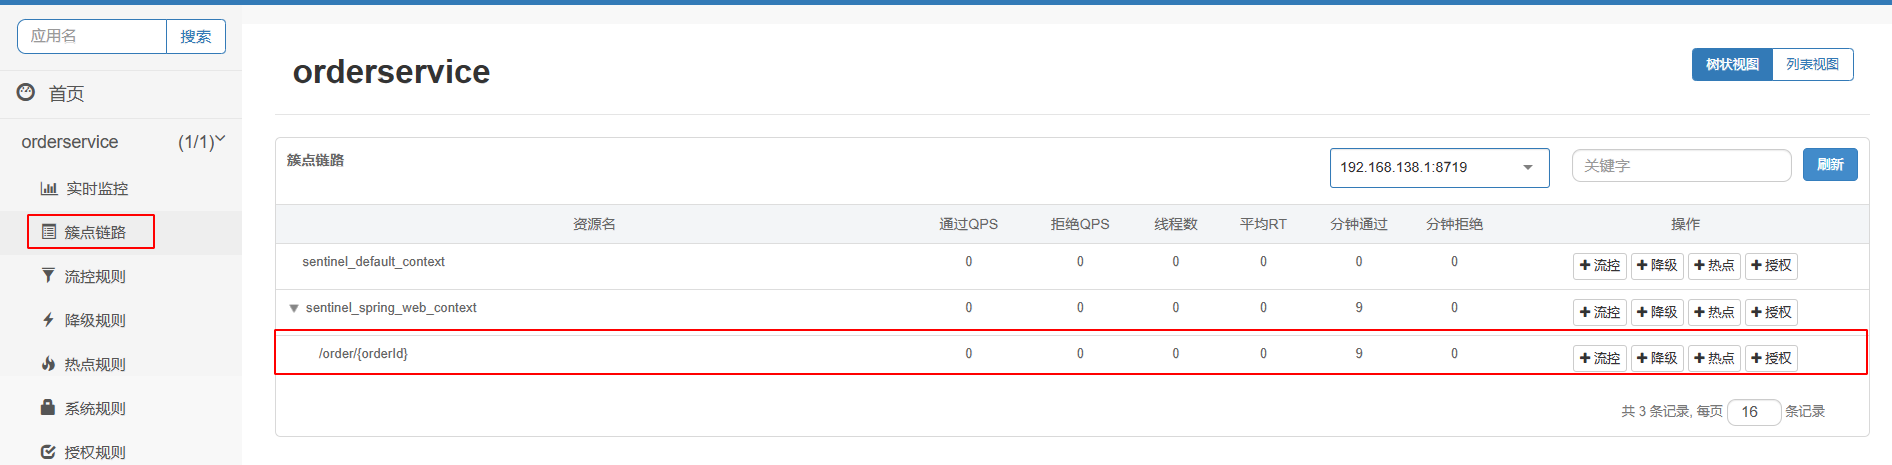
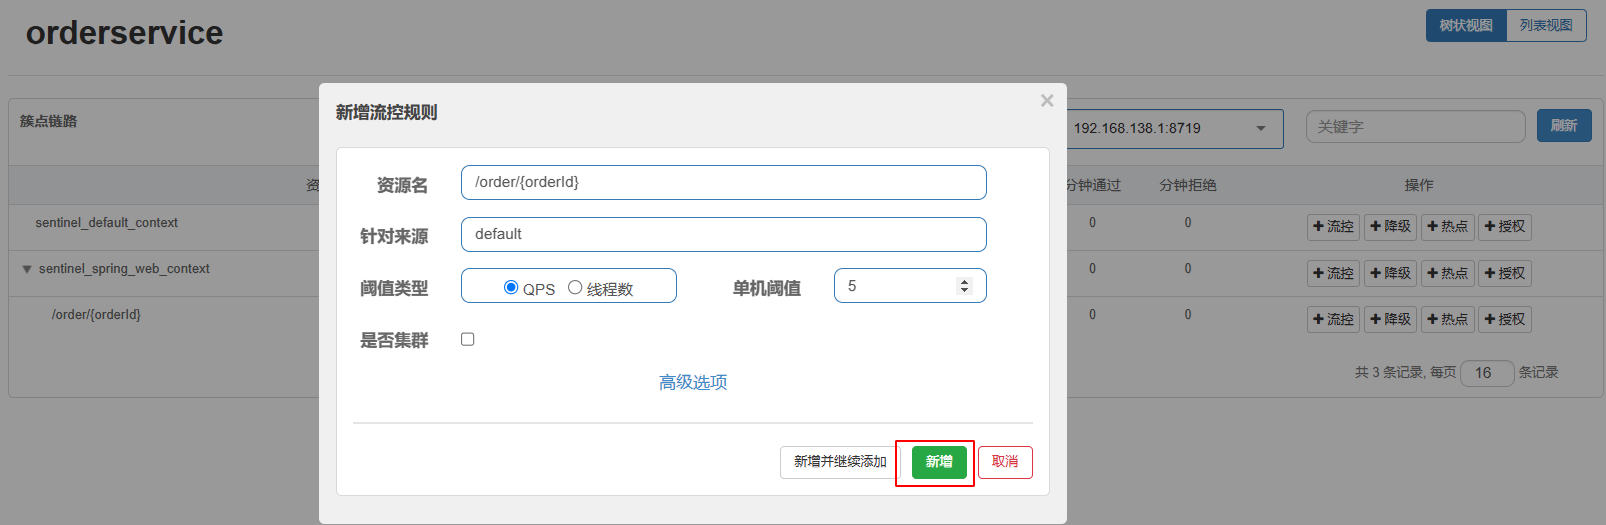
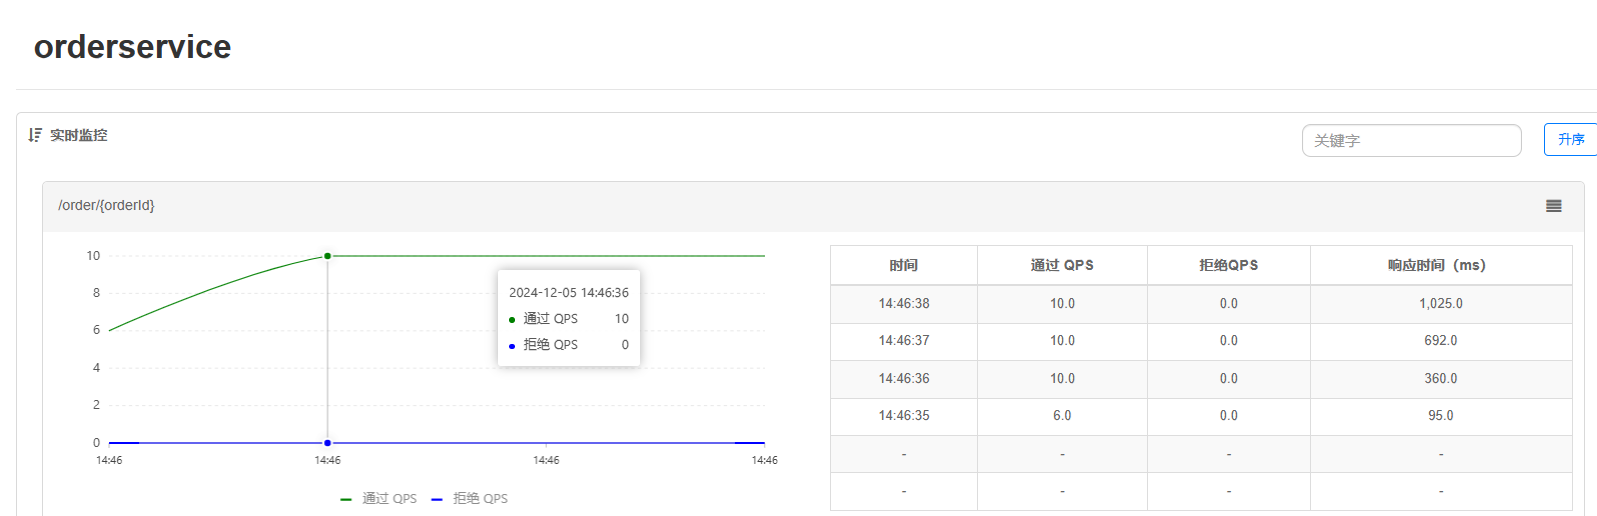
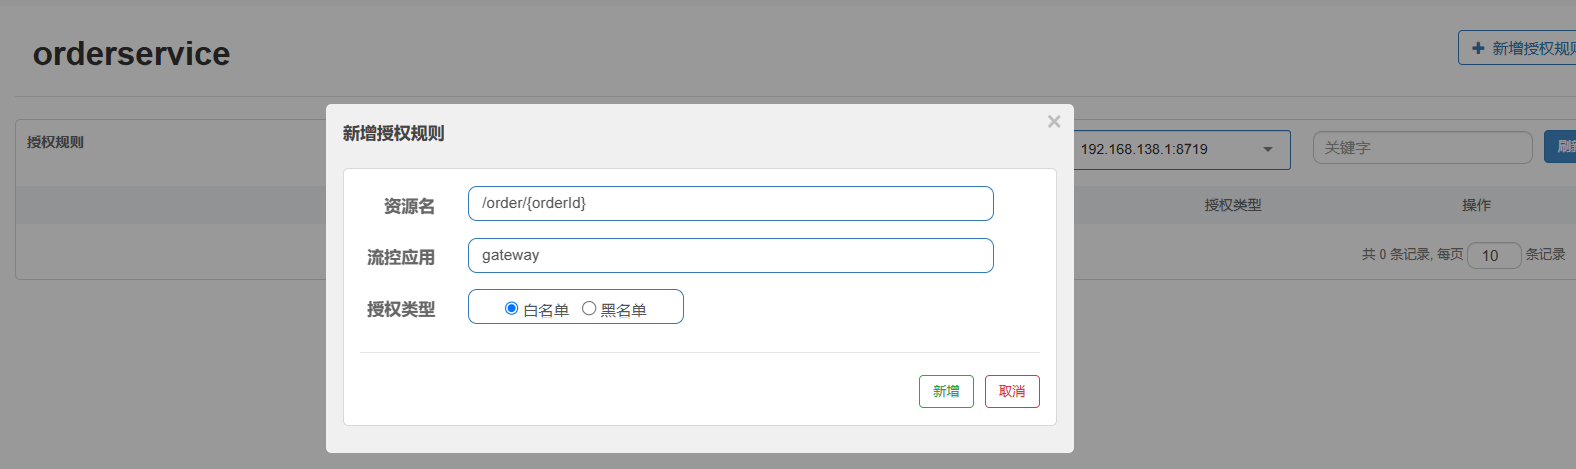
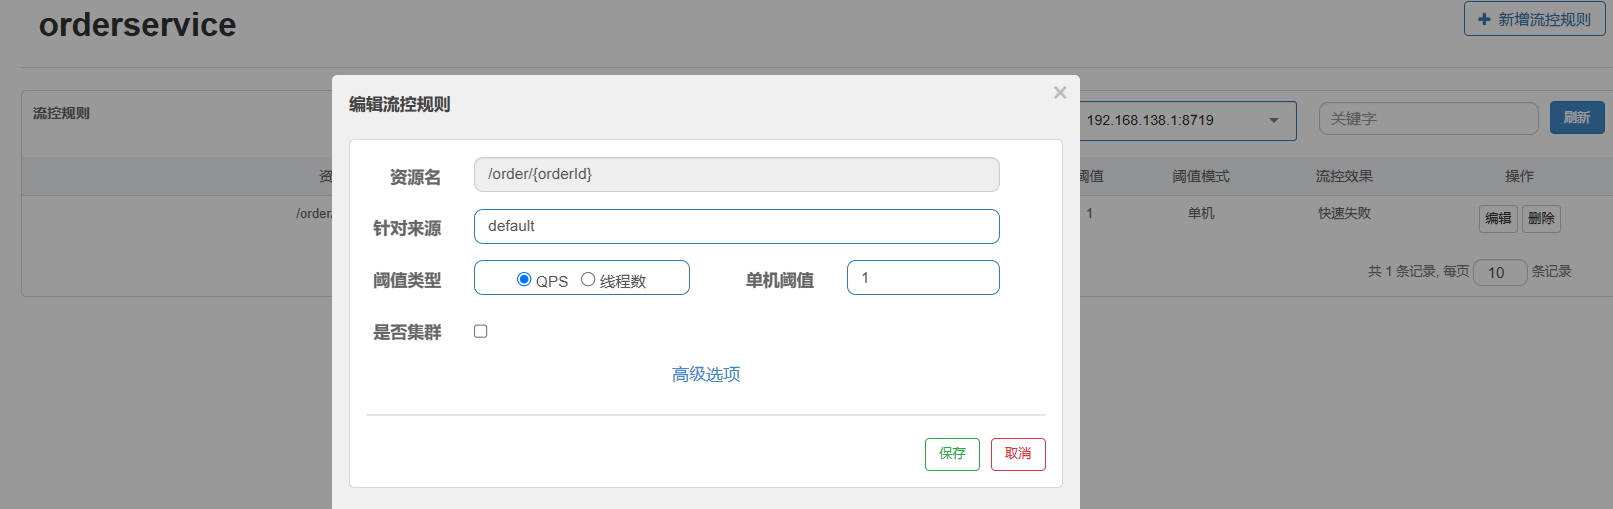
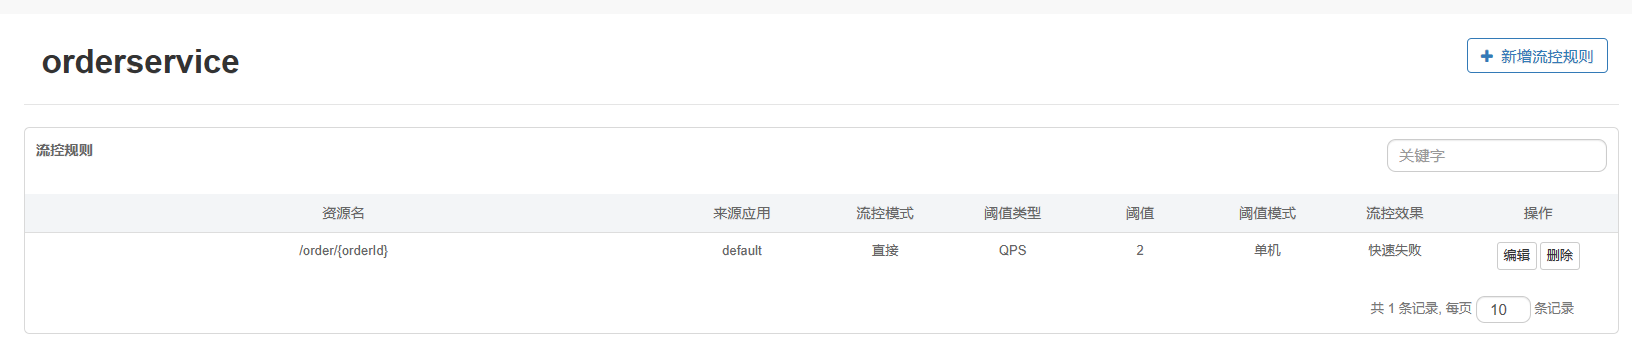
点击资源/order/{orderId}后面的流控按钮,就可以弹出表单。表单中可以添加流控规则,如下图所示:

其含义是限制 /order/{orderId}这个资源的单机QPS为1,即每秒只允许1次请求,超出的请求会被拦截并报错。
3.1.2 流控规则入门案例
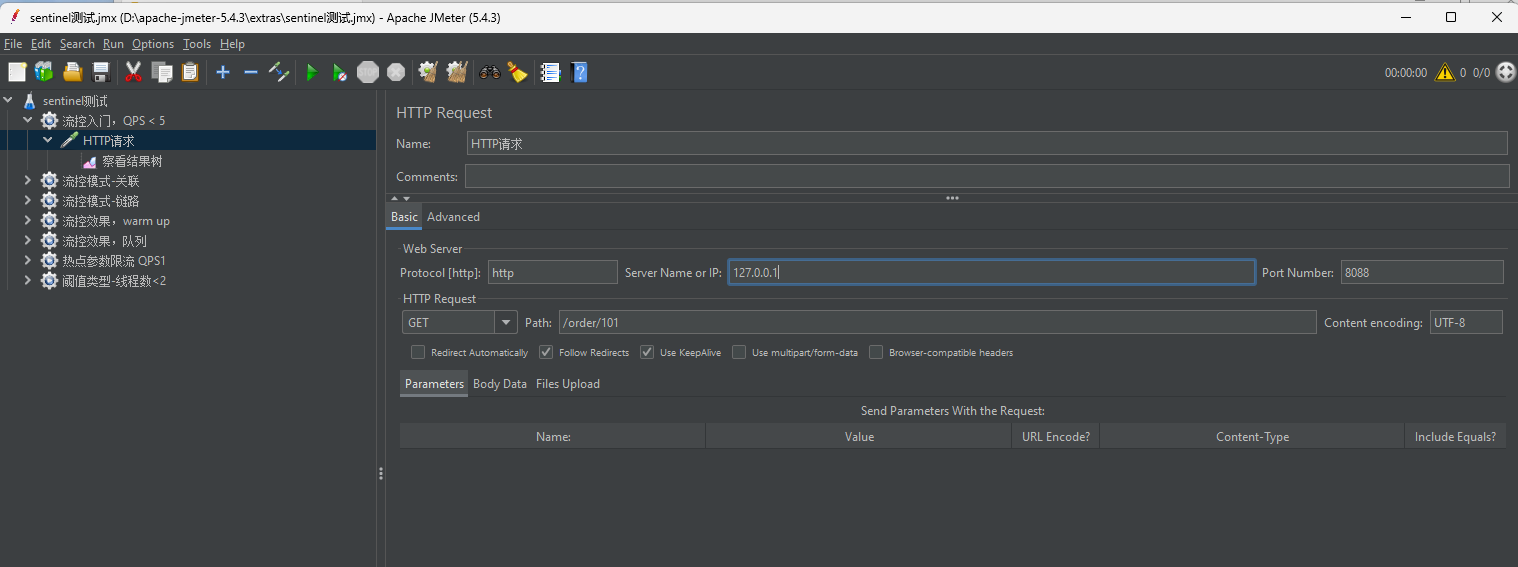
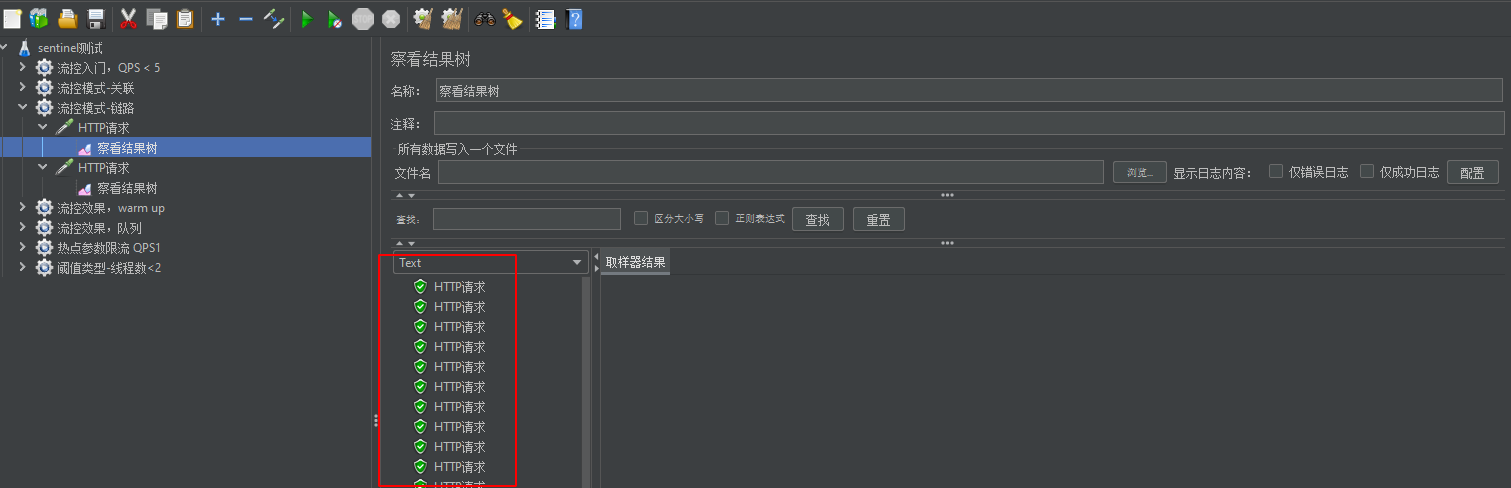
配置案例:给 /order/{orderId}这个资源设置流控规则,QPS不能超过 5。然后利用jemeter测试。
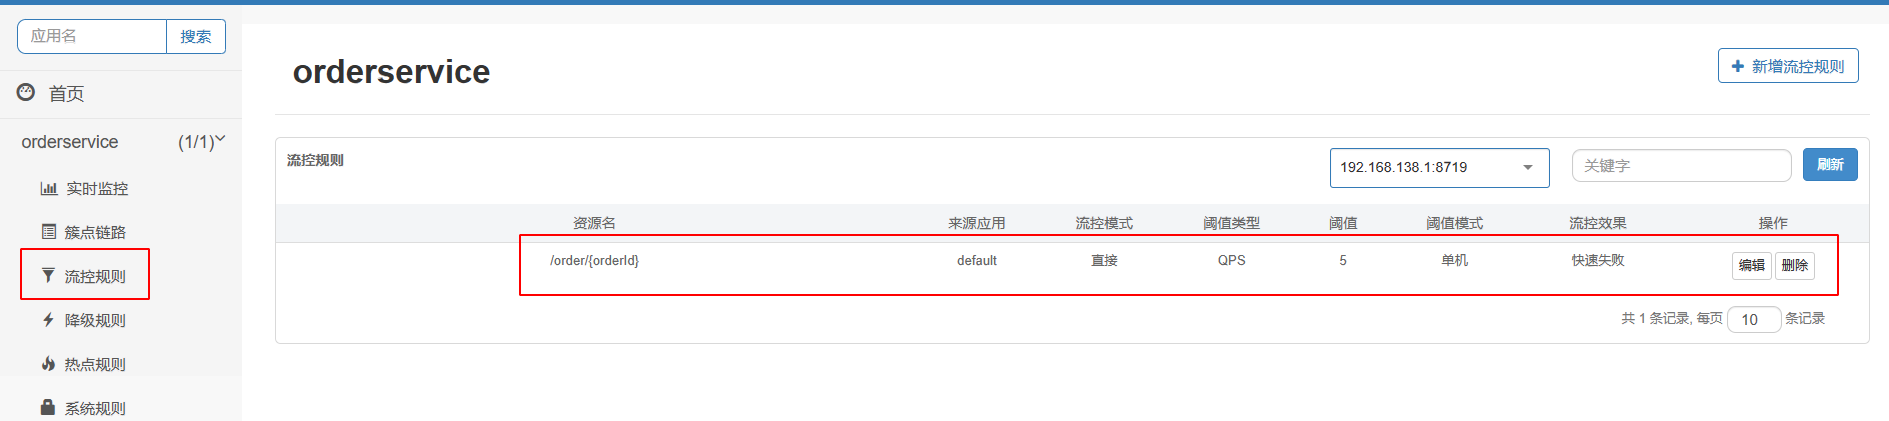
使用jemeter或者快速刷新浏览器都可以触发此规则

3.2 流控模式
在添加限流规则时,点击高级选项,可以选择三种流控模式:
直接:统计当前资源的请求,触发阈值时对当前资源直接限流,也是默认的模式
关联:统计与当前资源相关的另一个资源,触发阈值时,对当前资源限流
eg:A触发阈值,但是我对B进行限流
链路:统计从指定链路访问到本资源的请求,触发阈值时,对指定链路限流
eg:我有ABC三个资源,其中AB都调用C,但是我只对B调用的进行限流

3.2.1 关联模式
使用场景:比如用户支付时需要修改订单状态,同时用户要查询订单。查询和修改操作会争抢数据库锁,产生竞争。业务需求是有限支付和更新订单的业务,因此当修改订单业务触发阈值时,需要对查询订单业务限流。
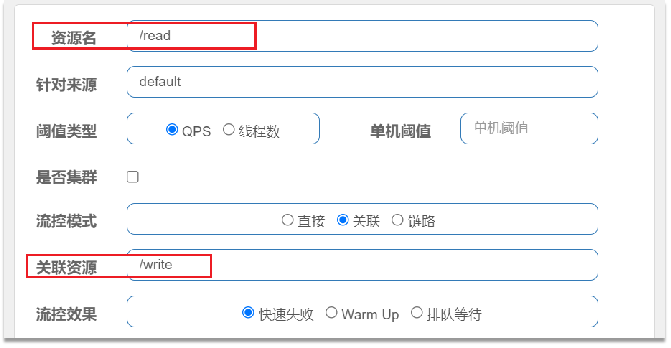
当/write资源访问量触发阈值时,就会对/read资源限流,避免影响/write资源
配置案例:
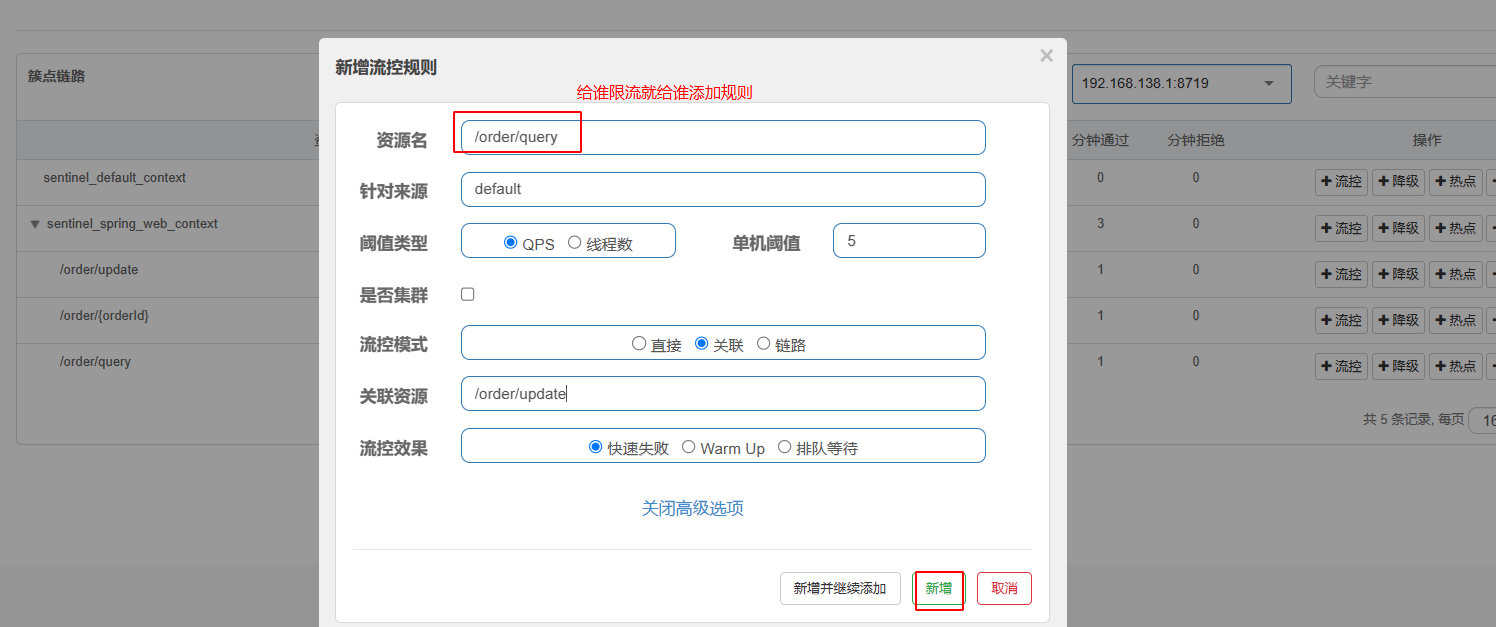
在OrderController新建两个端点:/order/query和/order/update,无需实现业务
@GetMapping("/query")
public String queryOrder() {
return "查询订单成功!";
}

@GetMapping("/update")
public String updateOrder() {
return "更新订单成功!";
}
配置流控规则,当/order/ update资源被访问的QPS超过5时,对/order/query请求限流
jmeter测试,持续发起update请求,再访问query,发现query已经被限流
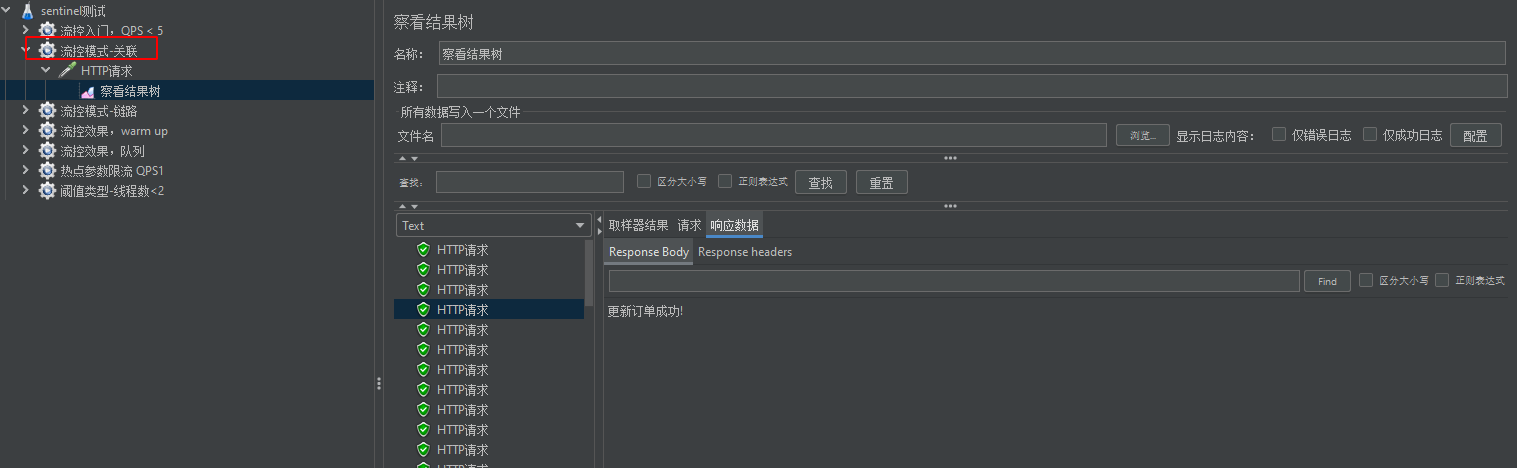
浏览器访问query接口,http://localhost:8088/order/query,已经被限流

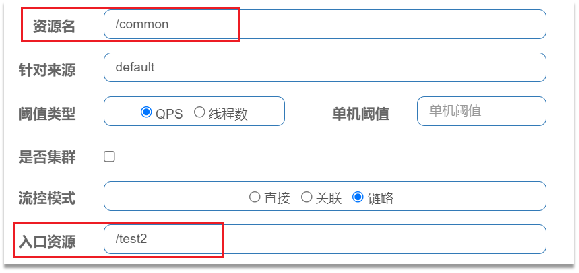
3.2.2 链路模式
链路模式:只针对从指定链路访问到本资源的请求做统计,判断是否超过阈值
例如有两条请求链路:
- /test1 -》/common
- /test2 -》/common
如果只希望统计从/test2进入到/common的请求,则可以这样配置:
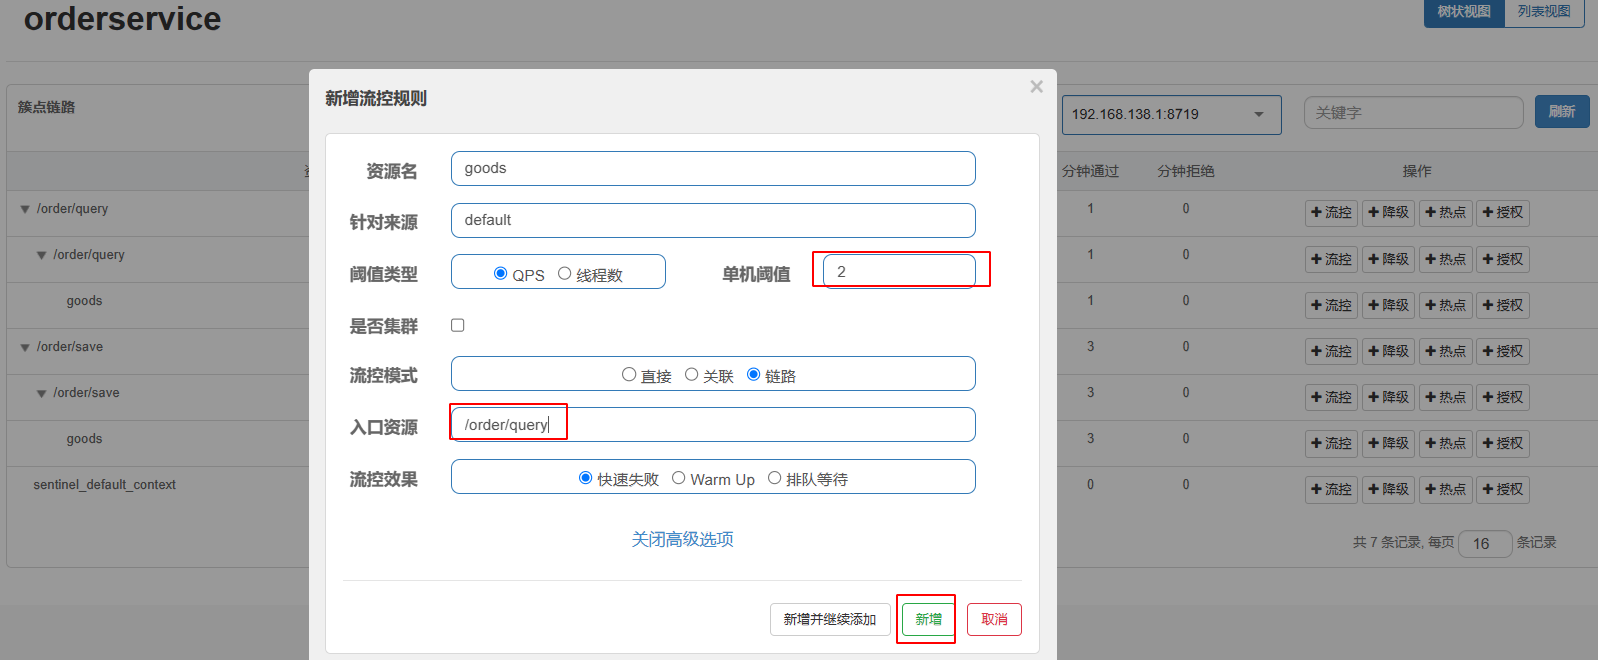
配置案例:有查询订单和创建订单业务,两者都需要查询商品。针对从查询订单进入到查询商品的请求统计,并设置限流。
在OrderService中添加一个queryGoods方法,不用实现业务
Sentinel默认只标记Controller中的方法为资源,如果要标记其它方法,需要利用@SentinelResource注解,示例:
@SentinelResource("goods")
public void queryGoods() {
	System.err.println("查询商品");
}
Sentinel默认会将Controller方法做context整合,导致链路模式的流控失效,需要修改application.yml,添加配置:
spring:
  cloud:
    sentinel:
      web-context-unify: false # 关闭context整合
在OrderController中,改造/order/query端点,调用OrderService中的queryGoods方法
@GetMapping("/query")
public String queryOrder() {
    orderService.queryGoods();
    System.out.println("查询订单");
    return "查询订单成功!";
}
在OrderController中添加一个/order/save的端点,调用OrderService的queryGoods方法
@GetMapping("/save")
public String saveOrder() {
    orderService.queryGoods();
    System.out.println("新增订单");
    return "新增订单成功!";
}
给queryGoods设置限流规则,从/order/query进入queryGoods的方法限制QPS必须小于2
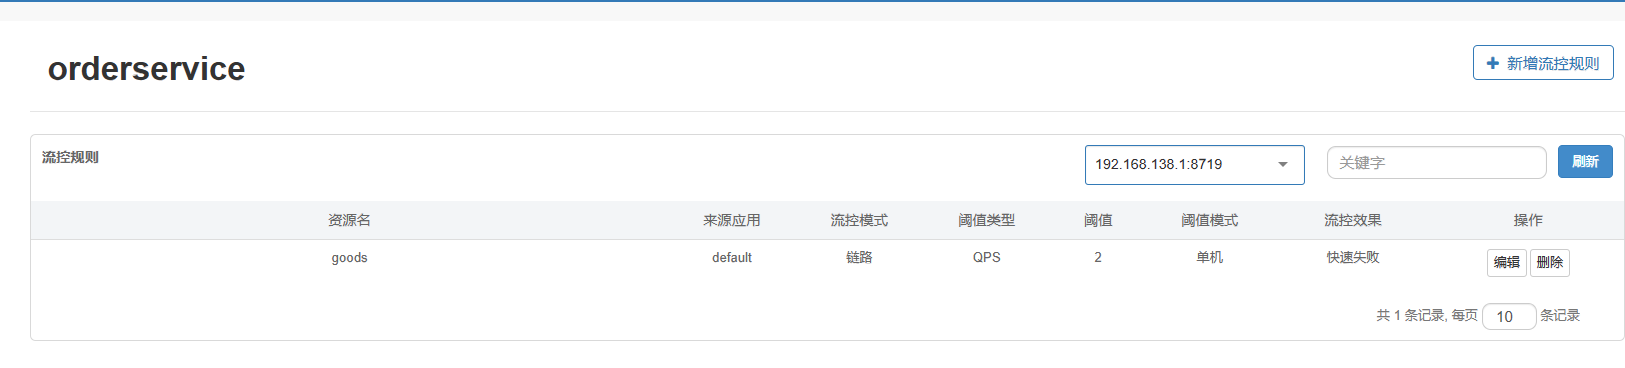
调用save方法执行全部为正常执行
调用query方法,发现执行被限流
3.2.3 总结
流控模式有哪些
- 直接:对当前资源限流
- 关联:高优先级资源触发阈值,对低优先级资源限流。
- 链路:阈值统计时,只统计从指定资源进入当前资源的请求,是对请求来源的限流
3.3 流控效果
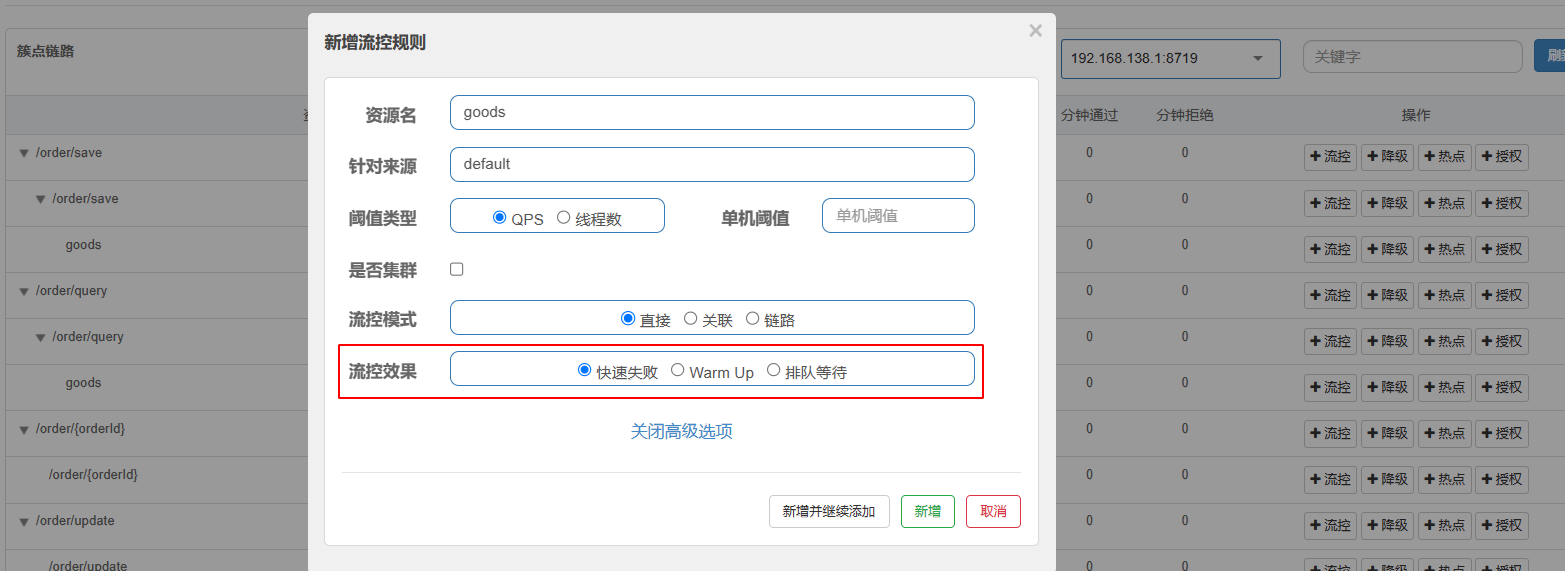
流控效果是指请求达到流控阈值时应该采取的措施,包括三种:
- 快速失败:达到阈值后,新的请求会被立即拒绝并抛出FlowException异常。是默认的处理方式。
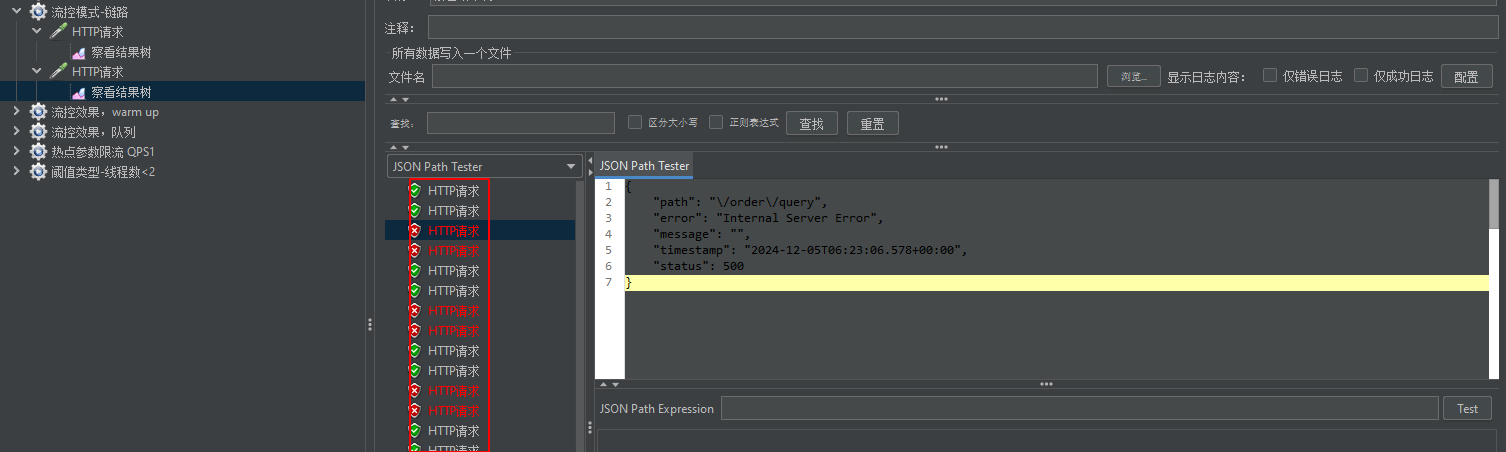
- warm up:预热模式,对超出阈值的请求同样是拒绝并抛出异常。但这种模式阈值会动态变化,从一个较小值逐渐增加到最大阈值。
- 排队等待:让所有的请求按照先后次序排队执行(设置超时时间),两个请求的间隔不能小于指定时长
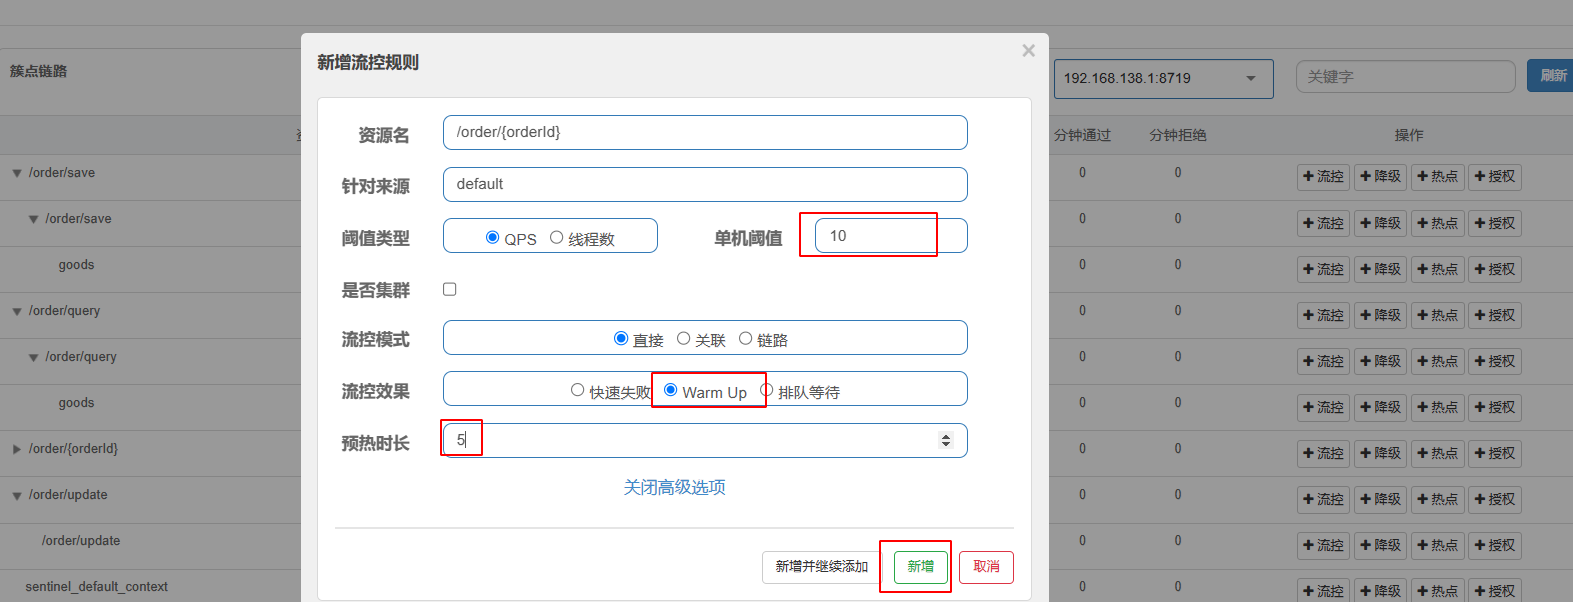
3.3.1 预热模式
warm up也叫预热模式,是应对服务冷启动的一种方案。请求阈值初始值是 threshold[最大阈值] / coldFactor[启动因子],持续指定时长后,逐渐提高到threshold值。而coldFactor的默认值是3.
例如,我设置QPS的threshold为10,预热时间为5秒,那么初始阈值就是 10 / 3 ,也就是3,然后在5秒后逐渐增长到10.

案例配置:给/order/{orderId}这个资源设置限流,最大QPS为10,利用warm up效果,预热时长为5秒
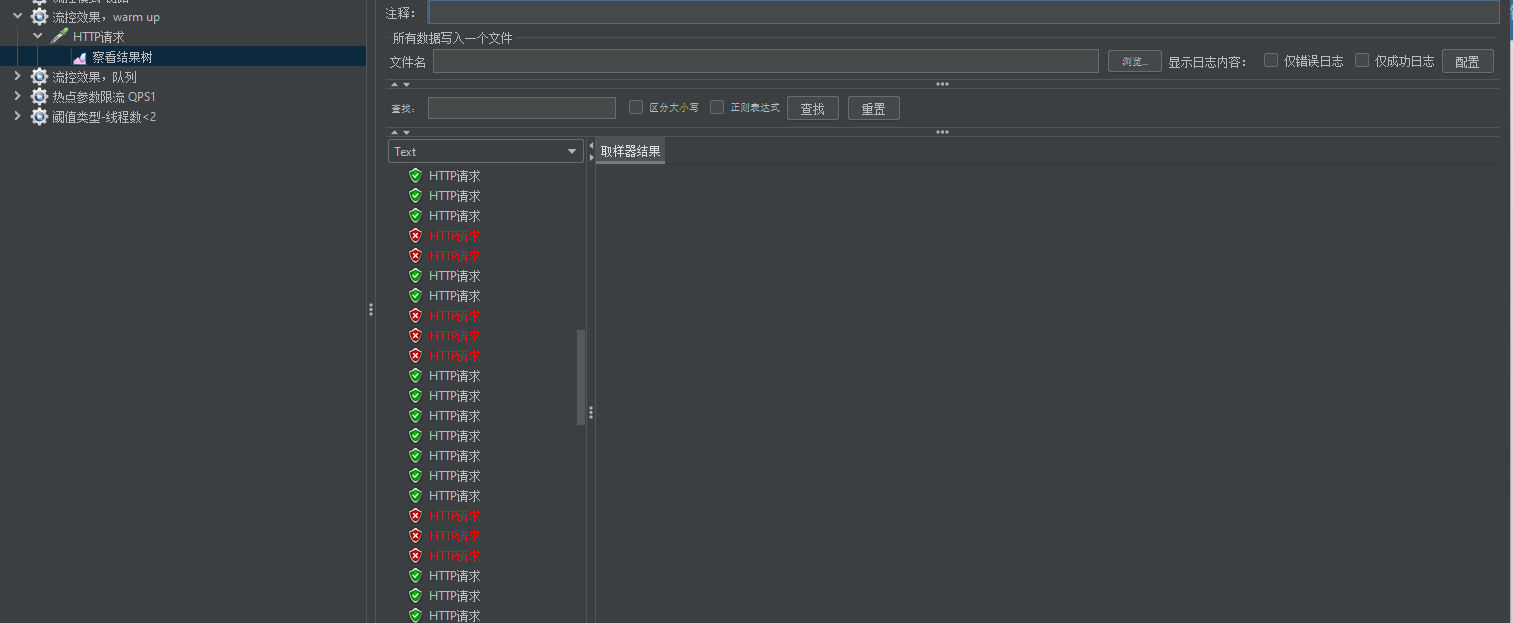
发起请求,成功的越来越多
查看控制台,发现有一条上升曲线
3.3.2 排队等待
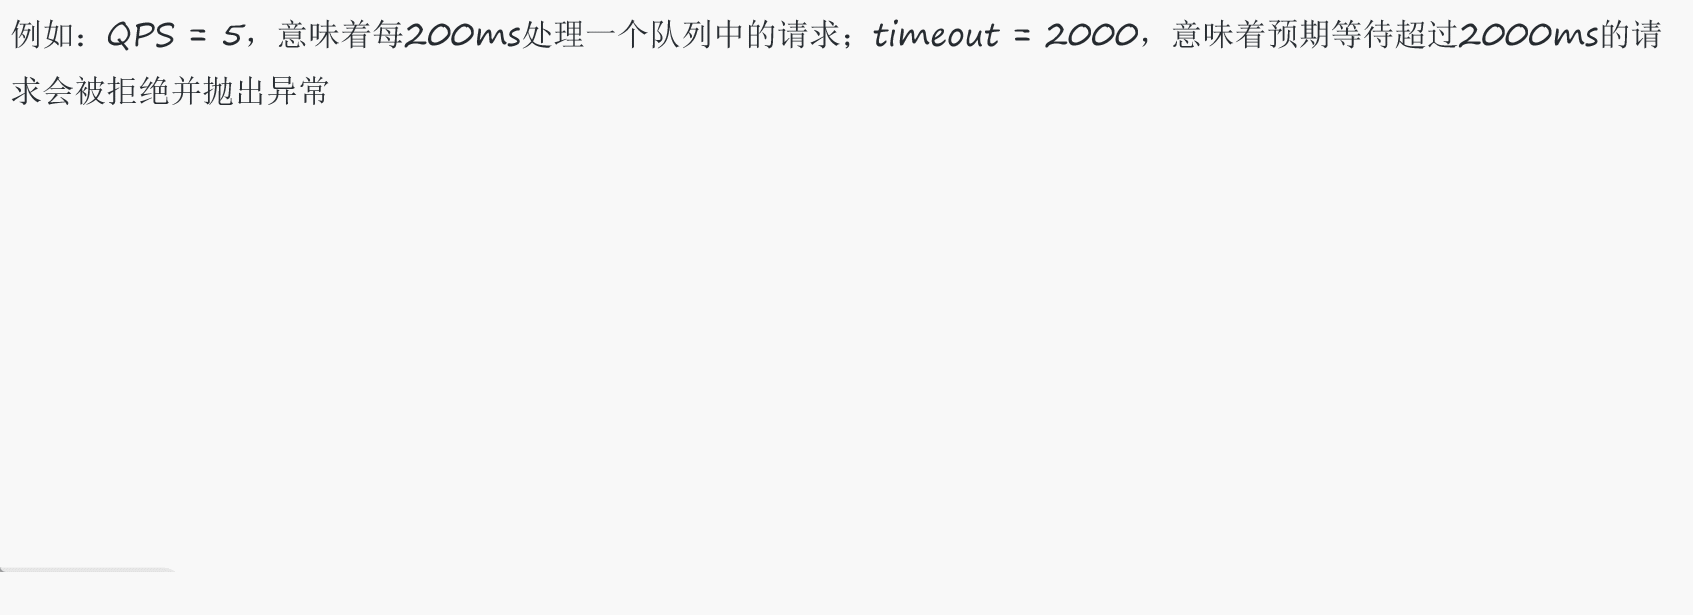
当请求超过QPS阈值时,快速失败和warm up 会拒绝新的请求并抛出异常。而排队等待则是让所有请求进入一个队列中,然后按照阈值允许的时间间隔依次执行。后来的请求必须等待前面执行完成,如果请求预期的等待时间超出最大时长,则会被拒绝。
例如:QPS = 5,意味着每200ms处理一个队列中的请求;timeout = 2000,意味着预期等待超过2000ms的请求会被拒绝并抛出异常
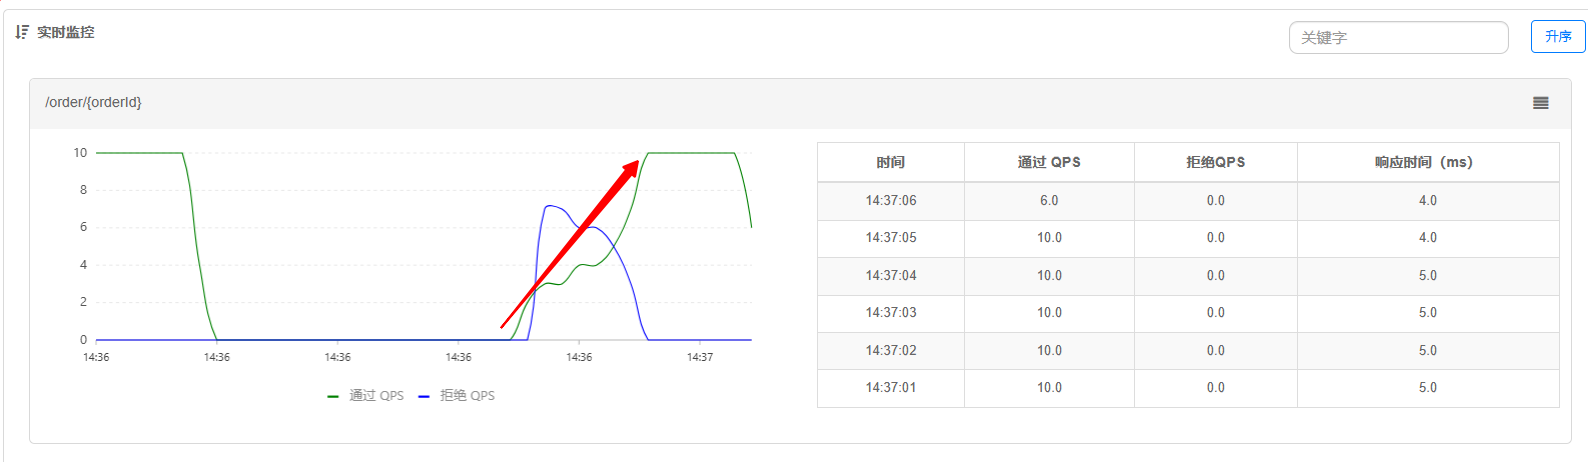
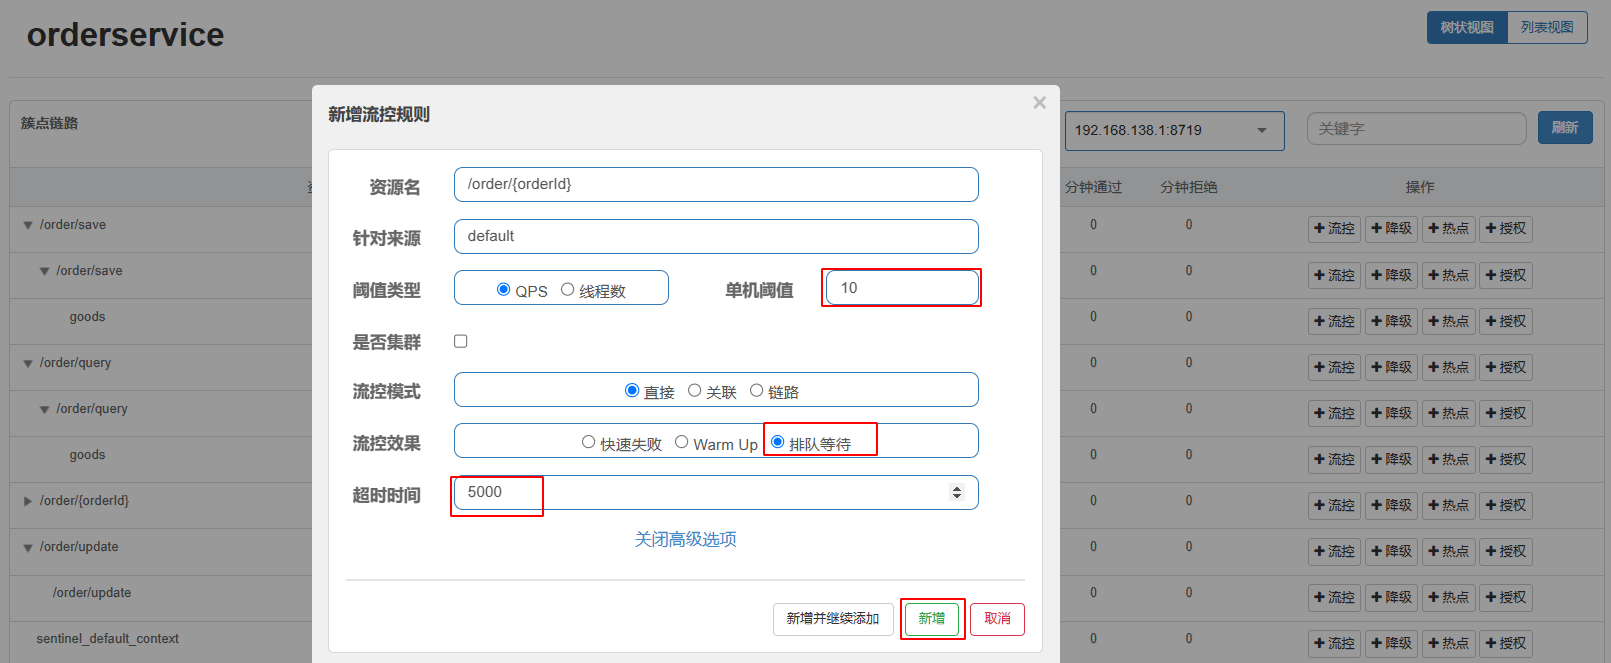
配置案例:给/order/{orderId}这个资源设置限流,最大QPS为10,利用排队的流控效果,超时时长设置为5s
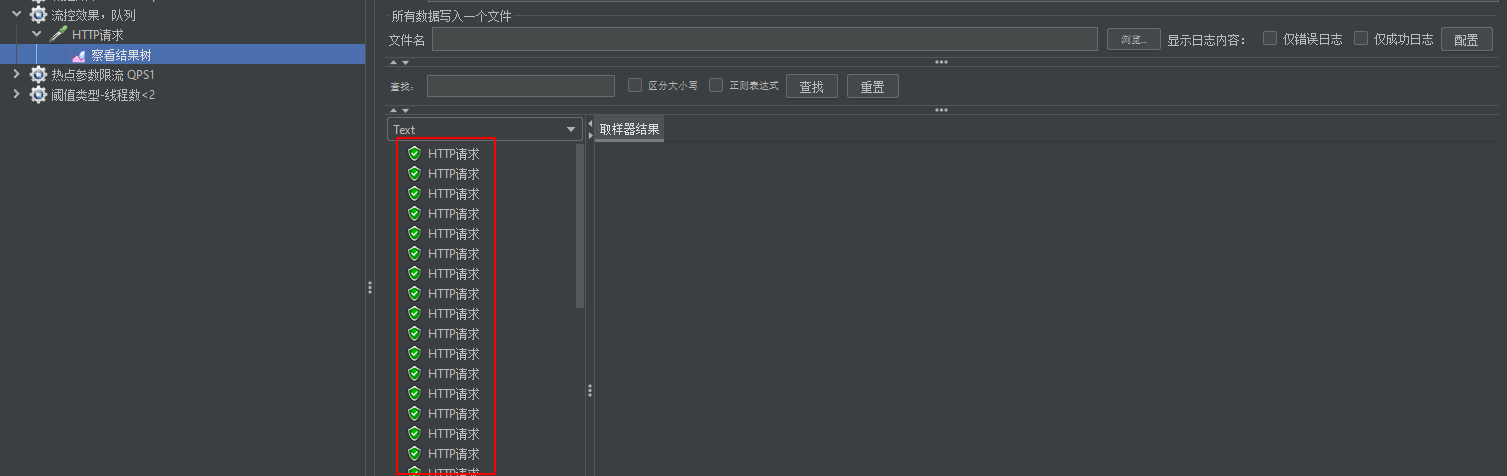
我们使用并发15进行请求,发现请求没有被拒绝,全部执行成功
我们查看控制台,发现流量被摊平,qps都是10
3.3.3 总结
流控效果有哪些
- 快速失败:QPS超过阈值时,拒绝新的请求
- warm up: QPS超过阈值时,拒绝新的请求;QPS阈值是逐渐提升的,可以避免冷启动时高并发导致服务宕机。
- 排队等待:请求会进入队列,按照阈值允许的时间间隔依次执行请求;如果请求预期等待时长大于超时时间,直接拒绝
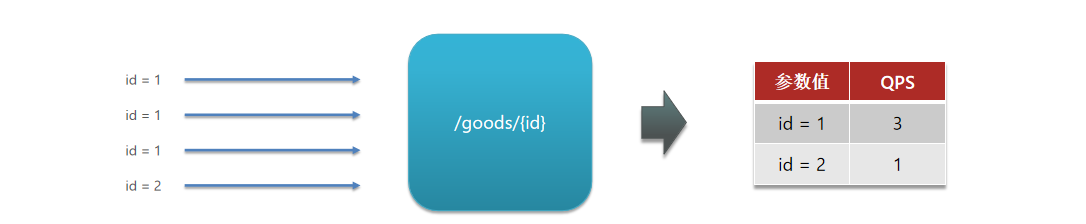
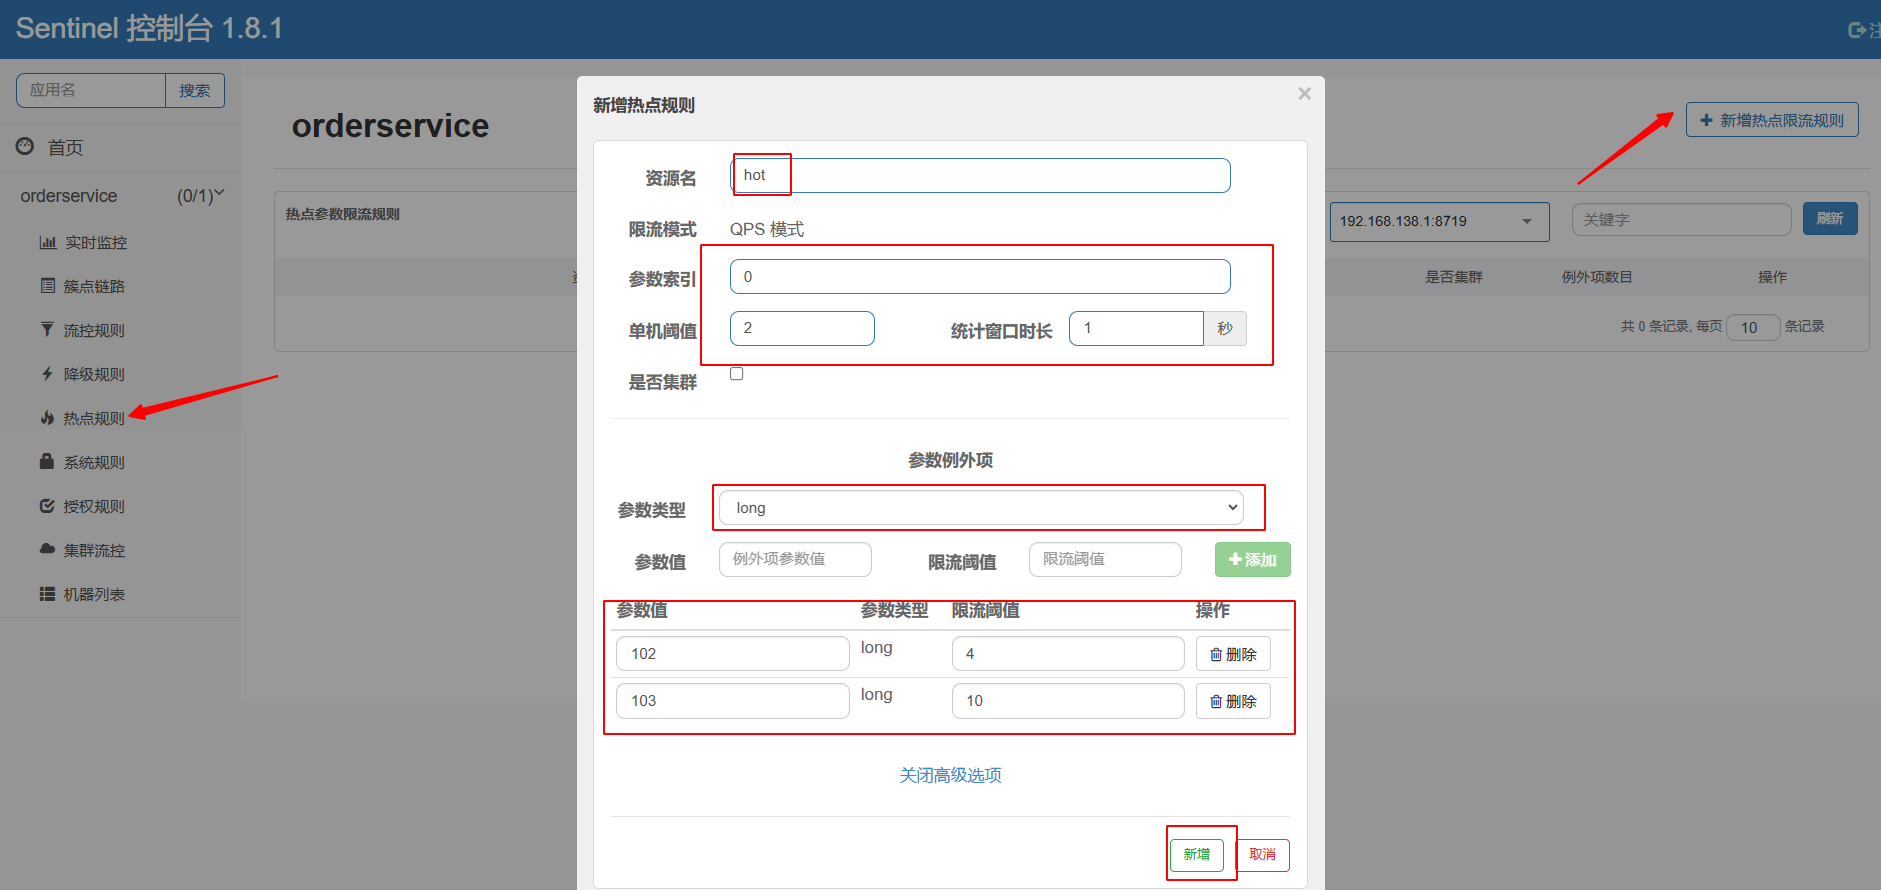
3.4 热点参数限流
之前的限流是统计访问某个资源的所有请求,判断是否超过QPS阈值。而热点参数限流是分别统计参数值相同的请求,判断是否超过QPS阈值。
配置示例:
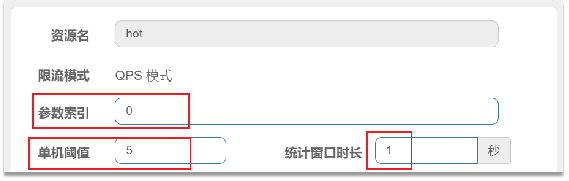
代表的含义是:对hot这个资源的0号参数(第一个参数)做统计,每1秒相同参数值的请求数不能超过5
在热点参数限流的高级选项中,可以对部分参数设置例外配置:
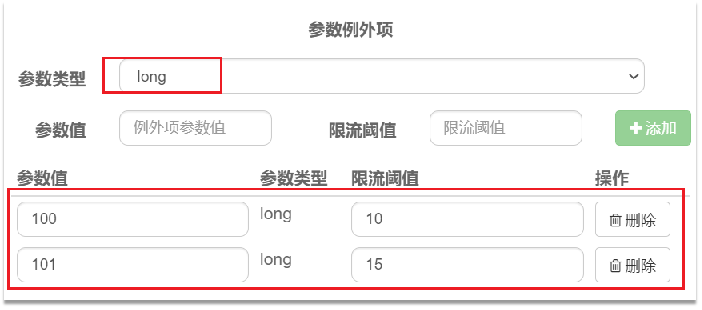
结合上一个配置,这里的含义是对0号的long类型参数限流,每1秒相同参数的QPS不能超过5,有两个例外:
如果参数值是100,则每1秒允许的QPS为10
如果参数值是101,则每1秒允许的QPS为15
配置案例:给/order/{orderId}这个资源添加热点参数限流,规则如下:
- 默认的热点参数规则是每1秒请求量不超过2
- 给102这个参数设置例外:每1秒请求量不超过4
- 给103这个参数设置例外:每1秒请求量不超过10
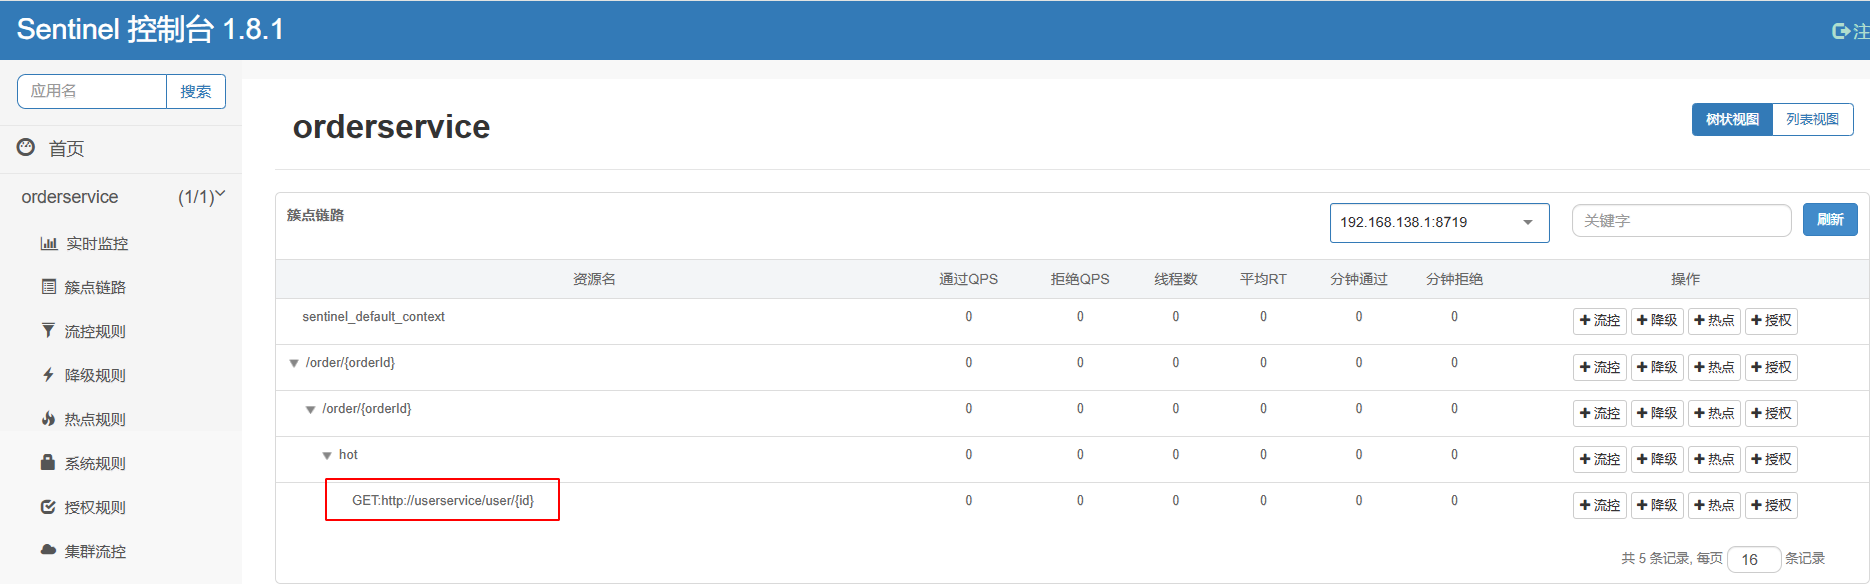
注意:热点参数限流对默认的SpringMVC资源无效,其中 /order/{orderId} 这个资源即为默认资源,配置是无效的,只有sentinel注解配置资源才生效
@SentinelResource("hot")
@GetMapping("{orderId}")
public Order queryOrderByUserId(@PathVariable("orderId") Long orderId) {
    // 根据id查询订单并返回
    return orderService.queryOrderById(orderId);
}
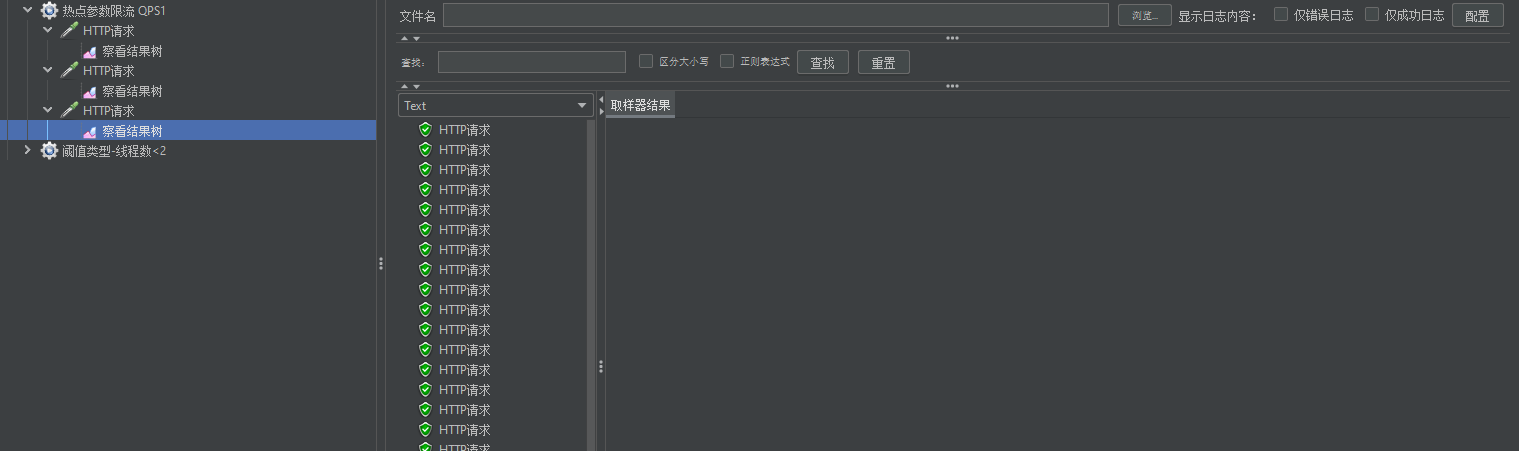
我们使用jmeter进行测试,发现101的被限流

102参数的也被限流,但是限流没有101热点参数那么多
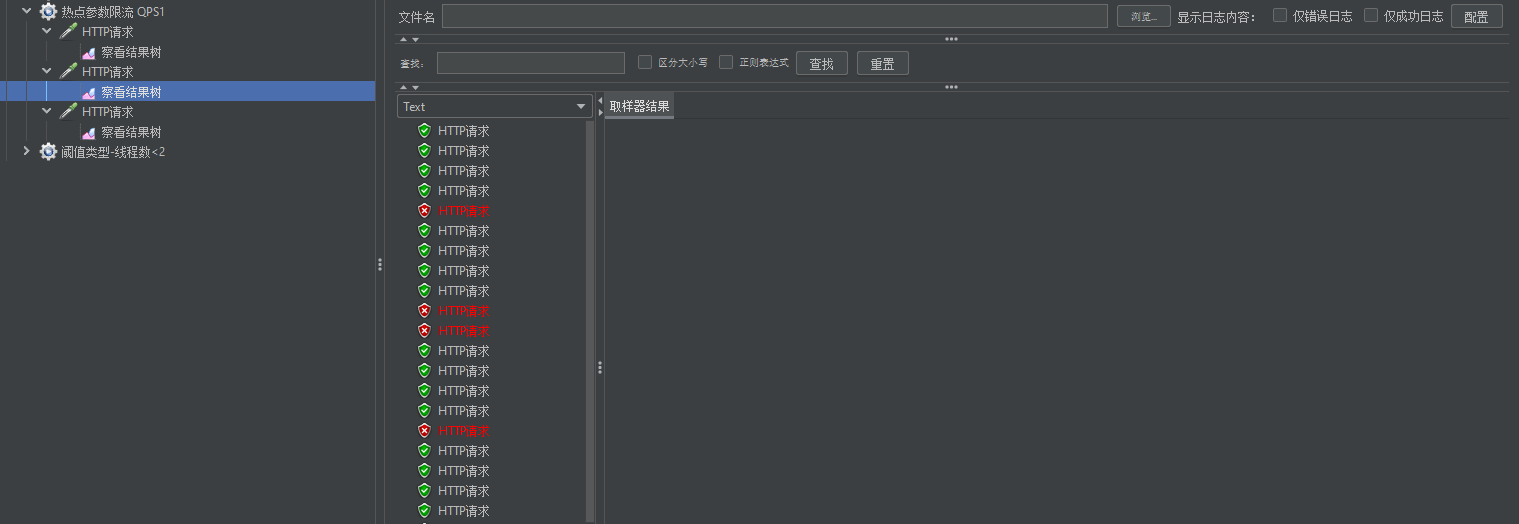
103参数的没有被限流
4.隔离和降级
降级于隔离主要包含以下部分
- FeignClient整合Sentinel
- 线程隔离(舱壁模式)
- 熔断降级
隔离和降级
虽然限流可以尽量避免因高并发而引起的服务故障,但服务还会因为其它原因而故障。而要将这些故障控制在一定范围,避免雪崩,就要靠线程隔离(舱壁模式)和熔断降级手段了。不管是线程隔离还是熔断降级,都是对客户端(调用方)的保护。
线程隔离工作流程原理

熔断降级工作流程原理

4.1 FeignClient整合Sentinel
SpringCloud中,微服务调用都是通过Feign来实现的,因此做客户端保护必须整合Feign和Sentinel。
修改OrderService的application.yml文件,开启Feign的Sentinel功能
feign:
  sentinel:
  	# 开启Feign的Sentinel功能
    enabled: true
给FeignClient编写失败后的降级逻辑
方式一:FallbackClass,无法对远程调用的异常做处理
方式二:FallbackFactory,可以对远程调用的异常做处理,我们选择这种
具体降级逻辑的实现步骤如下:
步骤1:在feing-api项目中定义类,实现FallbackFactory:
@Slf4j
public class UserClientFallbackFactory implements FallbackFactory<UserClient> {
	@Override
	public UserClient create(Throwable throwable) {
		// 创建UserClient接口实现类,实现其中的方法,编写失败降级的处理逻辑
		return new UserClient() {
			@Override
			public User findById(Long id) {
				// 记录异常信息
				log.error("查询用户失败", throwable);
				// 根据业务需求返回默认的数据,这里是空用户
				return new User();
			}
		};
	}
}
步骤2:在feing-api项目中的DefaultFeignConfiguration类中将UserClientFallbackFactory注册为一个Bean
@Bean
public UserClientFallbackFactory userClientFallback(){
	return new UserClientFallbackFactory();
}
步骤三:在feing-api项目中的UserClient接口中使用UserClientFallbackFactory:
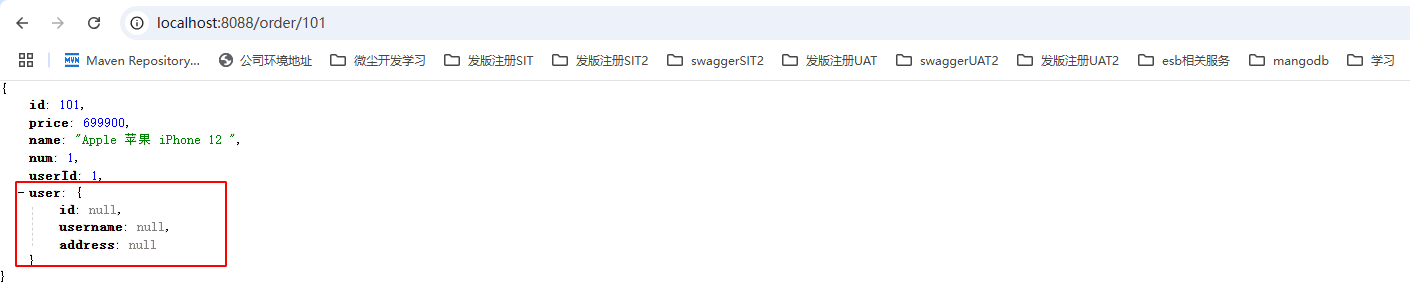
@FeignClient(value = "userservice", fallbackFactory = UserClientFallbackFactory.class)
public interface UserClient {
	@GetMapping("/user/{id}")
	User findById(@PathVariable("id") Long id);
}
重启服务,控制台观察feign接口已经被注册为资源信息
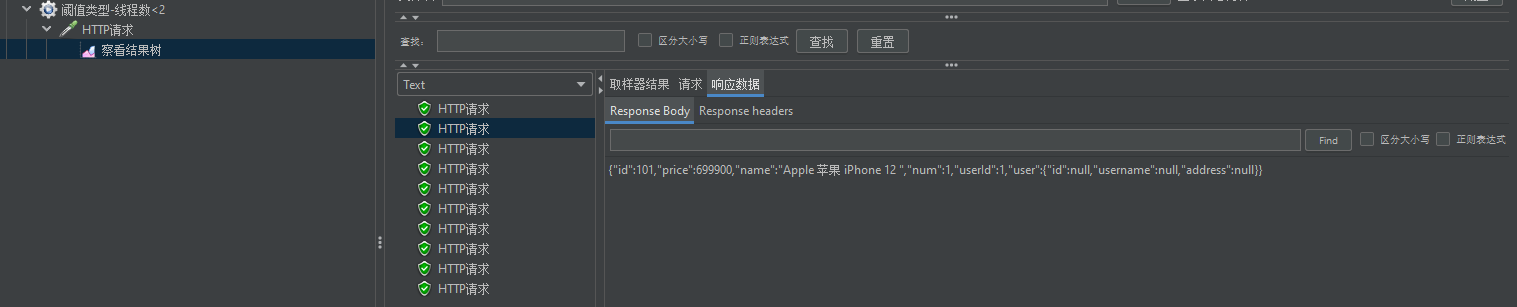
简单配置了限流规则,之后访问测试 http://localhost:8088/order/101,多次刷新请求,发现user信息返回空user
阶段总结
Sentinel支持的雪崩解决方案:
- 线程隔离(仓壁模式)
- 降级熔断
Feign整合Sentinel的步骤:
- 在application.yml中配置:feign.sentienl.enable=true
- 给FeignClient编写FallbackFactory并注册为Bean
- 将FallbackFactory配置到FeignClient
4.2 线程隔离
线程隔离有两种方式实现:
线程池隔离
信号量隔离(Sentinel默认采用)
两个具体的工作模式对比如下:

线程池隔离优缺点:
- 优点:支持主动超时,支持异步调用
- 缺点:线程的额外开销比较大
- 场景:低扇出(服务发散请求较低,对外依赖调用较少)
信号量隔离优缺点:
- 优点:轻量级,无额外开销
- 缺点:不支持主动超时,不支持异步调用
- 场景:高频调用,高扇出
如何实现线程隔离(舱壁模式):
- QPS:就是每秒的请求数,在快速入门中已经演示过
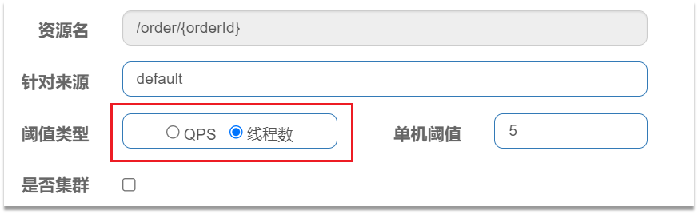
- 线程数:是该资源能使用用的tomcat线程数的最大值。也就是通过限制线程数量,实现舱壁模式。
配置案例:给 UserClient的查询用户接口设置流控规则,线程数不能超过 2。然后利用jemeter测试。

我们使用jemeter进行测试,发现少部分请求返回数据正常,大部分请求返回数据user信息为空
4.3 熔断降级
熔断降级是解决雪崩问题的重要手段。其思路是由断路器统计服务调用的异常比例、慢请求比例,如果超出阈值则会熔断该服务。即拦截访问该服务的一切请求;而当服务恢复时,断路器会放行访问该服务的请求。
熔断一共有三个状态,close,open以及half-open,三个状态转换的过程如下图所示:

断路器熔断策略有三种:慢调用、异常比例、异常数
4.3.1 慢调用
业务的响应时长(RT)大于指定时长的请求认定为慢调用请求。在指定时间内,如果请求数量超过设定的最小数量,慢调用比例大于设定的阈值,则触发熔断。例如:
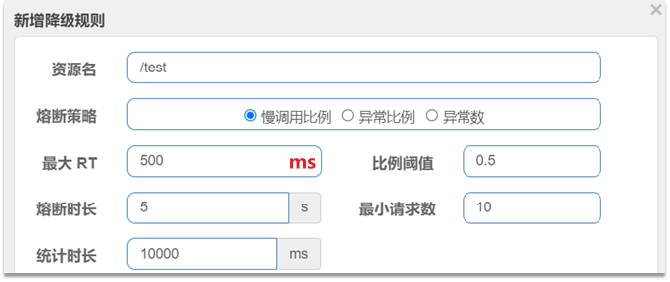
配置详解:RT超过500ms的调用是慢调用,统计最近10000ms内的请求,如果请求量超过10次,并且慢调用比例不低于0.5,则触发熔断,熔断时长为5秒。然后进入half-open状态,放行一次请求做测试。
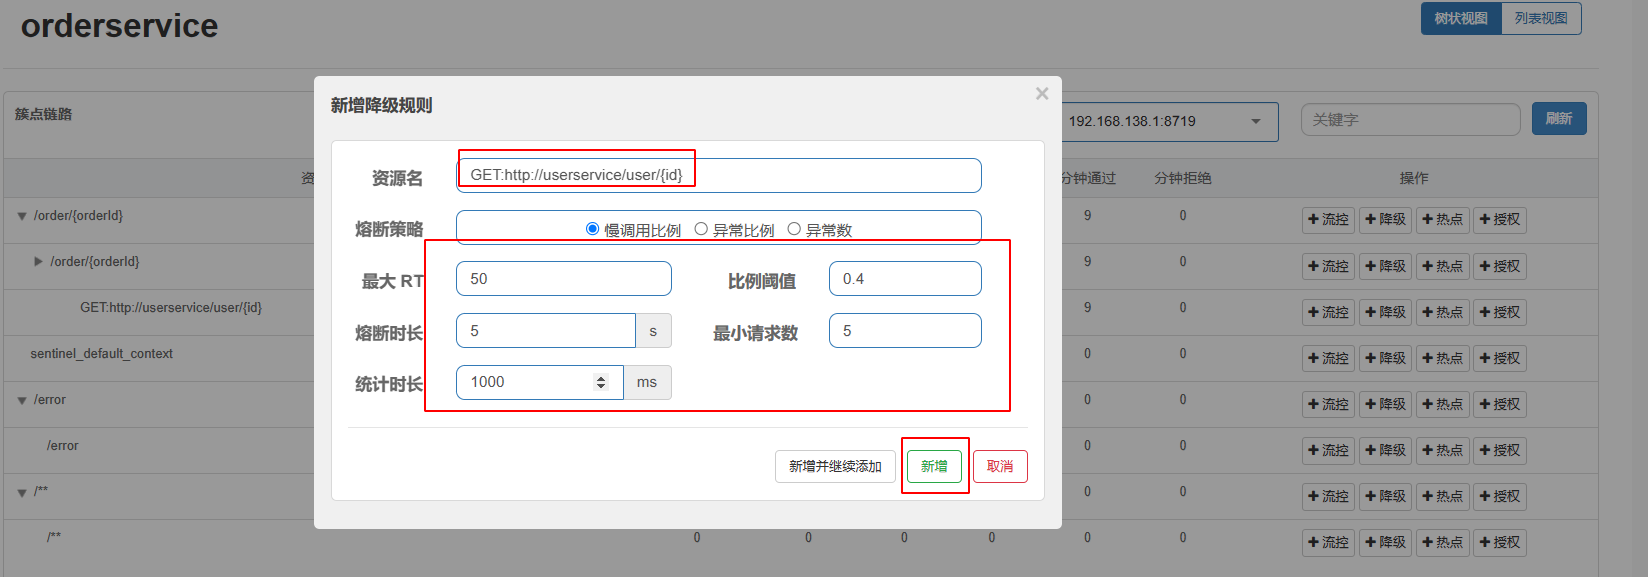
配置案例:给 UserClient的查询用户接口设置降级规则,慢调用的RT阈值为50ms,统计时间为1秒,最小请求数量为5,失败阈值比例为0.4,熔断时长为54
为了触发慢调用规则,我们需要修改UserService中的业务,增加业务耗时
@GetMapping("/{id}")
public User queryById(@PathVariable("id") Long id,
                      @RequestHeader(value = "Truth", required = false) String truth) throws InterruptedException {
    if (id == 1) {
        Thread.sleep(60);
    }
    System.out.println("truth: " + truth);
    return userService.queryById(id);
}
访问订单101信息,多次刷新,发现feign调用结果返回为空,被降级了,然后我们访问102订单信息,发现同样被降级了,正常情况下102访问非常快,现在接口降级熔断了,无法访问。
4.3.2 异常比例
异常比例或异常数:统计指定时间内的调用,如果调用次数超过指定请求数,并且出现异常的比例达到设定的比例阈值(或超过指定异常数),则触发熔断。例如:
统计最近1000ms内的请求,如果请求量超过10次,并且异常比例不低于0.5,则触发熔断,熔断时长为5秒。然后进入half-open状态,放行一次请求做测试。
配置案例:给 UserClient的查询用户接口设置降级规则,统计时间为1秒,最小请求数量为5,失败阈值比例为0.4,熔断时长为5s,为了触发异常统计,我们需要修改UserService中的业务,抛出异常:
@GetMapping("/{id}")
public User queryById(@PathVariable("id") Long id,
                      @RequestHeader(value = "Truth", required = false) String truth) throws InterruptedException {
    if (id == 1) {
        Thread.sleep(60);
    } else if (id == 2) {
        throw new RuntimeException("故意抛出异常,触发熔断操作");
    }
    System.out.println("truth: " + truth);
    return userService.queryById(id);
}

开始调用接口访问102资源5次,触发接口的熔断降级,然后再次访问103接口,发现无法访问,因为接口降级了,快速失败

总结:Sentinel熔断降级的策略有哪些?
- 慢调用比例:超过指定时长的调用为慢调用,统计单位时长内慢调用的比例,超过阈值则熔断
- 异常比例:统计单位时长内异常调用的比例,超过阈值则熔断
- 异常数:统计单位时长内异常调用的次数,超过阈值则熔断
5.授权规则
此部分主要包含如下内容操作
- 授权规则
- 自定义异常结果
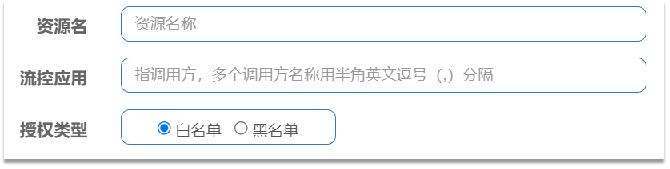
5.1 授权规则
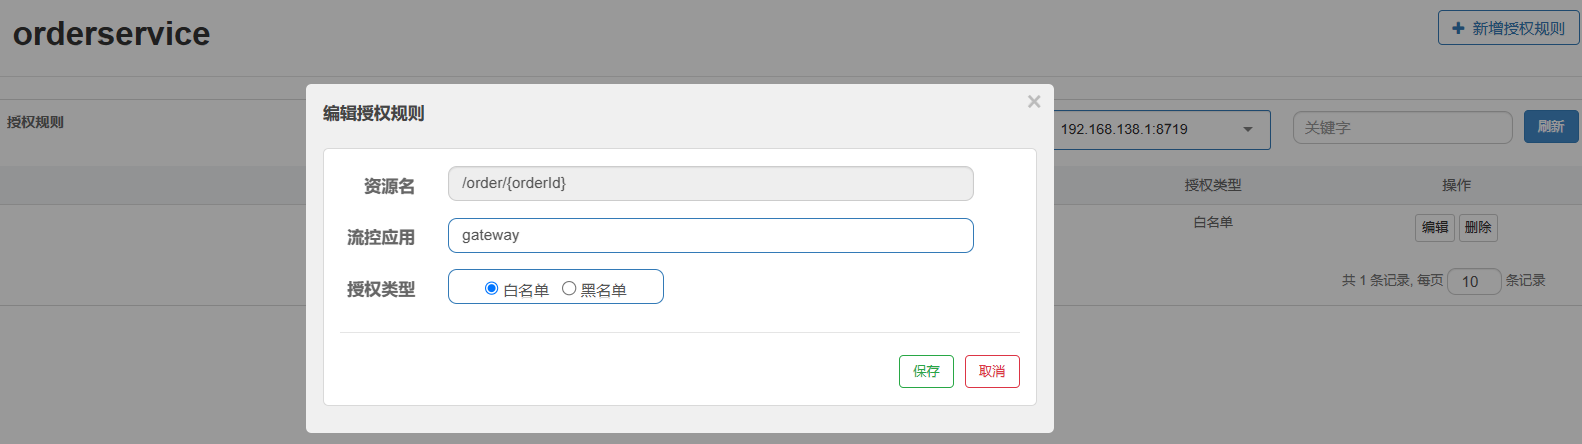
授权规则可以对调用方的来源做控制,有白名单和黑名单两种方式。
- 白名单:来源(origin)在白名单内的调用者允许访问
- 黑名单:来源(origin)在黑名单内的调用者不允许访问
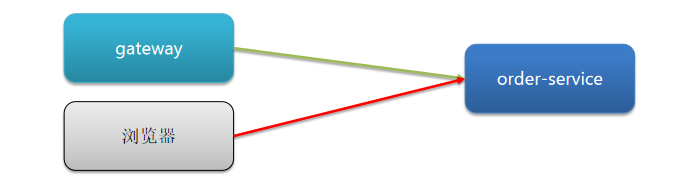
例如,我们限定只允许从网关来的请求访问order-service,那么流控应用中就填写网关的名称
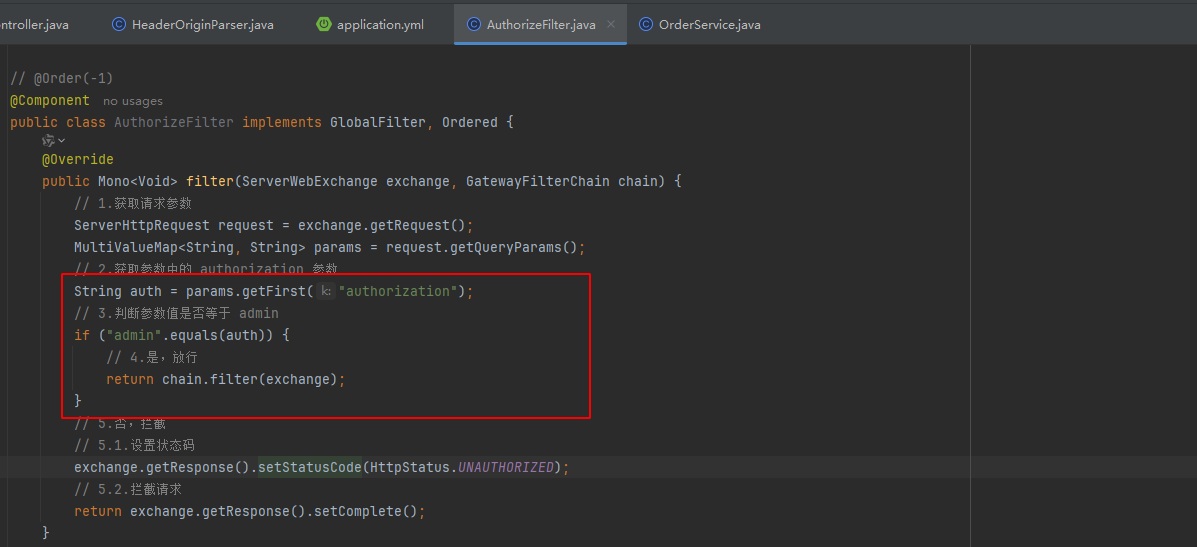
Sentinel是通过RequestOriginParser这个接口的parseOrigin来获取请求的来源的。
public interface RequestOriginParser {
	 /**
	  * 从请求request对象中获取origin,获取方式自定义
	  */
	 String parseOrigin(HttpServletRequest request);
 }
例如,我们尝试从request中获取一个名为origin的请求头,作为origin的值:
@Component
public class HeaderOriginParser implements RequestOriginParser {
	@Override
	public String parseOrigin(HttpServletRequest request) {
			String origin = request.getHeader("origin");
			if(StringUtils.isEmpty(origin)){
				return "blank";
			}
			return origin;
	}
}
我们还需要在gateway服务中,利用网关的过滤器添加名为gateway的origin头:
spring:
  cloud:
	gateway:
	  default-filters:
	    # 添加名为origin的请求头,值为gateway
	    - AddRequestHeader=origin,gateway
添加完了之后,我们发现从浏览器直接访问order信息已经被限制了

我们从网关访问 http://localhost:10010/order/101?authorization=admin 发现正常访问
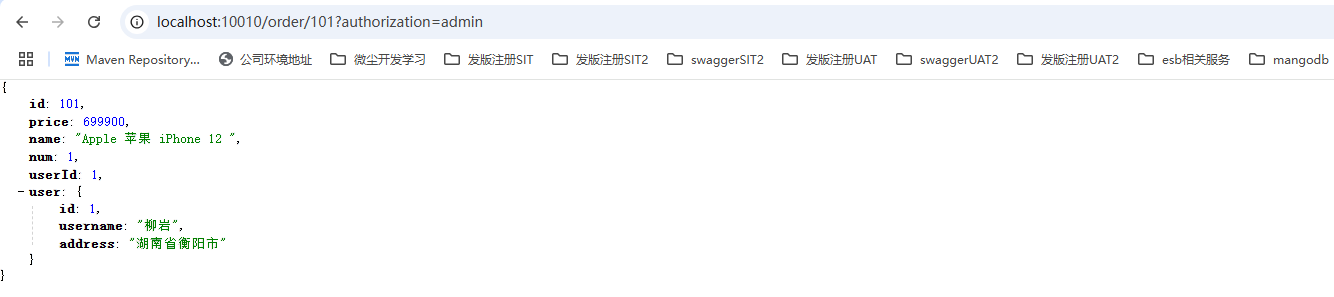
其中网关请求路径后面的authorization=admin为一个简单的权限校验
5.2 自定义异常
默认情况下,发生限流、降级、授权拦截时,都会抛出异常到调用方。如果要自定义异常时的返回结果,需要实现BlockExceptionHandler接口:
public interface BlockExceptionHandler {

     /**
	  * 处理请求被限流、降级、授权拦截时抛出的异常:BlockException
      */
	 void handle(HttpServletRequest request, HttpServletResponse response, BlockException e) throws Exception;
}
而BlockException包含很多个子类,分别对应不同的场景:
| 异常 | 说明 |
|---|---|
| FlowException | 限流异常 |
| ParamFlowException | 热点参数限流的异常 |
| DegradeException | 降级异常 |
| AuthorityException | 授权规则异常 |
| SystemBlockException | 系统规则异常 |
我们在order-service中定义类,实现BlockExceptionHandler接口:
package cn.itcast.order.exception;

import com.alibaba.csp.sentinel.adapter.spring.webmvc.callback.BlockExceptionHandler;
import com.alibaba.csp.sentinel.slots.block.BlockException;
import com.alibaba.csp.sentinel.slots.block.authority.AuthorityException;
import com.alibaba.csp.sentinel.slots.block.degrade.DegradeException;
import com.alibaba.csp.sentinel.slots.block.flow.FlowException;
import com.alibaba.csp.sentinel.slots.block.flow.param.ParamFlowException;
import org.springframework.stereotype.Component;

import javax.servlet.http.HttpServletRequest;
import javax.servlet.http.HttpServletResponse;

@Component
public class SentinelBlockHandler implements BlockExceptionHandler {
    @Override
    public void handle(HttpServletRequest httpServletRequest,
                       HttpServletResponse httpServletResponse, BlockException e) throws Exception {
        String msg = "未知异常";
        int status = 429;
        if (e instanceof FlowException) {
            msg = "请求被限流了!";
        } else if (e instanceof DegradeException) {
            msg = "请求被降级了!";
        } else if (e instanceof ParamFlowException) {
            msg = "热点参数限流!";
        } else if (e instanceof AuthorityException) {
            msg = "请求没有权限!";
            status = 401;
        }

        httpServletResponse.setContentType("application/json;charset=utf-8");
        httpServletResponse.setStatus(status);
        httpServletResponse.getWriter().println("{\"message\": \"" + msg + "\", \"status\": " + status + "}");
    }
}
设置之后,我们再重启服务,设置/order/{id}资源的流控为qps 1,多次点击浏览器发现访问响应自定义异常信息

添加一个授权规则,再次进行访问发现提示没有权限信息

总结:获取请求来源的接口是什么?处理BlockException的接口是什么?
- RequestOriginParser
- BlockExceptionHandler
6.规则持久化
此部分规则持久化分为两部分操作:
- 规则管理模式
- 实现push模式
6.1 规则管理模式
Sentinel的控制台规则管理有三种模式:
| 模式 | 说明 | 优点 | 缺点 |
|---|---|---|---|
| 原始模式 | API 将规则推送至客户端并直接更新到内存中,扩展写数据源(WritableDataSource),默认就是这种 | 简单,无任何依赖 | 不保证一致性;规则保存在内存中,重启即消失。严重不建议用于生产环境 |
| Pull 模式 | 扩展写数据源(WritableDataSource), 客户端主动向某个规则管理中心定期轮询拉取规则,这个规则中心可以是 RDBMS、文件 等 | 简单,无任何依赖;规则持久化 | 不保证一致性;实时性不保证,拉取过于频繁也可能会有性能问题。 |
| Push 模式 | 扩展读数据源(ReadableDataSource),规则中心统一推送,客户端通过注册监听器的方式时刻监听变化,比如使用 Nacos、Zookeeper 等配置中心。这种方式有更好的实时性和一致性保证。生产环境下一般采用push模式的数据源。 | 规则持久化;一致性; | 引入第三方依赖 |
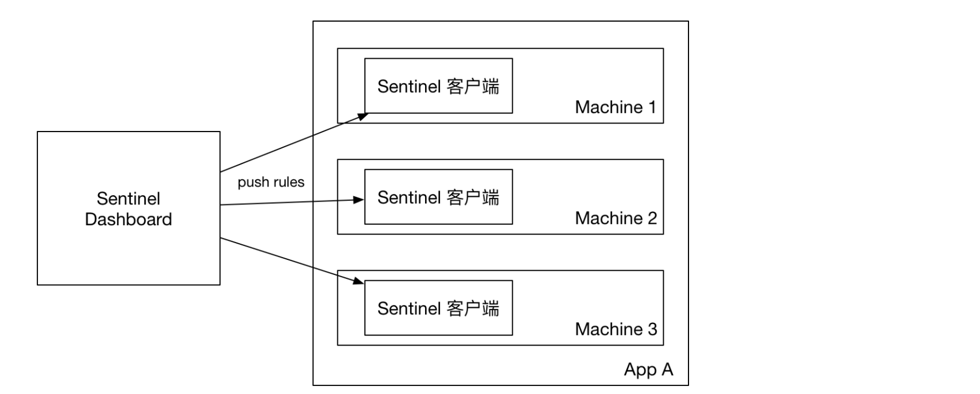
6.1.1 原始模式
原始模式:控制台配置的规则直接推送到Sentinel客户端,也就是我们的应用。然后保存在内存中,服务重启则丢失
6.1.2 pull模式
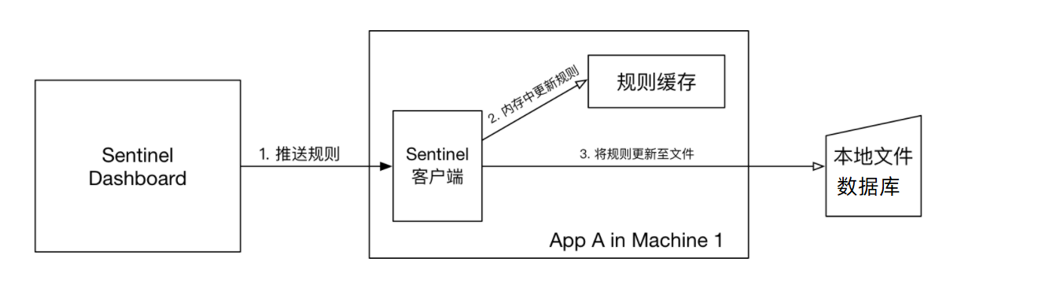
pull模式:控制台将配置的规则推送到Sentinel客户端,而客户端会将配置规则保存在本地文件或数据库中。以后会定时去本地文件或数据库中查询,更新本地规则。
6.1.3 push模式
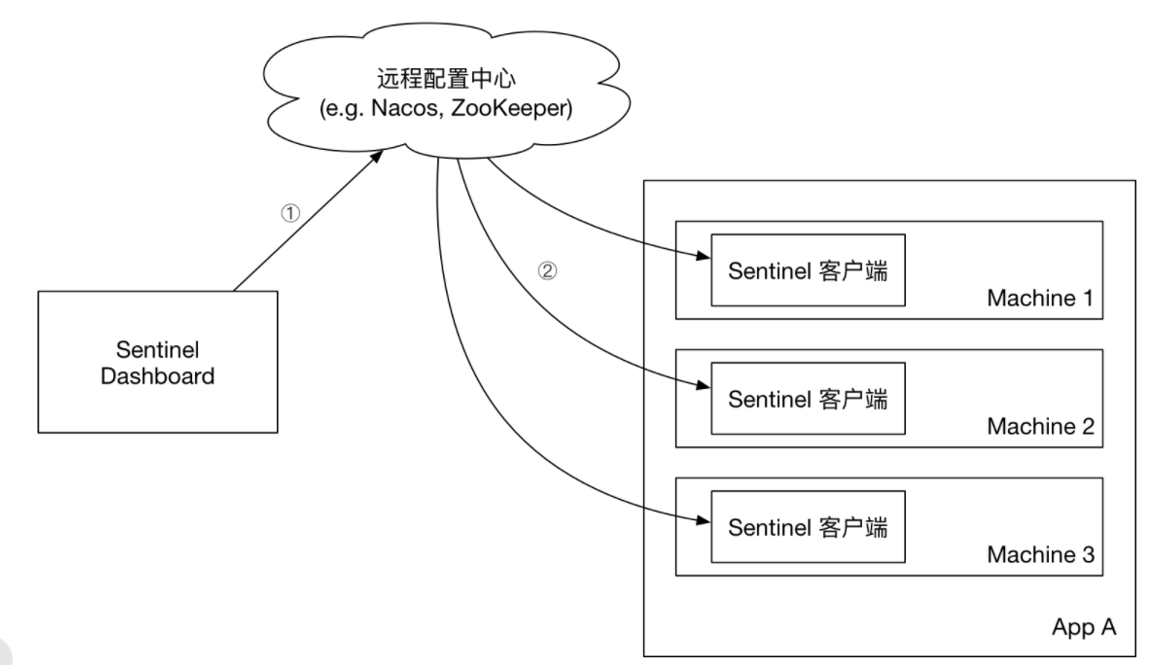
push模式:控制台将配置规则推送到远程配置中心,例如Nacos。Sentinel客户端监听Nacos,获取配置变更的推送消息,完成本地配置更新。
总结:Sentinel的三种配置管理模式是什么?
- 原始模式:保存在内存
- pull模式:保存在本地文件或数据库,定时去读取
- push模式:保存在nacos,监听变更实时更新
6.2 push 模式规则持久化
此部分分为两部分,一部分服务端sentinel包修改,一部分客户端修改
6.1 客户端修改
具体步骤如下:
引入依赖
在order-service中引入sentinel监听nacos的依赖:
<dependency>
    <groupId>com.alibaba.csp</groupId>
    <artifactId>sentinel-datasource-nacos</artifactId>
</dependency>
配置nacos地址
在order-service中的application.yml文件配置nacos地址及监听的配置信息:
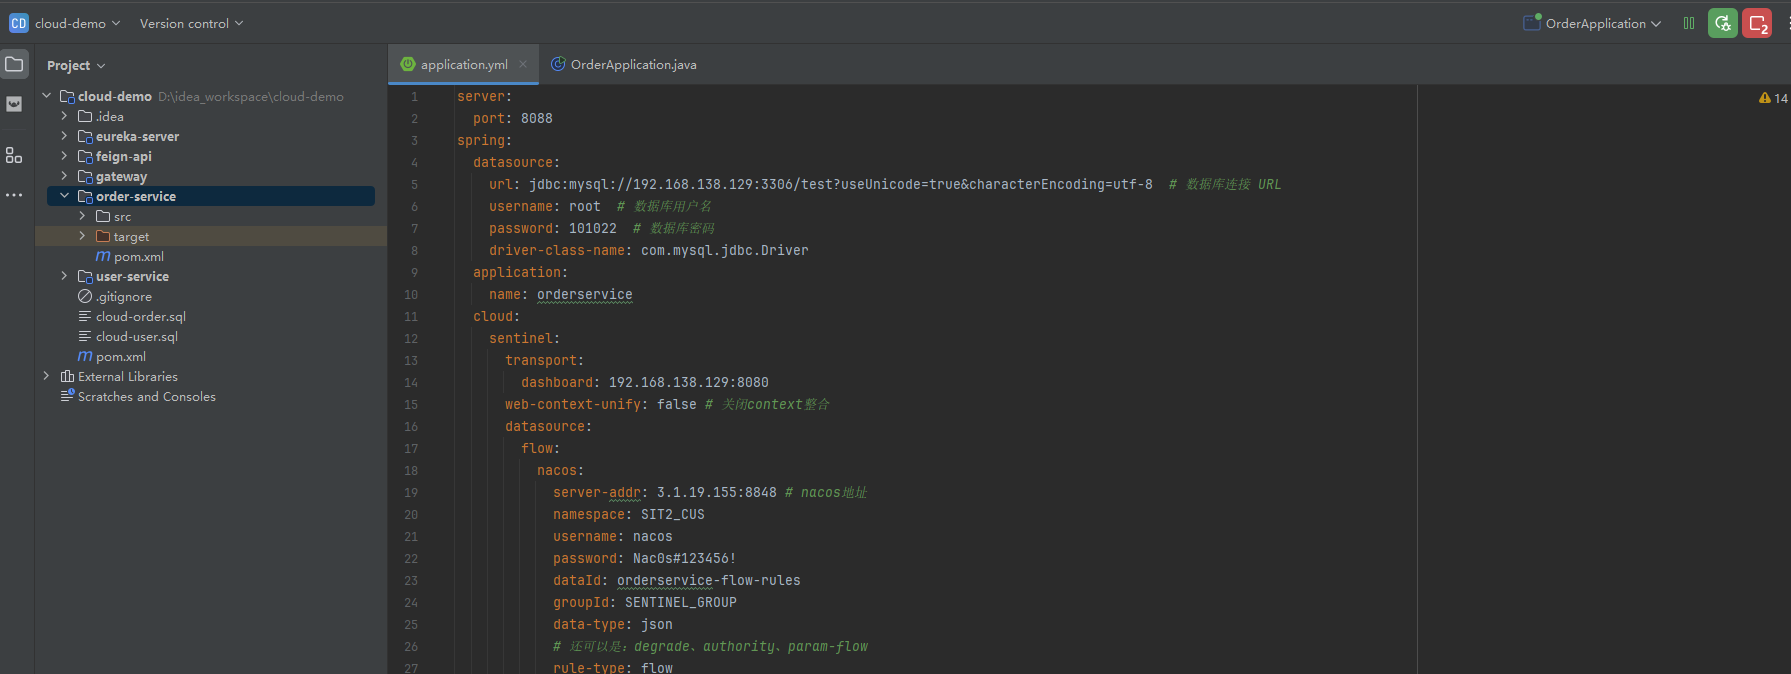
spring:
  datasource:
    url: jdbc:mysql://192.168.138.129:3306/test?useUnicode=true&characterEncoding=utf-8  # 数据库连接 URL
    username: root  # 数据库用户名
    password: 101022  # 数据库密码
    driver-class-name: com.mysql.jdbc.Driver
  application:
    name: orderservice
  cloud:
    sentinel:
      transport:
        dashboard: 192.168.138.129:8080
      web-context-unify: false # 关闭context整合
      datasource:
        flow:
          nacos:
            server-addr: 3.1.19.155:8848 # nacos地址
            namespace: SIT2_CUS
            username: nacos
            password: Nac0s#123456!
            dataId: orderservice-flow-rules
            groupId: SENTINEL_GROUP
            data-type: json
            # 还可以是:degrade、authority、param-flow
            rule-type: flow
        degrade:
          nacos:
            server-addr: 3.1.19.155:8848 # nacos地址
            namespace: SIT2_CUS
            username: nacos
            password: Nac0s#123456!
            dataId: orderservice-degrade-rule
            groupId: SENTINEL_GROUP
            data-type: json
            # 还可以是:degrade、authority、param-flow
            rule-type: degrade
    nacos:
      username: nacos
      password: Nac0s#123456!
      discovery:
        server-addr: 3.1.19.155:8848
        namespace: SIT2_CUS
      config:
        server-addr: 3.1.19.155:8848 # nacos的服务端地址
        file-extension: yml # 配置文件格式
        group: GIT_GROUP
        namespace: SIT2_CUS
        ext-config:
          - data-id: git-common-config-sit2.yml
            group: GIT_GROUP
            refresh: true
            namespace: SIT2_CUS
6.2 sentinel服务端修改
6.2.1 下载sentinel包
我们修改使用sentinel1.8.6版本包,具体的下载地址为 https://github.com/alibaba/Sentinel/releases/tag/1.8.6
6.2.2 本地编译
编译之前,我们需要修改项目中所有的 sentinel-datasource-nacos pom包,删除其 <scope>test</scope>
<!-- 将以下依赖的 scope 注释掉 -->
<dependency>
    <groupId>com.alibaba.csp</groupId>
    <artifactId>sentinel-datasource-nacos</artifactId>
    <version>1.8.6</version>
    <scope>test</scope>
</dependency>
6.2.3 编辑nacos链接信息
修改dashboard的application.properties文件,新增nacos链接信息
# Sentinel nacos setting
sentinel.nacos.username=nacos
sentinel.nacos.password=Nac0s#123456!
sentinel.nacos.namespace=SIT2_CUS
sentinel.nacos.server-addr=3.1.19.155:8848
6.2.4 配置类编辑
复制dashborad对应com.alibaba.csp.sentinel.dashboard.rule.nacos 目录下的类到对应目录
编辑NacosConfig类
package com.alibaba.csp.sentinel.dashboard.rule;

import com.alibaba.csp.sentinel.dashboard.datasource.entity.rule.DegradeRuleEntity;
import com.alibaba.csp.sentinel.dashboard.datasource.entity.rule.FlowRuleEntity;
import com.alibaba.csp.sentinel.datasource.Converter;
import com.alibaba.fastjson.JSON;
import com.alibaba.nacos.api.PropertyKeyConst;
import com.alibaba.nacos.api.config.ConfigFactory;
import com.alibaba.nacos.api.config.ConfigService;
import org.springframework.context.annotation.Bean;
import org.springframework.context.annotation.Configuration;

import java.util.List;
import java.util.Properties;

/**
 * @author Eric Zhao
 * @since 1.4.0
 */
@Configuration
public class NacosConfig {

    @Bean
    public Converter<List<FlowRuleEntity>, String> flowRuleEntityEncoder() {
        return JSON::toJSONString;
    }

    @Bean
    public Converter<String, List<FlowRuleEntity>> flowRuleEntityDecoder() {
        return s -> JSON.parseArray(s, FlowRuleEntity.class);
    }

    @Bean
    public Converter<List<DegradeRuleEntity>, String> degradeRuleEntityEncoder() {
        return JSON::toJSONString;
    }

    @Bean
    public Converter<String, List<DegradeRuleEntity>> degradeRuleEntityDecoder() {
        return s -> JSON.parseArray(s, DegradeRuleEntity.class);
    }

    @Bean
    public ConfigService nacosConfigService(NacosPropertiesConfiguration nacosPropertiesConfiguration) throws Exception {
        Properties properties = new Properties();
        properties.put(PropertyKeyConst.SERVER_ADDR, nacosPropertiesConfiguration.getServerAddr());
        properties.put(PropertyKeyConst.NAMESPACE, nacosPropertiesConfiguration.getNamespace());
        properties.put(PropertyKeyConst.USERNAME, nacosPropertiesConfiguration.getUsername());
        properties.put(PropertyKeyConst.PASSWORD, nacosPropertiesConfiguration.getPassword());
        return ConfigFactory.createConfigService(properties);
    }
}
编辑NacosConfigUtil类
package com.alibaba.csp.sentinel.dashboard.rule;

/**
 * @author Eric Zhao
 * @since 1.4.0
 */
public final class NacosConfigUtil {

    public static final String GROUP_ID = "SENTINEL_GROUP";

    public static final String FLOW_DATA_ID_POSTFIX = "-flow-rules";
    // lxc 新增降级逻辑文件尾缀
    public static final String DEGRADE_DATA_ID_POSTFIX = "-degrade-rule";
    public static final String PARAM_FLOW_DATA_ID_POSTFIX = "-param-rules";
    public static final String CLUSTER_MAP_DATA_ID_POSTFIX = "-cluster-map";

    /**
     * cc for `cluster-client`
     */
    public static final String CLIENT_CONFIG_DATA_ID_POSTFIX = "-cc-config";
    /**
     * cs for `cluster-server`
     */
    public static final String SERVER_TRANSPORT_CONFIG_DATA_ID_POSTFIX = "-cs-transport-config";
    public static final String SERVER_FLOW_CONFIG_DATA_ID_POSTFIX = "-cs-flow-config";
    public static final String SERVER_NAMESPACE_SET_DATA_ID_POSTFIX = "-cs-namespace-set";

    private NacosConfigUtil() {}
}
新增nacos配置信息读取类 NacosPropertiesConfiguration
package com.alibaba.csp.sentinel.dashboard.rule;

import org.springframework.boot.context.properties.ConfigurationProperties;
import org.springframework.context.annotation.Configuration;

/**
 * @description: nacos配置类
 * @program: bank-credit-sy
 * @author: lixuchun
 * @create: 2024-12-06
 */
@Configuration
@ConfigurationProperties(prefix = "sentinel.nacos")
public class NacosPropertiesConfiguration {

    private String serverAddr;
    private String dataId;
    private String groupId;
    private String namespace;
    private String username;
    private String password;

    public String getServerAddr() {
        return serverAddr;
    }

    public void setServerAddr(String serverAddr) {
        this.serverAddr = serverAddr;
    }

    public String getDataId() {
        return dataId;
    }

    public void setDataId(String dataId) {
        this.dataId = dataId;
    }

    public String getGroupId() {
        return groupId;
    }

    public void setGroupId(String groupId) {
        this.groupId = groupId;
    }

    public String getNamespace() {
        return namespace;
    }

    public void setNamespace(String namespace) {
        this.namespace = namespace;
    }

    public String getUsername() {
        return username;
    }

    public void setUsername(String username) {
        this.username = username;
    }

    public String getPassword() {
        return password;
    }

    public void setPassword(String password) {
        this.password = password;
    }
}
编辑flow目录下的provider以及publish类
FlowRuleNacosProvider
package com.alibaba.csp.sentinel.dashboard.rule.flow;

import com.alibaba.csp.sentinel.dashboard.datasource.entity.rule.FlowRuleEntity;
import com.alibaba.csp.sentinel.dashboard.rule.DynamicRuleProvider;
import com.alibaba.csp.sentinel.dashboard.rule.NacosConfigUtil;
import com.alibaba.csp.sentinel.datasource.Converter;
import com.alibaba.csp.sentinel.util.StringUtil;
import com.alibaba.nacos.api.config.ConfigService;
import org.springframework.beans.factory.annotation.Autowired;
import org.springframework.stereotype.Component;

import java.util.ArrayList;
import java.util.List;

/**
 * @author Eric Zhao
 * @since 1.4.0
 */
@Component("flowRuleNacosProvider")
public class FlowRuleNacosProvider implements DynamicRuleProvider<List<FlowRuleEntity>> {

    @Autowired
    private ConfigService configService;

    @Autowired
    private Converter<String, List<FlowRuleEntity>> converter;

    @Override
    public List<FlowRuleEntity> getRules(String appName) throws Exception {
        String rules = configService.getConfig(appName + NacosConfigUtil.FLOW_DATA_ID_POSTFIX,
            NacosConfigUtil.GROUP_ID, 3000);
        if (StringUtil.isEmpty(rules)) {
            return new ArrayList<>();
        }
        return converter.convert(rules);
    }
}
FlowRuleNacosPublisher
package com.alibaba.csp.sentinel.dashboard.rule.flow;

import com.alibaba.csp.sentinel.dashboard.datasource.entity.rule.FlowRuleEntity;
import com.alibaba.csp.sentinel.dashboard.rule.DynamicRulePublisher;
import com.alibaba.csp.sentinel.dashboard.rule.NacosConfigUtil;
import com.alibaba.csp.sentinel.datasource.Converter;
import com.alibaba.csp.sentinel.util.AssertUtil;
import com.alibaba.nacos.api.config.ConfigService;
import com.alibaba.nacos.api.config.ConfigType;
import org.springframework.beans.factory.annotation.Autowired;
import org.springframework.stereotype.Component;

import java.util.List;

/**
 * @author Eric Zhao
 * @since 1.4.0
 */
@Component("flowRuleNacosPublisher")
public class FlowRuleNacosPublisher implements DynamicRulePublisher<List<FlowRuleEntity>> {

    @Autowired
    private ConfigService configService;
    @Autowired
    private Converter<List<FlowRuleEntity>, String> converter;

    @Override
    public void publish(String app, List<FlowRuleEntity> rules) throws Exception {
        AssertUtil.notEmpty(app, "app name cannot be empty");
        if (rules == null) {
            return;
        }
        configService.publishConfig(app + NacosConfigUtil.FLOW_DATA_ID_POSTFIX,
                NacosConfigUtil.GROUP_ID, converter.convert(rules), ConfigType.JSON.getType());
    }
}
新增DegradeRuleNacosProvider以及DegradeRuleNacosPublisher
DegradeRuleNacosProvider
package com.alibaba.csp.sentinel.dashboard.rule.degrade;

import com.alibaba.csp.sentinel.dashboard.datasource.entity.rule.DegradeRuleEntity;
import com.alibaba.csp.sentinel.dashboard.datasource.entity.rule.FlowRuleEntity;
import com.alibaba.csp.sentinel.dashboard.rule.DynamicRuleProvider;
import com.alibaba.csp.sentinel.dashboard.rule.NacosConfigUtil;
import com.alibaba.csp.sentinel.datasource.Converter;
import com.alibaba.csp.sentinel.util.StringUtil;
import com.alibaba.nacos.api.config.ConfigService;
import org.springframework.beans.factory.annotation.Autowired;
import org.springframework.stereotype.Component;

import java.util.ArrayList;
import java.util.List;

/**
 * @author Eric Zhao
 * @since 1.4.0
 */
@Component("degradeRuleNacosProvider")
public class DegradeRuleNacosProvider implements DynamicRuleProvider<List<DegradeRuleEntity>> {

    @Autowired
    private ConfigService configService;
    @Autowired
    private Converter<String, List<DegradeRuleEntity>> converter;

    @Override
    public List<DegradeRuleEntity> getRules(String appName) throws Exception {
        String rules = configService.getConfig(appName + NacosConfigUtil.DEGRADE_DATA_ID_POSTFIX,
            NacosConfigUtil.GROUP_ID, 3000);
        if (StringUtil.isEmpty(rules)) {
            return new ArrayList<>();
        }
        return converter.convert(rules);
    }
}
DegradeRuleNacosPublisher
package com.alibaba.csp.sentinel.dashboard.rule.degrade;

import com.alibaba.csp.sentinel.dashboard.datasource.entity.rule.DegradeRuleEntity;
import com.alibaba.csp.sentinel.dashboard.datasource.entity.rule.FlowRuleEntity;
import com.alibaba.csp.sentinel.dashboard.rule.DynamicRulePublisher;
import com.alibaba.csp.sentinel.dashboard.rule.NacosConfigUtil;
import com.alibaba.csp.sentinel.datasource.Converter;
import com.alibaba.csp.sentinel.util.AssertUtil;
import com.alibaba.nacos.api.config.ConfigService;
import com.alibaba.nacos.api.config.ConfigType;
import org.springframework.beans.factory.annotation.Autowired;
import org.springframework.stereotype.Component;

import java.util.List;

/**
 * @author Eric Zhao
 * @since 1.4.0
 */
@Component("degradeRuleNacosPublisher")
public class DegradeRuleNacosPublisher implements DynamicRulePublisher<List<DegradeRuleEntity>> {

    @Autowired
    private ConfigService configService;
    @Autowired
    private Converter<List<DegradeRuleEntity>, String> converter;

    @Override
    public void publish(String app, List<DegradeRuleEntity> rules) throws Exception {
        AssertUtil.notEmpty(app, "app name cannot be empty");
        if (rules == null) {
            return;
        }
        configService.publishConfig(app + NacosConfigUtil.DEGRADE_DATA_ID_POSTFIX,
                NacosConfigUtil.GROUP_ID, converter.convert(rules), ConfigType.JSON.getType());
    }
}
配置FlowControllerV2,修改配置信息如下:
@Autowired
@Qualifier("flowRuleNacosProvider")
private DynamicRuleProvider<List<FlowRuleEntity>> ruleProvider;

@Autowired
@Qualifier("flowRuleNacosPublisher")
private DynamicRulePublisher<List<FlowRuleEntity>> rulePublisher;
新增一个DegradeControllerV2替换原有DegradeController,原有DegradeController路径修改为/v1/
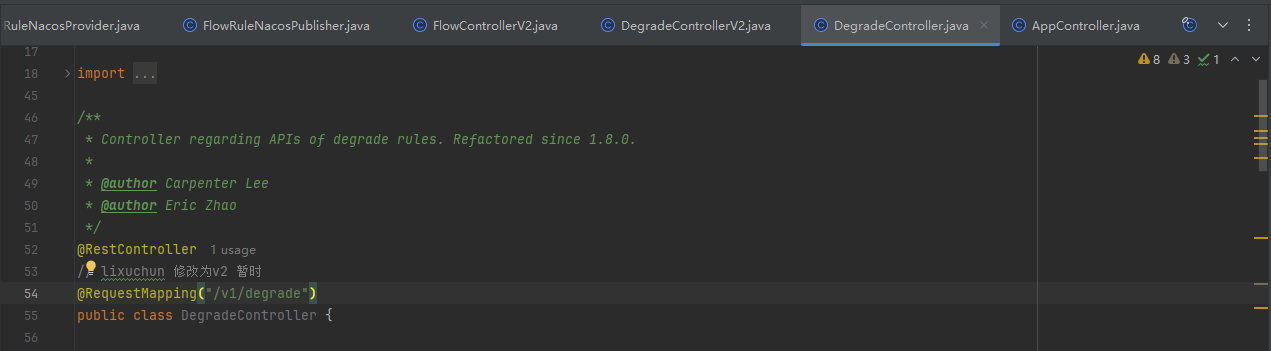
新增DegradeControllerV2在原有controller主要修改以下内容信息
查询规则时使用 degradeRuleProvider:
在 apiQueryMachineRules 方法中,你可以尝试从 degradeRuleProvider 获取规则,而不是直接从 sentinelApiClient 获取。发布规则时使用 degradeRulePublisher:
在 apiAddRule, apiUpdateRule, 和 delete 方法中,你可以调用 degradeRulePublisher 来发布规则变更。private boolean publishRules(String app, String ip, Integer port) throws Exception { List<DegradeRuleEntity> rules = repository.findAllByMachine(MachineInfo.of(app, ip, port)); // lxc修改 return sentinelApiClient.setDegradeRuleOfMachine(app, ip, port, rules); degradeRulePublisher.publish(app, rules); return true; }DegradeControllerV2内容信息为
package com.alibaba.csp.sentinel.dashboard.controller.v2;

import com.alibaba.csp.sentinel.dashboard.auth.AuthAction;
import com.alibaba.csp.sentinel.dashboard.auth.AuthService.PrivilegeType;
import com.alibaba.csp.sentinel.dashboard.client.SentinelApiClient;
import com.alibaba.csp.sentinel.dashboard.datasource.entity.rule.DegradeRuleEntity;
import com.alibaba.csp.sentinel.dashboard.discovery.AppManagement;
import com.alibaba.csp.sentinel.dashboard.discovery.MachineInfo;
import com.alibaba.csp.sentinel.dashboard.domain.Result;
import com.alibaba.csp.sentinel.dashboard.repository.rule.RuleRepository;
import com.alibaba.csp.sentinel.dashboard.rule.DynamicRuleProvider;
import com.alibaba.csp.sentinel.dashboard.rule.DynamicRulePublisher;
import com.alibaba.csp.sentinel.slots.block.RuleConstant;
import com.alibaba.csp.sentinel.slots.block.degrade.circuitbreaker.CircuitBreakerStrategy;
import com.alibaba.csp.sentinel.util.StringUtil;
import org.slf4j.Logger;
import org.slf4j.LoggerFactory;
import org.springframework.beans.factory.annotation.Autowired;
import org.springframework.beans.factory.annotation.Qualifier;
import org.springframework.web.bind.annotation.*;

import java.util.Date;
import java.util.List;

/**
 * Controller regarding APIs of degrade rules. Refactored since 1.8.0.
 *
 * @author Carpenter Lee
 * @author Eric Zhao
 */
@RestController
@RequestMapping("/degrade")
public class DegradeControllerV2 {

    private final Logger logger = LoggerFactory.getLogger(DegradeControllerV2.class);

    @Autowired
    private RuleRepository<DegradeRuleEntity, Long> repository;
    @Autowired
    private SentinelApiClient sentinelApiClient;
    @Autowired
    private AppManagement appManagement;

    @Autowired
    @Qualifier("degradeRuleNacosProvider")
    private DynamicRuleProvider<List<DegradeRuleEntity>> degradeRuleProvider;

    @Autowired
    @Qualifier("degradeRuleNacosPublisher")
    private DynamicRulePublisher<List<DegradeRuleEntity>> degradeRulePublisher;


    @GetMapping("/rules.json")
    @AuthAction(PrivilegeType.READ_RULE)
    public Result<List<DegradeRuleEntity>> apiQueryMachineRules(String app, String ip, Integer port) {
        if (StringUtil.isEmpty(app)) {
            return Result.ofFail(-1, "app can't be null or empty");
        }
        if (StringUtil.isEmpty(ip)) {
            return Result.ofFail(-1, "ip can't be null or empty");
        }
        if (port == null) {
            return Result.ofFail(-1, "port can't be null");
        }
        if (!appManagement.isValidMachineOfApp(app, ip)) {
            return Result.ofFail(-1, "given ip does not belong to given app");
        }
        try {
            // lxc修改 List<DegradeRuleEntity> rules = sentinelApiClient.fetchDegradeRuleOfMachine(app, ip, port);
            List<DegradeRuleEntity> rules = degradeRuleProvider.getRules(app);
            rules = repository.saveAll(rules);
            return Result.ofSuccess(rules);
        } catch (Throwable throwable) {
            logger.error("queryApps error:", throwable);
            return Result.ofThrowable(-1, throwable);
        }
    }

    @PostMapping("/rule")
    @AuthAction(PrivilegeType.WRITE_RULE)
    public Result<DegradeRuleEntity> apiAddRule(@RequestBody DegradeRuleEntity entity) throws Exception {
        Result<DegradeRuleEntity> checkResult = checkEntityInternal(entity);
        if (checkResult != null) {
            return checkResult;
        }
        Date date = new Date();
        entity.setGmtCreate(date);
        entity.setGmtModified(date);
        try {
            entity = repository.save(entity);
        } catch (Throwable t) {
            logger.error("Failed to add new degrade rule, app={}, ip={}", entity.getApp(), entity.getIp(), t);
            return Result.ofThrowable(-1, t);
        }
        if (!publishRules(entity.getApp(), entity.getIp(), entity.getPort())) {
            logger.warn("Publish degrade rules failed, app={}", entity.getApp());
        }
        return Result.ofSuccess(entity);
    }

    @PutMapping("/rule/{id}")
    @AuthAction(PrivilegeType.WRITE_RULE)
    public Result<DegradeRuleEntity> apiUpdateRule(@PathVariable("id") Long id,
                                                     @RequestBody DegradeRuleEntity entity) throws Exception {
        if (id == null || id <= 0) {
            return Result.ofFail(-1, "id can't be null or negative");
        }
        DegradeRuleEntity oldEntity = repository.findById(id);
        if (oldEntity == null) {
            return Result.ofFail(-1, "Degrade rule does not exist, id=" + id);
        }
        entity.setApp(oldEntity.getApp());
        entity.setIp(oldEntity.getIp());
        entity.setPort(oldEntity.getPort());
        entity.setId(oldEntity.getId());
        Result<DegradeRuleEntity> checkResult = checkEntityInternal(entity);
        if (checkResult != null) {
            return checkResult;
        }

        entity.setGmtCreate(oldEntity.getGmtCreate());
        entity.setGmtModified(new Date());
        try {
            entity = repository.save(entity);
        } catch (Throwable t) {
            logger.error("Failed to save degrade rule, id={}, rule={}", id, entity, t);
            return Result.ofThrowable(-1, t);
        }
        if (!publishRules(entity.getApp(), entity.getIp(), entity.getPort())) {
            logger.warn("Publish degrade rules failed, app={}", entity.getApp());
        }
        return Result.ofSuccess(entity);
    }

    @DeleteMapping("/rule/{id}")
    @AuthAction(PrivilegeType.DELETE_RULE)
    public Result<Long> delete(@PathVariable("id") Long id) throws Exception {
        if (id == null) {
            return Result.ofFail(-1, "id can't be null");
        }

        DegradeRuleEntity oldEntity = repository.findById(id);
        if (oldEntity == null) {
            return Result.ofSuccess(null);
        }

        try {
            repository.delete(id);
        } catch (Throwable throwable) {
            logger.error("Failed to delete degrade rule, id={}", id, throwable);
            return Result.ofThrowable(-1, throwable);
        }
        if (!publishRules(oldEntity.getApp(), oldEntity.getIp(), oldEntity.getPort())) {
            logger.warn("Publish degrade rules failed, app={}", oldEntity.getApp());
        }
        return Result.ofSuccess(id);
    }

    private boolean publishRules(String app, String ip, Integer port) throws Exception {
        List<DegradeRuleEntity> rules = repository.findAllByMachine(MachineInfo.of(app, ip, port));
        // lxc修改 return sentinelApiClient.setDegradeRuleOfMachine(app, ip, port, rules);
        degradeRulePublisher.publish(app, rules);
        return true;
    }

    private <R> Result<R> checkEntityInternal(DegradeRuleEntity entity) {
        if (StringUtil.isBlank(entity.getApp())) {
            return Result.ofFail(-1, "app can't be blank");
        }
        if (StringUtil.isBlank(entity.getIp())) {
            return Result.ofFail(-1, "ip can't be null or empty");
        }
        if (!appManagement.isValidMachineOfApp(entity.getApp(), entity.getIp())) {
            return Result.ofFail(-1, "given ip does not belong to given app");
        }
        if (entity.getPort() == null || entity.getPort() <= 0) {
            return Result.ofFail(-1, "invalid port: " + entity.getPort());
        }
        if (StringUtil.isBlank(entity.getLimitApp())) {
            return Result.ofFail(-1, "limitApp can't be null or empty");
        }
        if (StringUtil.isBlank(entity.getResource())) {
            return Result.ofFail(-1, "resource can't be null or empty");
        }
        Double threshold = entity.getCount();
        if (threshold == null || threshold < 0) {
            return Result.ofFail(-1, "invalid threshold: " + threshold);
        }
        Integer recoveryTimeoutSec = entity.getTimeWindow();
        if (recoveryTimeoutSec == null || recoveryTimeoutSec <= 0) {
            return Result.ofFail(-1, "recoveryTimeout should be positive");
        }
        Integer strategy = entity.getGrade();
        if (strategy == null) {
            return Result.ofFail(-1, "circuit breaker strategy cannot be null");
        }
        if (strategy < CircuitBreakerStrategy.SLOW_REQUEST_RATIO.getType()
            || strategy > RuleConstant.DEGRADE_GRADE_EXCEPTION_COUNT) {
            return Result.ofFail(-1, "Invalid circuit breaker strategy: " + strategy);
        }
        if (entity.getMinRequestAmount()  == null || entity.getMinRequestAmount() <= 0) {
            return Result.ofFail(-1, "Invalid minRequestAmount");
        }
        if (entity.getStatIntervalMs() == null || entity.getStatIntervalMs() <= 0) {
            return Result.ofFail(-1, "Invalid statInterval");
        }
        if (strategy == RuleConstant.DEGRADE_GRADE_RT) {
            Double slowRatio = entity.getSlowRatioThreshold();
            if (slowRatio == null) {
                return Result.ofFail(-1, "SlowRatioThreshold is required for slow request ratio strategy");
            } else if (slowRatio < 0 || slowRatio > 1) {
                return Result.ofFail(-1, "SlowRatioThreshold should be in range: [0.0, 1.0]");
            }
        } else if (strategy == RuleConstant.DEGRADE_GRADE_EXCEPTION_RATIO) {
            if (threshold > 1) {
                return Result.ofFail(-1, "Ratio threshold should be in range: [0.0, 1.0]");
            }
        }
        return null;
    }
}
修改前端代码:
- 添加 Nacos 接口并修改地址
文件路径: src/main/webapp/resources/app/scripts/controllers/identity.js
操作: 将 FlowServiceV1 改为 FlowServiceV2,将 /dashboard/flow/ 改为 /dashboard/v2/flow/ - 修改页面中的路由地址
文件路径: src/main/webapp/resources/app/scripts/directives/sidebar/sidebar.html
操作: 搜索 dashboard.flowV1 并定位到第 57 行,去掉 V1。
文件路径: src/main/webapp/resources/app/views/flow_v2.html
操作: 注释掉回到单机页面的按钮
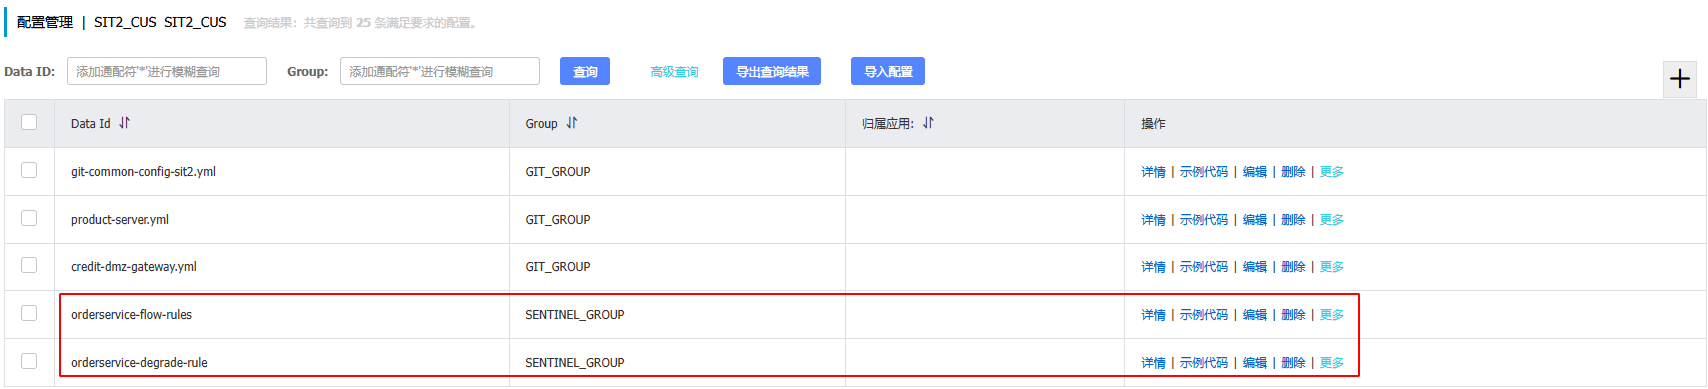
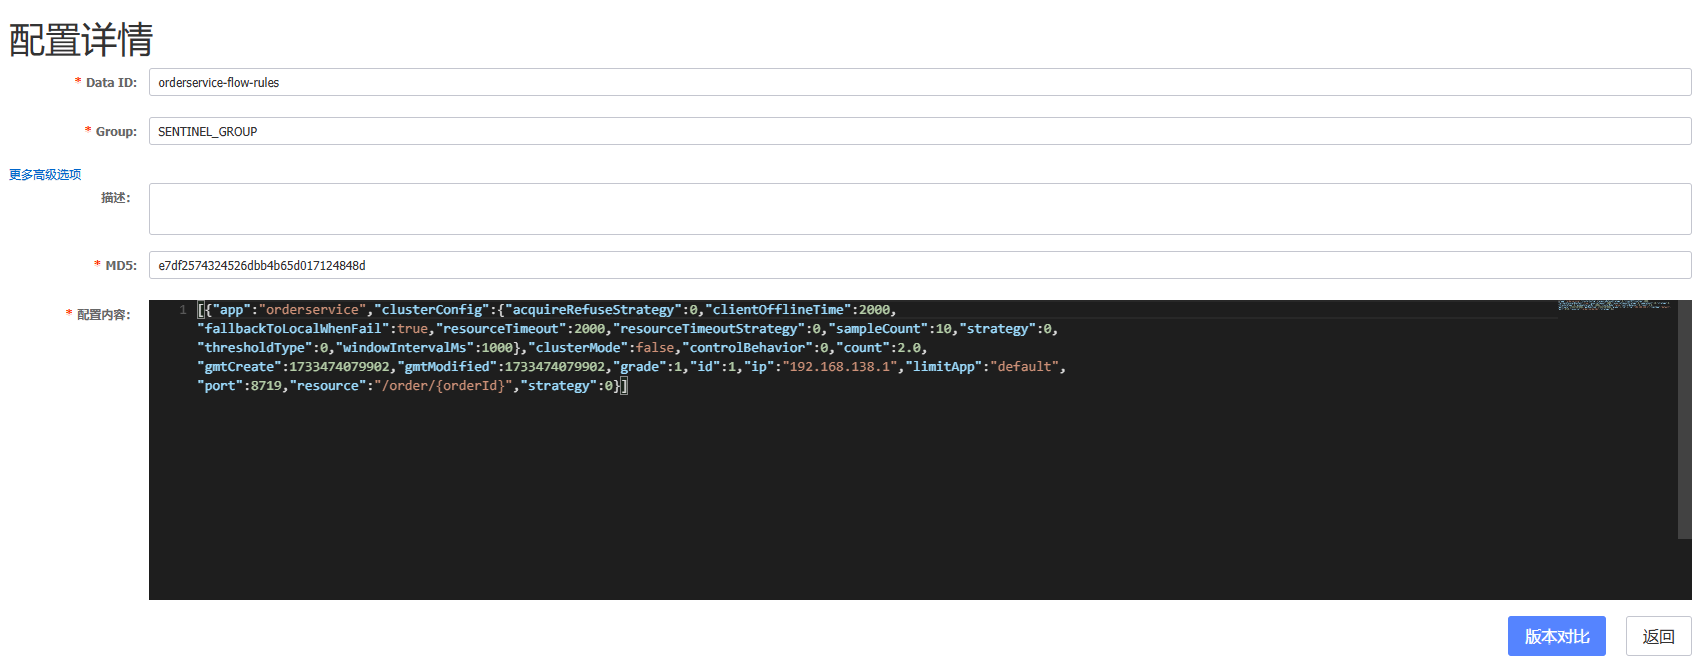
在nacos上面需要新增两个文件,对应到客户端配置文件名称以及dashboard配置的文件尾缀,文件为json格式,内容为{}即可
6.3 测试
6.3.1 启动dashboard
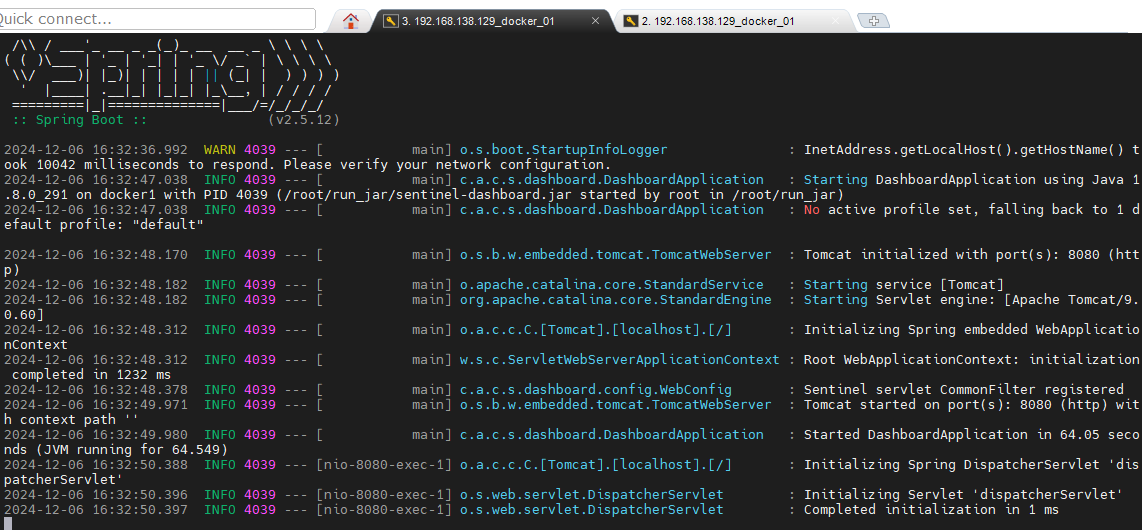
sentinel服务端启动服务 java -jar sentinel.jar
6.3.2 启动客户端
启动客户端服务
6.3.3 准备簇点链路
开始访问http://localhost:8088/order/101,然后进入sentinel dashboard进行查看是否穿线簇点链路
6.3.4 配置限流熔断规则
开始配置限流规则以及熔断规则

6.3.5 规则持久化验证
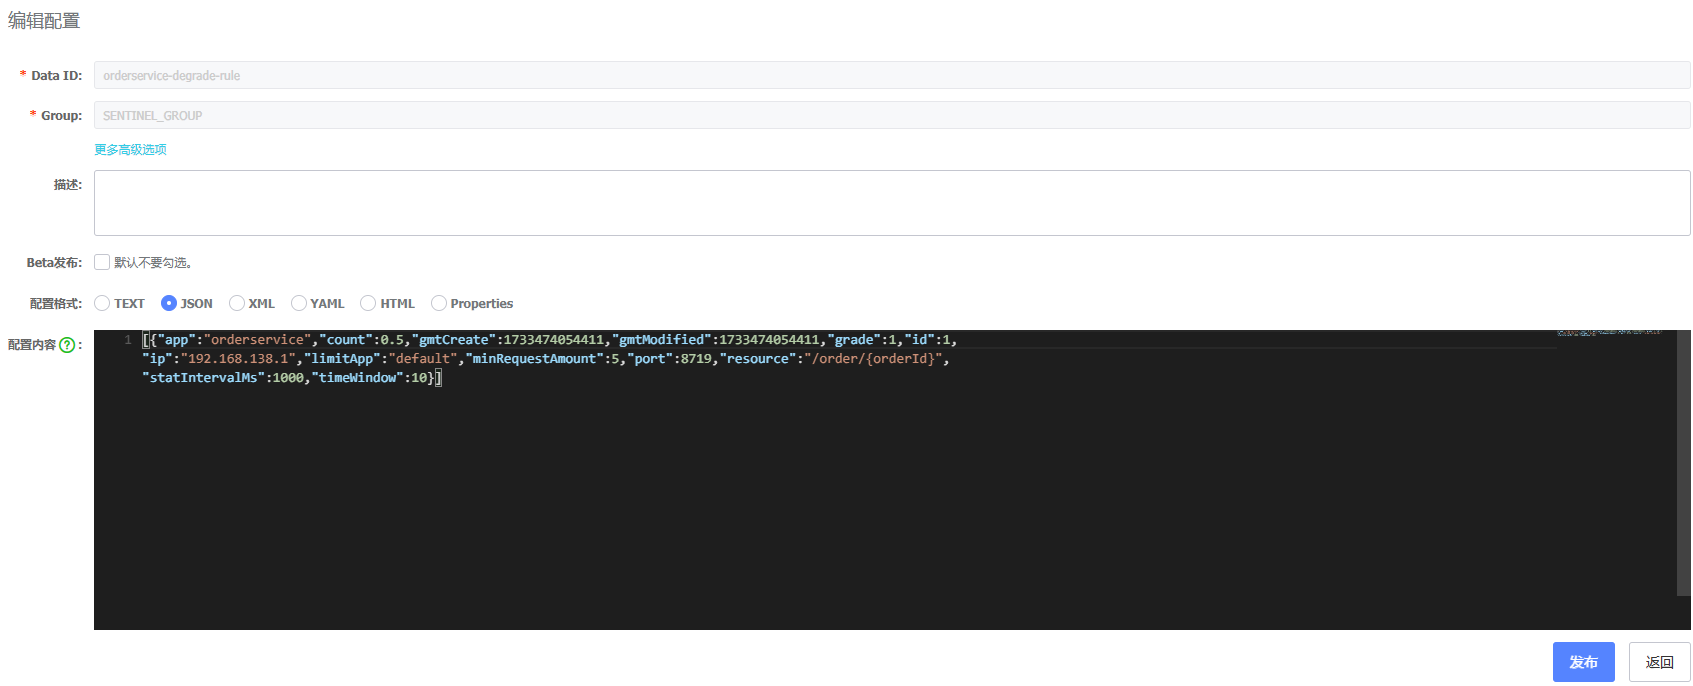
然后前往nacos观察两个文件已经有了规则内容
6.3.6 规则限流验证
开始调用接口http://localhost:8088/order/101,观察限流是否生效,发现限流生效了

此文为黑马sentinel视频的学习笔记,此处记录方便后续学习复习参考使用