Pillow 是 Python 中最流行的图像处理库之一,它是经典库 PIL(Python Imaging Library)的维护分支(Fork),兼容 Python 3 并修复了许多原生 PIL 的缺陷。它提供了丰富的图像处理功能,适合基础的图像操作和简单的图像合成任务。
pillow库是一个phthon中比较基础的图像处理库,官方文档
通过下面的方法进行安装
pip install pillow
Image对象
from PIL import Image
# 导入图片
im = Image.open(fp)
# 显示图片
im.show()
1. 创建图片
# 创建图片
im = Image.open(mode, size, color)
im.show()
| mode | 描述 |
|---|---|
| 1 | 1 位像素(取值范围 0-1),0表示黑,1 表示白,单色通道。 |
| L | 8 位像素(取值范围 0 -255),灰度图,单色通道。 |
| P | 8 位像素,使用调色板映射到任何其他模式,单色通道。 |
| RGB | 3 x 8位像素,真彩色,三色通道,每个通道的取值范围 0-255。 |
| RGBA | 4 x 8位像素,真彩色+透明通道,四色通道。 |
| CMYK | 4 x 8位像素,四色通道,可以适应于打印图片。 |
| YCbCr | 3 x 8位像素,彩色视频格式,三色通道。 |
| LAB | 3 x 8位像素,L * a * b颜色空间,三色通道 |
| HSV | 3 x 8位像素,色相,饱和度,值颜色空间,三色通道。 |
| I | 32 位有符号整数像素,单色通道。 |
| F | 32 位浮点像素,单色通道。 |
2.对象属性
import PIL.Image
im = PIL.Image.open(file)
print(im.size)       # 查看图片大小
print(im.readonly)   # 查看是否为只读,1为是,0为否
print(im.format)     # 查看图片格式
print(im.info)       # 查看图片信息
print(im.mode)       # 查看图片模式
3.格式转换
im = PIL.Image.open(file)
im.save(fp, format=None)

im.convert(mode, params) # 格式转换
im.save(fp)
4.图片缩放
im_new = im.resize(size, resample=image.BICUBIC, box=None, reducing_gap=None)  # 注意要重新赋值
im_new.show()  # 缩放后的图片
5. 创建缩略图
im = Image.open("C:\\study\\testPic\\demoPic.png")
im.thumbnail((100,100))
im.save("C:\\study\\testPic\\demoPica.png")

im.thumbnail(size,resample)  # 直接在原图的基础上修改
size:是一个元祖参数,缩小后的图片尺寸
resample:可选参数,指图像重采样滤波器,有四种过滤方式,分别是 Image.BICUBIC(双立方插值法)、PIL.Image.NEAREST(最近邻插值法)、PIL.Image.BILINEAR(双线性插值法)、PIL.Image.LANCZOS(下采样过滤插值法),默认为 Image.BICUBIC
6.图像分离与合并
图片分离
im = Image.open("C:\\study\\testPic\\demoPic.png")
# 图片模式
print(im.mode)
r, g, b, a = im.split()
图片合并
im_merge = Image.merge("RGB", (r,g,b))
im_merge.save("C:\\study\\testPic\\demoPicMerge.png")
blend() 方法来混合 RGBA 模式的图片(PNG 格式)
# 图片混合,alpha:透明度 ,取值范围为 0 到 1。要求图片的模式相同,尺寸相同
Image.blend(image1,image2, alpha)

ima = Image.open("C:\\study\\testPic\\a.png")
ima = ima.convert('RGBA')
ima = ima.resize((512, 512))

imb = Image.open("C:\\study\\testPic\\b.png")
imb = imb.convert('RGBA')
imb = imb.resize((512, 512))

imBlend = Image.blend(ima, imb, 0.5)
imBlend.save("C:\\study\\testPic\\blend.png")
7.图片裁剪
im = Image.open("C:\\study\\testPic\\a.png")
box = (100,100,300,300)
# 进行矩形区域裁剪
region = im.crop(box)
8.图片旋转
im = Image.open("C:\\study\\testPic\\a.png")
im = im.transpose(Image.ROTATE_180)
9.拷贝粘贴
im = Image.open("C:\\study\\testPic\\a.png")
# 复制一张图片副本
im_copy = im.copy()
# 对副本进行裁剪
im_crop = im_copy.crop((0, 0, 200, 100))
# 创建一个新的图像作为蒙版,L模式,单颜色值
image_new = Image.new('L', (200, 100), 200)
# 将裁剪后的副本粘贴至副本图像上,并添加蒙版
im_copy.paste(im_crop, (100, 100, 300, 200), mask=image_new)
# 显示粘贴后的图像
im_copy.show()
ImageFilter
滤波器能够有效抑制噪声的产生,并且不影响被处理图像的形状、大小以及原有的拓扑结构
from PIL import Image, ImageFilter

im = Image.open("C:\\study\\testPic\\a.png")
im_ft = im.filter(ImageFilter.EMBOSS)  # 添加浮雕滤波器
im_ft.show()
| ImageFilter.BLUR | 模糊滤波,即均值滤波 |
|---|---|
| ImageFilter.CONTOUR | 轮廓滤波,寻找图像轮廓信息 |
| ImageFilter.DETAIL | 细节滤波,使得图像显示更加精细 |
| ImageFilter.FIND_EDGES | 寻找边界滤波(找寻图像的边界信息) |
| ImageFilter.EMBOSS | 浮雕滤波,以浮雕图的形式显示图像 |
| ImageFilter.EDGE_ENHANCE | 边界增强滤波 |
| ImageFilter.EDGE_ENHANCE_MORE | 深度边缘增强滤波 |
| ImageFilter.SMOOTH | 平滑滤波 |
| ImageFilter.SMOOTH_MORE | 深度平滑滤波 |
| ImageFilter.SHARPEN | 锐化滤波 |
| ImageFilter.GaussianBlur() | 高斯模糊 |
| ImageFilter.UnsharpMask() | 反锐化掩码滤波 |
| ImageFilter.Kernel() | 卷积核滤波 |
| ImageFilter.MinFilter(size) | 最小值滤波器,从 size 参数指定的区域中选择最小像素值,然后将其存储至输出图像中。 |
| ImageFilter.MedianFilter(size) | 中值滤波器,从 size 参数指定的区域中选择中值像素值,然后将其存储至输出图像中。 |
| ImageFilter.MaxFilter(size) | 最大值滤波器 |
| ImageFilter.ModeFilter() | 模式滤波 |
ImageColor
颜色处理模块 ImageColor,该模块支持不同格式的颜色,比如 RGB 格式的颜色三元组、十六进制的颜色名称(#ff0000)以及颜色英文单词(“red”)。同时,它还可以将 CSS(层叠样式表,用来修饰网页)风格的颜色转换为 RGB 格式
from PIL import Image, ImageColor

im = Image.new(mode="RGB", size=(100, 100), color=ImageColor.getrgb('HSL(0,100%,50%)'))
im.show()

im = Image.new(mode="RGB", size=(100, 100), color=ImageColor.getcolor('#aaffbb', 'RGBA'))
im.show()
ImageFont
加载字体文件并设置文本样式,支持TrueType(.ttf)、OpenType(.otf)及系统内置字体:
加载字体
from PIL import ImageFont

# 加载TrueType字体,指定大小
font = ImageFont.truetype("arial.ttf", size=24)  # 自定义字体文件
font_system = ImageFont.load_default()          # 系统默认字体
设置字体属性,支持设置字体大小、粗体/斜体(需字体文件本身支持):
font = ImageFont.truetype("arial_bold.ttf", size=20) # 加载粗体字体
ImageDraw
图像绘制模块,在图像上绘制文本、几何图形和像素点
Pillow库的ImageFont和ImageDraw模块能力介绍
Pillow(PIL Fork)是Python中广泛使用的图像处理库,ImageFont和ImageDraw是其核心的文字与图形绘制模块,常用于添加水印、验证码生成、图表标注等场景。以下是两者核心能力的详细说明:
1. ImageFont模块(字体管理)
核心功能: 加载字体文件并设置文本样式
加载字体文件
支持TrueType(.ttf)、OpenType(.otf)及系统内置字体:from PIL import ImageFont # 加载TrueType字体,指定大小 font = ImageFont.truetype("arial.ttf", size=24) # 自定义字体文件 font_system = ImageFont.load_default() # 系统默认字体字体属性设置
支持设置字体大小、粗体/斜体(需字体文件本身支持):font = ImageFont.truetype("arial_bold.ttf", size=20) # 加载粗体字体
2. ImageDraw模块(图像绘制)
核心功能: 在图像上绘制文本、几何图形和像素点
(1) 文本绘制
from PIL import Image, ImageDraw, ImageFont

# 创建画布
img = Image.new("RGB", (400, 200), color="white")
draw = ImageDraw.Draw(img)

# 定义字体
font = ImageFont.truetype("arial.ttf", 24)

# 绘制文本(位置、内容、颜色、字体、对齐方式)
draw.text(
    xy=(50, 50),           # 起始坐标(左上角)
    text="Hello Pillow!",
    fill="red",            # 颜色支持名称/RGB元组
    font=font,
    anchor="lt"            # 对齐方式(左对齐)
)
(2) 几何图形绘制
线条:
draw.line(xy=[(10,10), (100,100)], fill="blue", width=2)矩形:
draw.rectangle(xy=[(50,50), (150,150)], outline="green", fill="yellow", width=3)多边形/椭圆/弧线:
draw.polygon(xy=[(200,100), (250,150), (300,50)], fill="purple")
draw.ellipse(xy=[(300,20), (380,80)], fill="orange")
draw.arc(xy=[(200,100), (300,200)], start=45, end=180, fill="black", width=2)
(3) 像素点与高级功能
绘制单个像素点:
draw.point((50,60), fill="red")抗锯齿支持(需使用
ImageDraw.ImageDraw.antialias):draw.line(..., joint="curve") # 曲线平滑
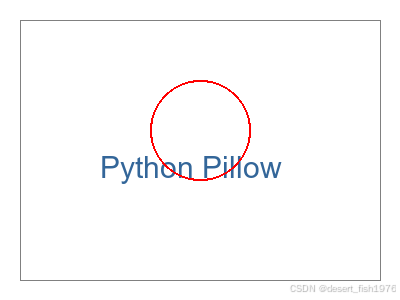
示例代码整合:
from PIL import Image, ImageDraw, ImageFont

# 创建图像与Draw对象
img = Image.new("RGB", (400, 300), "white")
draw = ImageDraw.Draw(img)

# 使用自定义字体
font = ImageFont.truetype("arial.ttf", 30)

# 绘制多个元素
draw.rectangle([(20,20), (380,280)], outline="gray")
draw.text((100,150), "Python Pillow", fill="#336699", font=font)
draw.ellipse([(150,80), (250,180)], outline="red", width=2)

# 保存结果
img.save("output.png")