图书管理系统
用户登录
需求分析
账号密码校验接口:根据输入用户名和密码校验登录是否通过。
接口定义
- url:/user/login
- type:post
- 请求参数:name=admin&password=admin
- 返回:true //账号密码验证成功,false//账号密码验证失败
前端页面代码
<body>
    <div class="container-login">
        <div class="container-pic">
            <img src="pic/computer.png" width="350px">
        </div>
        <div class="login-dialog">
            <h3>登陆</h3>
            <div class="row">
                <span>用户名</span>
                <input type="text" name="userName" id="userName" class="form-control">
            </div>
            <div class="row">
                <span>密码</span>
                <input type="password" name="password" id="password" class="form-control">
            </div>
            <div class="row">
                <button type="button" class="btn btn-info btn-lg" onclick="login()">登录</button>
            </div>
        </div>
    </div>
    <script src="js/jquery.min.js"></script>
    <script>
        function login() {
            $.ajax({
                url: "/user/login",
                type: "post",
                data: {
                    userName: $("#userName").val(),
                    password: $("#password").val()
                },
                success: function (result) {
                    if (result == "") {
                        location.href = "book_list.html";
                    } else {
                        alert(result)
                    }
                }
            })
        }
    </script>
</body>
服务器代码
@RequestMapping("/user")
@RestController
public class UserController {
    @RequestMapping("/login")
    public String login(String userName, String password, HttpSession session) {
        //1.校验参数
        //2.验证密码是否正确
        //3.返回结果
        if (!StringUtils.hasLength(userName) || !StringUtils.hasLength(password)) {
            return "用户名或密码为空";
        }
        //理论上应该从数据库中读取,暂时先不用
        //一般正确情况下,会有后续的操作,因此建议将后续操作比较多的情况下放在括号外面
        if (!"admin".equals(userName) || !"admin".equals(password)) {
            return "密码错误";
        }
        session.setAttribute("userName", userName);
        return "";
    }
}
图书列表展示
需求分析
图书列表:提供图书列表信息
接口定义
- url:/user/login
- type:post
- 请求参数:无
- 返回:
[{“id”: 1,
“bookName”:“book1”,
“author” :“author1”,
“count”:270,
“price”: 20”,
publish":“publish1”,
“status”: 1,
“statusCN”:“可借阅”}…]
前端页面部分代码
		<script>
            //这里需要直接访问到后端的图书列表信息,直接需要访问到后端,所以直接开始就使用ajax,但是为了代码的可读性,将其封装到一个方法里面先
            getBookList();
            function getBookList() {
                $.ajax({
                    url:"/book/getBookList",
                    type:"get",
                    success:function(books){
                        var finalHtml = "";
                        //下面使用单引号的原因是因为html中也有双引号,可能会造成出错
                        for(var book of books){
                            finalHtml += '<tr>';
                            finalHtml += '<td><input type="checkbox" name="selectBook" value="'+book.id+'" id="selectBook" class="book-select"></td>';
                            finalHtml += '<td>'+book.id+'</td>';
                            finalHtml += '<td>'+book.bookName+'</td>';
                            finalHtml += '<td>'+book.author+'</td>';
                            finalHtml += '<td>'+book.num+'</td>';
                            finalHtml += '<td>'+book.price+'</td>';
                            finalHtml += '<td>'+book.publishName+'</td>';
                            finalHtml += '<td>'+book.statusCN+'</td>';
                            finalHtml += '<td>';
                            finalHtml += ' <div class="op">';
                            finalHtml += '<a href="book_update.html?bookId='+book.id+'">修改</a>';
                            finalHtml += '<a href="javascript:void(0)" onclick="deleteBook('+book.id+')">删除</a>';
                            finalHtml += '</div></td></tr>';
                        }
                        $("tbody").html(finalHtml);
                    }
                })
            }
服务器代码
Controller层
@RequestMapping("/book")
@RestController
public class BookController {
    @Autowired
    private BookService bookService;

    @RequestMapping("/getBookList")
    public List<BookInfo> getBookList() {
//        BookService bookService = new BookService();
        return bookService.getBookList();
    }
}
service层
@Component
public class BookService {
    @Autowired
    private BookDao bookDao;

    public List<BookInfo> getBookList(){
//        BookDao bookDao = new BookDao();
        List<BookInfo> bookInfos = bookDao.mockData();
        for (BookInfo bookInfo : bookInfos) {
            if (bookInfo.getStatus() == 2){
                bookInfo.setStatusCN("不可借阅");
            }else {
                bookInfo.setStatusCN("可借阅");
            }
        }
        return bookInfos;
    }
}
Dao层
@Component
public class BookDao {
    //理论上该方法应该从数据库中获取,当前采用mock方式
    public List<BookInfo> mockData(){
        List<BookInfo> bookInfos = new ArrayList<BookInfo>();
        //mock数据,也就是测试时候所有的模拟数据
        for (int i = 1; i <= 15; i++) {
            BookInfo bookInfo = new BookInfo();
            bookInfo.setId(i);
            bookInfo.setAuthor("作者" + i);
            bookInfo.setBookName("图书" + i);
            bookInfo.setNum(i * 2 + 1);
            bookInfo.setPrice(new BigDecimal(i*3));
            bookInfo.setPublishName("出版社" + i);
            if (i % 5 == 0){
                bookInfo.setStatus(2);
//                bookInfo.setStatusCN("不可借阅");
            }else {
                bookInfo.setStatus(1);
//                bookInfo.setStatusCN("可借阅");
            }
            bookInfos.add(bookInfo);
        }
        return bookInfos;
    }
}
modle层
@Data
public class BookInfo {
    private Integer id;
    private String bookName;
    private String author;
    private Integer num;
    private BigDecimal price;
    private String publishName;
    private Integer status;//1-可借阅  0-不可借阅  这里的数据都是要存放到数据库中的,尽量减少往数据库中存放文字信息
    private String statusCN;//这个字段不用网数据库中存储,仅是为了与status进行文字与数字的转换
}
Spring IoC
Spring的抽象概念:Spring是包含了众多⼯具⽅法的IoC容器。
定义
IoC 是Spring的核心思想,之前项目在类上添加 @Restcontroller 和@Controller 注解,就是把这个对象交给Spring管理,Spring框架启动时就会加载该类,把对象交给Spring管理,就是loC思想。
loC:Inversion of Control(控制反转),也就是说 Spring是一个"控制反转"的容器。
什么是控制反转呢?也就是控制权反转,什么的控制权发生了反转?
获得依赖对象的过程被反转了也就是说,当需要某个对象时,传统开发模式中需要自己通过 new 创建对象,现在不需要再进行创建,把创建对象的任务交给容器,程序中只需要依赖注入(DependencyInjection, Dl)就可以了这个容器称为:loC容器,Spring是一个loC容器,所以有时Spring 也称为Spring 容器。
传统程序开发
比如开发一个汽车,传统的设计思路为:
先设计轮子(Tire),然后根据轮子的大小设计底盘(Bottom),接着根据底盘设计车身(Framework),后根据车身设计好整个汽车(Car)。
这里就出现了一个"依赖"关系:汽车依赖车身,车身依赖底盘,底盘依赖轮子。
也就是Car类依赖Framework类,Framework类依赖Bottom类,Bottom类依赖Tire类。
这样的设计看起来没问题,但是可维护性却很低,接下来需求有了变更:随着对的车的需求量越来越大,个性化需求也会越来越多,我们需要加工多种尺寸的轮胎。
此时,开发一个汽车需要依赖再依赖,直至依赖到轮胎的尺寸,也就是下面的改法。
    public static void main(String[] args) {
        public static void main(String[] args) {
            Car car = new Car(20);
            car.run();
        }
    }

public class Car {
    private Framework framework;
    public Car(int size) {
        framework = new Framework(size);
        System.out.println("Car init....");
    }
    public void run() {
        System.out.println("Car run...");
    }
}

public class Framework {
    private Bottom bottom;
    public Framework(int size) {
        bottom = new Bottom(size);
        System.out.println("Framework init...");
    }
}

public class Bottom {
    private Tire tire;
    public Bottom(int size) {
        this.tire = new Tire(size);
        System.out.println("Bottom init...");
    }
}

public class Tire {
    private int size;
    public Tire(int size) {
        this.size = size;
        System.out.println("轮胎尺⼨: " + size);
    }
}
以上代码可以看出,以上程序的问题是:当最底层代码改动之后,整个调用链上的所有代码都需要修改,程序的耦合度非常高(修改一处代码,影响其他处的代码修改)。
解决方案
我们尝试换一种思路,先设计汽车的大概样子,然后根据汽车的样子来设计车身,根据车身来设计底盘,最后根据底盘来设计轮子。这时候,依赖关系就倒置过来了:轮子依赖底盘,底盘依赖车身,车身依赖汽车。

可以尝试不在每个类中创建下级类,如果创建下级类就会出现当下级类发生改变操作,自己也要跟着修改。
此时,只需要将原来由自己创建的下级类,改为传递的方式(也就是注入的方式),因为我们不需要在当前类中创建下级类了,所以下级类即使发生变化(创建或减少参数),当前类本身也无需修改任何代码,这样就完成了程序的解耦。
public class Main {
    public static void main(String[] args) {
        Tire tire = new Tire(20);
        Bottom bottom = new Bottom(tire);
        Framework framework = new Framework(bottom);
        Car car = new Car(framework);
        car.run();
    }
}

public class Car {
    private Framework framework;
    public Car(Framework framework) {
        this.framework = framework;
        System.out.println("Car init....");
    }
    public void run() {
        System.out.println("Car run...");
    }
}

public class Car {
    private Framework framework;
    public Car(Framework framework) {
        this.framework = framework;
        System.out.println("Car init....");
    }
    public void run() {
        System.out.println("Car run...");
    }
}

public class Framework {
    private Bottom bottom;
    public Framework(Bottom bottom) {
        this.bottom = bottom;
        System.out.println("Framework init...");
    }
}

public class Bottom {
    private Tire tire;
    public Bottom(Tire tire) {
        this.tire = tire;
        System.out.println("Bottom init...");
    }
}

public class Tire {
    private int size;
    public Tire(int size) {
        this.size = size;
        System.out.println("轮胎尺⼨: " + size);
    }
}
代码经过以上调整,无论底层类如何变化,整个调用链是不用做任何改变的,这样就完成了代码之间的解耦,从而实现了更加灵活、通用的程序设计了。
IoC优势
在传统的代码中对象创建顺序是:Car>Framework->Bottom->Tire
改进之后解耦的代码的对象创建顺序是:Tire->Bottom->Framework ->Car
改进之后的控制权发生的反转,不再是使用方对象创建并控制依赖对象了,而是把依赖对象注入将当前对象中,依赖对象的控制权不再由当前类控制了。
这样的话,即使依赖类发生任何改变,当前类都是不受影响的,这就是典型的控制反转,也就是IoC的实现思想。

loC容器具备以下优点
- 资源集中管理:loC容器会帮助管理一些资源(对象等),需要使用时,只需要从loC容器中去取就可以了。
- 解耦合:在创建实例的时候不需要了解其中的细节,降低了使用资源双方的依赖程度,也就是耦合度。
Spring 就是一种loC容器,帮助我们来做了这些资源管理。
Spring DI
Dl:DependencyInjection(依赖注入),容器在运行期间,动态的为应用程序提供运行时所依赖的资源,称之为依赖注入。
程序运行时需要某个资源,此时容器就为其提供这个资源。
从这点来看,依赖注入(DI)和控制反转(l0C)是从不同的角度的描述的同一件事情,就是指通过引入loC容器,利用依赖关系注入的方式,实现对象之间的解耦。
上述代码通过构造函数的方式,把依赖对象注入到需要使用的对象中。
IoC是一种思想,也是"目标",而思想只是一种指导原则,最终还是要有可行的落地方案,而 DI 就属于具体的实现。
所以也可以说,DI是loC的一种实现。
IoC &DI使用
既然 Spring 是一个 loC(控制反转)容器,作为容器,那么它就具备两个最基础的功能:存、取。
Spring 容器管理的主要是对象,这些对象,我们称之为"Bean"。把这些对象交由Spring管理,由Spring来负责对象的创建和销毁,程序只需要告诉Spring,哪些需要存,以及如何从Spring中取出对象。
主要注解
@Component:交给Spring管理
@Autowired:注入运行时依赖的对象
@Component
public class BookService {
    @Autowired
    private BookDao bookDao;

    public List<BookInfo> getBookList(){
//        BookDao bookDao = new BookDao();
        List<BookInfo> bookInfos = bookDao.mockData();
        for (BookInfo bookInfo : bookInfos) {
            if (bookInfo.getStatus() == 2){
                bookInfo.setStatusCN("不可借阅");
            }else {
                bookInfo.setStatusCN("可借阅");
            }
        }
        return bookInfos;
    }
}
Spring IoC详解
前⾯提到IoC控制反转,就是将对象的控制权交给Spring的IOC容器,由IOC容器创建及管理对象,也就是bean的存储。
bean的存储
五大注解
- 五大类注解:@Controller、@Service、@Repository、@Component、@Configuration 。
- bean对象:在spring容器中存放的对象。
- ApplicationContext: 翻译为Spring上下文,指的就是当前的运行环境,也可以看作是⼀个容器。故ApplicationContext的对象中存放了所有与当前的运行环境有关的内容,比如 spring容器中存放的bean对象。
@Controller(控制器存储)
这里仅展示@Controller,其他四个注解与@Controller类似。
将UserControllerTest类用@Controller注解存放到IoC容器中。
@Controller
public class UserControllerTest {
    public void say(){
        System.out.println("hello, UserControllerTest");
    }
}
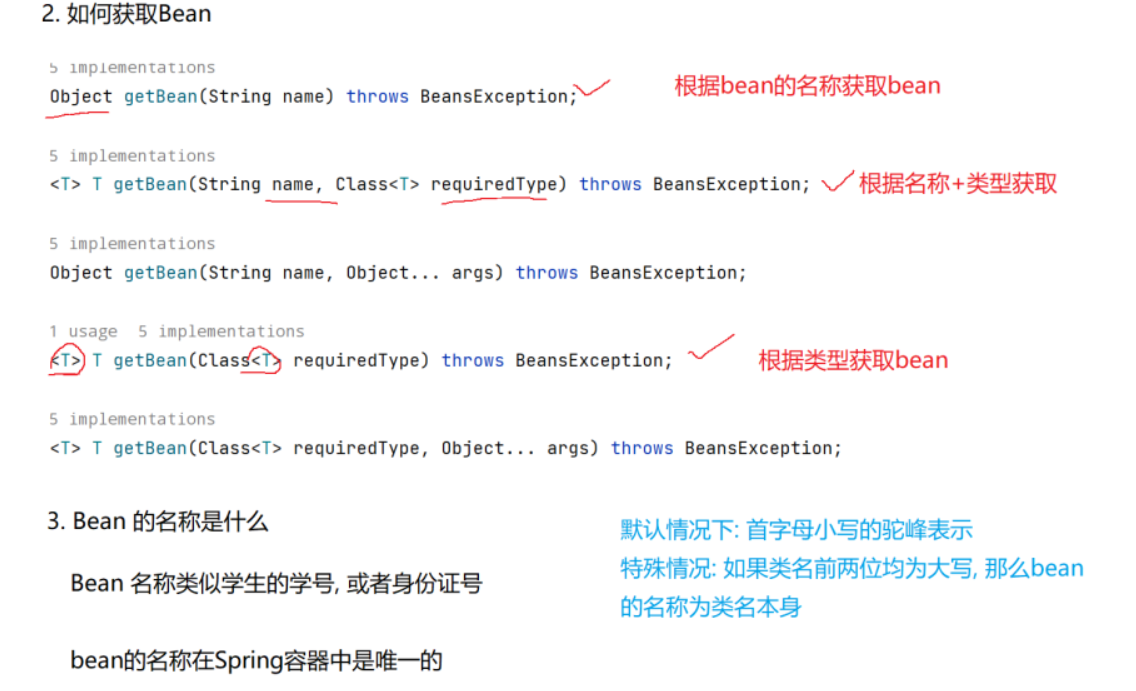
getBean()方法
这里分别使用三种getBean()方法来获取UserController对象,进行打印测试
@SpringBootApplication
public class LibraryApplication {
    public static void main(String[] args) {
        ConfigurableApplicationContext context = SpringApplication.run(LibraryApplication.class, args);
        UserControllerTest bean = context.getBean(UserControllerTest.class);
        bean.say();
        System.out.println(bean);
        UserControllerTest userControllerTest = (UserControllerTest) context.getBean("userControllerTest");
        userControllerTest.say();
        System.out.println(userControllerTest);
        UserControllerTest userControllerTest1 = context.getBean("userControllerTest", UserControllerTest.class);
        userControllerTest1.say();
        System.out.println(userControllerTest1);
    }
}
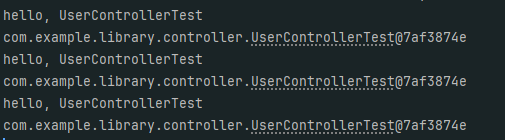
结果成功输出也就是获取到了UserControllerTest对象,并且地址一样,说明是一个对象。
获取对象的功能是Application的父类BeanFactory的功能。
面试:ApplicationContext VS BeanFactory
继承关系和功能方面来说:Spring 容器有两个顶级的接口BeanFactory和ApplicationContext。
其中 BeanFactory 提供了基础的访问容器的能力,而ApplicationContext 属于 BeanFactony 的子类,它除了继承了 BeanFactory 的所有功能之外,它还拥有独特的特性,还添加了环境管理支持、资源访问支持、以及事件传播等方面的支持。
从性能方面来说:ApplicationContext 是一次性加载并初始化所有的 Bean 对象,而BeanFactory 是需要那个才去加载那个,因此更加轻量(空间换时间)。
为什么要这么多类注解
与应用分层呼应,让程序员看到类注解之后,就能直接了解当前类的用途。
- @Controller:控制层,接收请求,对请求进行处理,并进行响应
- @Servie:业务逻辑层,处理具体的业务逻辑
- @Repository:数据访问层,也称为持久层,负责数据访问操作
- @Configuration:配置层,处理项目中的一些配置信息
- @Component:是一个元注解,也就是说可以注解其他类注解@Controller,@Service,@Repository,@Confiquraion,这些注解被称为@Component 的行生注解,因为这些注解源代码里面都有一个注解@Component。
五大注解是否可以混用
功能上:@Service @Repository @Configuration @Component 可以完全混用,@Controller有自己的特殊性。
规范上:不可以混用。因为我们想要与应用分层呼应。

程序被Spring管理的条件
- 程序要被spring扫描到(默认路径是启动类所在的目录以及子目录),手动设置:@ComponentScan(basePackages = “~”)
- 程序需要配置五大注解和@Bean
方法注解–@Bean
@Bean要搭配类注解使用
类注解是添加到某个类上的,但是存在两个问题:
- 使用外部包里的类,没办法添加类注解
- 一个类,需要多个对象,比如多个数据源
示例1,@Bean要搭配类注解使用
@Configuration
public class UserConfig {
    public void say(){
        System.out.println("hi,UserConfig");
    }
    @Bean
    public User user(){
        return new User("张三");
    }
}
示例2:定义多个对象,使用类的类型扫描
@Service
public class UserService {
    public void say(){
        System.out.println("hello, UserService");
    }
    @Bean
    public BookInfo user(){
        return new BookInfo();
    }
    @Bean
    public BookInfo user1(){
        return new BookInfo();
    }
}

@SpringBootApplication
public class LibraryApplication {
    public static void main(String[] args) {
        ConfigurableApplicationContext context = SpringApplication.run(LibraryApplication.class, args);
        BookInfo bean = context.getBean(BookInfo.class);
        System.out.println(bean);
    }
}
通过类的类型扫描,这里出现了报错,通过类的类型扫描,此时容器中有两个User对象,根据类型获取对象,此时Spring不知道要获取哪个对象,所以报错了。

解决办法:用类的名字扫描。
@SpringBootApplication
public class LibraryApplication {
    public static void main(String[] args) {
        ConfigurableApplicationContext context = SpringApplication.run(LibraryApplication.class, args);
        BookInfo bean1 = (BookInfo) context.getBean("user");
        System.out.println(bean1);
        BookInfo bean2 = (BookInfo) context.getBean("user1");
        System.out.println(bean2);
    }
}

扫描路径
把启动类放到其他的目录下面,再次启动程序,会出错。

就是因为没有找到对应的bean对象,使用五大注解声明的bean,要想生效,还需要配置扫描路径,让Spring扫描到这些注解也就是通过 @ComponentScan 来配置扫描路径。
@ComponentScan({"com.example.library"})
@SpringBootApplication
public class LibraryApplication {
    public static void main(String[] args) {
        ConfigurableApplicationContext context = SpringApplication.run(LibraryApplication.class, args);
    }
}
Spring DI详解
DI(依赖注入):依赖注入是一个过程,是指loC容器在创建Bean时,去提供运行时所依赖的资源,而资源指的就是对象在上面程序案例中,我们使用了 @Autowired 这个注解,完成了依赖注入的操作简单来说,就是把对象取出来放到某个类的属性中。
在一些文章中,依赖注入也被称之为"对象注入”、"属性装配”,具体含义需要结合文章的上下文来理解。
关于依赖注入, Spring也给我们提供了三种方式:
属性注入(Field Injection)
构造⽅法注入(Constructor Injection)
Setter 注入(Setter Injection)
属性注入
@Controller
public class UserControllerTest {
    @Autowired
    private UserService userService;//属性注入

    public void say(){
        System.out.println("hello, UserControllerTest");
    }
}
构造方法注入
只有一个构造方法的时候即使不加@Autowired也可以获取数据,但是要是加一个空的构造方法,会报出空指针异常。
因为程序启动的时候会首先调用无参数的构造方法,如果没有会调用我们写的,但是两个都有的话就会调用无参数的,此时并没有真正new对象,去调用say()方法就会出现空指针异常。
解决办法:就是在想要注入的构造方法中添加@Autowired注解
@Controller
public class UserControllerTest {
    private UserService userService;

    @Autowired
    public UserService(UserService service){
        this.userService = service;
    }

    public void say(){
        System.out.println("hello, UserControllerTest");
    }
}
Setter注入
@Controller
public class UserControllerTest {
    private UserService userService;

    @Autowired
    public void setUserService(UserService service){
        this.userService = service;
    }

    public void say(){
        System.out.println("hello, UserControllerTest");
    }
}
优缺点
- 属性注入
优点:简洁,使用方便
缺点:只能用于 loC 容器,如果是非 loC 容器不可用,并且只有在使用的时候才会出现 NPE(空指针异常);不能注入一个Final修饰的属性。 - 构造函数注入(Spring4.x推荐)
优点:可以注入final修饰的属性;注入的对象不会被修改依赖对象;在使用前一定会被完全初始化,因为依赖是在类的构造方法中执行的,而构造方法是在类加载阶段就会执行的方法;通用性好,构造方法是JDK支持的,所以更换任何框架都是适用的。
缺点:注入多个对象时,代码会比较繁琐。 - Setter注入
优点:方便在类实例之后,重新对该对象进行配置或者注入。
缺点:不能注入一个Final修饰的属性;注入对象可能会被改变,因为setter方法可能会被多次调用,就有被修改的风险。
@Autowired存在的问题
Student 实体类
@Data
public class Student {
    private String name;
    private Integer id;

    public Student() {

    }

    public Student(String name) {
        this.name = name;
    }

    public Student(String name, Integer id) {
        this.name = name;
        this.id = id;
    }
BeanConfig类
@Configuration
public class BeanConfig {
    @Bean
    public Student StudentInfo() {
        return new Student("wh",01);
    }
    @Bean
    public Student StudentInfo2() {
        return new Student("Bob",02);
    }
}
DomeController类
@Controller
public class DomeController {
    @Autowired
    private Student student;
    public void say(){
        System.out.println(student);
    }
}
启动类
@SpringBootApplication
public class SpringIocApplication {

    public static void main(String[] args) {
        ConfigurableApplicationContext context = SpringApplication.run(SpringIocApplication.class, args);

        DomeController bean = context.getBean(DomeController.class);
        bean.say();
    }
}
运行

报错的原因是,非唯一的 Bean 对象
解释:@Autowired是先按照类型去注入,匹配到多个对象时,再按照名称去注入。
如果明确注入对象的名称,则可以正确打印该学生信息。
@Controller
public class DomeController {
    @Autowired
    private Student StudentInfo2;
    public void say(){
        System.out.println(StudentInfo2);
    }
}
那当没有明确注入对象的名称,又想得到正确结果我们可以怎么做?
有以下几种解决方案:
@Primary
@Qualifier
@Resource
@Primary
使用@Primary注解:当存在多个相同类型的Bean注入时,加上@Primary注解,来确定默认的实现。
直接加到Bean注入的方法上。
@Primary
@Bean
public Student StudentInfo() {
    return new Student("wh", 01);
}
@Qualifier
使⽤@Qualifier注解:指定当前要注⼊的bean对象。 在@Qualifier的value属性中,指定注⼊的bean 的名称。
@Qualifier注解不能单独使⽤,必须配合@Autowired使用。
@Controller
public class DomeController {
    @Qualifier("StudentInfo2")
    @Autowired
    private Student student;
    public void say(){
        System.out.println(student);
    }
}
@Resource
本身就是依赖注入注解,是按照bean的名称进行注入。
@Controller
public class DomeController {
    @Resource(name = "StudentInfo")
    private Student student;
    public void say(){
        System.out.println(student);
    }
}
面试–@Autowird 与 @Resource的区别
- @Autowired 是spring框架提供的注解,而@Resource是JDK提供的注解。
- @Autowired 默认是按照类型注入,而@Resource是按照名称注入,相比于 @Autowired 来说, @Resource ⽀持更多的参数设置,例如 name 设置,根据名称获取 Bean。