源码拉取步骤可以看这篇文章有讲解,下面直接进入正题:
前言
在《源码篇 剖析 Vue 双向绑定原理》这篇文章中,提到了 Vue 中不管是可以处理 Object 数据的 Object.defineProperty,还是 处理 Array 数据的 拦截器,都无法监听到新增属性或删除属性,那时我们提到了 Vue.set() 和 Vue.delete(),以及使用它们两个如何解决这个问题。本文将扩展其他的全局 API,针对使用方法及源码进行分析说明。
正文
1. Vue.complie√
用法:
用于将模板字符串编译成渲染函数。
Vue 3 中 Vue.compile() 被移除,直接通过组件定义或 createApp 进行渲染。
Vue2 示例:
const renderFunction = Vue.compile('<div>{{ message }}</div>');

new Vue({
  data: {
    message: 'hello'
  },
  render: renderFunction.render,
  staticRenderFns: renderFunction.staticRenderFns
})
render 和 staticRenderFns 在源码中有定义:
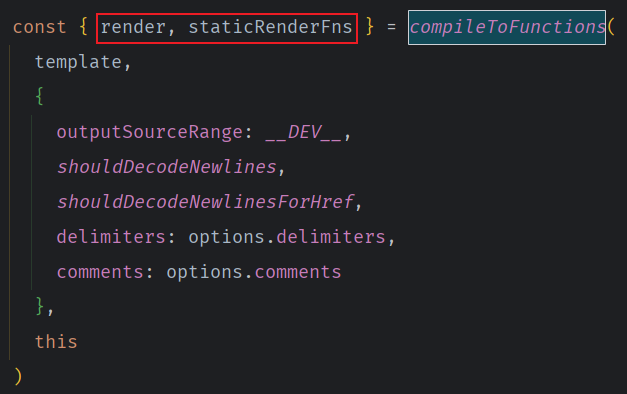
源码分析:
在源码文件 src/platforms/web/runtime-with-compiler.ts 中有一句源码:
Vue.compile = compileToFunctions它内部调用了 compileToFunctions 方法
该代码片段源码位置:src/compiler/index.ts,此处只展示相关的代码部分
export const createCompiler = createCompilerCreator(function baseCompile(
  template: string,
  options: CompilerOptions
): CompiledResult {
  const ast = parse(template.trim(), options)
  if (options.optimize !== false) {
    optimize(ast, options)
  }
  const code = generate(ast, options)
  return {
    ast,
    render: code.render,
    staticRenderFns: code.staticRenderFns
  }
})- 模板解析阶段:通过正则等方式解析 template 模板中的指令、class、style 等数据形成AST
const ast = parse(template.trim(), options)- 优化阶段:遍历AST,找出其中的静态节点,并打上标记
if (options.optimize !== false) {
    optimize(ast, options)
}- 代码生成阶段:将AST转换成渲染函数
const code = generate(ast, options)总结:
更详细的内容将在后续文章描述模板编译内容的时候说明。
Vue.directive、Vue.filter 和 Vue.component 源码写在一起,因此将在最后位置一起分析
2. Vue.filter√
用法:
用于注册、获取全局过滤器,接收两个参数:过滤器 id 和过滤器的定义。
注册:将定义好的过滤器存放在某个位置;
获取:根据过滤器id在存放过滤器的位置读取过滤器。
Vue3 不再支持 Vue.filter(),可以使用计算属性或方法替代。
使用:{{ message | capitalize }}
Vue2 示例:
// 注册
Vue.filter('capitalize', function(value) {
  if (!value) return '';
  return value.charAt(0).toUpperCase() + value.slice(1);
});

// getter,返回已注册的过滤器
const myFilter = Vue.filter('my-filter');
Vue.options['filters']用来存放全局过滤器。根据是否传入 definition 参数来判断注册过滤器和获取过滤器。如果没有传入 definition 参数,则表示为获取过滤器,根据过滤器 id 读取过滤器;如果传入 definition 参数,则表示为注册过滤器,就将其保存在this.options['filters']中。
Vue.options = Object.create(null)
Vue.options['filters'] = Object.create(null)

Vue.filter= function (id,definition) {
    if (!definition) {
        return this.options['filters'][id]
    } else {
        this.options['filters'][id] = definition
        return definition
    }
}
3. Vue.component√
用法:
用于注册、获取全局组件。
注:Vue2、Vue3 使用方法相同!
Vue.component('my-component', {
  template: '<div>Hello from my component!</div>'
});

const myComponent = Vue.component('my-component');
和 Vue.filter 同理,根据是否传入 definition 参数来判断注册组件和获取组件。如果是注册组件,在非生产环境下会校验组件的name值是否合法。
Vue.options = Object.create(null)
Vue.options['components'] = Object.create(null)

Vue.filter= function (id,definition) {
    if (!definition) {
        return this.options['components'][id]
    } else {
        if (process.env.NODE_ENV !== 'production' && type === 'component') {
            validateComponentName(id)
        }
        if (type === 'component' && isPlainObject(definition)) {
            definition.name = definition.name || id
            definition = this.options._base.extend(definition)
        }
        this.options['components'][id] = definition
        return definition
    }
}
4. Vue.directive√
用法:
用于注册、获取全局指令。
Vue2 示例:
Vue.directive('focus', {
  bind: function () {},
  inserted: function () {},
  update: function () {},
  componentUpdated: function () {},
  unbind: function () {}
})

// 注册 (指令函数)
Vue.directive('focus', function () {
  // 这里会被 `bind` 和 `update` 调用
})

// getter
const myDirective = Vue.directive('focus')
Vue3示例:
Vue.directive('focus', {
  beforeMount(el) {
    el.focus();
  }
});
和 Vue.filter 同理,根据是否传入 definition 参数来判断注册指令和获取指令。
如果是注册指令,继续判断 definition 参数是否是一个函数,如果是则默认监听 bind 和 update。
如果 definition 参数不是一个函数,即认为它是用户自定义的指令对象,直接将其保存在 this.options['directives'] 中。
Vue.options = Object.create(null)
Vue.options['directives'] = Object.create(null)

Vue.directive= function (id,definition) {
    if (!definition) {
        return this.options['directives'][id]
    } else {
        if (type === 'directive' && typeof definition === 'function') {
            definition = { bind: definition, update: definition }
        }
        this.options['directives'][id] = definition
        return definition
    }
}
Vue.directive、Vue.filter、Vue.component 源码分析:
上面我们已经分别分析了内部实现原理,下面是完整实现代码:
源码位置1:src/shared/constants.ts
export const ASSET_TYPES = ['component', 'directive', 'filter'] as const源码位置2:src/core/global-api/index.ts
Vue.options = Object.create(null)
ASSET_TYPES.forEach(type => {
    Vue.options[type + 's'] = Object.create(null)
})
源码位置3:src/core/global-api/assets.ts
ASSET_TYPES.forEach(type => {
    Vue[type] = function (
      id: string,
      definition?: Function | Object
    ): Function | Object | void {
      if (!definition) {
        return this.options[type + 's'][id]
      } else {
        if (__DEV__ && type === 'component') {
          validateComponentName(id)
        }
        if (type === 'component' && isPlainObject(definition)) {
          definition.name = definition.name || id
          definition = this.options._base.extend(definition)
        }
        if (type === 'directive' && isFunction(definition)) {
          definition = { bind: definition, update: definition }
        }
        this.options[type + 's'][id] = definition
        return definition
      }
    }
})
5. Vue.use√
用法:
用于安装插件。插件只能注册一次,多次调用无效;Vue.use 必须在实例化 Vue 之前调用。
Vue2 示例:
Vue.use(MyPlugin);Vue3示例:
const app = Vue.createApp(App);
app.use(MyPlugin);
如果插件需要配置项:
Vue.use(MyPlugin, { someOption: true });而插件本质上是一个带有 install 方法的对象或函数:
const MyPlugin = {
  install(Vue, options) {
    // 注册全局组件
    Vue.component('MyGlobalComponent', { /* ... */ })

    // 添加全局方法
    Vue.prototype.$myMethod = function () { /* ... */ }

    // 添加全局混入
    Vue.mixin({ /* ... */ })
  }
}
或者
function MyPlugin(Vue, options) {
  // 同样逻辑
}
源码分析:
该代码片段源码位置:src/core/global-api/use.ts,此处只展示相关的代码部分
Vue.use = function (plugin: Function | any) {
    const installedPlugins =
      this._installedPlugins || (this._installedPlugins = [])
    if (installedPlugins.indexOf(plugin) > -1) {
      return this
    }

    const args = toArray(arguments, 1)
    args.unshift(this)

    if (isFunction(plugin.install)) {
      plugin.install.apply(plugin, args)
    } else if (isFunction(plugin)) {
      plugin.apply(null, args)
    }

    installedPlugins.push(plugin)
    return this
}
这段代码是 Vue 2 中 Vue.use 的内部实现,核心逻辑是注册插件并防止重复安装。
const installedPlugins = this._installedPlugins || (this._installedPlugins = [])
if (installedPlugins.indexOf(plugin) > -1) {
  return this
}- 缓存已安装的插件,防止重复安装。this 指的是全局 Vue 构造函数。
- _installedPlugins 用来记录已经安装过的插件,如果没有就初始化为空数组。
- 如果插件已安装过,直接返回。
const args = toArray(arguments, 1)
args.unshift(this)
Vue.use(plugin, ...options) 是支持传递参数的,这里主要在获取到传入的其余参数:
例如:
Vue.use(MyPlugin, { foo: 1 }, 'extraValue')- plugin 是第一个参数;
- 后面的 { foo: 1 } 和 'extraValue' 是传给插件的参数。
从 arguments 中取出 index = 1 及之后的所有参数,组成一个新的数组。
例如:
function installPlugin(...args) {
  console.log(args)
}

Vue.use(MyPlugin, 'param1', 'param2')- arguments = [MyPlugin, 'param1', 'param2']
- toArray(arguments, 1) 得到的是:['param1', 'param2']
用 unshift 把 this(即 Vue 构造函数)放到第一个参数,形如 [Vue, ...options],供插件使用。
if (isFunction(plugin.install)) {
  plugin.install.apply(plugin, args)
} else if (isFunction(plugin)) {
  plugin.apply(null, args)
}- 判断插件的类型,并调用其 install 方法或本体
- Vue.use 会分别调用:plugin.install(Vue, options)或 plugin(Vue, options)
installedPlugins.push(plugin)- 记录当前插件已安装
6. Vue.observable√
用法:
用于创建响应式对象。返回的对象可以直接用于渲染函数和计算属性内,并且会在发生改变时触发相应的更新。
Vue2 示例:
const state = Vue.observable({ count: 0 });
state.count++;
Vue3示例:
const state = reactive({ count: 0 });
state.count++;
总结:
它内部调用了observe方法,在这篇文章中已经分析过源码:
源码篇 剖析 Vue2 双向绑定原理_vue源码解析双向绑定-CSDN博客
7. Vue.mixin
用法:
用于全局注册一个混入对象,它会影响每个创建的组件实例。(全局污染风险高)
注:Vue2、Vue3 使用方法相同!
在 Vue 3 中,推荐使用:
- composition API 中的组合函数(如 useXXX)
- provide/inject
- 局部 mixin(仍然支持)
- 插件机制
下面这段代码会让每个组件在创建时都执行 created,并拥有 sayHello() 方法。
Vue.mixin({
  created() {
    console.log('全局混入的 created 被调用')
  },
  methods: {
    sayHello() {
      console.log('Hello from mixin')
    }
  }
})
会和组件自身的选项合并(如 data, methods, created 等),混入合并规则:
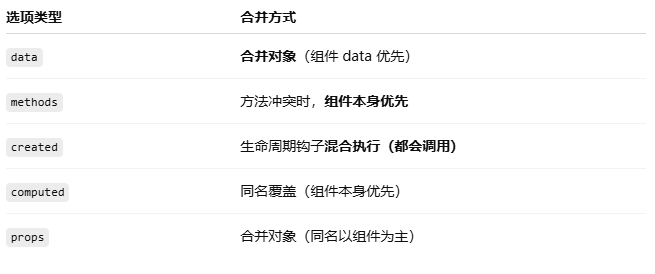
例如在组件中直接使用混入方法:
export default {
  logName: 'MyComponent',
  mounted() {
    this.sayHello()
  }
}
源码分析:
该代码片段源码位置:src/core/global-api/mixin.ts,此处只展示相关的代码部分
export function initMixin(Vue: GlobalAPI) {
  Vue.mixin = function (mixin: Object) {
    this.options = mergeOptions(this.options, mixin)
    return this
  }
}- initMixin(Vue) 作用是初始化全局 API 的一部分,例如 Vue.mixin, Vue.extend, Vue.use 等;
this.options = mergeOptions(this.options, mixin)这是最关键的一句:
- this 是 Vue 构造函数;
- this.options 是全局配置对象(存储全局组件、指令、生命周期等);
- mixin 是用户传入的配置对象(如:data、methods、生命周期钩子等);
mergeOptions() 是 Vue 内部用于合并两个配置对象的方法,它处理了:
- 生命周期钩子合并;
- data、props、methods 合并;
- 组件、指令等全局配置合并;
- 递归合并、原型链继承等处理细节。
最终的效果是:将 mixin 中的内容注入到全局 Vue.options 中,从而影响后续所有组件。
8. Vue.nextTick√
用法:
一个异步方法,用于在下次 DOM 更新循环结束之后执行延迟回调。
注:Vue2、Vue3 使用方法相同!
Vue.nextTick(() => {
  console.log('DOM updated!');
});
在 Vue3 中可以在 async/await 中使用:
await Vue.nextTick()为什么需要使用它?
Vue 在更新数据时是异步批处理的。例如:
this.message = 'hello'
this.$refs.box.innerText // ❌ 可能还是旧的内容
在这种情况下,如果马上访问 DOM,可能还没更新完。所以应该这样:
this.message = 'hello'
Vue.nextTick(() => {
  // ✅ 现在 DOM 已经更新
  console.log(this.$refs.box.innerText)
})
源码分析:
该代码片段源码位置:src/core/util/next-tick.ts,此处只展示相关的代码部分
这里有一部分代码是js事件循环相关的,此处先不说明,直接看核心函数 nextTick:
const callbacks: Array<Function> = []
let pending = false
function flushCallbacks() {
pending = false
const copies = callbacks.slice(0)
callbacks.length = 0
for (let i = 0; i < copies.length; i++) {
copies[i]()
}
}
export function nextTick(cb?: (...args: any[]) => any, ctx?: object) {
let _resolve
callbacks.push(() => {
if (cb) {
try {
cb.call(ctx)
} catch (e: any) {
handleError(e, ctx, 'nextTick')
}
} else if (_resolve) {
_resolve(ctx)
}
})
if (!pending) {
pending = true
timerFunc()
}
if (!cb && typeof Promise !== 'undefined') {
return new Promise(resolve => {
_resolve = resolve
})
}
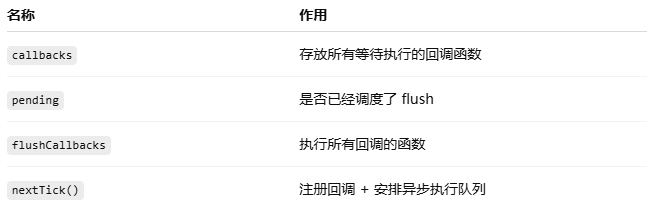
}这段代码可以分为三部分:
- 缓存任务回调队列(callbacks 数组)
- 异步调度处理函数(flushCallbacks)
- 主方法 nextTick —— 把回调放进队列,并在合适时机执行
const callbacks: Array<Function> = []
let pending = false- callbacks 是所有通过 nextTick 注册的回调函数队列;
- pending 用来避免重复触发异步定时器(只调度一次执行)。
function flushCallbacks() {
  pending = false
  const copies = callbacks.slice(0)
  callbacks.length = 0
  for (let i = 0; i < copies.length; i++) {
    copies[i]()
  }
}- 把当前回调队列拷贝到 copies 中执行(避免执行过程中又添加新的)执行完清空原队列;
- 这是 “DOM 更新完成之后所有任务的批处理执行点”。
callbacks.push(() => {
  if (cb) {
    try {
      cb.call(ctx)
    } catch (e) {
      handleError(e, ctx, 'nextTick')
    }
  } else if (_resolve) {
    _resolve(ctx)
  }
})- 将 cb 包成函数压入 callbacks 队列中;
- 如果没传 cb,说明调用的是 await nextTick(),这时保存 resolve 函数,执行时用于 Promise 触发。
if (!pending) {
  pending = true
  timerFunc()
}- 如果当前还没排队过 flushCallbacks,就安排一个异步任务执行它;
- timerFunc() 是平台相关的“微任务调度器”(源码中会根据环境选择 Promise.then / MutationObserver / setTimeout 等)。
if (!cb && typeof Promise !== 'undefined') {
  return new Promise(resolve => {
    _resolve = resolve
  })
}- 如果没有传回调(如:await nextTick()),就返回一个 Promise;
- 当队列执行完,调用 resolve()。
9. Vue.set 和 Vue.delete√
用法:
注:
Vue.set 和 Vue.delete 这两个API 仅在 Vue2中使用。
在 Vue 3 中,响应式系统(基于 Proxy)已经原生支持动态添加和删除属性。
Vue2 示例:
Vue.set(obj, 'newKey', 'newValue');

Vue.delete(obj, 'key');
data: {
person: {
name: 'John Doe'
}
}
methods: {
addProperty() {
this.$set(this.person, 'age', 30);
},
removeProperty() {
this.$delete(this.person, 'age');
}
}Vue3 示例:
Vue3 的响应式系统源码分析会持续更新,这里不对 reactive 和 ref 展开描述。
const person = reactive({
  name: 'John Doe'
});

function addProperty() {
  person.age = 30;
}

function removeProperty() {
  delete person.age;
}
源码分析:
该代码片段源码位置:src/core/observer/index.ts,此处只展示相关的代码部分
export function set<T>(array: T[], key: number, value: T): T
export function set<T>(object: object, key: string | number, value: T): T
export function set(
  target: any[] | Record<string, any>,
  key: any,
  val: any
): any {
  if (__DEV__ && (isUndef(target) || isPrimitive(target))) {
    warn(
      `Cannot set reactive property on undefined, null, or primitive value: ${target}`
    )
  }
  if (isReadonly(target)) {
    __DEV__ && warn(`Set operation on key "${key}" failed: target is readonly.`)
    return
  }
  const ob = (target as any).__ob__
  if (isArray(target) && isValidArrayIndex(key)) {
    target.length = Math.max(target.length, key)
    target.splice(key, 1, val)

    if (ob && !ob.shallow && ob.mock) {
      observe(val, false, true)
    }
    return val
  }
  if (key in target && !(key in Object.prototype)) {
    target[key] = val
    return val
  }
  if ((target as any)._isVue || (ob && ob.vmCount)) {
    __DEV__ &&
      warn(
        'Avoid adding reactive properties to a Vue instance or its root $data ' +
          'at runtime - declare it upfront in the data option.'
      )
    return val
  }
  if (!ob) {
    target[key] = val
    return val
  }
  defineReactive(ob.value, key, val, undefined, ob.shallow, ob.mock)
  if (__DEV__) {
    ob.dep.notify({
      type: TriggerOpTypes.ADD,
      target: target,
      key,
      newValue: val,
      oldValue: undefined
    })
  } else {
    ob.dep.notify()
  }
  return val
}
开头两行声明了重载函数 set,该函数可以用于设置数组或对象的值。
export function set<T>(array: T[], key: number, value: T): T
export function set<T>(object: object, key: string | number, value: T): T
export function set(
target: any[] | Record<string, any>,
key: any,
val: any
): any {这里是函数的主体,接受三个参数:
- target:目标对象或数组。
- key:要设置的属性或数组索引。
- val:要设置的值。
if (__DEV__ && (isUndef(target) || isPrimitive(target))) {
  warn(
    `Cannot set reactive property on undefined, null, or primitive value: ${target}`
  )
}
检查 target 是否是 undefined 或原始类型(null、boolean、number、string、symbol)。如果是,会在开发模式下警告,表示无法在这些类型上设置响应式属性。
if (isReadonly(target)) {
  __DEV__ && warn(`Set operation on key "${key}" failed: target is readonly.`)
  return
}
检查 target 是否为只读对象。如果是,会在开发模式下发出警告,表示不能在只读对象上设置属性,并直接返回。
const ob = (target as any).__ob__ob 是目标对象的响应式代理对象,__ob__ 是 Vue 用来追踪对象的响应式代理对象。每个响应式对象都会有一个 _ob_ 属性,指向它的代理对象。
if (isArray(target) && isValidArrayIndex(key)) {
  target.length = Math.max(target.length, key)
  target.splice(key, 1, val)

  if (ob && !ob.shallow && ob.mock) {
    observe(val, false, true)
  }
  return val
}
如果 target 是一个数组且 key 是有效的数组索引时的处理。
if (key in target && !(key in Object.prototype)) {
  target[key] = val
  return val
}
如果 key 已经存在于 target 对象中,且 key 不是 Object.prototype 上的属性(即它是该对象自身的属性),则直接给该属性赋值。
if ((target as any)._isVue || (ob && ob.vmCount)) {
  __DEV__ &&
    warn(
      'Avoid adding reactive properties to a Vue instance or its root $data ' +
        'at runtime - declare it upfront in the data option.'
    )
  return val
}
如果 target 是一个 Vue 实例或者该对象属于某个 Vue 实例,则在开发模式下警告,表示避免在 Vue 实例运行时动态添加属性,应当在 data 选项中声明。
if (!ob) {
  target[key] = val
  return val
}
如果 target 没有 __ob__(即它不是响应式对象),则直接给它的属性赋值,并返回。
defineReactive(ob.value, key, val, undefined, ob.shallow, ob.mock)使用 defineReactive 方法来设置该属性的响应式特性。
if (__DEV__) {
  ob.dep.notify({
    type: TriggerOpTypes.ADD,
    target: target,
    key,
    newValue: val,
    oldValue: undefined
  })
} else {
  ob.dep.notify()
}- 开发模式下,ob.dep.notify() 会触发依赖的更新。
- 非开发模式下,调用 ob.dep.notify() 来通知所有依赖更新。
下面是 delete 方法实现源码,大部分代码与 set 方法一致,只针对不同的地方进行说明。
export function del<T>(array: T[], key: number): void
export function del(object: object, key: string | number): void
export function del(target: any[] | object, key: any) {
  if (__DEV__ && (isUndef(target) || isPrimitive(target))) {
    warn(
      `Cannot delete reactive property on undefined, null, or primitive value: ${target}`
    )
  }
  if (isArray(target) && isValidArrayIndex(key)) {
    target.splice(key, 1)
    return
  }
  const ob = (target as any).__ob__
  if ((target as any)._isVue || (ob && ob.vmCount)) {
    __DEV__ &&
      warn(
        'Avoid deleting properties on a Vue instance or its root $data ' +
          '- just set it to null.'
      )
    return
  }
  if (isReadonly(target)) {
    __DEV__ &&
      warn(`Delete operation on key "${key}" failed: target is readonly.`)
    return
  }
  if (!hasOwn(target, key)) {
    return
  }
  delete target[key]
  if (!ob) {
    return
  }
  if (__DEV__) {
    ob.dep.notify({
      type: TriggerOpTypes.DELETE,
      target: target,
      key
    })
  } else {
    ob.dep.notify()
  }
}
检查属性是否存在:
if (!hasOwn(target, key)) {
  return
}
删除并通知依赖:
delete target[key]11. Vue.extend√
用法:
注:Vue2、Vue3 使用方法相同!
用于创建一个扩展的 Vue 构造器,常用于定义组件。初始有一个 id="app " 的 div元素:
<div id="app"></div>使用 Vue.extend(options) 【{Object} options】 将展示 message 数据的 span 标签写入 div 中:
const Extended = Vue.extend({
  template: '<span>{{ message }}</span>',
  data() {
    return { message: 'Hello from extended component!' };
  }
});

const instance = new Extended();
instance.$mount('#app');
使用 Vue.extend() 创建这个组件,通过 $mount('#mount-point') 将组件实例挂载到 id="app" 的元素上,并将 message 插入span 标签中,结果如下:
<div id="app">
  <span>Hello from extended component!</span>
</div>
源码分析:
该代码片段源码位置:src/core/global-api/extend.ts,此处只展示相关的代码部分
Vue.extend = function (extendOptions: any): typeof Component {
    extendOptions = extendOptions || {}
    const Super = this
    const SuperId = Super.cid
    const cachedCtors = extendOptions._Ctor || (extendOptions._Ctor = {})
    if (cachedCtors[SuperId]) {
      return cachedCtors[SuperId]
    }

    const name = getComponentName(extendOptions) || getComponentName(Super.options)
    if (__DEV__ && name) {
      validateComponentName(name)
    }

    const Sub = function VueComponent(this: any, options: any) {
      this._init(options)
    } as unknown as typeof Component
    Sub.prototype = Object.create(Super.prototype)
    Sub.prototype.constructor = Sub
    Sub.cid = cid++
    Sub.options = mergeOptions(Super.options, extendOptions)
    Sub['super'] = Super

    if (Sub.options.props) {
      initProps(Sub)
    }
    if (Sub.options.computed) {
      initComputed(Sub)
    }

    Sub.extend = Super.extend
    Sub.mixin = Super.mixin
    Sub.use = Super.use

    ASSET_TYPES.forEach(function (type) {
      Sub[type] = Super[type]
    })

    if (name) {
      Sub.options.components[name] = Sub
    }

    Sub.superOptions = Super.options
    Sub.extendOptions = extendOptions
    Sub.sealedOptions = extend({}, Sub.options)

    cachedCtors[SuperId] = Sub
    return Sub
}
这段代码是 Vue 中 Vue.extend() 方法的实现,用于创建一个新的 Vue 组件构造器,继承父组件的选项并返回一个新的构造器。 下面对代码内容进行分解说明:
Vue.extend = function (extendOptions: any): typeof Component- Vue.extend() 方法接收一个 extendOptions 参数,这个参数是扩展的组件选项(如 data、computed、methods、props 等)。
- 返回的类型是新的组件构造器(typeof Component),即一个类或构造函数。
extendOptions = extendOptions || {}
const Super = this
const SuperId = Super.cid
const cachedCtors = extendOptions._Ctor || (extendOptions._Ctor = {})- 确保 extendOptions 不是 undefined 或 null,如果没有传入参数,则使用空对象作为默认值。
- Super 代表当前 Vue 构造器,即调用 extend 方法的 Vue 类。
- SuperId 存储当前构造器的 cid,是 Vue 为每个构造器分配的唯一标识符。
- cachedCtors 用于缓存已经创建过的组件构造器。_Ctor 存储在 extendOptions 上,用于缓存当前构造器。
- 如果 extendOptions 中已经有 _Ctor,则使用它;如果没有,则创建一个新的空对象。
if (cachedCtors[SuperId]) {
    return cachedCtors[SuperId]
}- 如果当前构造器已经被创建过,直接返回缓存的构造器。
const name = getComponentName(extendOptions) || getComponentName(Super.options)
if (__DEV__ && name) {
    validateComponentName(name)
}- 从 extendOptions 中获取组件名称,如果没有,则从父组件 Super.options 中获取。
- 如果当前是开发环境,并且组件有名称,验证组件名称是否合法。
const Sub = function VueComponent(this: any, options: any) {
    this._init(options)
} as unknown as typeof Component
Sub.prototype = Object.create(Super.prototype)
Sub.prototype.constructor = Sub
Sub.cid = cid++- 创建一个新的构造函数 Sub,它将作为新的组件构造器。VueComponent 是一个临时函数,调用其 this._init(options) 方法来初始化组件实例。
- 将 Super 父类的原型继承到 Sub 子类中,并为 Sub 组件分配一个唯一的 cid。
Sub.options = mergeOptions(Super.options, extendOptions)
Sub['super'] = Super- 合并父组件的选项 Super.options 和扩展选项 extendOptions,将结果存储 Sub.options 中。
- 给 Sub 添加一个 super 属性,指向父组件 Super。这允许在组件内部访问父类的信息。
if (Sub.options.props) {
  initProps(Sub)
}

function initProps(Comp: typeof Component) {
  const props = Comp.options.props
  for (const key in props) {
    proxy(Comp.prototype, `_props`, key)
  }
}- 如果 Sub.options 中定义了 props,则调用 initProps 方法来初始化 props
if (Sub.options.computed) {
  initComputed(Sub)
}

function initComputed(Comp: typeof Component) {
  const computed = Comp.options.computed
  for (const key in computed) {
    defineComputed(Comp.prototype, key, computed[key])
  }
}- 如果 Sub.options 中定义了 computed,则调用 initComputed 方法来初始化计算属性。
Sub.extend = Super.extend
Sub.mixin = Super.mixin
Sub.use = Super.use

ASSET_TYPES.forEach(function (type) {
  Sub[type] = Super[type]
})

if (name) {
  Sub.options.components[name] = Sub
}- Sub 继承父类的一些方法。
- 遍历 ASSET_TYPES,将 Super 上的相应类型的资源复制到 Sub 上。
- 如果组件有名称,将 Sub 作为组件注册到 Sub.options.components 中,确保它能在父组件中被使用。
Sub.superOptions = Super.options
Sub.extendOptions = extendOptions
Sub.sealedOptions = extend({}, Sub.options)

cachedCtors[SuperId] = Sub
return Sub- 给 Sub 新增三个独有的属性。
- 将新创建的组件构造器 Sub 缓存到 cachedCtors 中,便于复用。
- 返回创建的新组件构造器 Sub。
总结:
将整个过程看作一个 "类扩展" 的过程:Vue.extend() 通过原型继承基础类(Vue)并添加一些新的属性和方法来生成一个新的子类(Sub),这个子类就是 Vue 组件的构造器,能够被实例化为 Vue 组件,并且具有 Vue 组件所需的所有功能。
12.Vue.version√
用法:
用于获取当前 Vue 的版本。
console.log(Vue.version);13. Vue.createApp()
用法:
注:Vue 2 没有这个 API,它是通过 new Vue() 来创建 Vue 实例!
new Vue({
  el: '#app',
  data: {
    message: 'Hello, Vue 2!'
  }
});
Vue.createApp() 用于创建 Vue 应用实例,是 Vue3 中的 API。
const app = Vue.createApp({
  data() {
    return {
      message: 'Hello, Vue 3!'
    };
  }
});
app.mount('#app');
源码分析:
因为我们下载的 Vue 源码版本是2.7,因此这里面没有封装 Vue.createApp() 这个 API 的源码,它的大致逻辑是这样的,就不对此段代码进行展开说明了:
function createApp(rootComponent) {
  // 创建应用实例
  const app = {
    _component: rootComponent,  // 存储根组件
    _props: null,                // 存储 props,默认值为 null
    _container: null,            // 存储挂载容器的引用

    // 注册组件
    component(name, component) {
      // 可以注册全局组件
      this._components[name] = component;
      return this;
    },

    // 挂载到 DOM
    mount(container) {
      this._container = document.querySelector(container);  // 获取 DOM 容器
      if (!this._container) {
        throw new Error('Container not found');
      }

      // 初始化根组件
      const componentInstance = this._createComponentInstance(this._component);
      this._renderComponent(componentInstance);

      return this;
    },

    // 创建组件实例
    _createComponentInstance(component) {
      // 实际实现中会有更多逻辑,创建组件实例,初始化其数据、生命周期等
      return {
        component,
        data: component.data ? component.data() : {},
        template: component.template,
      };
    },

    // 渲染组件
    _renderComponent(componentInstance) {
      const { data, template } = componentInstance;

      // 使用模板渲染组件,这里可以是一个复杂的渲染过程
      const renderedTemplate = template.replace(/\{\{(\w+)\}\}/g, (_, key) => data[key]);

      // 将渲染后的结果添加到挂载容器中
      this._container.innerHTML = renderedTemplate;
    },
  };

  app._components = {};  // 用于存储注册的全局组件

  return app;
}
总结
- Vue 3 引入 createApp() 来替代 new Vue(),并且一些 API 如 Vue.filter() 和 Vue.compile() 被移除或替代。
- Vue 3 中的响应式系统得到增强,Vue.observable() 被 reactive() 和 ref() 替代,Vue.set() 和 Vue.delete() 不再需要,直接操作对象即可。