摘 要
本文介绍如何利用Dlib面部特征点检测和OpenCV图像处理技术,通过Python实现面部特征的精准调整。我们将以改变眼间距为例,演示包括地标检测、三角剖分变形等关键技术,该方法可扩展至嘴唇、眉毛等面部特征的调整。
技术栈
-
Python 3.8+
OpenCV 4.x
Dlib 19.24
NumPy
SciPy
实现步骤
1. 环境准备
import cv2import dlibimport numpy as npfrom scipy.spatial import Delaunayimport gdownimport os
2. 模型文件下载
import gdownimport osos.chdir('/content')SHAPE_PREDICTOR_URL = 'https://drive.google.com/uc?id=17lKsYuDwBuc4O-OSKRzgwpoNnrwC2ws-'gdown.download(SHAPE_PREDICTOR_URL, 'shape_predictor_81_face_landmarks.dat', quiet=False)
3. 加载模型和图像
detector = dlib.get_frontal_face_detector()predictor = dlib. shape_predictor("/content/shape_predictor_81_face_landmarks.dat")image = cv2.imread("/content/your_image.jpg")detector = dlib.get_frontal_face_detector()predictor = dlib. shape_predictor("/content/shape_predictor_81_face_landmarks.dat")image = cv2.imread("/content/your_image.jpg")
4. 检测人脸并提取特征点
gray = cv2.cvtColor(image, cv2.COLOR_BGR2GRAY)faces = detector(gray)landmarks = predictor(gray, faces[0])original_points = np.array([(p.x, p.y) for p in landmarks.parts()], dtype=np.float32)
将图像转换为灰度图像以便更好地检测。然后首先检测人脸并提取其 81 个人脸特征点。
5. 修改眼睛特征点
modified_points = original_points.copy()left_eye_indices = [36, 37, 38, 39, 40, 41]right_eye_indices = [42, 43, 44, 45, 46, 47]shift_amount = 10for idx in left_eye_indices:modified_points[idx][0] -= shift_amountfor idx in right_eye_indices:modified_points[idx][0] += shift_amount
这部分代码是实际面部作发生的地方。它会创建原始面部特征点的副本,并移动眼睛特征点以增加它们之间的距离。左眼点(索引 36-41)通过从 x 坐标中减去shift_amount向左移动,而右眼点 (42-47) 通过添加相同的量向右移动。这会将眼睛间距增加 2 × shift_amount。相同的逻辑可用于作其他面部特征,只需更改地标索引以针对不同的区域,并根据所需的移动方向调整 x 或 y 值。增加或减少 x 轴可水平移动要素,而更改 y 轴可垂直移动要素。
6. 使用 Delaunay 三角剖分进行面部变形
delaunay = Delaunay(original_points)triangles = delaunay.simplices
使用 Delaunay 三角剖分将面部划分为三角形,这可确保图像平滑变形。
7. 逐个扭曲三角形
pts_src = np.array([original_points[i] for i in tri], dtype=np.float32)pts_dst = np.array([modified_points[i] for i in tri], dtype=np.float32)matrix = cv2.getAffineTransform(pts_src, pts_dst)triangle_mask = np.zeros((h, w), dtype=np.uint8)cv2.fillConvexPoly(triangle_mask, pts_src.astype(np.int32), 255)warped_triangle = cv2.warpAffine(image, matrix, (w, h), flags=cv2.INTER_LINEAR, borderMode=cv2.BORDER_REFLECT)warped_image[triangle_mask == 255] = warped_triangle[triangle_mask == 255]
对于每个三角形,计算仿射变换并应用它。这部分对于自然的经纱至关重要。
8. 合并并显示结果
mask = np.any(warped_image != 0, axis=-1).astype(np.uint8) * 255combined_image = cv2.bitwise_and(image, image, mask=255 - mask)combined_image += cv2.bitwise_and(warped_image, warped_image, mask=mask)cv2_imshow(image)cv2_imshow(combined_image)cv2.imwrite("Result_eyes.jpg", combined_image)
创建原始图像和 Warp 版本的平滑合成。结果看起来不错,就好像这个人恰好有一双更宽的眼睛一样。
这项技术不仅限于眼睛,您还可以使用它来纵其他面部特征,例如嘴唇、鼻子、眉毛或下巴。您所需要的只是一组正确的地标。
我们查看一些示例图像,这些图像突出显示了各种经过处理的面部属性。
眼睛部分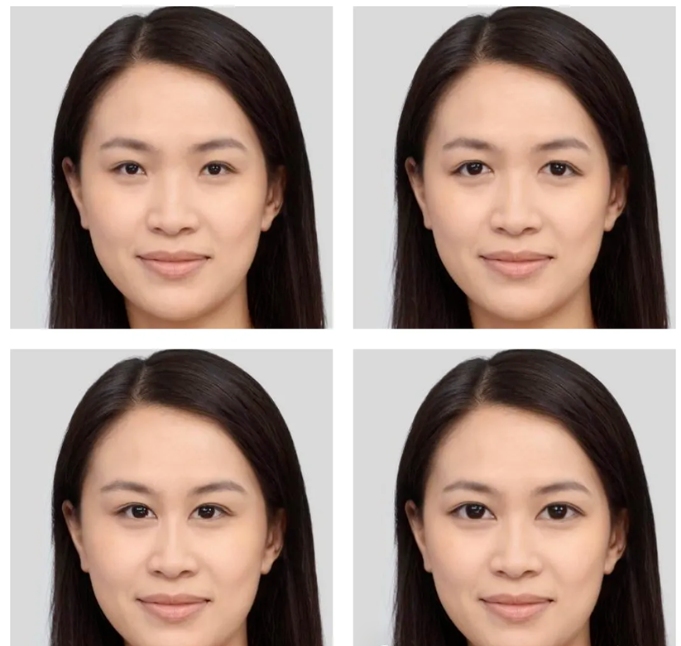
鼻子部分
嘴唇部分

大礼包1:Pytorch常用函数手册
Pytorch函数手册,即可下载学习全网第一份Pytorch函数常用手册,包括Tensors介绍、基础函数介绍、数据处理函数、优化函数、CUDA编程、多处理等十四章内容。
大礼包2:145个OpenCV实例应用代码
145个OpenCV实例应用代码(Python和C++双语言实现)。