本文环境:php7.3.4 CI3.0框架
一、H5直传总步骤:
(1)、获取临时密钥:
临时密钥是通过如下两种方式生成:
方式一:COS STS SDK ,适用于开发语言场景。
方式二:STS 云 API ,适用于用户更方便快捷的生成密钥。
本文用第二种:通过secretId和secretKey,获取临时签名返回给H5前端,前端将文件和临时签名上传到CDN;教程链接在这里:
1、对象存储 使用临时密钥访问 COS_腾讯云
2、对象存储 临时密钥生成及使用指引_腾讯云
(2)、前端所在的域名要腾讯云COS控制台设置:跨域访问 CORS 设置,教程链接在这里:对象存储 Web 端直传实践_腾讯云
二、详细步骤如下:
1、用composer命令安装STS拓展
composer require tencentcloud/sts2、手动引入编写代码:
Tencent.php
<?php
defined('BASEPATH') OR exit('No direct script access allowed');
 // 手动引入腾讯云 STS SDK 必要文件
 require_once APPPATH . 'libraries/third_party/TencentCos/vendor/autoload.php';
 use TencentCloud\Common\Credential;
 use TencentCloud\Common\Profile\ClientProfile;
 use TencentCloud\Common\Profile\HttpProfile;
 use TencentCloud\Common\Exception\TencentCloudSDKException;
 use TencentCloud\Sts\V20180813\StsClient;
 use TencentCloud\Sts\V20180813\Models\GetFederationTokenRequest;
class Tencent {
    private $cos_config = array(
        'region' => 'ap-beijing', // 替换为你的 COS 地域,例如 ap-guangzhou
        'secretId' => 'ABCDWFO', // 替换为你的 SecretId
        'secretKey' => 'VSOSOSO', // 替换为你的 SecretKey
        'bucket' => 'abc-asdfas', // 替换为你的 Bucket 名称,例如 examplebucket-1250000000
        'timeout' => 60,
        'connect_timeout' => 60,
        'teo_domain' => 'https://www.baidu.com' // 替换为你的 TEO 自定义域名
    );

    public function __construct() {
        $this->_CI = & get_instance();
		$this->_CI->load->helper('comm');
    }


    // 获取临时凭据
    function getFederationToken(){
        $bucket = $this->cos_config['bucket']; // 替换为你的 COS 存储桶名称
        $region = $this->cos_config['region']; // 替换为你的 COS 区域,例如 ap-guangzhou
        $cred = new Credential($this->cos_config['secretId'], $this->cos_config['secretKey']);
        // 使用临时密钥示例
        // $cred = new Credential("SecretId", "SecretKey", "Token");
        // 实例化一个http选项,可选的,没有特殊需求可以跳过
        $httpProfile = new HttpProfile();
        $stsr="sts." . $region . ".tencentcloudapi.com";
        $httpProfile->setEndpoint($stsr);

        // 实例化一个client选项,可选的,没有特殊需求可以跳过
        $clientProfile = new ClientProfile();
        $clientProfile->setHttpProfile($httpProfile);
        // 实例化要请求产品的client对象,clientProfile是可选的
        $client = new StsClient($cred, $region, $clientProfile);

        // 实例化一个请求对象,每个接口都会对应一个request对象
        $req = new GetFederationTokenRequest();
        $bucket = $this->cos_config['bucket'];
        $policy = [
            "version" => "2.0",
            "statement" => [
                [
                    "effect" => "allow",
                    "action" => [
                        "ES:CreateServerlessSpace",
                        "ES:CreateServerlessInstance",
                        "ES:DescribeServerlessInstances",
                        "ES:CreateServerlessInstanceUser",
                        "ES:DescribeServerlessInstanceUsers",
                        "ES:CreateServerlessDi",
                        "ES:DescribeServerlessDi",
                        "ES:DeleteServerlessInstanceUser",
                        "ES:DeleteServerlessDi",
                        "ES:DeleteServerlessInstance",
                        "ES:DescribeServerlessSpaces",
                        "ES:SearchServerlessData",
                        'name/cos:PutObject',
                        'name/cos:InitiateMultipartUpload',
                        'name/cos:ListMultipartUploads',
                        'name/cos:ListParts',
                        'name/cos:UploadPart',
                        'name/cos:CompleteMultipartUpload'
                    ],
                    "resource" => [
                        "*"
                    ]
                ]
            ]
        ];

        $params = array(
            'Name' => 'cos',
            'DurationSeconds' => 3600,
            'Policy' => (json_encode($policy))
        );
        $req->fromJsonString(json_encode($params));

        // 返回的resp是一个GetFederationTokenResponse的实例,与请求对象对应
        $resp = $client->GetFederationToken($req);
        $arr=json_decode($resp->toJsonString(),true);

        if(!empty($arr['Credentials'])){
            $response = [
                'SecretId' => $arr['Credentials']['TmpSecretId'],
                'SecurityToken' => $arr['Credentials']['Token'],
                'Expiration' => $arr['Expiration'],
                'SecretKey' => $arr['Credentials']['TmpSecretKey'],
                'Bucket' => $bucket,
                'Region' => $region,
                'RequestId' => $arr['RequestId']
            ];
            return $response;

        }
        return false;
    }
}里面的policy策略,具体看这里:1、访问管理 元素参考概述_腾讯云 2、demo:https://github.com/tencentyun/qcloud-cos-sts-sdk/blob/master/php/demo/sts_test.php
3、将获取的临时签名及信息输出前端
upload.php
class upload {
	function upload_h5_cdn_package() {
		$data['cos_path'] = 'adbcd/tst';//换成自己需要上传的CDN空间位置
		$cdn=new Tencent();
		$res=$cdn->getFederationToken();
		$data['SecretId']=$res['SecretId'];
		$data['SecretKey']=$res['SecretKey'];
		$data['Bucket']=$res['Bucket'];
		$data['Region']=$res['Region'];
		$data['SecurityToken']=$res['SecurityToken'];
		$data['UploadPath']=$cos_path.'test.jpg';//换成自己的文件
		$data['Expiration']=$res['Expiration'];
		$this->load->view("bapp/upload_h5_cdn_package",$data);
	}
}
4、写前端代码
upload_h5_cdn_package.html
<!DOCTYPE html>
<html lang="en">
<head>
    <meta charset="UTF-8">
    <meta name="viewport" content="width=device-width, initial-scale=1.0">
    <!-- Bootstrap CSS -->
    <link href="/statics/css/bootstrap.min.css" rel="stylesheet" crossorigin="anonymous">
    <!-- jQuery hu-->
    <script src="/statics/js/jquery-2.1.1.js"></script>
    <!--换成自己的插件路径 -->
    <script src="/assets/layer.js"></script>
    <title>CDN H5 直传</title>
    <script src="https://unpkg.com/cos-js-sdk-v5@1.8.7/dist/cos-js-sdk-v5.min.js"></script>
    <style>
        body {
            background-color: #f8f9fa;
        }
        .upload-container {
            min-height: 100vh;
            display: flex;
            align-items: center;
            justify-content: center;
        }
        .upload-form {
            background-color: white;
            padding: 2rem;
            border-radius: 8px;
            box-shadow: 0 2px 10px rgba(0, 0, 0, 0.1);
            width: 100%;
            max-width: 500px;
        }
        .btn-upload {
            padding: 10px 20px;
            font-size: 1.1rem;
        }
        #picker {
            display: inline-block;
        }
        .progress-container {
            display: none;
            margin-top: 1rem;
        }
        .error-message {
            display: none;
        }
    </style>
</head>
<body>
    <div class="upload-container">
        <div class="upload-form">
            <h3 class="text-center mb-4">上传文件</h3>
            <div class="alert alert-danger error-message"></div>
            <form id="uploadForm">

                <div class="mb-3" style="margin: 1rem;height: 5rem;">
                    <input type="file" id="fileInput" />
                </div>
                <div class="d-flex align-items-center">
                    <button type="button" id="uploadButton" onclick="uploadFile()" class="btn btn-primary btn-upload" >开始上传</button>
                </div>
                <div class="progress-container">
                    <div class="progress-bar">
                        <div class="progress" id="progressBar"></div>
                    </div>
                    <p>上传进度: <span id="progressText">0%</span></p>
                </div>
                <div id="uploadResult"></div>
            </form>
        </div>
    </div>
    <script>


        var signatureData={};
        signatureData.SecretId="<?=$SecretId?>";
        signatureData.SecurityToken="<?=$SecurityToken?>";
        signatureData.Bucket="<?=$Bucket?>";
        signatureData.Region="<?=$Region?>";
        signatureData.UploadPath="<?=$cos_path?>";
        signatureData.Expiration="<?=$Expiration?>";
        signatureData.SecretKey="<?=$SecretKey?>";
        function uploadFile() {
            if (!signatureData) {
                layer.msg('签名数据未加载,请稍后重试');
                return;
            }

            const file = document.getElementById('fileInput').files[0];
            if (!file) {
                layer.msg('请选择文件');
                return;
            }

            const cos = new COS({
                getAuthorization: function(options, callback) {
                    const auth = {
                        TmpSecretId: signatureData.SecretId,
                        TmpSecretKey: signatureData.SecretKey,
                        SecurityToken: signatureData.SecurityToken, // 确保 SecurityToken 存在
                        StartTime: Math.floor(Date.now() / 1000),
                        ExpiredTime: Math.floor(new Date(signatureData.Expiration).getTime() / 1000)
                    };
                    console.log('getAuthorization 返回:', auth); // 调试:打印授权数据
                    callback(auth);
                }
            });

            const progressBar = document.getElementById('progressBar');
            const progressText = document.getElementById('progressText');
            const uploadResult = document.getElementById('uploadResult');

            cos.putObject({
                Bucket: signatureData.Bucket,
                Region: signatureData.Region,
                Key: signatureData.UploadPath,
                Body: file,
                onProgress: function(progressData) {
                    const percent = Math.round(progressData.percent * 100);
                    progressBar.style.width = percent + '%';
                    progressText.innerText = percent + '%';
                }
            }, function(err, data) {
                if (err) {
                    uploadResult.innerText = '上传失败: ' + JSON.stringify(err);
                } else {
                    uploadResult.innerText = '上传成功: ' + JSON.stringify(data);
                    // 调用回调函数更新版本
                    updateVersionCallback(data.Location, signatureData.GameInfo.game_name, signatureData.GameInfo.current_version);
                }
            });
        }


        function updateVersionCallback(fileUrl, gameName, currentVersion) {
            const appid = 'YOUR_APPID'; // 替换为实际 Appid 或从前端/后端获取
            const newVersion = prompt('请输入新版本号(当前版本: ' + currentVersion + '):', currentVersion);

            if (!newVersion) {
                layer.msg('版本号不能为空');
                return;
            }
            layer.msg('更新成功');
            return;

            fetch('<?php echo base_url('upload/update_version'); ?>', {
                method: 'POST',
                headers: { 'Content-Type': 'application/json' },
                body: JSON.stringify({
                    appid: appid,
                    version: newVersion,
                    file_url: fileUrl
                })
            })
            .then(response => response.json())
            .then(data => {
                if (data.error) {
                    alert('版本更新失败: ' + data.error);
                } else {
                    alert('版本更新成功: ' + data.message);
                    document.getElementById('currentVersion').innerText = newVersion;
                }
            })
            .catch(err => {
                alert('版本更新失败: ' + err.message);
            });
        }
    </script>

</body>
</html>
5、将自己的域名添加到腾讯云 跨域访问 CORS 设置;具体操作步骤在这里:对象存储 Web 端直传实践_腾讯云
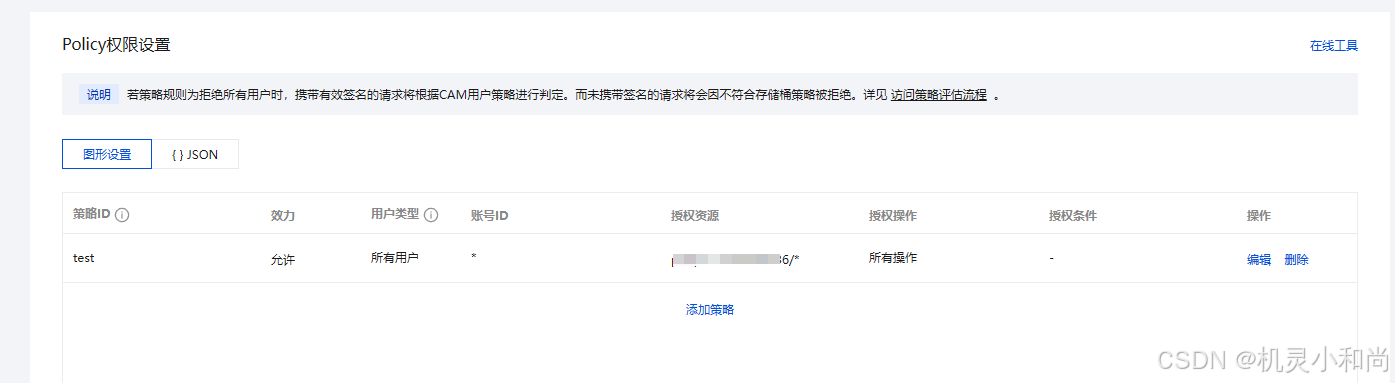
设置策略时,记得存储桶页面这里也应该要设置一下:
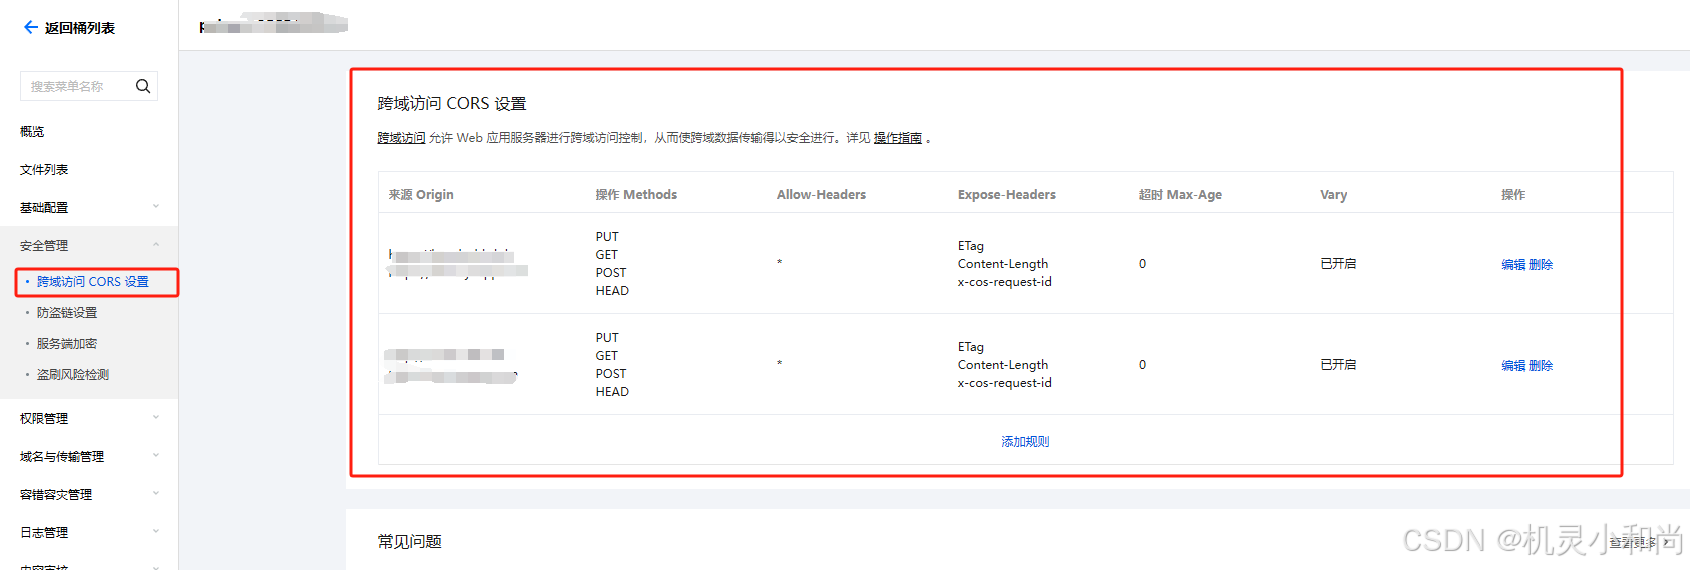
如果第五步没有做就会出现这个提示: {"message":"CORS blocked or network error","code":"Error","error":{"message":"CORS blocked or network error","code":"Error"},"headers":{},"url":"http://xxxxxx","method":"PUT"}