作者:来自 Elastic Dayananda Srinivas

探索组织如何利用 Elasticsearch 检测和处理贷款或保险申请中的重复项。
Elasticsearch 带来了大量新功能,帮助你为你的使用场景构建最佳搜索方案。深入了解我们的示例 notebooks,开始免费云试用,或立即在本地机器上尝试 Elastic。
想象这个场景:一位客户在周一以 “Katherine Johnson” 申请了一笔 $50,000 的贷款,然后在周三又以 “Kate Johnson” 提交了另一份申请。是同一个人,同一个地址,但你的系统将他们视为不同的申请人。结果?重复批准、违规操作、严重财务损失。
这个挑战远不止简单拼写错误,它涉及复杂的欺诈手段、真实用户失误,以及人们实际填写表单时的各种情况。当你的重复检测失效时,你不仅是在亏钱 —— 你还在违反监管规定,破坏客户信任,并引发运营混乱。
让我们构建一个可以在后端处理数千份申请时捕捉这些重复项的解决方案。借助 Elasticsearch 的音近搜索能力和 LLM,我们将打造一个既强大又实用的系统。
重复检测的隐藏复杂性
重复检测的挑战远比多数组织意识到的更深。以下是真实场景中传统系统难以应对的情况:
姓名变化误导系统:
经典拼写错误:"John Smith" vs "Jon Smith" vs "Jonathon Smith" —— 是拼写错误,还是不同的人?
发音混淆:"Shawn" vs "Shaun" vs "Sean" vs "Shon" —— 发音相同,拼写不同
昵称与变体:"Alexander" vs "Alex" vs "Xander" —— 同一个人,多种称呼
地址差异带来盲区:
街道缩写:"123 Maple Street" vs "123 Maple St" vs "123 Maple Avenue" —— 同一地址,不同写法
公寓表示差异:"Unit 5, 42 Elm Road" vs "42 Elm Rd, Apt 5" —— 同一地址,不同结构
城市名称混淆:"Los Angeles" vs "LA" —— 地理名称的不同表达
家庭关系使检测复杂化:
名字相似、地址相同:"Bob Brown" 和 "Rob Brown",住在 "789 Pine Rd" —— 他们是双胞胎,不是重复
世代后缀:"James Carter Sr." vs "James Carter Jr." —— 一个字母的差异却意义重大
如果没有可靠方式标记这些重复记录,组织可能无意中为同一客户批准多笔贷款或保险单,违反资格规定,增加违约风险,并带来收入损失。
解决方案
通过将 Elasticsearch 与现代 AI 模型结合,我们可以构建一个智能、可扩展且高性价比的重复记录识别与清除方案。
姓名的音近搜索:
Elasticsearch 支持音近算法,能识别发音相同但拼写不同的名字。例如,“Smith” 和 “Smyth” 被视为相同,因为发音一致。这使系统能够发现简单文本匹配无法识别的重复项。你可以将其理解为教搜索引擎像人一样 “听” 名字 —— 让 “John” 和 “Jon” 被认为是同一个人。
处理地址格式差异:
用户输入的地址格式往往各不相同。我们使用 AI 模型生成地址的不同形式或同义词 —— 如 “Syd.” 和 “Sydney”、 “Bengaluru” 和 “Bangalore” —— 并利用这些变体优化 Elasticsearch 查询。即使用户输入与系统存储内容不完全匹配,也能实现地址匹配。
使用 AI 进行去重判断:
当我们从 Elasticsearch 检索到可能重复的记录后,将其传递给 AI 模型进行去重判断。虽然我们也可以使用 Levenshtein 或 Jaro-Winkler 等算法,但当涉及更多字段(如出生日期、身份证号或电话号码)时,逻辑会变复杂。AI 模型提供了灵活性,能够整体分析数据,简化判断逻辑,更容易在多个字段间识别真正的重复项。
架构概览
以下是该解决方案的高级工作流程:

亲自体验一下!
先决条件与设置
在进入具体实现之前,我们先确认所需的全部内容。
所需基础设施
Elasticsearch 集群 —— 你需要访问一个 Elasticsearch 集群。本次设置中,我使用的是 Elastic Cloud 托管的 Elasticsearch 9.0.0 版本。如果你还没有集群,有以下两种选择:
Elastic Cloud —— 你可以在这里创建一个新集群,并选择 Elastic Cloud 托管或 Elasticsearch Serverless 选项。
本地设置 —— 如果你更喜欢本地运行,可以使用这里提供的脚本快速启动一个集群。
Phonetic Analysis 插件 —— 为支持姓名音近匹配,请确保你的 Elasticsearch 安装已启用 Phonetic Analysis 插件。
Ollama LLM 服务器 —— 鉴于我们要处理姓名、地址、出生日期等敏感信息,建议使用本地 LLM。可以使用 Ollama 运行轻量模型如 LLaMa 3.2 8B。它运行快速、本地部署,适合此类数据处理。
先从这里下载并安装与你操作系统兼容的 Ollama 版本。
安装完成后,运行
ollama run llama3:8b拉取并运行该模型。
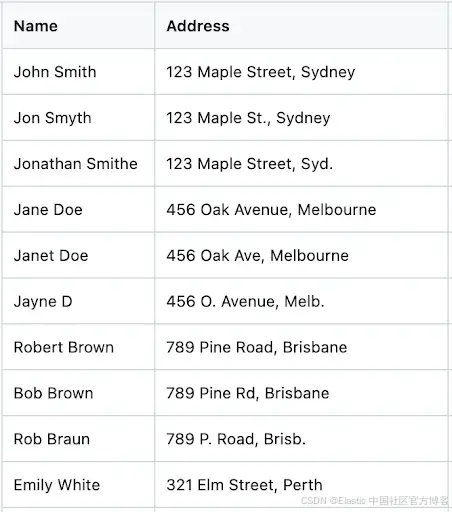
样例数据集 —— 为测试设置并模拟真实场景,我准备了一个包含姓名、地址等细微差异的小型数据集。你可以从此链接下载包含 101 条记录的样例数据集。
下方是样例数据集的截图:
开发环境:
!pip install elasticsearch==9.0.2
!pip install pandas==2.2.2
!pip install -U langchain-community==0.3.26
!pip install -U streamlit==1.46.1
!npm install -g localtunnel@2.0.2
这些安装提供以下功能:
elasticsearch:用于连接 Elasticsearch 的客户端库
pandas:用于数据处理和 CSV 操作
langchain-community:用于集成 OpenAI,进行 AI 分析
streamlit:用于构建交互式网页界面
localtunnel:用于将本地开发环境暴露到公网
第 1 步:连接到 Elasticsearch
我们需要 Elasticsearch 的 endpoint 和 API Key 进行身份验证。
获取你的 Elasticsearch endpoint:
- 登录 Elastic Cloud
- 进入你的部署
- 从部署概览中复制 Elasticsearch endpoint
创建 API key:
- 从你的部署中打开 Kibana
- 进入 Stack Management → API Keys
- 创建一个新的 API key 并妥善保存
当你获取到凭证后,建立连接。
将下面的代码保存并执行,文件名为 “es_connect.py”。记得填写 ES_URL 和 API_KEY 的值。
from elasticsearch import Elasticsearch,helpers
import os

# Set environment variables
os.environ["ES_URL"] = ""
os.environ["API_KEY"] = ""

# Use them
es = Elasticsearch(
    hosts=[os.environ["ES_URL"]],
    api_key=os.environ["API_KEY"]
)
# Test the connection
if es.ping():
    print("✅ Connected to Elasticsearch!")
else:
    print("❌ Connection failed.")
第 2 步:创建索引模板
我们重复检测系统的核心在于索引配置,尤其是我们指示 Elasticsearch 根据姓名生成音近编码的部分。我们将创建一个索引模板,使用姓名的音近匹配以及地址的最佳匹配。
了解语音分析器:
我们的模板使用了两种音近算法:
Double Metaphone:处理复杂的发音变化,适用于多样化的姓名
Soundex:为发音相似的姓名提供一致的编码
以下是完整的索引模板。
将下面的代码保存并执行,文件名为 “create_index_template.py”
from es_connect import es
# Define the index template
index_template = {
       "index_patterns": [
           "names-*"
       ],
       "settings": {
           "index": {
               "analysis": {
                   "filter": {
                       "my_dmetaphone_filter": {
                           "replace": "false",
                           "type": "phonetic",
                           "encoder": "double_metaphone"
                       },
                       "my_soundex": {
                           "type": "phonetic",
                           "encoder": "soundex"
                       }
                   },
                   "analyzer": {
                       "name_analyzer_soundex": {
                           "filter": [
                               "lowercase",
                               "my_soundex"
                           ],
                           "tokenizer": "standard"
                       },
                       "name_analyzer_dmetaphone": {
                           "filter": [
                               "lowercase",
                               "my_dmetaphone_filter"
                           ],
                           "tokenizer": "standard"
                       }
                   }
               },
               "number_of_shards": "1",
               "number_of_replicas": "1"
           }
       },
       "mappings": {
           "properties": {
               "address": {
                   "type": "text",
                   "fields": {
                       "keyword": {
                           "ignore_above": 256,
                           "type": "keyword"
                       }
                   }
               },
               "name": {
                   "analyzer": "name_analyzer_dmetaphone",
                   "type": "text",
                   "fields": {
                       "soundex": {
                           "analyzer": "name_analyzer_soundex",
                           "type": "text"
                       }
                   }
               }
           }
       }
   }

    # Create the template
try:
   response = es.indices.put_template(name="name-search",body=index_template)
   print("Index template created successfully:", response)
except Exception as e:
print("Error creating index template:", e)这个模板的作用:
音近处理:在索引时,姓名会自动转换为音近编码
多字段分析:每个姓名同时使用 Double Metaphone 和 Soundex 进行分析
地址优化:地址同时支持全文匹配和精确匹配的索引方式
灵活匹配:该模板支持多种搜索策略,适用于不同使用场景
第 3 步:加载并索引数据
现在,我们来加载样例数据集,并将其索引到 Elasticsearch 以便进行搜索。将以下代码保存并执行,文件名为 “index_csv_data.py”
import pandas as pd
from es_connect import es, helpers
file_path = input("Enter the path to your CSV file: ")
try:
    df = pd.read_csv(file_path)
    print("\nFirst 5 rows of the file:")
    print(df.head())
except Exception as e:
    print(f"Error reading the file: {e}")

# Define the index name where the data will be ingested
INDEX_NAME = 'names-search'


def generate_bulk_data(df):
   for index, row in df.iterrows():
       yield {
           "_index": INDEX_NAME,
           "_source": row.to_dict()
       }
# Delete if index already exists
if es.indices.exists(index=INDEX_NAME):
   es.indices.delete(index=INDEX_NAME)
   print(f"Index '{INDEX_NAME}' deleted.")


try:
   response = helpers.bulk(es, generate_bulk_data(df))
   print("Data ingestion complete!")
   print(f"Indexed {response[0]} documents successfully.")
except Exception as e:
   print("Error during bulk ingestion:", e)
第 4 步:启动 Llama 模型并生成地址变体
获取用户输入的地址,并通过调用 LLM 生成该地址的多种变体,以处理一些细微差异。
例如,如果用户输入 "123 Maple St., Syd",模型将生成关键词,如 ["123 Maple St., Sydney", "Street", "Str", "Sydnei", "Syd"]。
# Import required libraries
import pandas as pd
import streamlit as st
import json
from es_connect import es
from langchain_community.llms.ollama import Ollama
from langchain.prompts import PromptTemplate
from langchain.chains import LLMChain

@st.cache_resource
def get_ollama_model():
    return Ollama(
        model="llama3:8b",
        temperature=0.1,  # Low temperature for consistent results
        base_url="http://localhost:11434"  # Default Ollama URL
    )

def get_address_variations(model, input_address):
    prompt_template = PromptTemplate(
        template=(
            "Given the address below, generate a concise JSON array of common synonyms, place name variations, abbreviations, misspellings, and variations people might use for this address."
            "Return ONLY a JSON array, with no explanation or extra text."
            "If no variations are found, return an array with only the original address."
            "Address: {address}"
        ),
        input_variables=["address"],
    )
    chain = LLMChain(llm=model, prompt=prompt_template)
    try:
        llm_response = chain.run({"address": input_address})
        print("Raw LLM response:", llm_response)
        address_variations = json.loads(llm_response.strip())
        if not isinstance(address_variations, list):
            address_variations = [input_address]
    except Exception as e:
        print(f"Error parsing LLM response: {e}")
        address_variations = [input_address]
    return address_variations
第 5 步:构建最终搜索查询
使用从上述姓名和地址变体生成的值来构建搜索查询。
def query_elasticsearch(index, input_name, input_address, size=5):
    model = get_ollama_model()
    address_variations = get_address_variations(model, input_address)
    print(f"Address variations used for search: {address_variations}")

    # Use multi_match to search for all variations in the address field
    body = {
        "query": {
            "bool": {
                "must": [
                    {"match_phrase": {"name": input_name}},
                    {
                        "multi_match": {
                            "query": " ".join(address_variations),
                            "fields": ["address"],
                            "type": "best_fields"
                        }
                    }
                ]
            }
        },
        "size": size
    }

    print("Elasticsearch query body:", json.dumps(body, indent=2))
    response = es.search(index=index, body=body)
    return response['hits']['hits']
第 6 步:检查重复项
上述搜索查询会找到潜在匹配项。随后,这些姓名和地址将作为上下文提供给模型。通过以下函数,我们将提示模型计算它们是重复项的概率。
def check_duplicates(search_name, input_address, response):
    # Create prompt template optimized for local models
    prompt_template = PromptTemplate(
        template="""
You are a data deduplication expert. Analyze the following information and provide a structured comparison.

Input Name: {search_name}
Input Address: {input_address}

Potential matches from database:
{response}

Instructions:
1. Compare each potential match against the input name and address
2. Calculate a match percentage (0-100%) for each record
3. Consider name variations, spelling differences, and address similarities
4. Classification Rules:
        - 80%+ match = Duplicate
        - 60-79% match = Review Required
        - Below 60% = Not Duplicate
5. Use the Jaro-Winkler algorithm principles.


Format your response as a markdown table. Sort results based on match percentage. Include the columns:
| Name | Address | Match % | Status | Explanation |

Example format:
| John Smith | 123 Main St | 95% | DUPLICATE | Exact name match, address variation |
| Jon Smyth | 123 Main Street | 85% | DUPLICATE | Name spelling variation, same address |

""",
        input_variables=["search_name", "input_address", "response"],
    )

    # Prepare prompt input
    prompt_input = {
        "search_name": search_name,
        "input_address": input_address,
        "response": response
    }

    # Create the LLM chain
    model = get_ollama_model()
    chain = LLMChain(llm=model, prompt=prompt_template)

    # Get the response from Ollama
    response = chain.run(prompt_input)
    return response
第 7 步:创建 Streamlit 界面
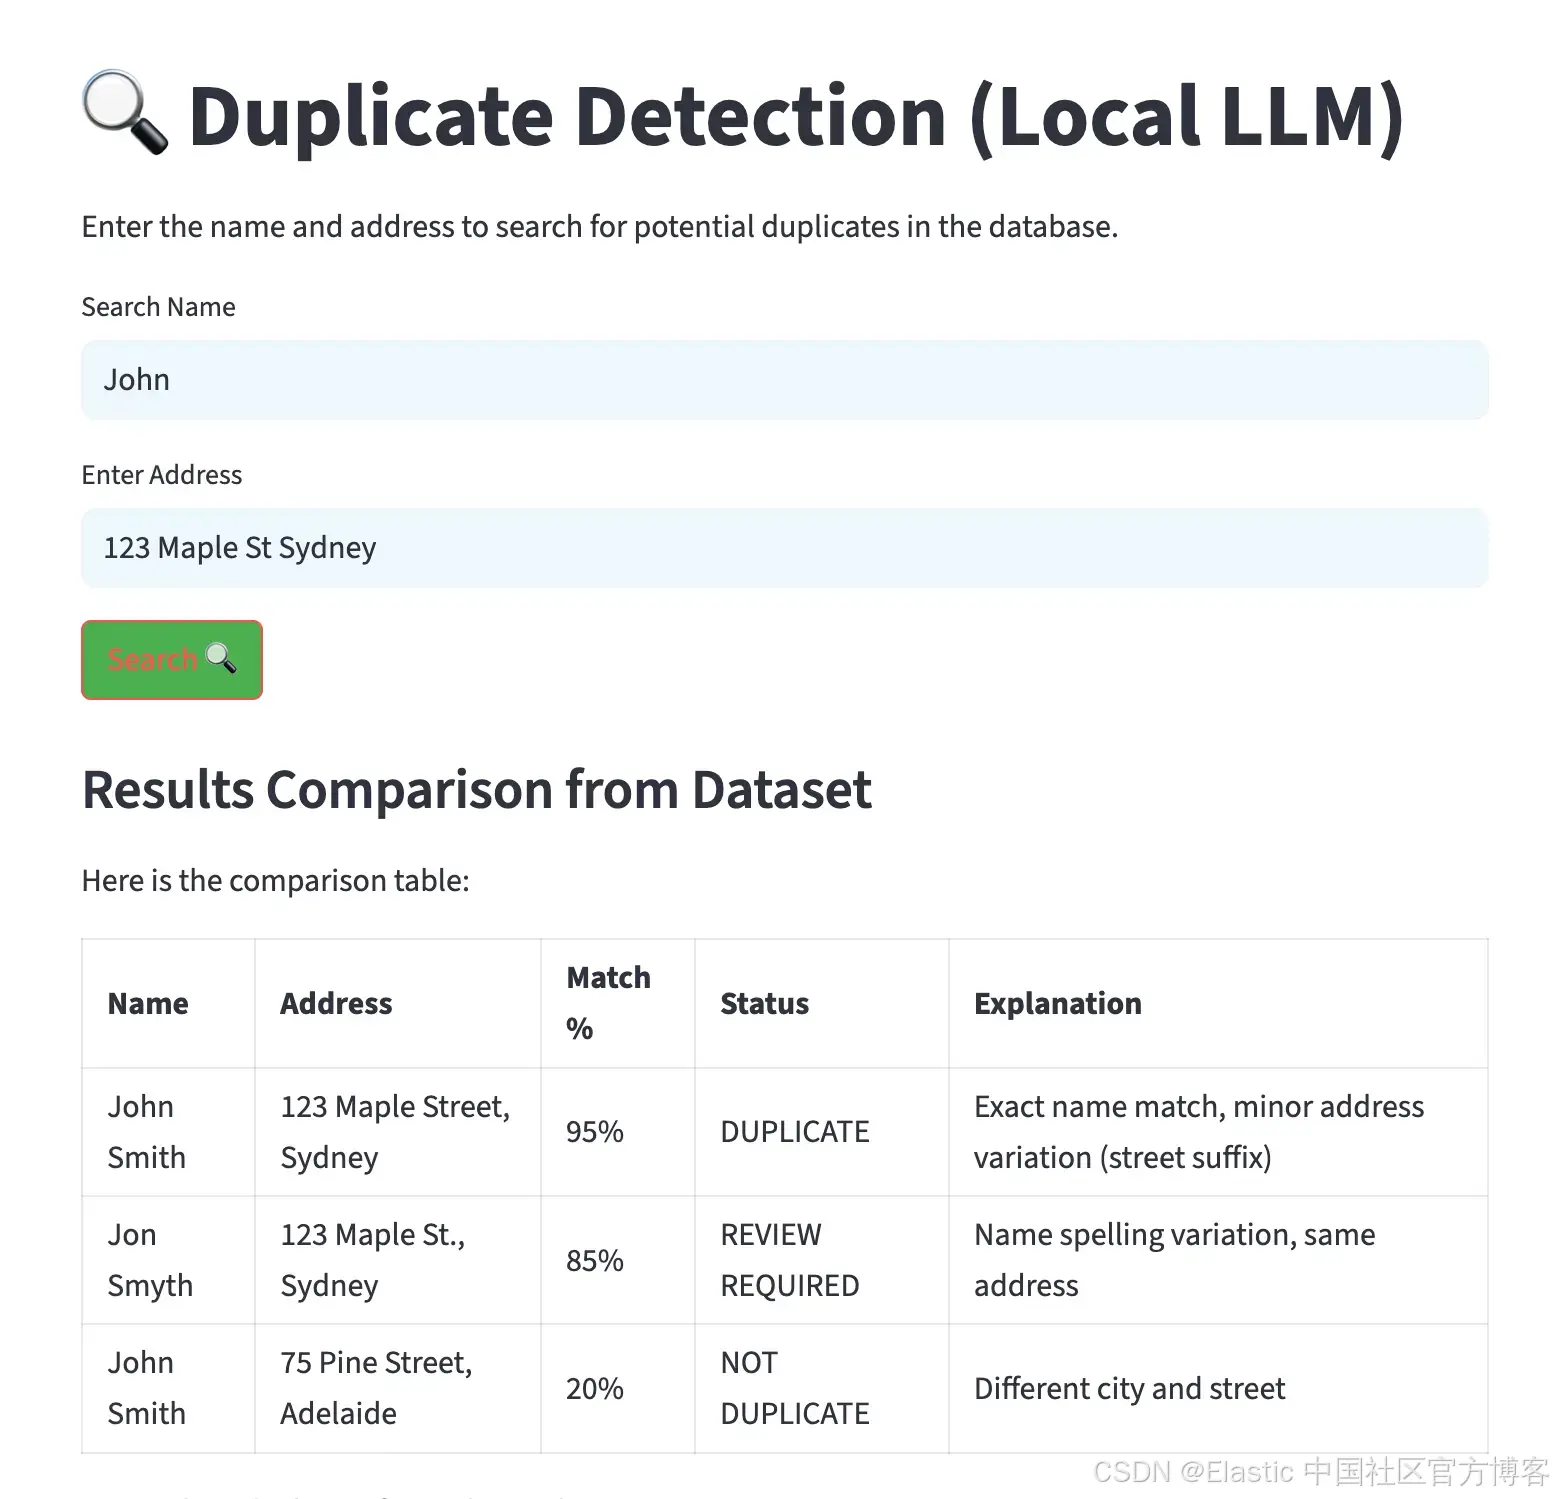
现在,使用下面的 Streamlit 代码来创建一个简洁、直观的界面。
# Main function for Streamlit app
def main():
    st.set_page_config(page_title="Duplicate Detection (Local LLM)", layout="centered")
    # Custom CSS for styling
    st.markdown("""
        <style>
            body { font-family: 'Arial', sans-serif; color: #333; }
            .stTextInput input { background-color: #f0f8ff; padding: 10px; border-radius: 5px; }
            .stButton button { background-color: #4CAF50; color: white; border-radius: 5px; }
            .stButton button:hover { background-color: #45a049; }
            .response-table th, .response-table td { padding: 10px; border: 1px solid #ddd; }
            .response-table th { background-color: #f4f4f4; }
            .response-table td { text-align: center; }
        </style>
    """, unsafe_allow_html=True)


    st.title("🔍 Duplicate Detection (Local LLM)")
    st.write("Enter the name and address to search for potential duplicates in the database.")

    # Input fields
    input_name = st.text_input("Search Name", placeholder="Enter the name you want to search for...")
    input_address = st.text_input("Enter Address", placeholder="Enter the address")


    if st.button("Search 🔍"):
        if input_name and input_address:

            index_name = "names-search"


            with st.spinner("Searching for duplicates..."):
                # Query Elasticsearch for potential duplicates
                es_response = query_elasticsearch(index_name, input_name, input_address)


                # Build context from results
                if es_response:
                    # Format the response data for the LLM
                    formatted_response = []
                    for hit in es_response:
                        source = hit['_source']
                        formatted_response.append(f"Name: {source['name']}, Address: {source['address']}")

                    response = "\n".join(formatted_response)


                    # Send the details to Ollama for analysis
                    response = check_duplicates(input_name, input_address, response)


                    # Display the response on the UI
                    st.write("### Results Comparison from Dataset")
                    st.markdown(response)

                    # Show raw Elasticsearch results for reference
                    with st.expander("Raw Elasticsearch Results"):
                        for hit in es_response:
                            st.json(hit['_source'])
                else:
                    st.write("❌ No potential duplicates found.")
        else:
            st.write("⚠️ Please enter both the name and address to search.")

if __name__ == "__main__":
    main()
第 8 步:执行并测试系统
为优化性能,避免重复加载模型和过多连接打开,将第 4、5、6、7 步的代码整合到一个名为 app.py 的文件中。然后用该文件启动 Streamlit 界面。
streamlit run app.py执行后,会生成一个界面,允许输入姓名和地址。结果会以表格形式显示,按匹配百分比排序,并包含潜在重复项的解释,如下图所示。
贷款和保险申请之外的应用场景
去重技术在多个行业和领域有广泛应用。以下是一些主要例子:
政府和公共服务 —— 标记重复的选民登记、税务记录、社会保障申请或公共福利项目注册。
客户关系管理(CRM) —— 识别 CRM 数据库中的重复客户记录,提升数据质量,避免冗余。
医疗系统 —— 发现医院管理系统中的重复病人记录,确保医疗历史和账单准确。
电子商务平台 —— 识别重复的产品列表或卖家档案,维护干净的目录,提升用户体验。
房地产与物业管理 —— 发现物业管理系统中重复的房源或租户信息。
总结:使用 Elasticsearch 构建去重流程
我们展示了如何结合 Elasticsearch 的音近搜索功能和本地 LLM 处理,创建一个应对真实复杂情况的强大去重流程。
首先,准备好集群和所需数据集,并部署本地模型。然后,利用姓名、地址及其变体等关键实体查询 Elasticsearch 找到相似匹配。接着,将 Elasticsearch 返回结果作为上下文传给模型进行重复分析。模型根据指令判断哪些记录可能是重复。
请记住,重复检测不是一次性项目,而是持续改进的过程。AI 组件会根据反馈学习,搜索算法也能基于结果不断优化,系统的准确性随时间提升。
通过在这些场景中实施 Elasticsearch,企业能够领先一步,确保数据准确、合规,并在快速变化的市场中保持竞争优势。
原文:Building intelligent duplicate detection with Elasticsearch and AI - Elasticsearch Labs