文章目录
- 数据准备
- 一、 概述
- 二、需求: 多组件共享数据
- 三、vuex 的使用 - 创建仓库
- 四、核心概念 - state 状态
- 五、开启严格模式及Vuex的单项数据流
- 六、mutations+mapMutations同步修改仓库属性的值
- 七、actions+mapActions异步修改仓库属性的值
- 八、核心概念-getters
- 9 前面四个属性的总结
- 十、核心概念 - 模块 module
- 总结
数据准备
新建项目
- 检查版本
node版本:20.18.0
@vue/cli版本:5.0.8 - 新建文件夹,输入cmd回车打开命令行窗口

- 命令行窗口:输入指令
vue create 项目名
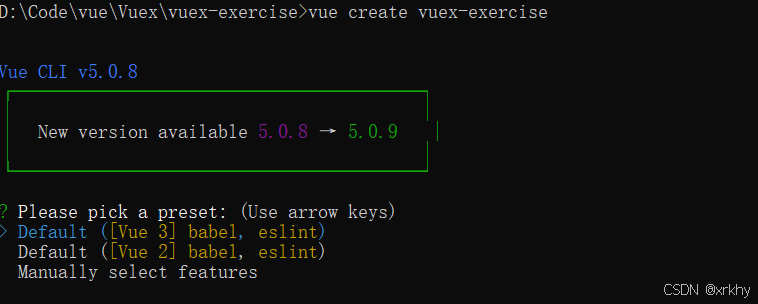
选择模块安装

vscode工具打开 删除无用文件
删除src/assets文件下的所有内容
删除src/components文件下的所有内容
修改src/app.vue
<template>
  <div id="app">

   </div>
</template>

<script>

export default {
  name: 'App'
}
</script>

<style lang="scss">
</style>
vscode运行项目
快捷键打开终端Ctrl + Shift + 反引号 打开终端。反引号是tab键上面那个
运行如下指令启动项目
npm run serve
一、 概述
1.是什么
Vuex 是一个 Vue 的 状态管理工具,状态就是数据。
官网如下:https://vuex.vuejs.org/zh/
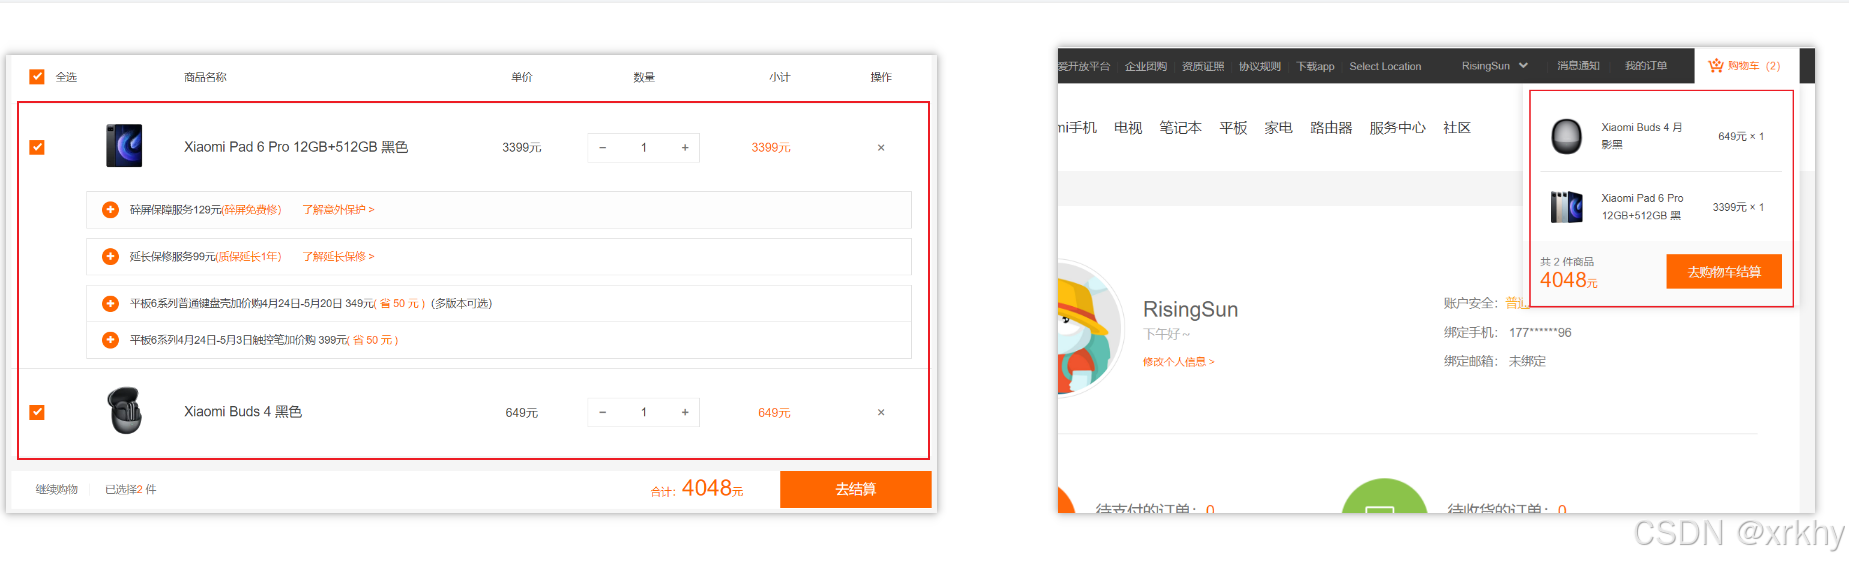
大白话:Vuex 是一个插件,可以帮我们管理 Vue 通用的数据 (多组件共享的数据)。例如:购物车数据 个人信息数
2. 使用场景
- 某个状态 在 很多个组件 来使用 (个人信息)
主页需要展示 XXX订单需要写你的名字等等。 - 多个组件 共同维护 一份数据 (购物车)
3.优势
- 共同维护一份数据,数据集中化管理
- 响应式变化
- 操作简洁 (vuex提供了一些辅助函数)
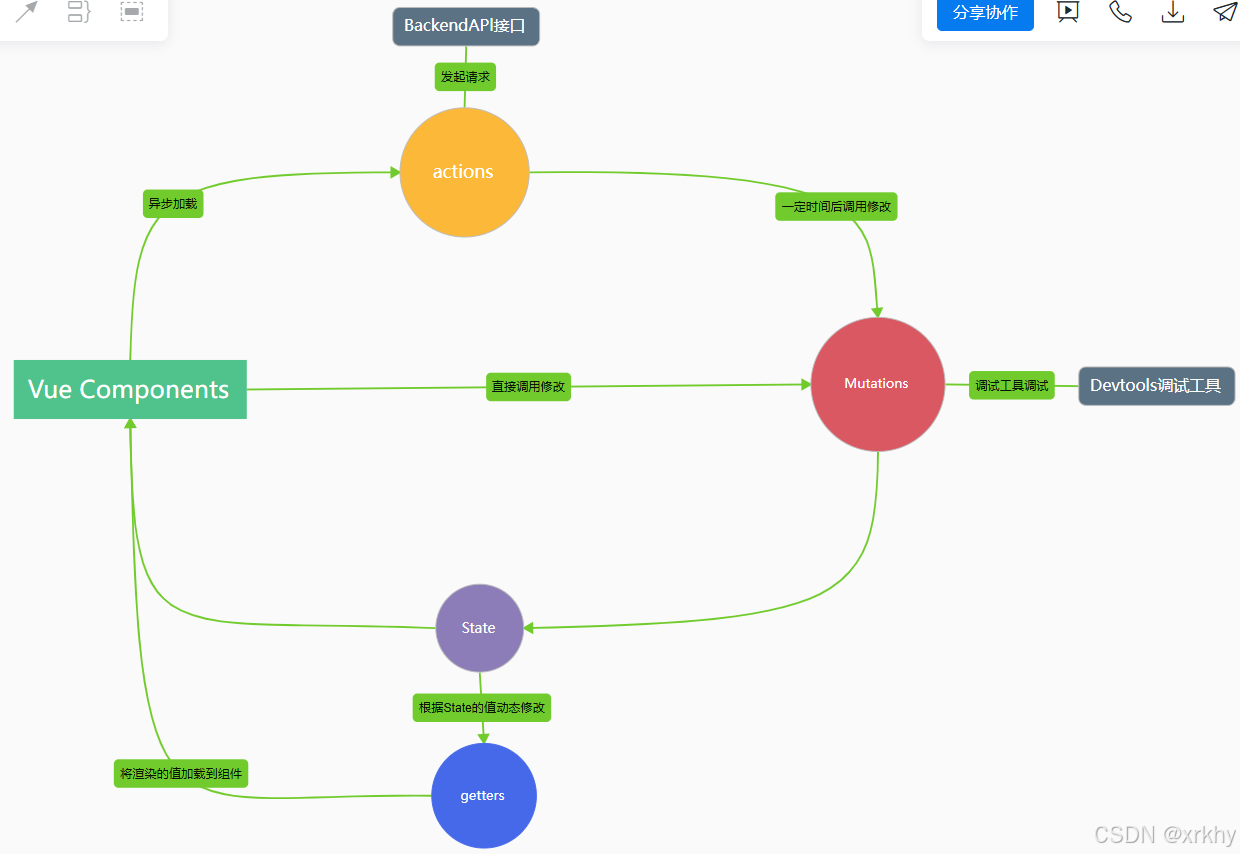
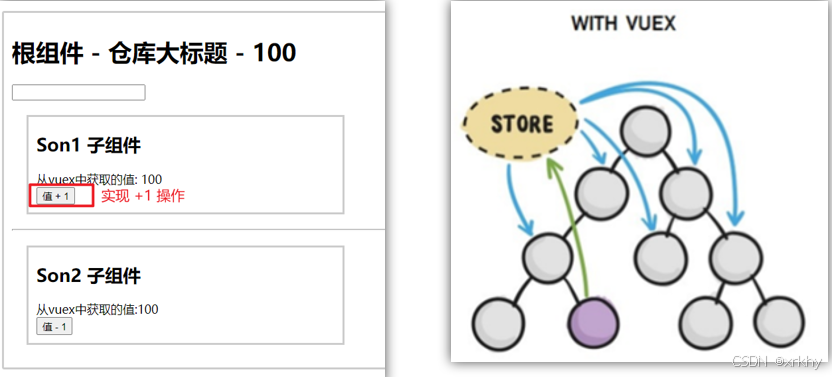
4 Vuex流程图
这个图等讲完后就能看懂了。
5.注意:
官方原文:
- 不是所有的场景都适用于vuex,只有在必要的时候才使用vuex
- 使用了vuex之后,会附加更多的框架中的概念进来,增加了项目的复杂度 (数据的操作更便捷,数据的流动更清晰)
Vuex就像《近视眼镜》, 你自然会知道什么时候需要用它~
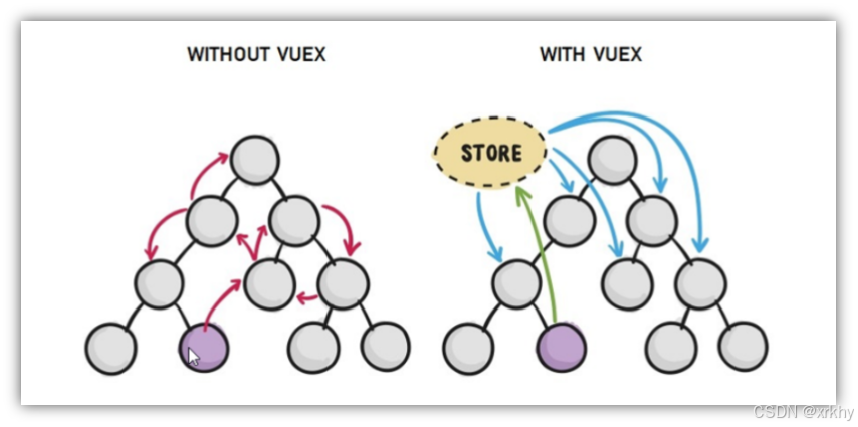
二、需求: 多组件共享数据
目标:基于脚手架创建项目,构建 vuex 多组件数据共享环境
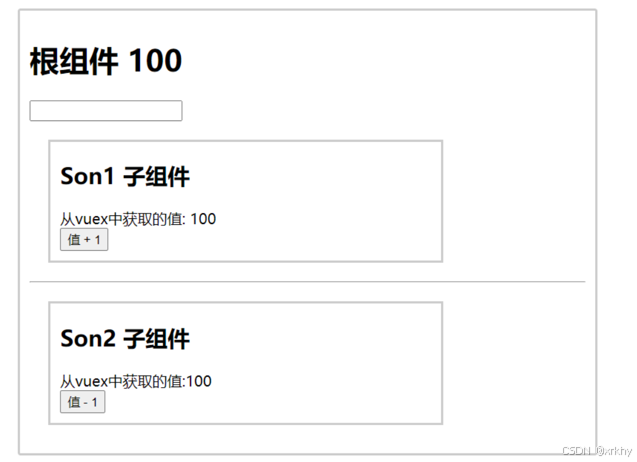
效果是三个组件共享一份数据:
- 任意一个组件都可以修改数据
- 三个组件的数据是同步的
创建三个组件, 目录如下
|-components
|--Son1.vue
|--Son2.vue
|-App.vue
源代码如下
Son1.vue
<template>
  <div class="box">
    <h2>Son1 子组件</h2>
    从vuex中获取的值: <label></label>
    <br>
    <button>值 + 1</button>
  </div>
</template>

<script>
export default {
  name: 'Son1Com'
}
</script>

<style lang="css" scoped>
.box{
  border: 3px solid #ccc;
  width: 400px;
  padding: 10px;
  margin: 20px;
}
h2 {
  margin-top: 10px;
}
</style>
Son2.vue
<template>
  <div class="box">
    <h2>Son2 子组件</h2>
    从vuex中获取的值:<label></label>
    <br />
    <button>值 - 1</button>
  </div>
</template>

<script>
export default {
  name: 'Son2Com'
}
</script>

<style lang="css" scoped>
.box {
  border: 3px solid #ccc;
  width: 400px;
  padding: 10px;
  margin: 20px;
}
h2 {
  margin-top: 10px;
}
</style>
App.vue
App.vue在入口组件中引入 Son1 和 Son2 这两个子组件
<template>
  <div id="app">
    <h1>根组件</h1>
    <input type="text">
    <Son1></Son1>
    <hr>
    <Son2></Son2>
  </div>
</template>

<script>
import Son1 from './components/Son1.vue'
import Son2 from './components/Son2.vue'

export default {
  name: 'app',
  data: function () {
    return {

    }
  },
  components: {
    Son1,
    Son2
  }
}
</script>

<style>
#app {
  width: 600px;
  margin: 20px auto;
  border: 3px solid #ccc;
  border-radius: 3px;
  padding: 10px;
}
</style>
main.js不变
import Vue from 'vue'
import App from './App.vue'

Vue.config.productionTip = false

new Vue({
  render: h => h(App)
}).$mount('#app')
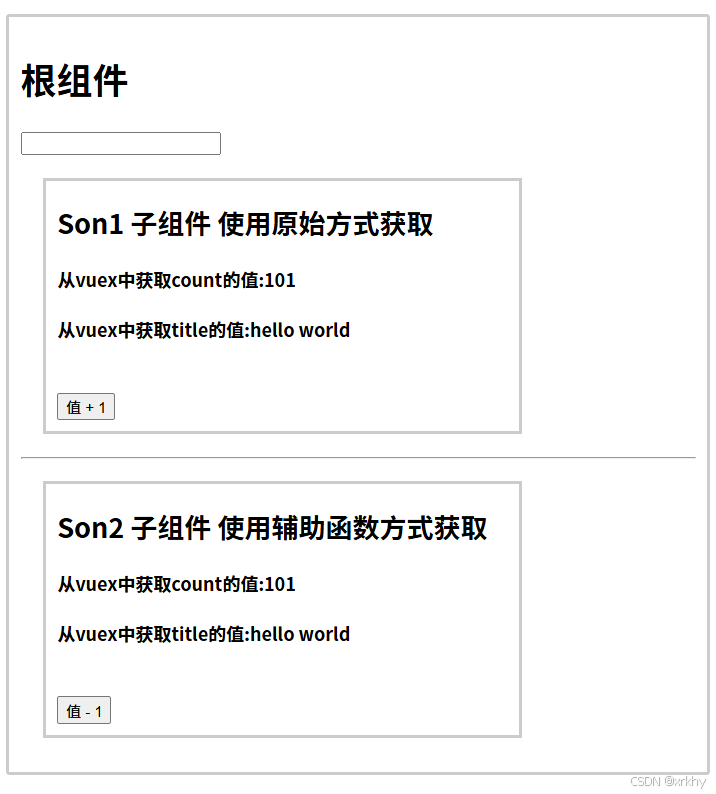
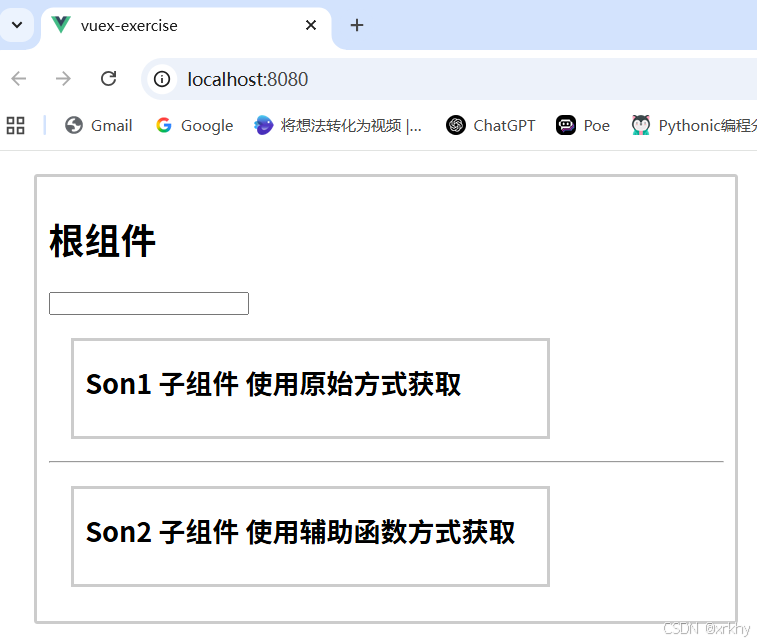
说明
上图中的Son1使用原始方法获取值Vuex的值 进行演示讲解
Son2使用辅助函数的方式获取值Vuex的值 进行演示讲解
三、vuex 的使用 - 创建仓库

1.安装 vuex
安装vuex与vue-router类似,vuex是一个独立存在的插件,如果脚手架初始化没有选 vuex,就需要额外安装。
yarn add vuex@3 或者 npm i vuex@3
注意
- vue2 安装Vuex3.0 版本 Router 3.0 版本
- vue3 安装Vuex4.0 版本 Router 4.0 版本
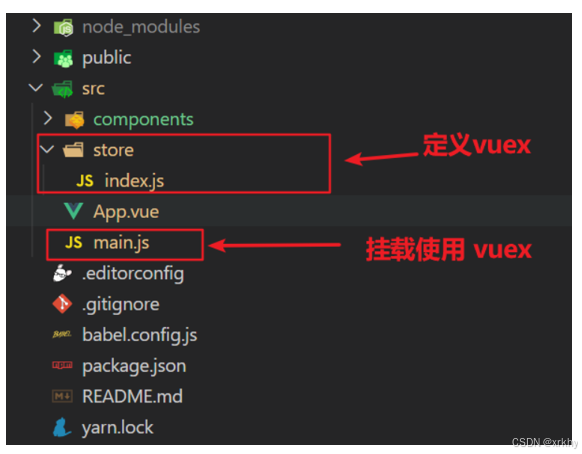
2.新建 store/index.js 专门存放 vuex
为了维护项目目录的整洁,在src目录下新建一个store目录其下放置一个index.js文件。 (和 router/index.js 类似)
3.创建仓库 store/index.js
// 导入 vue
import Vue from 'vue'
// 导入 vuex
import Vuex from 'vuex'
// vuex也是vue的插件, 需要use一下, 进行插件的安装初始化
Vue.use(Vuex)

// 创建仓库 store
const store = new Vuex.Store()

// 导出仓库
export default store
4 在 main.js 中导入挂载到 Vue 实例上
import Vue from 'vue'
import App from './App.vue'
import store from './store'

Vue.config.productionTip = false

new Vue({
  render: h => h(App),
  store
}).$mount('#app')
此刻起, 就成功创建了一个 空仓库!!
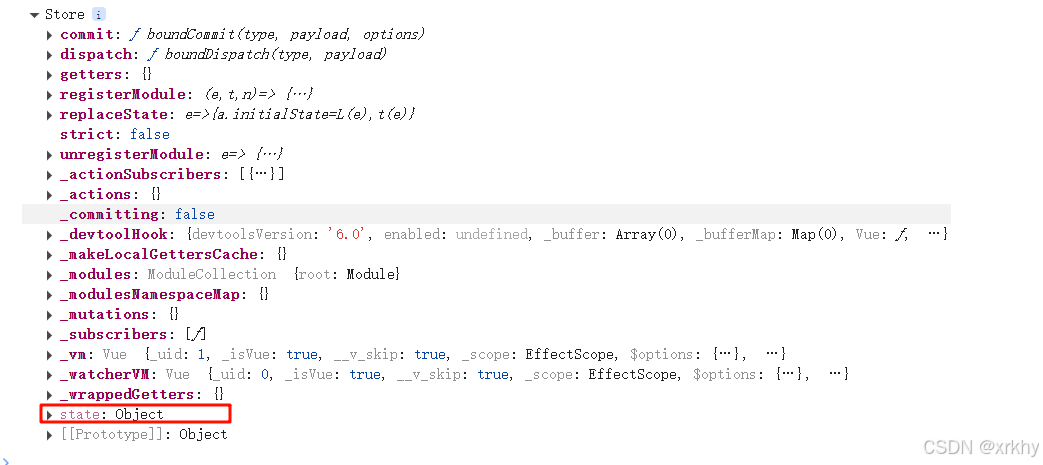
5.测试打印Vuex
App.vue
created(){
  console.log(this.$store)
}
四、核心概念 - state 状态
4.1 概念
State提供唯一的公共数据源,所有共享的数据都要统一放到Store中的State中存储。即上图的State—>Vue Components
4.2 store中定义state属性提供数据
打开项目中的store.js文件,在state对象中可以添加我们要共享的数据。
修改src/store/index.js
// 导入 vue
import Vue from 'vue'
// 导入 vuex
import Vuex from 'vuex'
// vuex也是vue的插件, 需要use一下, 进行插件的安装初始化
Vue.use(Vuex)

// 创建仓库 store
const store = new Vuex.Store({
  // state 状态, 即数据, 类似于vue组件中的data,
  // 区别:
  // 1.data 是组件自己的数据,
  // 2.state 中的数据整个vue项目的组件都能访问到
  state: {
    count: 101
  }
})
// 导出仓库
export default store
4.3 访问Vuex中的数据
问题: 如何在组件中获取count?
- 通过$store直接访问 —> {{ $store.state.count }}
- 通过辅助函数mapState 映射计算属性 —> {{ count }}(后面讲)
4.4 组件通过$store访问Vuex中的数据
获取 store:
 1.Vue模板中获取 this.$store
 2.js文件中获取 import 导入 store


模板中:     {{ $store.state.xxx }}
组件逻辑中:  this.$store.state.xxx
JS模块中:   store.state.xxx
4.4.1 模板中使用
组件中可以使用 $store 获取到vuex中的store对象实例,可通过state属性属性获取count, 如下
<h1>state的数据 - {{ $store.state.count }}</h1>
4.4.2. 组件逻辑中使用
将state属性定义在计算属性中 https://vuex.vuejs.org/zh/guide/state.html
<h1>state的数据 - {{ count }}</h1>
// 把state中数据,定义在组件内的计算属性中
  computed: {
    count () {
      return this.$store.state.count
    }
  }
4.4.3 js文件中使用
//main.js
import store from "@/store"
console.log(store.state.count)
每次都像这样一个个的提供计算属性, 太麻烦了,我们有没有简单的语法帮我们获取state中的值呢?
4.4.4 修改src/components/Son1.vue
<template>
  <div class="box">
    <h2>Son1 子组件 使用原始方式获取</h2>
    <!-- 模板中使用 -->
    <h4>从vuex中获取count的值:{{$store.state.count}}</h4>
    <!-- 组件逻辑中使用 -->
    <h4>从vuex中获取title的值:{{title}}</h4>
    <br>
    <button @click="handleAdd">值 + 1</button>
  </div>
</template>

<script>
export default {
  name: 'Son1Com',
  computed: {
    title() {
      return this.$store.state.title
    }
  },
  methods: {
    handleAdd() {
    }
  }
}
</script>

<style lang="css" scoped>
.box{
  border: 3px solid #ccc;
  width: 400px;
  padding: 10px;
  margin: 20px;
}
h2 {
  margin-top: 10px;
}
</style>
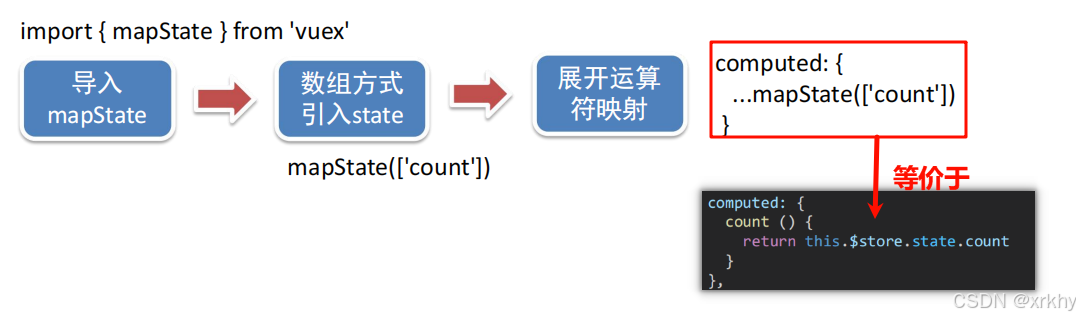
4.5 组件通过mapState获取 state中的数据
4.5.1 mapState作用
mapState是辅助函数,帮助我们把store中的数据
自动映射到 组件的计算属性中, 它属于一种方便的用法
4.5.2 修改src/components/Son2.vue
<template>
  <div class="box">
    <h2>Son2 子组件 使用辅助函数方式获取</h2>
    <h4>从vuex中获取count的值:{{count}}</h4>
    <h4>从vuex中获取title的值:{{title}}</h4>
    <br />
    <button>值 - 1</button>
  </div>
</template>

<script>
// 引入 mapState 辅助函数
import { mapState } from "vuex";
export default {
  name: 'Son2Com',
  computed: {
    ...mapState(["count", "title"]),
    // 等价于
    // count () {
    //   return this.$store.state.count;
    // }
    // title () {
    //   return this.$store.state.title;
    // }
  },
}
</script>

<style lang="css" scoped>
.box {
  border: 3px solid #ccc;
  width: 400px;
  padding: 10px;
  margin: 20px;
}
h2 {
  margin-top: 10px;
}
</style>
4.5.3 运行结果
五、开启严格模式及Vuex的单项数据流
1.目标
明确 vuex 同样遵循单向数据流,组件中不能直接修改仓库的数据
2.直接在组件中修改Vuex中state的值
Son1.vue
<template>
  <div class="box">
    <h2>Son1 子组件</h2>
    从vuex中获取的值: <label></label>
    <br>
    <!-- 1.绑定点击事件 -->
    <button @click="handleAdd">值 + 1</button>
  </div>
</template>

<script>
export default {
  name: 'Son1Com',
  // 定义方法
  methods: {
    handleAdd() {
      this.$store.state.count++
    }
  }
}
</script>

<style lang="css" scoped>
.box{
  border: 3px solid #ccc;
  width: 400px;
  padding: 10px;
  margin: 20px;
}
h2 {
  margin-top: 10px;
}
</style>
运行结果
不会报错,这是因为没有开启严格模式
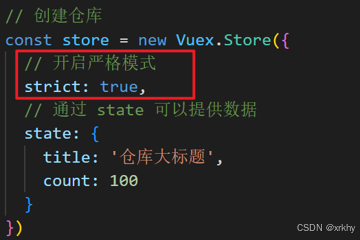
3.开启严格模式
严格模式有什么用
通过 strict: true 可以开启严格模式,开启严格模式后,直接修改state中的值会报错
state数据的修改只能通过mutations,并且mutations必须是同步的
运行结果
六、mutations+mapMutations同步修改仓库属性的值
6.1 概念
上面说了state中的属性值 不能直接修改就需要使用store的mutations属性定义方法去修改state中的值。
6.2 store中定义mutations
6.2.1 语法
注意事项
- mutations 修改state中的数据, 类似于vue组件中的methods
- mutations中属性的方法
+第一个参数是当前store的state属性
+第二个参数是payload(传递)载荷 用于传递参数
+ 注意:payload(传递)载荷只能有一个,想要传递多个参数要使用对象或者数组的形式。- mutations中的方法, 必须是同步方法。同步方法是指js中的普通方法。异步方法下面会讲。
6.2.2 代码:修改src/store/index.js
import Vue from 'vue'
import Vuex from 'vuex'
Vue.use(Vuex)

const store = new Vuex.Store({
  strict: true,
  state: {
    count: 101,
    title: 'hello world'
  },
  // mutations 修改state中的数据, 类似于vue组件中的methods
  mutations: {
    // mutations中的方法,
    //    第一个参数是当前store的state属性
    //    第二个参数是payload(传递)载荷  用于传递参数
    //      注意:payload(传递)载荷只能有一个,想要传递多个参数要使用对象或者数组的形式
    // mutations中的方法, 必须是同步方法
    // 传单个参数
    addCount(state, num) {
      state.count += num
    },
    // 传对象
    subCount(state, obj) {
      state.count -= obj.num
      console.log(obj.name);
    }
  },

})

export default store
6.3 组件中使用$store.emit()调用mutations方法
6.3.1 修改src/components/Son1.vue
由于上面在main.js全局已经全局挂在了所以不需要导入。
<template>
  <div class="box">
    <h2>Son1 子组件 使用原始方式获取</h2>
    <!-- 模板中使用 -->
    <h4>从vuex中获取count的值:{{$store.state.count}}</h4>
    <!-- 组件逻辑中使用 -->
    <h4>从vuex中获取title的值:{{title}}</h4>
    <br>
    <button @click="handleAdd">值 + 1</button>
    <button @click="$store.commit('addCount', 2)">值 + 2</button>
    <button @click="handleSub">值 - 1</button>

  </div>
</template>

<script>
export default {
  name: 'Son1Com',
  computed: {
    title() {
      return this.$store.state.title
    }
  },
  methods: {
    handleAdd() {
      this.$store.commit('addCount', 1)
    },
    handleSub() {
      this.$store.commit('subCount', {num: 1, name: '张三'})
    }
  }
}
</script>

<style lang="css" scoped>
.box{
  border: 3px solid #ccc;
  width: 400px;
  padding: 10px;
  margin: 20px;
}
h2 {
  margin-top: 10px;
}
</style>
6.3.2 运行结果
6.4 组件中使用mapMutations辅助函数调用mutations
6.4.1 mapMutations用法
<template>
    <button @click="addCount(1)">值 + 1</button>
    <button @click="subCount({num: 1, name: 'hello'})">值 - 1</button>
</template>
<script>
import { mapMutations} from "vuex";
export default {
  // ...
  methods: {
    ...mapMutations(["addCount","subCount"])
  },
}
</script>
6.4.2 代码实现
<template>
  <div class="box">
    <h2>Son2 子组件 使用辅助函数方式获取</h2>
    <h4>从vuex中获取count的值:{{count}}</h4>
    <h4>从vuex中获取title的值:{{title}}</h4>
    <br />
    <button @click="addCount(1)">值 + 1</button>
    <button @click="subCount({num: 1, name: 'hello'})">值 - 1</button>
  </div>
</template>

<script>
// 引入 mapState 辅助函数
import { mapState,mapMutations} from "vuex";
export default {
  name: 'Son2Com',
  methods: {
    ...mapMutations(["addCount","subCount"])
  },
  computed: {
    ...mapState(["count", "title"]),
    // 等价于
    // count () {
    //   return this.$store.state.count;
    // }
    // title () {
    //   return this.$store.state.title;
    // }
  },
}
</script>

<style lang="css" scoped>
.box {
  border: 3px solid #ccc;
  width: 400px;
  padding: 10px;
  margin: 20px;
}
h2 {
  margin-top: 10px;
}
</style>
6.4.3 运行结果
七、actions+mapActions异步修改仓库属性的值
7.1 概念
上面说了使用store的mutations属性定义方法去修改state中的值mutations中的方法,。这个必须是同步方法。
什么是同步方法?:普通方法。
什么是异步方法?:异步方法是指那些不会阻塞主线程执行、允许程序在等待操作完成期间继续执行其他任务的函数。
异步方法有哪些
- 回调函数(Callbacks):将函数作为参数传递给另一个函数,在异步操作完成后被调用。这是最基础的异步模式,但嵌套过多易导致“回调地狱”
setTimeout(() => { console.log("异步操作完成"); }, 1000); - Promise:ES6引入的异步处理对象,表示一个异步操作的最终状态(pending/fulfilled/rejected)。通过链式调用(.then()/.catch())管理依赖关系,解决回调嵌套问题 。
const promise = new Promise((resolve, reject) => { setTimeout(() => resolve("成功"), 1000); }); promise.then(result => console.log(result)); - Async/Await:ES8基于Promise的语法糖。async标记的函数返回Promise,await暂停函数执行直至Promise完成,使异步代码写法类似同步
async function fetchData() {
  try {
    const data = await fetch("/api/data");
    return data.json();
  } catch (error) {
    console.error(error);
  }
}
作用:mapActions 是把位于 actions中的方法提取了出来,映射到组件methods中。
mutations是同步更新数据 (便于监测数据的变化, 更新视图等, 方便于调试工具查看变化)。
actions则负责进行异步操作。里面的方法是异步的。
流程如下图所示。异步修改和同步修改的流程如下。
7.2 store中定义actions
7.2.1 语法
// ....
const store = new Vuex.Store({
  // ...
  mutations: {
    addCount(state, num) {
      state.count += num
    }
  },
  actions: {
    addCountAsync(context, num) {
      // 1秒后调用mutations中的addCount方法
      setTimeout(() => {
        context.commit('addCount', num)
      }, 1000)

    }
  }
  // ...
})
- actions中的方法,
- 第一个参数是context 上下文属性,
- 包含了 state(上面的state),
commit(用于调用mutations中的方法),
dispatch(用于调用actions中的方法),
getters(后面讲),
rootState, rootGetters- 第二个参数是payload(传递)载荷 用于传递参数
- 注意:payload(传递)载荷只能有一个,想要传递多个参数要使用对象或者数组的形式
- actions中的方法, 写异步方法
7.2.2 代码:修改src/store/index.js
import Vue from 'vue'
import Vuex from 'vuex'
Vue.use(Vuex)

const store = new Vuex.Store({
  strict: true,
  state: {
    count: 101,
    title: 'hello world'
  },
  // mutations 修改state中的数据, 类似于vue组件中的methods
  mutations: {
    // mutations中的方法,
    //    第一个参数是当前store的state属性
    //    第二个参数是payload(传递)载荷  用于传递参数
    //      注意:payload(传递)载荷只能有一个,想要传递多个参数要使用对象或者数组的形式
    // mutations中的方法, 必须是同步方法
    // 传单个参数
    addCount(state, num) {
      state.count += num
    },
    // 传对象
    subCount(state, obj) {
      state.count -= obj.num
      console.log(obj.name);
    }
  },
  // actions 类似于mutations, 但是actions中可以写异步方法
  actions: {
    // actions中的方法,
    //    第一个参数是context 上下文属性,
    //       包含了 state(上面的state),
    //              commit(用于调用mutations中的方法),
    //              dispatch(用于调用actions中的方法),
    //              getters(后面讲),
    //              rootState, rootGetters
    //    第二个参数是payload(传递)载荷  用于传递参数
    //       注意:payload(传递)载荷只能有一个,想要传递多个参数要使用对象或者数组的形式
    // actions中的方法, 写异步方法
    addCountAsync(context, num) {
      // console.log(context);
      // 1秒后调用mutations中的addCount方法
      setTimeout(() => {
        context.commit('addCount', num)
      }, 1000)
    },
    subCountAsync(context, obj) {
      // 1秒后调用mutations中的subCount方法
      setTimeout(() => {
        context.commit('subCount', obj);
      }, 1000)
    }

  }

})
export default store
7.3 组件中使用$store.dispatch()调用actions的方法
7.3.1 语法
<template>
  	<div>
		<!-- $store.dispatch调用actions中的方法 -->
    	<button @click="$store.dispatch('addCountAsync', 2)">1秒后值 + 2</button>
    	<button @click="handleAddAsync()">1秒后值 - 2</button>
	</div>
</template>

<script>
export default {
  methods: {
    handleAddAsync() {
      this.$store.dispatch('subCountAsync', {num: 2, name: '李四'})
    }
  }
}
</script>
7.3.2 修改src/components/Son1.vue
<template>
  <div class="box">
    <h2>Son1 子组件 使用原始方式获取</h2>
    <!-- 模板中使用 -->
    <h4>从vuex中获取count的值:{{$store.state.count}}</h4>
    <!-- 组件逻辑中使用 -->
    <h4>从vuex中获取title的值:{{title}}</h4>
    <br>
    <button @click="handleAdd">值 + 1</button>
    <button @click="$store.commit('addCount', 2)">值 + 2</button>
    <button @click="handleSub">值 - 1</button>
    <!-- $store.dispatch调用actions中的方法 -->
    <button @click="$store.dispatch('addCountAsync', 2)">1秒后值 + 2</button>
    <button @click="handleAddAsync()">1秒后值 - 2</button>

  </div>
</template>

<script>
export default {
  name: 'Son1Com',
  computed: {
    title() {
      return this.$store.state.title
    }
  },
  methods: {
    handleAdd() {
      this.$store.commit('addCount', 1)
    },
    handleSub() {
      this.$store.commit('subCount', {num: 1, name: '张三'})
    },
    handleAddAsync() {
      this.$store.dispatch('subCountAsync', {num: 2, name: '李四'})
    }

  }
}
</script>

<style lang="css" scoped>
.box{
  border: 3px solid #ccc;
  width: 400px;
  padding: 10px;
  margin: 20px;
}
h2 {
  margin-top: 10px;
}
</style>
7.3.3 运行结果
7.4 组件中使用mapActions调用actions的方法
7.4.1 mapActions语法
<template>
  <div>

  </div>
</template>

<script>
export default {

}
</script>
7.4.2 代码实现
<template>
  <div class="box">
    <h2>Son2 子组件 使用辅助函数方式获取</h2>
    <h4>从vuex中获取count的值:{{count}}</h4>
    <h4>从vuex中获取title的值:{{title}}</h4>
    <br />
    <button @click="addCount(1)">值 + 1</button>
    <button @click="subCount({num: 1, name: 'hello'})">值 - 1</button>
    <!-- mapActions辅助函数调用actions中的方法 -->
    <button @click="addCountAsync(1)">一秒后值 + 1</button>
    <button @click="subCountAsync({num: 1, name: 'hello'})">一秒后值 - 1</button>
  </div>
</template>

<script>
// 引入 mapState 辅助函数
import { mapState,mapMutations, mapActions} from "vuex";
export default {
  name: 'Son2Com',
  methods: {
    ...mapMutations(["addCount","subCount"]),
    ...mapActions(["addCountAsync","subCountAsync"]),
    // 等价于
    // addCountAsync () {
    //   this.$store.dispatch("addCountAsync", 1);
    // }
    // subCountAsync () {
    //   this.$store.dispatch("subCountAsync",{num: 1, name: 'hello'});
    // }
  },
  computed: {
    ...mapState(["count", "title"]),
  },
}
</script>

<style lang="css" scoped>
.box {
  border: 3px solid #ccc;
  width: 400px;
  padding: 10px;
  margin: 20px;
}
h2 {
  margin-top: 10px;
}
</style>
7.4.3 运行结果
八、核心概念-getters
8.1 概念getters
除了state之外,有时我们还需要从state中派生出一些状态,这些状态是依赖state的,此时会用到getters。
应用1:state中定义了list,为 1-10 的数组,组件中,需要显示所有大于5的数据。当state中的数据修改后,会影响getters中的属性。
应用2:计算购物车的总价格。
8.2 store中定义getters
8.2.1 语法
// ....
const store = new Vuex.Store({
  // ...
  state: {
    items: [ // 商品数组
      { id: 1, name: "iPhone", price: 5000, quantity: 2 },
      { id: 2, name: "MacBook", price: 12000, quantity: 1 }
    ]
  },
  mutations: {
    // 添加商品
    addItem(state, item) {
      state.items.push(item)
    },
    // 删除商品
    removeItem(state, id) {
      state.items = state.items.filter(item => item.id !== id)
    }
  },
  // getters 用来获取state中的数据, 类似于vue组件中的computed
  getters: {
    // getters中的方法,
    //    第一个参数是state属性
    //    第二个参数是getters属性
    // getters中的方法, 必须是同步方法
    // 计算items数组中所有商品的总价格
    totalPrice: (state) => {
      return state.items.reduce((total, item) => {
        return total + item.price * item.quantity;
      }, 0).toFixed(2); // 保留两位小数
    },
    // 计算items数组中所有商品的平均价格
    averagePrice: (state, getters) => getters.totalPrice / state.items.length
  }

})

// ...
8.2.2 代码:修改src/store/index.js
import Vue from 'vue'
import Vuex from 'vuex'
Vue.use(Vuex)

const store = new Vuex.Store({
  strict: true,
  state: {
    count: 101,
    title: 'hello world',
    items: [ // 商品数组
      { id: 1, name: "iPhone", price: 5000, quantity: 2 },
      { id: 2, name: "MacBook", price: 12000, quantity: 1 }
    ]
  },
  mutations: {
    addCount(state, num) {
      state.count += num
    },
    subCount(state, obj) {
      state.count -= obj.num
      console.log(obj.name);
    },
    // 添加商品
    addItem(state, item) {
      state.items.push(item)
    },
    // 删除商品
    removeItem(state, id) {
      state.items = state.items.filter(item => item.id !== id)
    }
  },
  actions: {
    addCountAsync(context, num) {
      setTimeout(() => {
        context.commit('addCount', num)
      }, 1000)
    },
    subCountAsync(context, obj) {
      setTimeout(() => {
        context.commit('subCount', obj);
      }, 1000)
    },
  },
  // getters 用来获取state中的数据, 类似于vue组件中的computed
  getters: {
    // getters中的方法,
    //    第一个参数是state属性
    //    第二个参数是getters属性
    // getters中的方法, 必须是同步方法
    // 计算items数组中所有商品的总价格
    totalPrice: (state) => {
      return state.items.reduce((total, item) => {
        return total + item.price * item.quantity;
      }, 0).toFixed(2); // 保留两位小数
    },
    // 计算items数组中所有商品的平均价格
    averagePrice: (state, getters) => getters.totalPrice / state.items.length
  }

})

export default store
8.3 组件中使用$store.commit调用getters的方法
8.3.1 语法
<template>
  <div class="box">
    <!-- 在js中要加this进行调用,即this.$store.getters.totalPrice -->
    <h4>从vuex中获取items的值:{{$store.state.items}}</h4>
    <button @click="$store.commit('addItem', {id: 3, name: 'AirPods', price: 1000, quantity: 1})">添加商品</button>
    <button @click="$store.commit('removeItem', 1)">删除商品</button>
    <br>
    <h4>从vuex中获取items的总价格:{{$store.getters.totalPrice}}</h4>
    <h4>从vuex中获取items的平均价格:{{$store.getters.averagePrice}}</h4>

  </div>
</template>
8.3.2 修改src/components/Son1.vue
<template>
  <div class="box">
    <h2>Son1 子组件 使用原始方式获取</h2>
    <!-- 模板中使用 -->
    <h4>从vuex中获取count的值:{{$store.state.count}}</h4>
    <!-- 组件逻辑中使用 -->
    <h4>从vuex中获取title的值:{{title}}</h4>
    <br>
    <button @click="handleAdd">值 + 1</button>
    <button @click="$store.commit('addCount', 2)">值 + 2</button>
    <button @click="handleSub">值 - 1</button>
    <!-- $store.dispatch调用actions中的方法 -->
    <button @click="$store.dispatch('addCountAsync', 2)">1秒后值 + 2</button>
    <button @click="handleAddAsync()">1秒后值 - 2</button>

    <br>
    <h4>从vuex中获取items的值:{{$store.state.items}}</h4>
    <button @click="$store.commit('addItem', {id: 3, name: 'AirPods', price: 1000, quantity: 1})">添加商品</button>
    <button @click="$store.commit('removeItem', 1)">删除商品</button>
    <br>
    <h4>从vuex中获取items的总价格:{{$store.getters.totalPrice}}</h4>
    <h4>从vuex中获取items的平均价格:{{$store.getters.averagePrice}}</h4>

  </div>
</template>

<script>
export default {
  name: 'Son1Com',
  computed: {
    title() {
      return this.$store.state.title
    }
  },
  methods: {
    handleAdd() {
      this.$store.commit('addCount', 1)
    },
    handleSub() {
      this.$store.commit('subCount', {num: 1, name: '张三'})
    },
    handleAddAsync() {
      this.$store.dispatch('subCountAsync', {num: 2, name: '李四'})
    }

  }
}
</script>

<style lang="css" scoped>
.box{
  border: 3px solid #ccc;
  width: 400px;
  padding: 10px;
  margin: 20px;
}
h2 {
  margin-top: 10px;
}
</style>
8.3.3 运行结果
8.4 组件中使用mapGetters调用getters的方法
8.4.1 mapGetters语法
<template>
  <div class="box">
    <h4>{{items}}</h4>
    <!-- 这里参数太长 我创建addhandle添加商品 -->
    <button @click="addhandle()">添加商品</button>
    <button @click="removeItem(1)">删除商品</button>
    <br />
    <h4>从vuex中获取items数组中所有商品的总价格:{{totalPrice}}</h4>
    <h4>从vuex中获取items数组中所有商品的平均价格:{{averagePrice}}</h4>
  </div>
</template>

<script>
// 引入 mapState 辅助函数
import { mapState,mapMutations, mapActions, mapGetters} from "vuex";
export default {
  name: 'Son2Com',
  computed: {
    // 将items数组中的数据映射到当前组件中
    ...mapState(["items"]),
    // getters 用来获取state中的数据, 类似于vue组件中的computed
    ...mapGetters(["totalPrice", "averagePrice"]),
  },
  methods: {
    // 将 添加商品 和 删除商品 引入。
    ...mapMutations(["addItem","removeItem"]),
    // 添加商品
    addhandle() {
      this.addItem({id: 3, name: 'AirPods', price: 1000, quantity: 1});
    }
  }

}
</script>
8.4.2 代码实现
<template>
  <div class="box">
    <h2>Son2 子组件 使用辅助函数方式获取</h2>
    <h4>从vuex中获取count的值:{{count}}</h4>
    <h4>从vuex中获取title的值:{{title}}</h4>
    <br />
    <button @click="addCount(1)">值 + 1</button>
    <button @click="subCount({num: 1, name: 'hello'})">值 - 1</button>
    <!-- mapActions辅助函数调用actions中的方法 -->
    <button @click="addCountAsync(1)">一秒后值 + 1</button>
    <button @click="subCountAsync({num: 1, name: 'hello'})">一秒后值 - 1</button>


    <br />
    <h4>{{items}}</h4>
    <!-- 这里参数太长 我创建addhandle添加商品 -->
    <button @click="addhandle()">添加商品</button>
    <button @click="removeItem(1)">删除商品</button>
    <br />
    <h4>从vuex中获取items数组中所有商品的总价格:{{totalPrice}}</h4>
    <h4>从vuex中获取items数组中所有商品的平均价格:{{averagePrice}}</h4>
  </div>
</template>

<script>
// 引入 mapState 辅助函数
import { mapState,mapMutations, mapActions, mapGetters} from "vuex";
export default {
  name: 'Son2Com',
  computed: {
    // 将items数组中的数据映射到当前组件中
    ...mapState(["count", "title", "items"]),
    // getters 用来获取state中的数据, 类似于vue组件中的computed
    ...mapGetters(["totalPrice", "averagePrice"]),
  },
  methods: {
    // 将 添加商品 和 删除商品 引入。
    ...mapMutations(["addCount","subCount","addItem","removeItem"]),
    ...mapActions(["addCountAsync","subCountAsync"]),
    // 添加商品
    addhandle() {
      this.addItem({id: 3, name: 'AirPods', price: 1000, quantity: 1});
    }
  }

}
</script>

<style lang="css" scoped>
.box {
  border: 3px solid #ccc;
  width: 400px;
  padding: 10px;
  margin: 20px;
}
h2 {
  margin-top: 10px;
}
</style>
8.4.3 运行结果
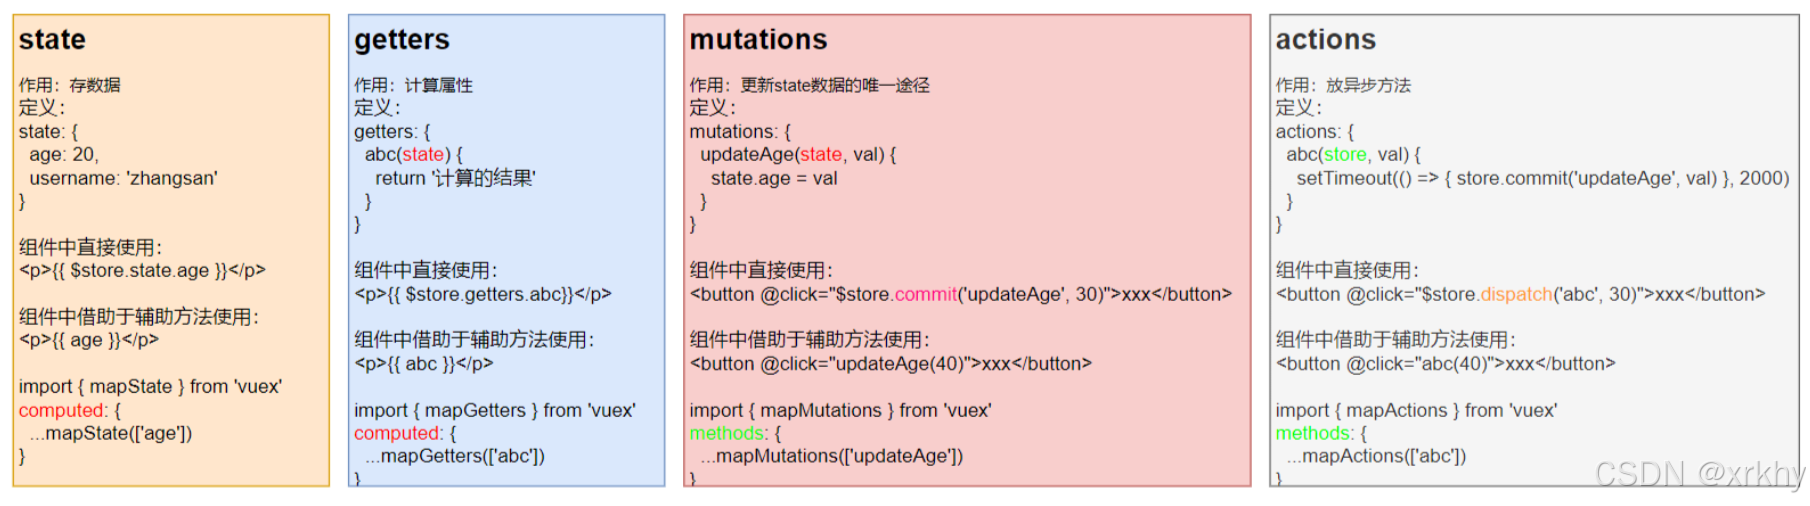
9 前面四个属性的总结
十、核心概念 - 模块 module
10.1 概念
由于使用单一状态树,应用的所有状态会集中到一个比较大的对象。当应用变得非常复杂时,store 对象就有可能变得相当臃肿。
这句话的意思是,如果把所有的状态都放在state中,当项目变得越来越大的时候,Vuex会变得越来越难以维护
由此,又有了Vuex的模块化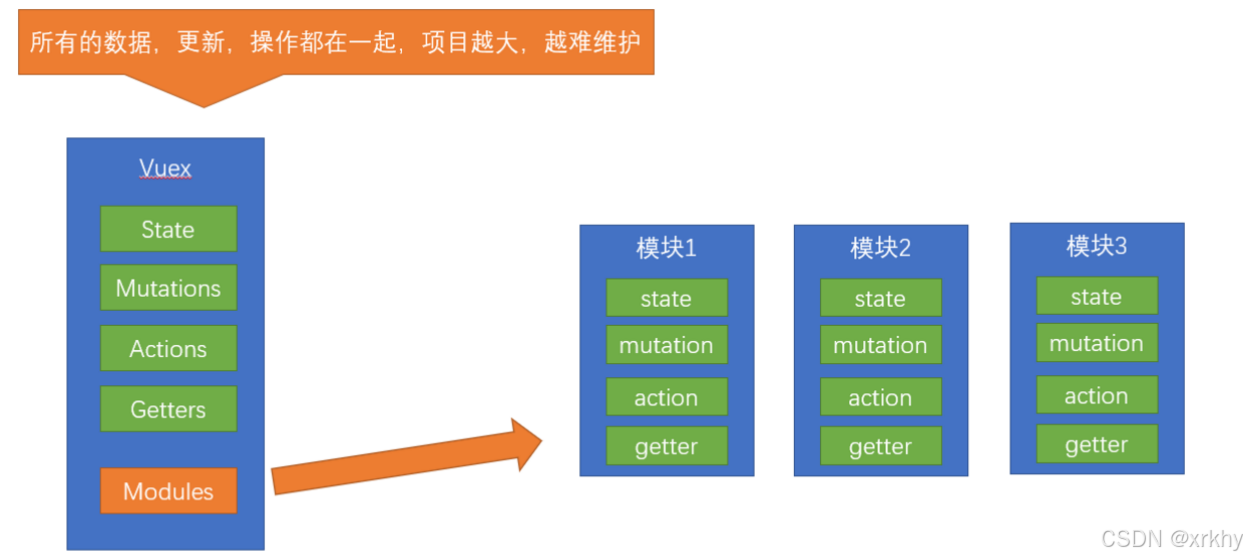
10.2 模块定义
定义两个模块 user 和 setting。这两个模块分别是用户信息和设置信息。
10.2.1 新建src/store/modules/user.js
user中管理用户的信息状态
const state = {
  userInfo: {
    name: 'zs',
    age: 18
  }
}

const mutations = {}

const actions = {}

const getters = {}

export default {
  state,
  mutations,
  actions,
  getters
}
10.2.2 新建src/store/modules/setting.js
setting中管理项目应用的 主题色 theme,描述 desc
const state = {
  theme: 'dark',
  desc: '描述真呀真不错'
}

const mutations = {}

const actions = {}

const getters = {}

export default {
  state,
  mutations,
  actions,
  getters
}
10.2.3 修改src/store/index.js
import Vue from 'vue'
import Vuex from 'vuex'
import user from './modules/user'
import setting from './modules/setting'
Vue.use(Vuex)

const store = new Vuex.Store({
  strict: true,
  state: {
    count: 101,
  },
  mutations: {},
  actions: {},
  getters: {},
  modules: {
    user,
    setting
  }

})

export default store
10.2.4 修改src/components/Son1.vue
<template>
  <div class="box">
    <h2>Son1 子组件 使用原始方式获取</h2>

  </div>
</template>

<script>
export default {
  computed: {

  },
  methods: {

  }
}
</script>

<style lang="css" scoped>
.box{
  border: 3px solid #ccc;
  width: 400px;
  padding: 10px;
  margin: 20px;
}
h2 {
  margin-top: 10px;
}
</style>
10.2.5 修改src/components/Son2.vue
<template>
  <div class="box">
    <h2>Son2 子组件 使用辅助函数方式获取</h2>
  </div>
</template>

<script>
export default {
  computed: {},
  methods: {},
};
</script>

<style lang="css" scoped>
.box {
  border: 3px solid #ccc;
  width: 400px;
  padding: 10px;
  margin: 20px;
}
h2 {
  margin-top: 10px;
}
</style>
10.2.6 运行结果如下
10.3 命名空间
10.3.1 什么是命名空间
我们知道上面虽然都分模块了,但是他们都还是会挂到根级别的state、getters、mutations、actions下。
如果我的user模块和setting模块下的state下都有一个叫做aa的属性。此时我使用辅助函数调用这个属性mapState(['aa']),代码无法识别这个aa是user模块下的aa属性 还是setting模块下的aa属性。
开启命名空间
解决不同模块的state、getters、mutations、actions重名问题
一般命名空间都是开启的
10.3.2 如何在子模块中开启命名空间
const state = {
  userInfo: {
    name: 'zs',
    age: 18
  }
}

const mutations = {}

const actions = {}

const getters = {}

export default {
  // 开启命名空间
  // 1. 解决不同模块命名冲突
  // 2. 解决不同模块的state、getters、mutations、actions重名问题

  namespaced: true,
  state,
  mutations,
  actions,
  getters
}
10.4 分模块的state使用和获取
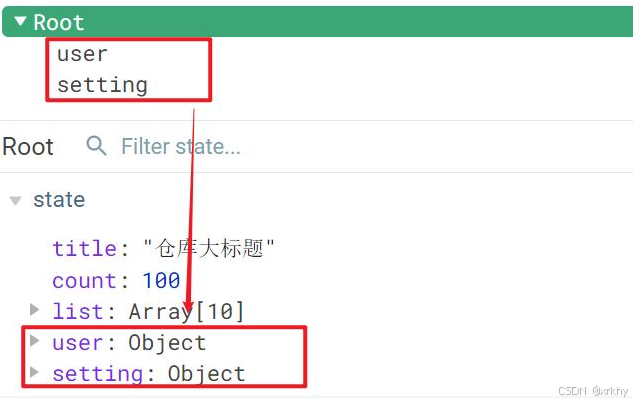
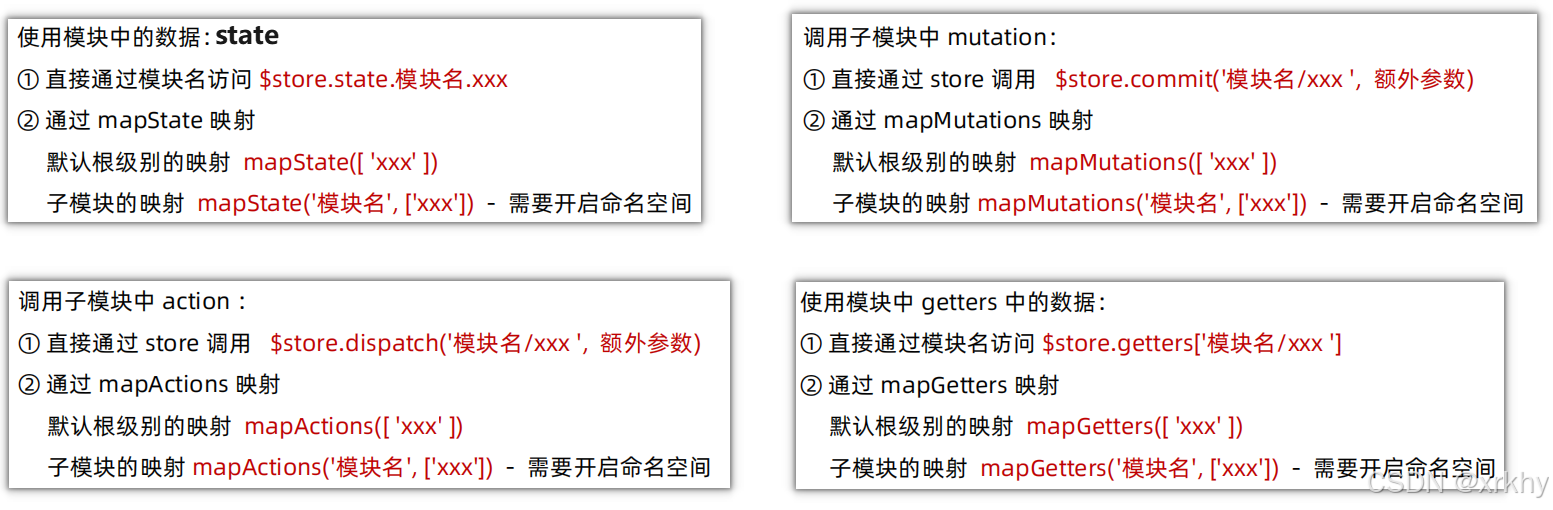
尽管已经分模块了,但其实子模块的状态,还是会挂到根级别的 state 中,属性名就是模块名使用模块中的数据
① 直接通过模块名访问 $store.state.模块名.xxx
② 通过 mapState 映射
默认根级别的映射 mapState([ 'xxx' ])
子模块的映射 mapState('模块名', ['xxx','xxx'...]) - 需要开启命名空间
10.5 分模块的mutations使用和获取
注意:默认模块中的 mutation 和 actions 会被挂载到全局,需要开启命名空间,才会挂载到子模块。
调用子模块中 mutation:
① 直接通过 store 调用 $store.commit('模块名/xxx', 额外参数)
② 通过 mapMutations 映射
默认根级别的映射 mapMutations([ 'xxx' ])
子模块的映射 mapMutations('模块名', ['xxx','xxx'...]) - 需要开启命名空间
10.6 分模块的actions使用和获取
注意:默认模块中的 mutation 和 actions 会被挂载到全局,需要开启命名空间,才会挂载到子模块。
调用子模块中 action :
① 直接通过 store 调用 $store.dispatch('模块名/xxx ', 额外参数)
② 通过 mapActions 映射
默认根级别的映射 mapActions([ ‘xxx’ ])
子模块的映射 mapActions(‘模块名’, [‘xxx’,‘xxx’]) - 需要开启命名空间
10.7 分模块的getters使用和获取
使用模块中 getters 中的数据:
① 直接通过模块名访问 $store.getters['模块名/xxx']
注意:没使用模块之前是使用的 $store.getters.xxx。
注意:使用模块后不使用的 $store.getters.某块名.xxx,原因为这里是
this.$store.getters的值为
{
	主模块名:属性
	字模块名/xxx: 属性
}
// 我们$store.getters.字模块名/xxx会报错因为有 / 这个图书字符。
// 因此使用$store.getters['模块名/xxx']
② 通过 mapGetters 映射
默认根级别的映射 mapGetters([ 'xxx' ])
子模块的映射 mapGetters('模块名', ['xxx','xxx'...]) - 需要开启命名空间
10.8 代码演示
修改src/components/Son1.vue
<template>
  <div class="box">
    <h2>Son1 子组件 使用原始方式获取</h2>
    <h4>$store.state.user: {{$store.state.user}}</h4>
    <button @click="$store.commit('user/updateName', '李四')">修改名字</button>
    <button @click="$store.dispatch('user/updateNameAsync', '王五')">1秒后修改</button>
    <button @click="$store.commit('user/updateAge', 10)">年龄加10</button>
    <h4>$store.getters["user/ageAddTen"]: {{$store.getters["user/ageAddTen"]}}</h4>
  </div>
</template>

<script>
export default {
  computed: {

  },
  methods: {

  },
  mounted() {
  }

}
</script>

<style lang="css" scoped>
.box{
  border: 3px solid #ccc;
  width: 400px;
  padding: 10px;
  margin: 20px;
}
h2 {
  margin-top: 10px;
}
</style>
修改src/components/Son2.vue
<template>
  <div class="box">
    <h2>Son2 子组件 使用辅助函数方式获取</h2>
    <h4>theme的值为: {{theme}}</h4>
    <h4>desc的值为: {{desc }}</h4>
    <button @click="updateTheme('light')">修改背景色</button>
    <button @click="updateThemeAsync('blue')">一秒后修改背景色</button>
    <h4>desc+theme的值为:{{ themeDesc }}</h4>
  </div>
</template>

<script>
import { mapState, mapGetters, mapMutations, mapActions } from "vuex";
export default {
  computed: {
    ...mapState('setting',["desc", "theme"]),
    ...mapGetters('setting',["themeDesc"]),
  },
  methods: {
    ...mapMutations('setting',["updateTheme"]),
    ...mapActions('setting',["updateThemeAsync"]),
  }
};
</script>

<style lang="css" scoped>
.box {
  border: 3px solid #ccc;
  width: 400px;
  padding: 10px;
  margin: 20px;
}
h2 {
  margin-top: 10px;
}
</style>
运行结果
总结
流程图
不使用分模块的写法
使用分模块写法
开启严格模式
在Vuex的根节点文件src/store/index.js中开启。
import Vue from 'vue'
import Vuex from 'vuex'
import user from './modules/user'
import setting from './modules/setting'
Vue.use(Vuex)

const store = new Vuex.Store({
  strict: true,
  state: { },
  mutations: {},
  actions: {},
  getters: {},
  modules: {
    user,
    setting
  }

})
export default store
开启命名空间
在子模块src/store/modules/模块.js中开启。
const state = {}

const mutations = {}

const actions = {}

const getters = {}

export default {
  // 开启命名空间
  namespaced: true,
  state,
  mutations,
  actions,
  getters
}