1 重新认识前端三件套(JSX)
1.1 JSX示例:
{/* jsx示例: */}
const test = (<h1>Hello, JSX!</h1>);
此处是一段jsx的代码,我们不难发现它的形式和我们的js是一样的,其本质上就是一个js代码,其中的值是传统的HTML的内容。
1.2 JSX的使用的注意要点
在jsx当中我们的所有的属性是通过驼峰命名来的,如HTML中的class,在JSX代码中需要使用className进行代替
const test = (<h1 class="title">Hello, JSX!</h1>);错误的
const test = (<h1 className="title">Hello, JSX!</h1>);正确的
嵌套js代码的时候使用 {} 进行引用
jsx代码进行注释的时与传统的js代码有所不同,在HTML标签外的的可以和js一样使用**//** 和 /**/ ,使用 {/**/} 进行注释,如下react的部分代码:
const test =
    (
        //正确注释1
        /*正确注释2*/
        <div>
            {/*正确的注释*/}
            <br/>
            /*错误的注释 1*/
            <br/>
            //错误的注释 2
        </div>
    )

function App() {
    return (
        test
    )
}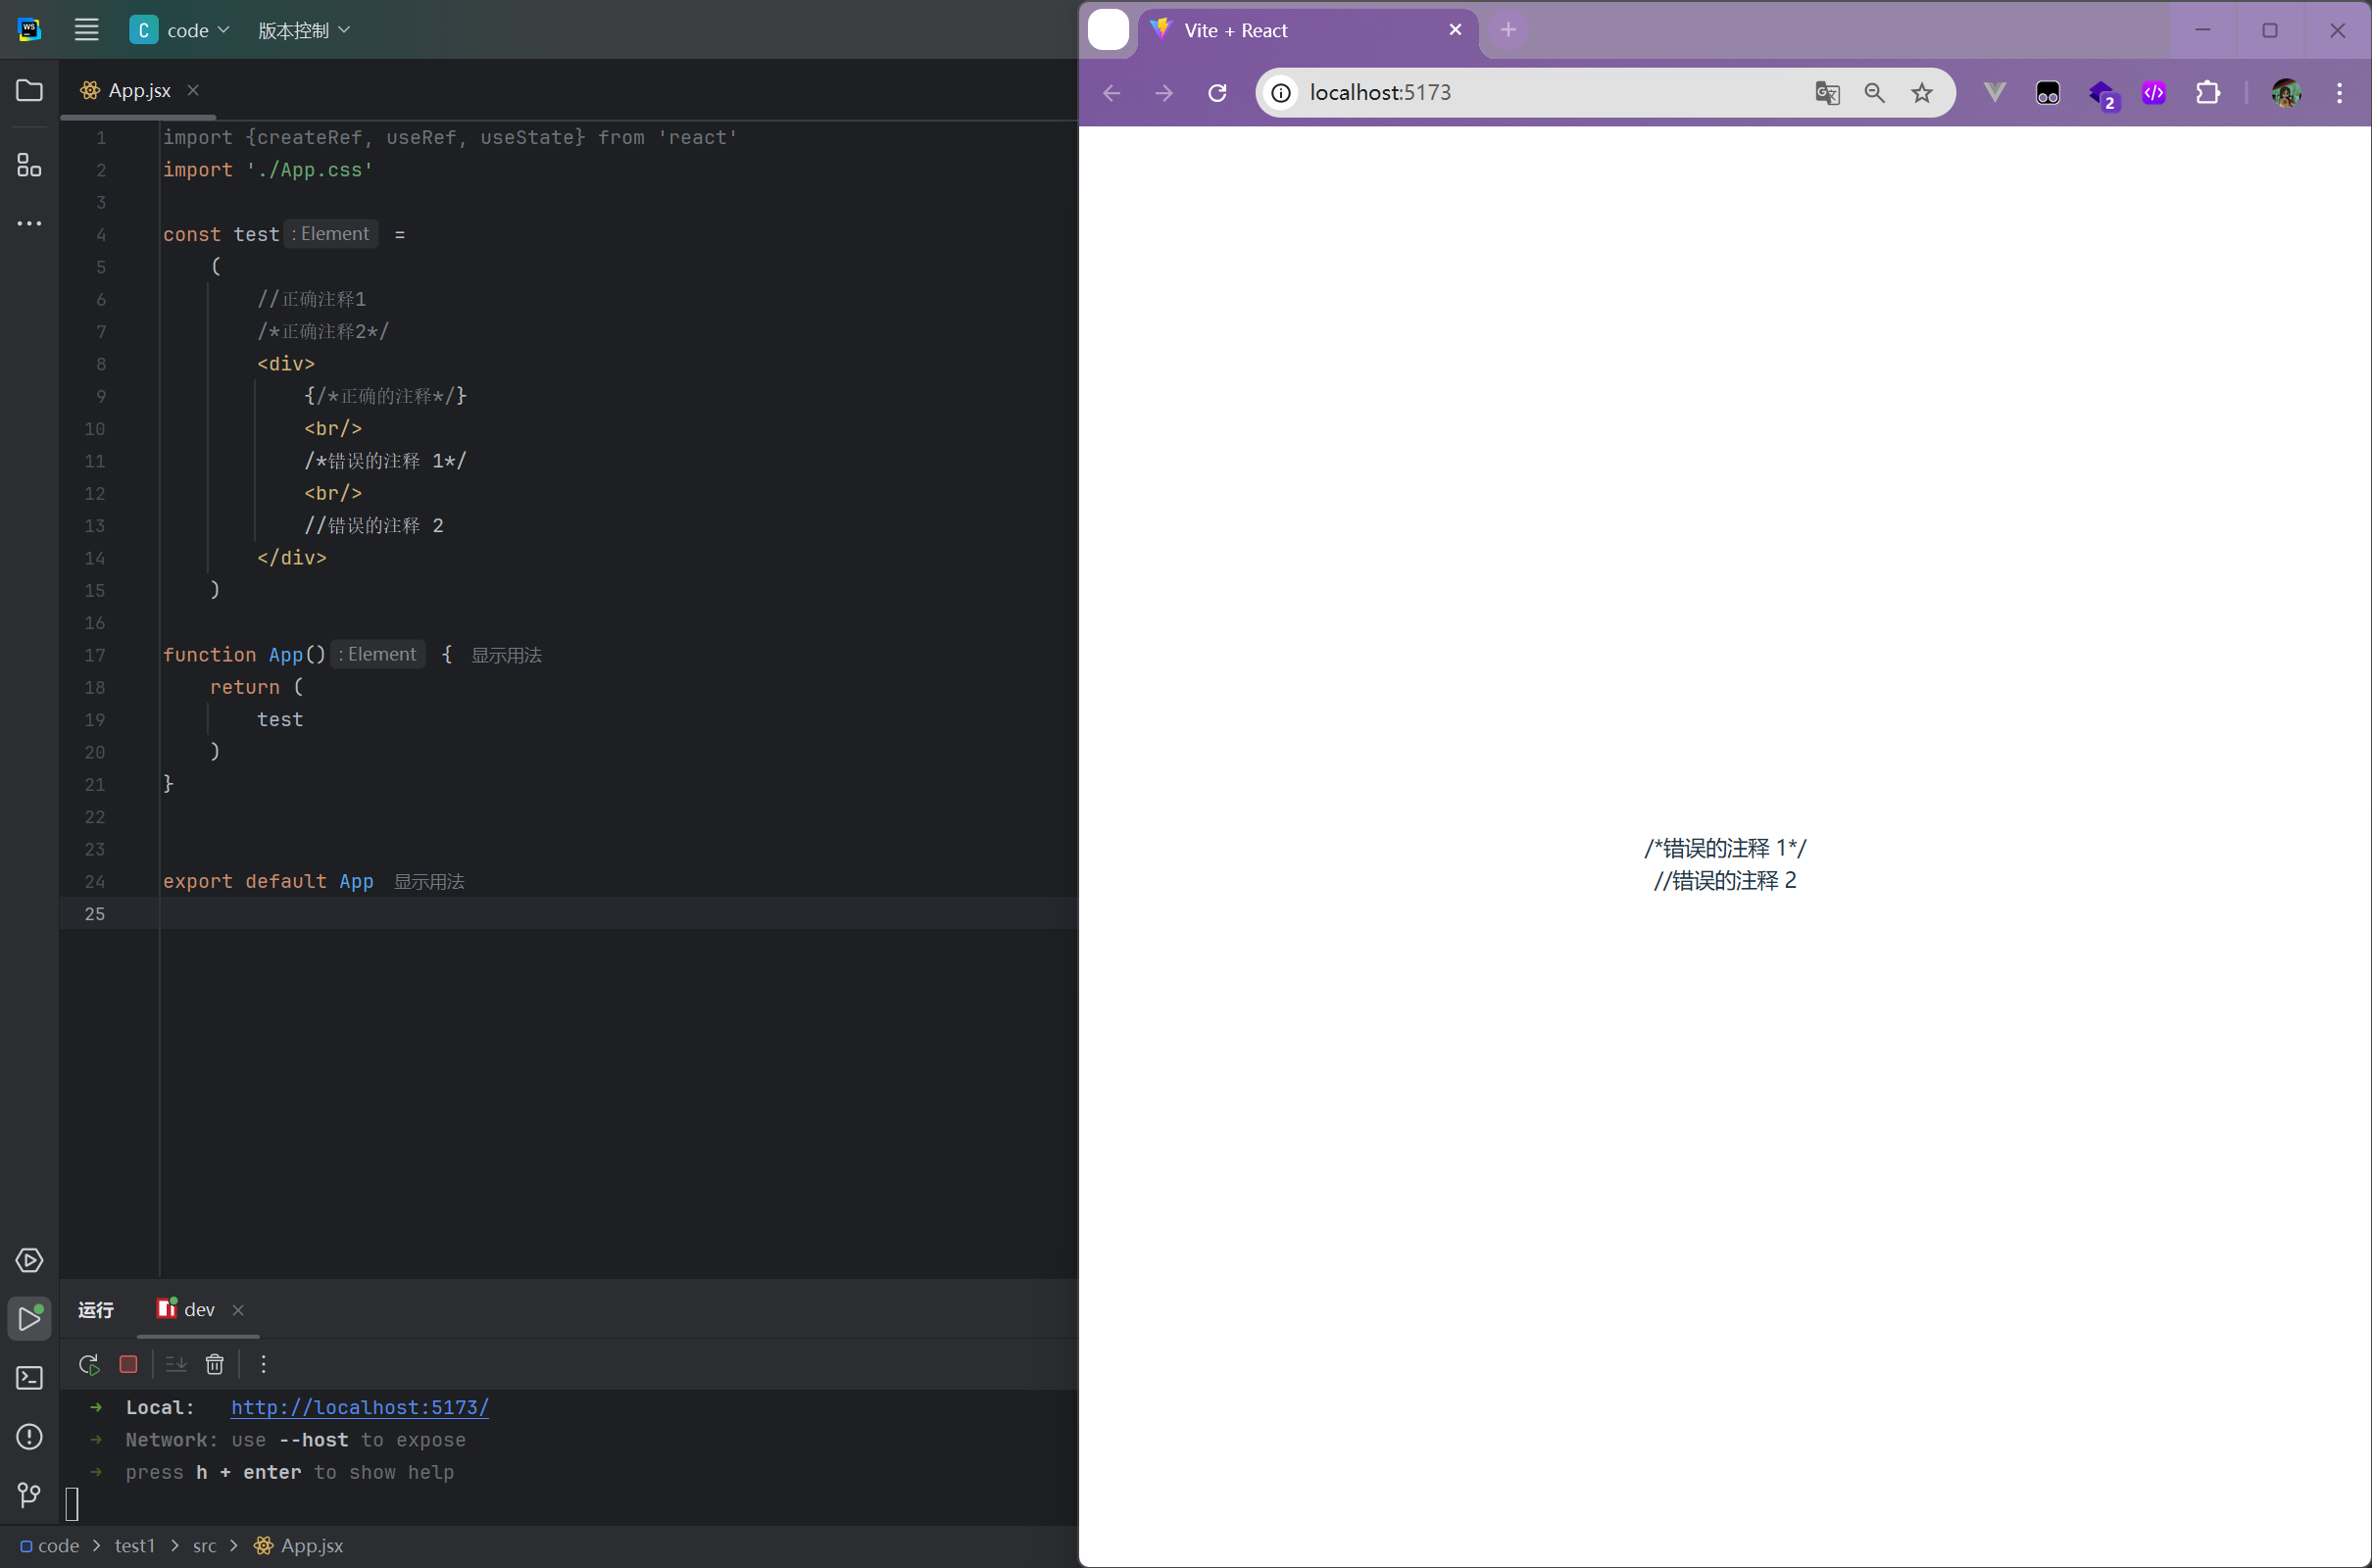
使用JSX的时候我们必须使用闭合的标签,包括单标签也需要闭合,有的时候会使用一个空的标签去进行闭合,如下所示:
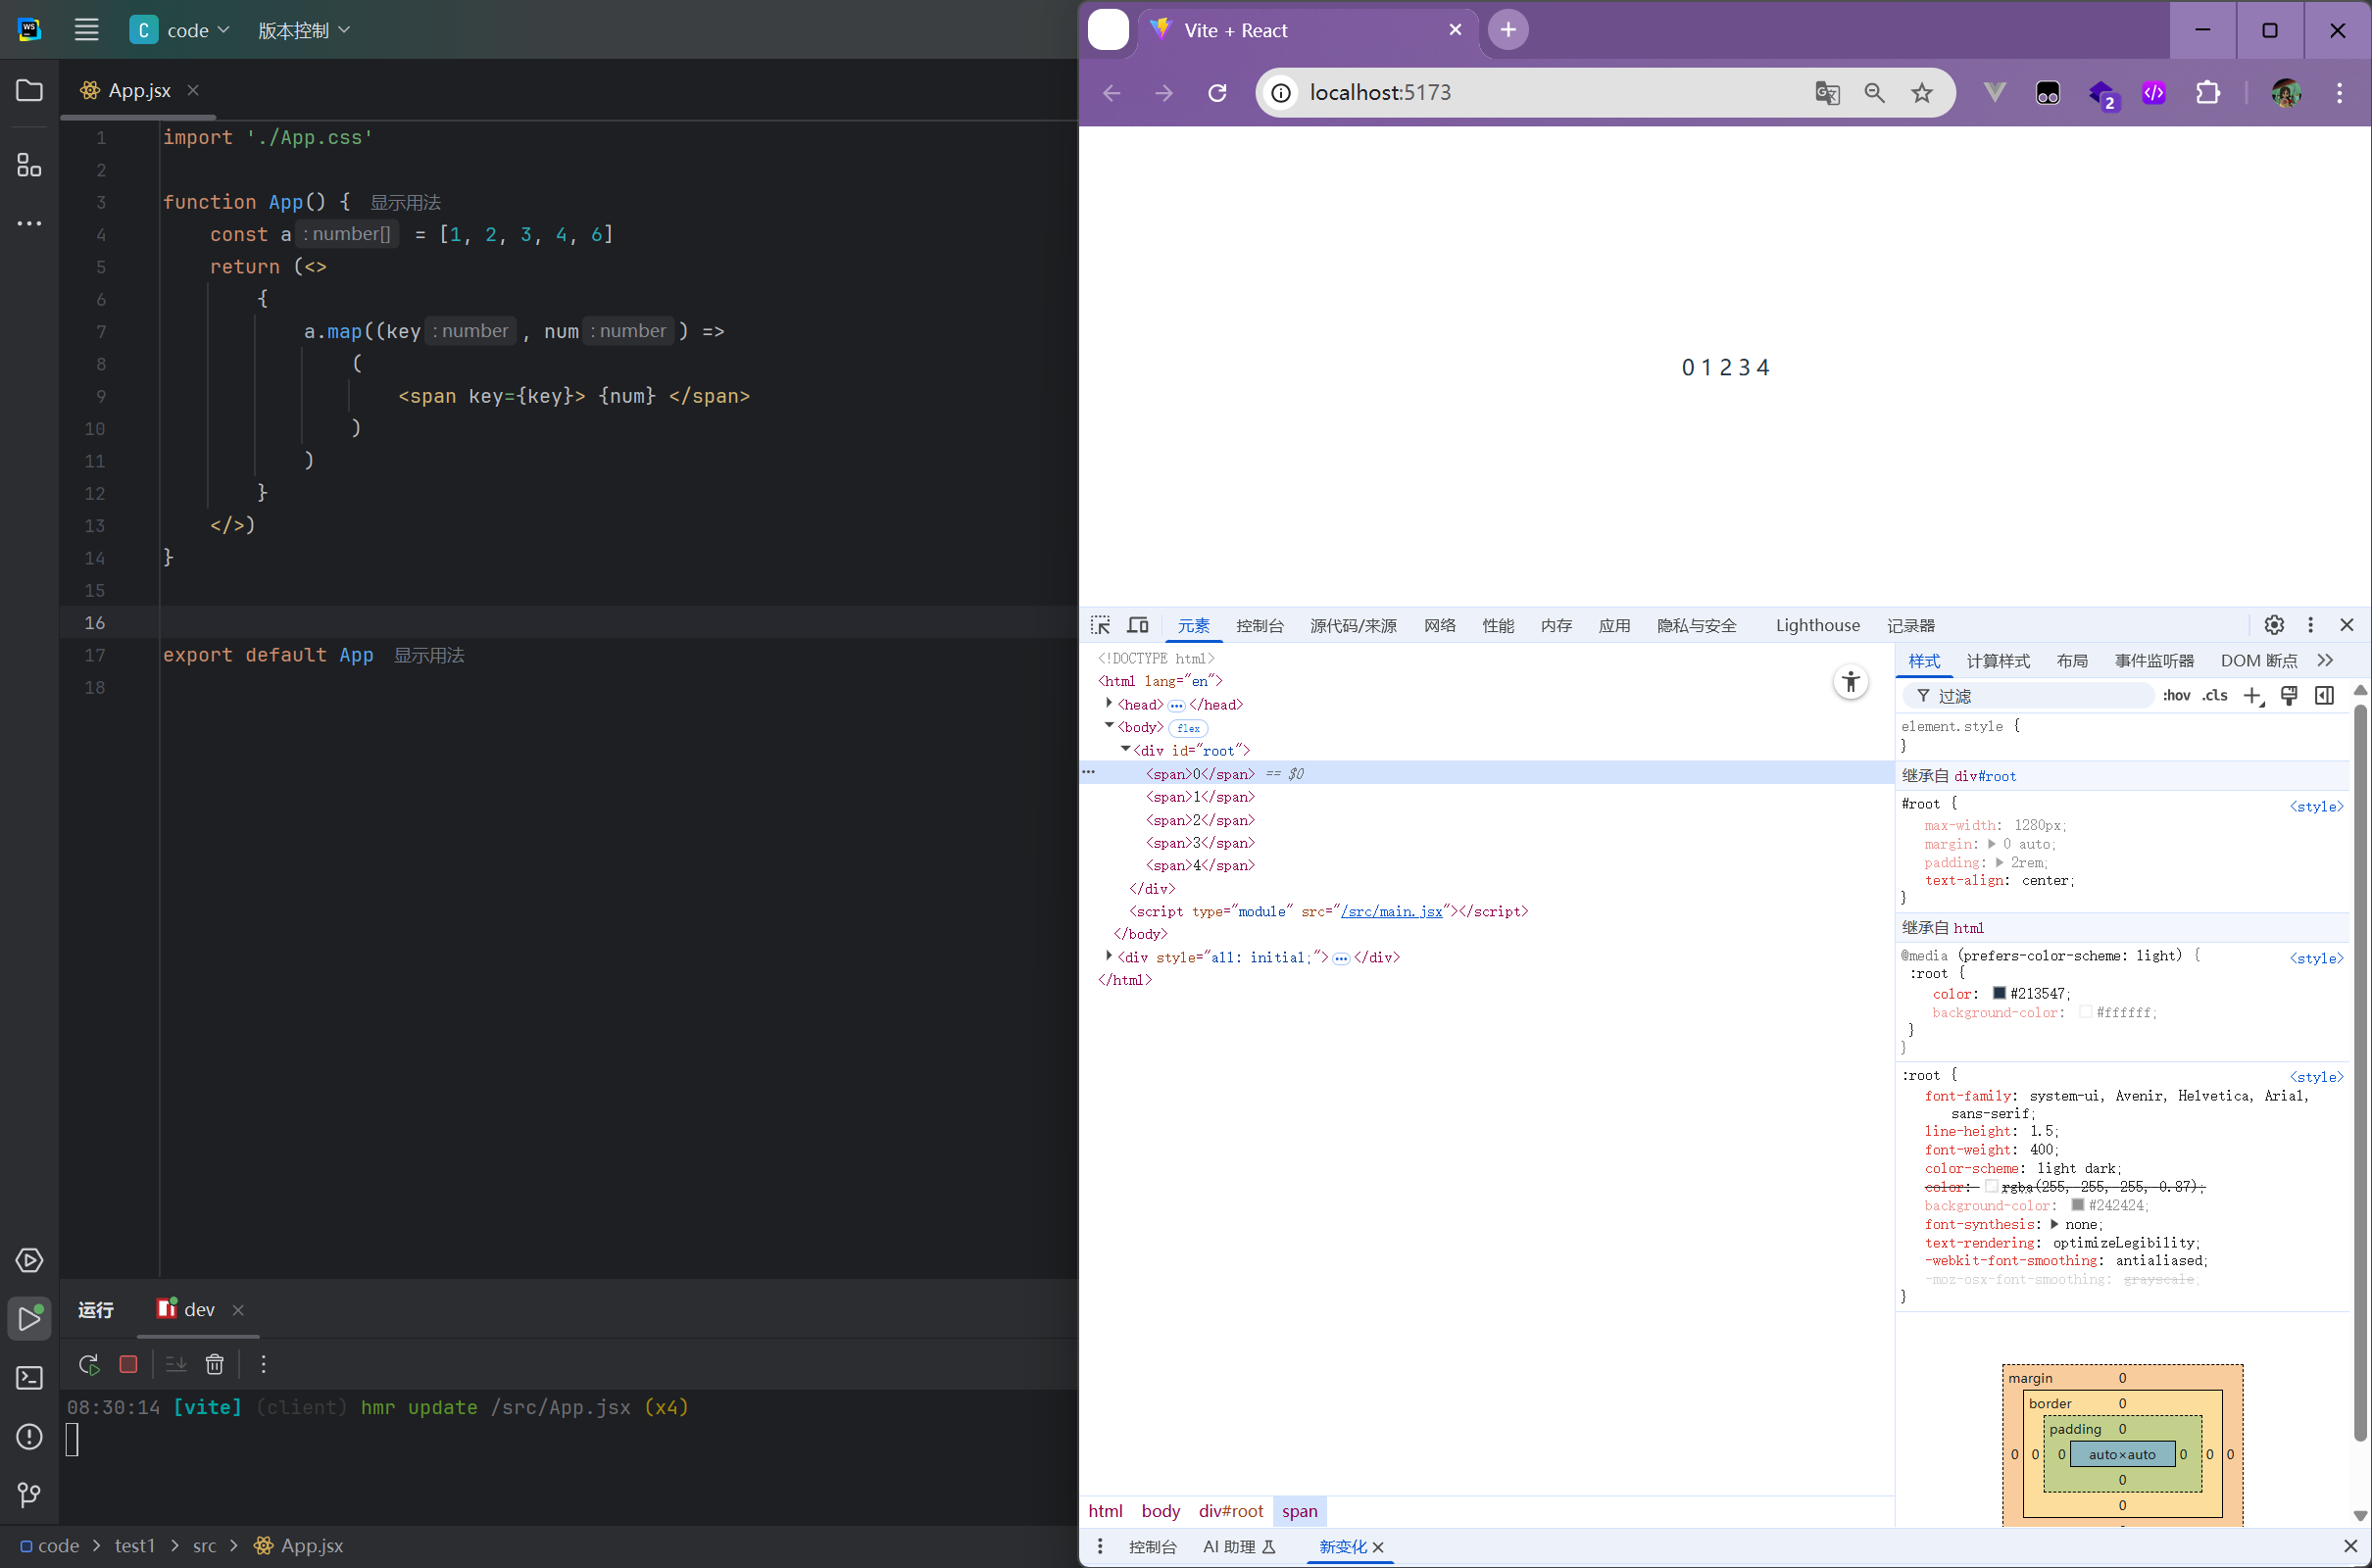
//1
<br>  错误的
<br/> 正确的
//2
错误的:
<span>1</span>
<span>2</span>
正确的:
<>
    <span>1</span>
	<span>2</span>
</>
在JSX当中不允许使用嵌入语句(if,for等),只允许使用赋值语句,当我们需要遍历一个数组的时候,需要使用map的方法,去进行遍历,如下所示:
import './App.css'

function App() {
    const a = [1, 2, 3, 4, 6]
    return (
        <>
        {
            a.map((key, num) =>
                (
                    <span key={key}> {num} </span>
                )
            )
        }
        </>
    )
}


export default App
2 react项目的初始化方式-vite方法(略写)
npm create vite@latest my-vite-app
//选择react js
cd my-vite-app
npm all
npm run dev
3 react中的组件申明
Tips:在react中我们有两种组件的声明方式:
     1. 函数式
     2. 类式
//函数式:可以使用rsf快捷
import React from 'react';

function T1(props) {
    return (
        <div>

        </div>
    );
}

export default T1;
//类式:可以使用rcc快捷
import React, {Component} from 'react';

class T1 extends Component {
    render() {
        return (
            <div>

            </div>
        );
    }
}

export default T1;
4 react的三大属性
Tips:
	-react的三大属性分别为:state,props,refs
	-state:
		定义:组件内部管理的动态数据,用于记录组件自身的状态变化。
		特点:
			1.私有性:仅在定义它的组件内部可访问
			2.可变性:通过 setState(类组件)或状态更新函数(函数组件的 				  useState)修改
			3.触发重渲染:状态更新时,组件会重新渲染
		使用场景:表单输入、切换开关、计数器等组件内部的动态变化
	-props:
		定义:从父组件传递到子组件的数据或回调函数,用于组件间通信。
    	特点:
			1.只读性:子组件不能直接修改接收的 props
			2.单向流动:从父组件到子组件的单向传递
			3.可传递任意类型:包括基本类型、对象、函数、JSX 等
		使用场景:父组件向子组件传递数据、配置信息或回调函数
	-refs:
		定义:用于访问 DOM 元素或组件实例的特殊属性。
		特点:
			1.绕过 React 数据流:直接操作 DOM 或组件实例
			2.不触发重渲染:修改 ref 不会导致组件重新渲染
			3.适用特殊场景:无法通过状态或属性实现的功能
		使用场景:
			获取输入框焦点,访问 DOM 元素的尺寸或位置,
			与第三方 DOM 库集成,管理动画
//state
function Counter() {
  // 函数组件中使用 useState 定义状态
  const [count, setCount] = React.useState(0);

  return (
    <div>
      <p>计数: {count}</p>
      <button onClick={() => setCount(count + 1)}>加1</button>
    </div>
  );
}
//props

// 子组件
function Greeting(props) {
  return <h1>Hello, {props.name}!</h1>;
}

// 父组件
function App() {
  return <Greeting name="Alice" />;
}
//ref
function TextInput() {
  const inputRef = React.useRef(null);

  const focusInput = () => {
    // 通过 ref 直接访问 DOM 元素
    inputRef.current.focus();
  };

  return (
    <div>
      <input type="text" ref={inputRef} />
      <button onClick={focusInput}>聚焦输入框</button>
    </div>
  );
}
5 react中的通信
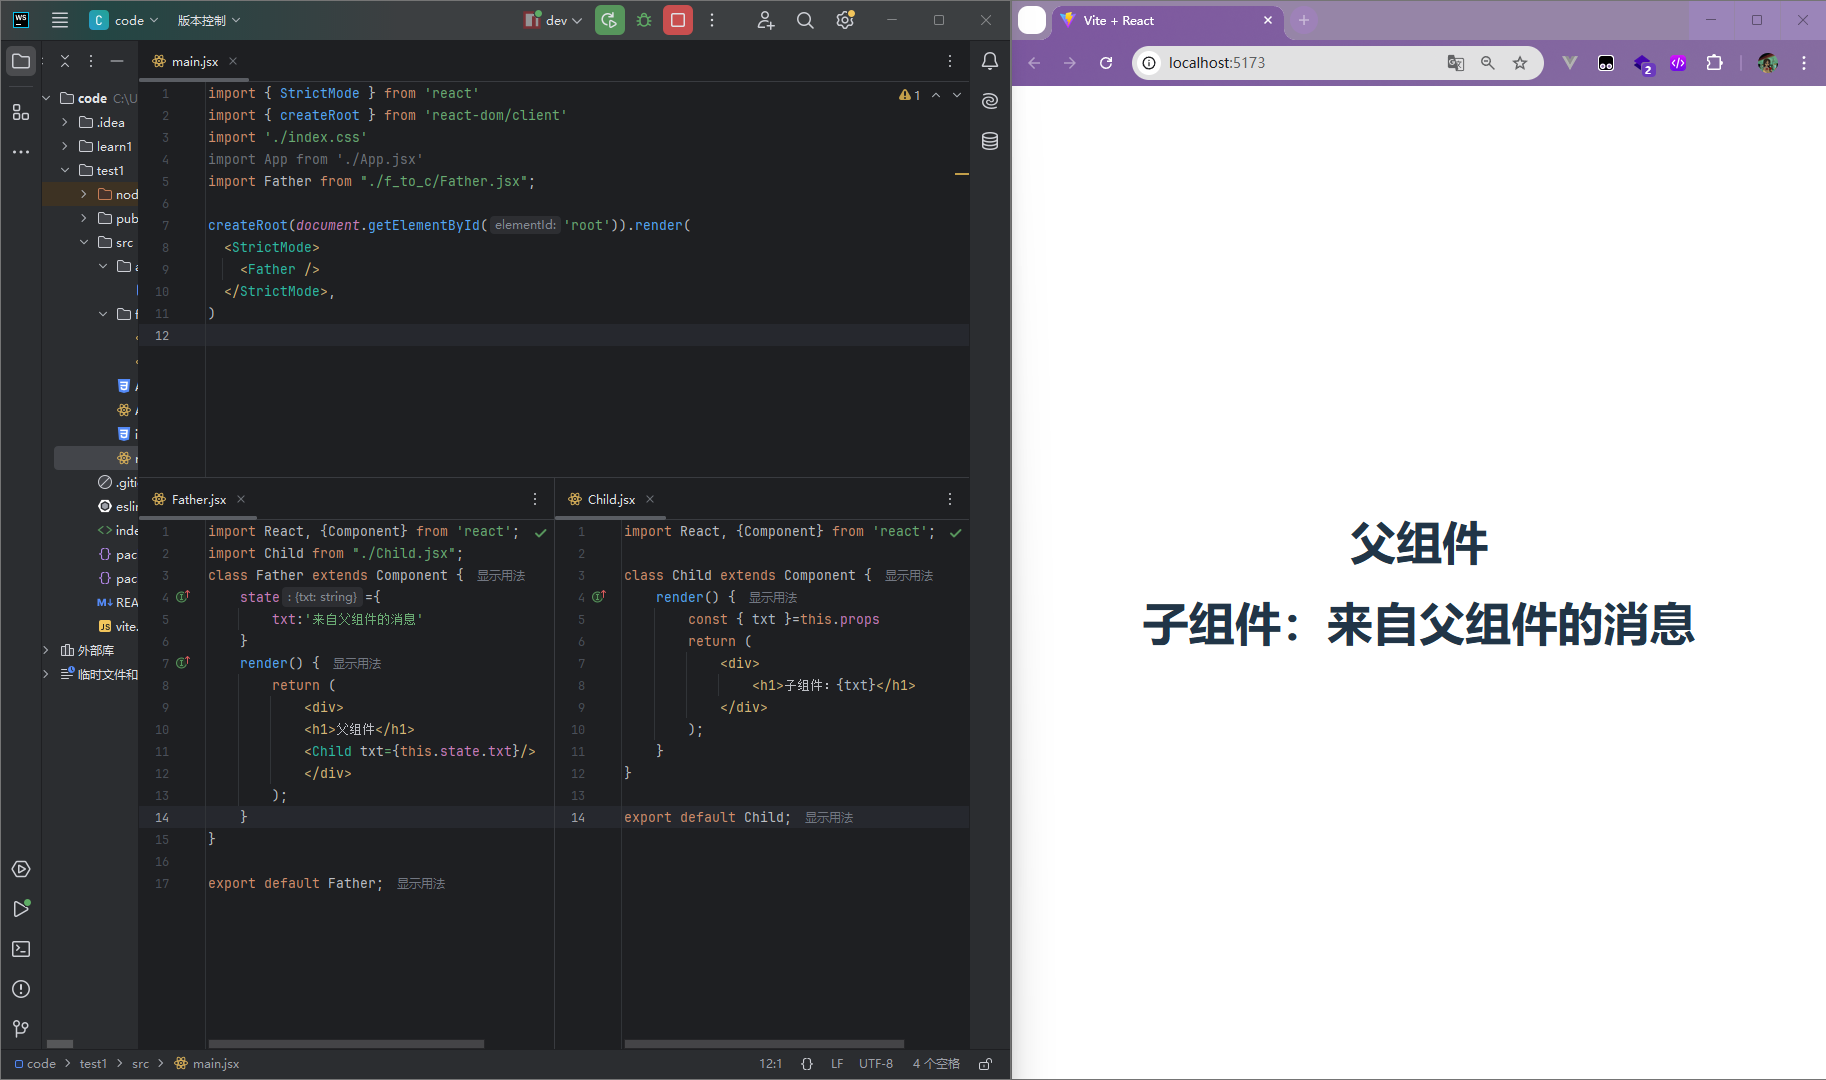
5.1 父传子
- Props方法
//Father.jsx 类式
import React, {Component} from 'react';
import Child from "./Child.jsx";
class Father extends Component {
    state={
        txt:'来自父组件的消息'
    }
    render() {
        return (
            <div>
            <h1>父组件</h1>
            <Child txt={this.state.txt}/>
            </div>
        );
    }
}

export default Father;
//Child.jsx 类式
import React, {Component} from 'react';

class Child extends Component {
    render() {
        const { txt }=this.props
        return (
            <div>
                <h1>子组件:{txt}</h1>
            </div>
        );
    }
}

export default Child;
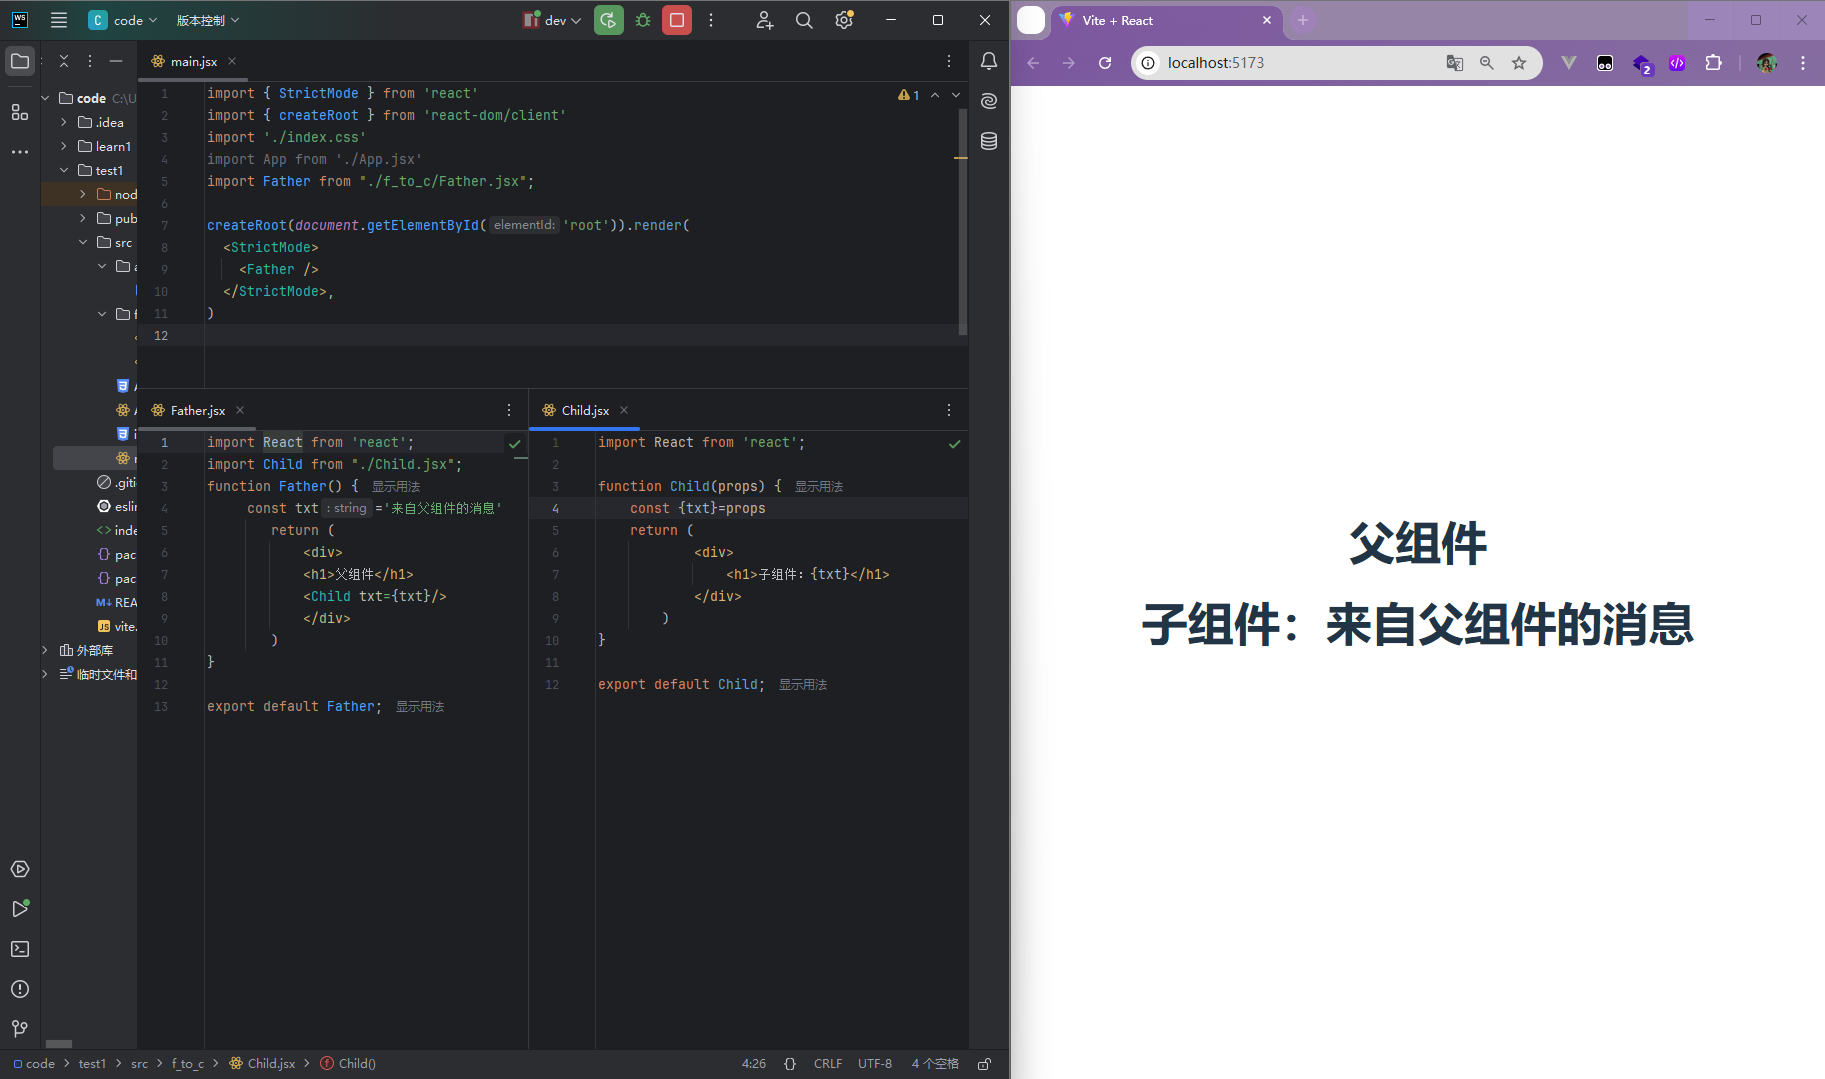
- 函数式
//Father.jsx
import React from 'react';
import Child from "./Child.jsx";
function Father() {
     const txt='来自父组件的消息'
        return (
            <div>
            <h1>父组件</h1>
            <Child txt={txt}/>
            </div>
        )
}

export default Father;
//Child.jsx
import React from 'react';

function Child(props) {
    const {txt}=props
    return (
            <div>
                <h1>子组件:{txt}</h1>
            </div>
        )
}

export default Child;
#当我们传递数据的时候,通常需要借助`prop-types`库的辅助检测
#prop-types 的安装
npm install --save prop-types
代码如下:
//Child.jsx 函数式
import React from 'react';
import PropTypes from 'prop-types'
Child.propTypes = {
    txt: PropTypes.string
}
function Child(props) {
    const {txt}=props
    return (
            <div>
                <h1>子组件:{txt}</h1>
            </div>
        )
}

export default Child;
//Child.jsx 类式
import React, {Component} from 'react';
import PropTypes from "prop-types";
class Child extends Component {
    render() {
        const { txt }=this.props
        Child.prototype = {
            txt:PropTypes.string.isRequired
        }
        return (
            <div>
                <h1>子组件:{txt}</h1>
            </div>
        );
    }
}

export default Child;
5.2 子传父
Tips:子传父的时候是通过props回调函数进行传递的,及我们实际上是父传子,然后通过回调函数改变其值
- 类式
//Father.jsx 类式
import React, {Component} from 'react';
import Child from "./Child.jsx";

class Father extends Component {
    state = {
        txt: '来自父组件的消息'
    }
    changeText = (txt) => {
        this.setState({txt});
    }

    render() {
        return (
            <div>
                <h1>父组件:{this.state.txt}</h1>
                <Child changeText={txt => {
                    this.changeText(txt)
                }}/>
            </div
        );
    }
}

export default Father;
//Child.jsx 类式
import React, {Component} from 'react';
class Child extends Component {
    changemsg=()=>{
        const newtxt='来自子组件的消息'
        this.props.changeText(newtxt);
    }
    render() {
        return (
            <div>
                <button onClick={()=>this.changemsg()}>点击传值</button>
            </div>
        );
    }
}

export default Child;
- 函数式
//Father.jsx 函数式
import React from 'react';
import Child from "./Child.jsx";

function Father() {
    const [txt, setTxt] = React.useState('来自父组件的消息')

    function changeTxt(Txt) {
        setTxt(txt)
    }

    return (
        <div>
            <h1>父组件</h1>
            <Child changeTxt={txt => changeTxt(txt)}/>
        </div>
    )
}

export default Father;
//Child.jsx 函数式
import React from 'react';

function Child(props) {
    function changemsg() {
        const newTxt = '来自父组件的消息'
        props.changeTxt(newTxt)
    }

    return (
        <div>
            <button onClick={changemsg}>点击传值</button>
        </div>
    )
}

export default Child;

5.3 兄弟组件之间
Tips:兄弟组件之间可以参考,子传父的代码,使用props和props的回调函数进行通信,但需要注意必须要有同一个父亲才行
- 类式
//Father.jsx 类式
import React, {Component} from 'react';
import Child1 from "./Child1.jsx";
import Child2 from "./Child2.jsx";

class Father extends Component {
    state = {
        txt: '未改变'
    }
    changeTxt = (txt) => {
        this.setState({txt})
    }

    render() {
        return (
            <div>
                <Child1 txt={this.state.txt}/>
                <Child2 changeTxt={txt => {
                    this.changeTxt(txt)
                }}/>
            </div>
        );
    }
}

export default Father;
//Child1.jsx 类式
import React, {Component} from 'react';
class Child1 extends Component {
render() {
const txt = this.props.txt;
return (
<div style={{backgroundColor: "yellow"}}>
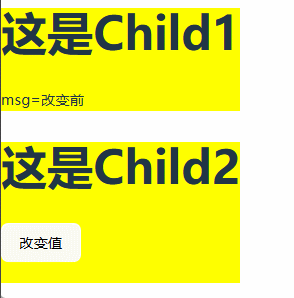
<h1>这是Child1</h1>
<div>
msg={txt}
</div>
</div>
);
}
}
export default Child1;
//Child2.jsx 类式
import React, {Component} from 'react';

class Child2 extends Component {
    changemsg = () => {
        const newtxt = "改变后";
        this.props.changeTxt(newtxt);
    }

    render() {
        return (
            <div style={{backgroundColor: "yellow"}}>
                <h1>这是Child2</h1>
                <button onClick={() => this.changemsg()}>改变值</button>
                <br/><br/>
            </div>
        );
    }
}

export default Child2;
- 函数式
//Father.jsx 函数式
import React from 'react';
import Child1 from "./Child1.jsx";
import Child2 from "./Child2.jsx";

function Father() {
    const [txt, setTxt] = React.useState('改变前')
    function changeTxt(txt){
        setTxt(txt)
    }
    return (
        <div>
            <Child1 txt={txt}/>
            <Child2 changeTxt={txt => {
                changeTxt(txt)
            }}/>
        </div>
    );
}

export default Father;
//Child1.jsx 函数式
import React from 'react';

function Child1(props) {
    const {txt} = props;
    return (
        <div style={{backgroundColor: "yellow"}}>
            <h1>这是Child1</h1>
            <div>
                msg={txt}
            </div>
        </div>
    );
}

export default Child1;
//Child2.jsx 函数式
import React from "react";

function Child2(props) {
    function changemsg() {
        const newTxt = '改变后'
        props.changeTxt(newTxt)
    }

    return (
        <div style={{backgroundColor: "yellow"}}>
            <h1>这是Child2</h1>
            <button onClick={changemsg}>改变值</button>
            <br/><br/>
        </div>
    );
}

export default Child2;
5.4任意组件之间
Tips:如果组件之间没有共同的父组件,那我们就可以用观察者进行组件之间的通信,这个时候我们就需要用到第三方的插件events。
#events的安装
npm install events
//event.js
import EventEmitter from "events";
export default new EventEmitter()
//part1.jsx
import event from "../../event.js"

function Part1() {
    return (
        <div>
            <button onClick={() => {
                //发送消息
                event.emit('message', '这是我发的消息')
            }}>发送消息
            </button>
        </div>
    )
}

export default Part1
//part2.jsx
import {useEffect, useState} from "react"
import event from "../../event.js"

function Part2() {
    const [message, setMessage] = useState('')
    useEffect(() => {
        //监听消息
        event.addListener('message', (message) => {
            setMessage(message)
        })
        return () => {
            event.removeListener('message', (message) => {
                console.log(message)
            })
        }
    })

    return (
        <div>{message}</div>
    )
}

export default Part2
//App.jsx
import './App.css'
import Part1 from './all_talk_send/Part1.jsx'
import Part2 from './all_talk_send/Part2.jsx'

function App() {
    return (
        <div>
            <Part1/>
            <Part2/>
        </div>
    )
}


export default App