基于C语言设计的全局光照明模型
Part 1 Whitted-Style Ray Tracing
Step 0. 算法流程
为了渲染出一张图片,RayTrace()计算了给定像素点的色彩取值。
根据光路可逆原理,可以从人眼作为出发点,沿着指向该pixel的某一点的方向发出一条ray。
Step1:射线求交 这条ray会碰到一个物体(墙壁、球、灯),所以计算这条ray和所有物体最近的交点,取交点距离ray发射点最近的点,即为这个ray第一次碰到的物体,同时求出交点和平面法向量。
Step2:判断是否被直接光照,做局部Phong Shading 如果该点被一些光线直接照射到(计算该点到光源连线间是否有物体遮挡),可以对所有照射到该点的光线,对该交点进行Bling Phong模型的局部光照模型计算其直接光照的影响。
Step3:递归求间接光照 同时光在该交点还会发生折射和反射(作业中未考虑折射,故后面只考虑反射),受到反射的间接光照影响,等于对从该交点发出沿反射光路径走出的ray,重新到Step1继续求。但是这一步反射的光在该交点会发生能量衰减,这和反射系数相关,然后才照射到人眼中,所以之后计算的间接光照需要累乘一个weight。
考虑递归10次能量衰减的就几乎很小了,故循环次数设为10。
这是Whitted-Style RayTracing实现的主要流程。
Step 1. 光线求交
空间中有两种物体,plane 和 sphere,需要分别计算ray和这两种物体的最近交点。
Plane
根据公式,得到代码
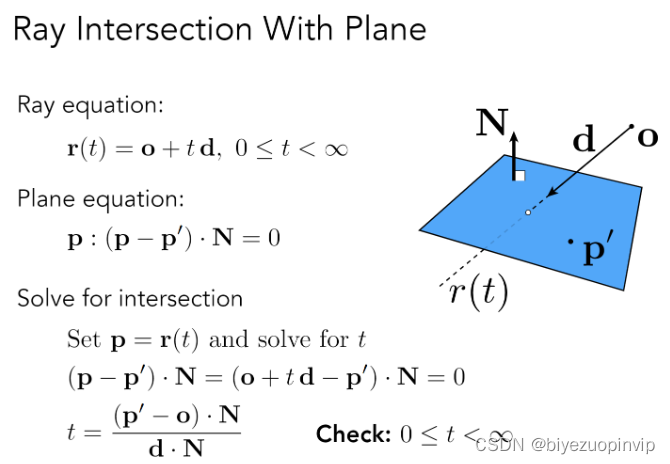
如果 d ⋅ N = 0 d · N = 0 d⋅N=0平行,没有交点,返回inf
如果 t t t为负,射线无法达到平面上,返回inf
否则返回t
virtual real Intersect(const Ray &ray) const override
{
    // Part 1, Step 1: your code here
    if(n_.dot(ray.dir_)==0)return std::numeric_limits<real>::infinity();
    real t = n_.dot(pos_ - ray.ori_)/(n_.dot(ray.dir_));
    if(t<=0.0)return std::numeric_limits<real>::infinity();
    else return t;
}
Sphere
根据公式,得到代码
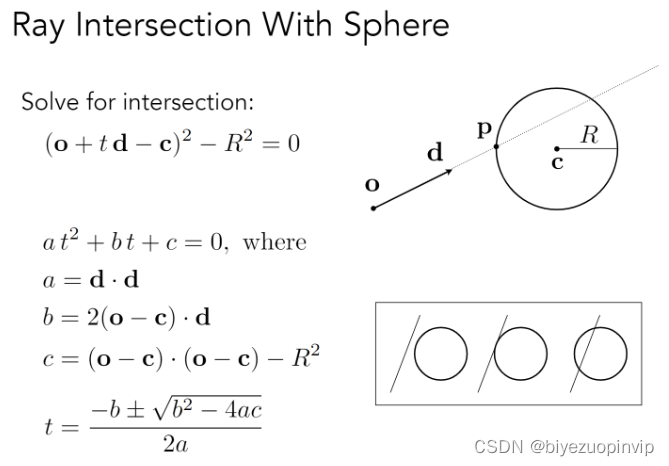
没有交点,或者解算出的交点为负,即射线无法达到球上,返回inf
否则,返回两个交点中大于0且离射线发射点最近的点。
virtual real Intersect(const Ray &ray) const override
{
	// Part 1, Step 1: your code here
	real a = ray.dir_.dot(ray.dir_);
	real b = 2*(ray.dir_).dot(ray.ori_ - cen_);
	real c = (ray.ori_ - cen_).dot(ray.ori_ - cen_) - rad_*rad_;
	if(b*b-4*a*c < 0) return std::numeric_limits<real>::infinity();
	real t1 = (-b+sqrt(b*b-4*a*c))/(2*a);
	real t2 = (-b-sqrt(b*b-4*a*c))/(2*a);
	if(t2>=0.0)return  t2;
	else if(t1>=0.0)return t1;
	else return std::numeric_limits<real>::infinity();
}
Step 2. RayTrace() 补全
代码需要补全Phong Shading部分和生成下一个depth的new ray部分的代码。
real max(real a,real b){
  if(a>b)return a;
  else return b;
}

Color RayTrace(const Scene &scene, Ray ray)
{
  Color color(0, 0, 0);
  Color weight(1, 1, 1);
  std::vector<Light> lights;

  for (int depth = 0; depth < 10; depth++) {
    lights.clear();
    Vec3 pos;
    const Object *obj = scene.Intersect(ray, pos);
    if (!obj) return color;
    auto mat = obj->Mat();
    const Vec3 n = obj->ClosestNormal(pos);

    // Lights
    for (const auto& tlight : scene.lights_) {
      Vec3 test_pos;
      const Ray test_ray(pos + 0.01 * (tlight->position - pos), (tlight->position - pos).normalized());
      const Object * test_obj = scene.Intersect(test_ray, test_pos);
      if (test_obj && test_obj->Mat()->emissive_) {
        lights.push_back(*tlight);
      }
    }

    // Phong shading
    Color result(0, 0, 0);
    // Part 1, Step 2: your code here
    Vec3 norm = n.normalized();
    // ambient
    Vec3 ambient = mat->k_d_ * scene.ambient_light_;
    result += Color(ambient);
    for (const auto& tlight : lights) {
      Vec3 light_dir = (tlight.position - pos).normalized();
      Vec3 view_dir = (ray.ori_ - pos).normalized();
      Vec3 reflect_vector = -light_dir + 2*norm*(norm.dot(light_dir));
      Vec3 half_vector = (light_dir+view_dir).normalized();

      real r2 = (tlight.position - pos).dot(tlight.position - pos);

      // diffuse
      Vec3 diffuse = mat->k_d_*(tlight.intensity/r2);
      diffuse *= std::max(0.0f,light_dir.dot(norm));
      // specular
      Vec3 specular = mat->k_s_*(tlight.intensity/r2);
      specular *= std::pow(std::max(0.0f, norm.dot(half_vector)), mat->alpha_);

      result += Color(diffuse + specular);
    }

    // accumulate color
    Color R = mat->k_s_ * 0.5;
    color += weight * (Color(1, 1, 1) - R) * result;
    weight *= R;

    // generate new ray
    // Part 1, Step 2: your code here
    Vec3 I = ray.dir_.normalized();
    // reflected
    ray.dir_ = I - 2 * norm *(norm.dot(I) );
    ray.ori_ = pos+ray.dir_*0.01;
  }

  return color;
}
在Phong Shading部分,经过试验,采用Bling Phong模型进行局部光照模型计算,计算其ambient light、diffuse light和specular light
实验结果
个人实现: 样例效果:
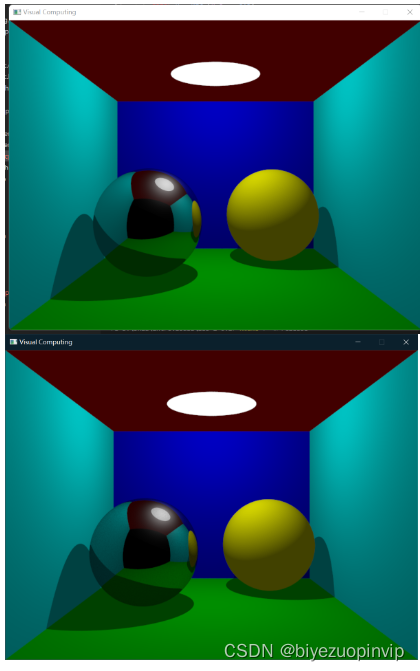
Whitted-Style Ray Tracing 的实现效果如左图,
和右图样例图相比,可以看出,效果大体一致。
Part 2 Path Tracing
Step 0. Path Tracing 和 Whitted-Style Ray Tracing 异同
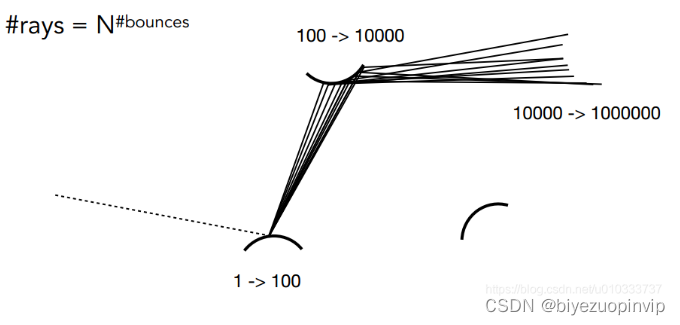
Path Tracing算法的核心思路是,对于一个pixel,从人眼发出的光在打到障碍物上的交点有可能发生镜面反射、高光反射、漫反射(、甚至折射)等等变化,需要对这一个点的可能发出的光线追踪下去获得光强,然后进行monto carlo积分得到近似解。但是如下图从一个点发出100条,经过第二个交点就会有10000条射线,这样运算量过大。
所以处理起来相当于在从人眼出发的地方采样多束光线,对每一条光线,递归,在每个交点随机采样其反射的方向并计算能量损失,当这束射线照射到光源上时,结束计算,将之前累积的能量损失乘以光强,得到该path最终射入人眼的光强;若一定数量后,还照不到光源,或者某一次反射后无法碰到物体,则返回光强为0,对所有光强求平均,获得该像素的值。
同
两种算法都因为直接正向计算光源发出的光最后到人眼时候显示的颜色这种方法实现不了,而需要根据光路可逆原理,从人眼开始,考虑到人眼对每一个像素发出光线。该光线打到不同物体上,在交点上发生了折射反射,通过递归追踪光线路径,中间计算光的能量变化,计算出最终显示在像素上的颜色。
异
- Whitted-Style Ray Tracing从人眼发出去的光的一次计算是确定的,在每个点考虑直接光照和递归处理反射的间接光照。但Path Tracing每次发出去的光的路径是不确定的,考虑在该点可能发生的漫反射、镜面反射等,在每个交点对接下来的光进行随机采样。
- Whitted-Style Ray Tracing依据Bling Phong模型需要考虑每个交点受环境光影响和直接光照影响,对于递归的下一段ray,考虑其在之前点的能量损耗,兼具累加和累乘;Path Tracing不需要在每个点上考虑直接光照,但需要考虑最终到达的光源发出的光在路径交点上的损耗,需要累乘。
- Whitted-Style Ray Tracing只能在每个镜面系数大的交点上继续追踪反射光和折射光,这对于漫反射系数比较大的平面就十分不友好,且其用到的Bling-Phong模型是一个不准确的经验模型,比如对于glossy材质的物体,Whitted-Style Ray Tracing做出来的效果跟类似于ideal mirror。但是Path Tracing,其考虑到了从一个交点可能存在的镜面反射、漫反射和折射,在处理specular coefficient 和 diffuse coefficient都比较高的物体的时候,更符合现实。
- Whitted-Style Ray Tracing不需要多次采样计算Monto Carlo 积分,运算时间很快,Path Tracing需要很长时间的采样计算积分,降噪收敛,运算时间长。
Step 1. Sample() 和 AxisAngle() 函数含义
Vec3 AxisAngle(const Vec3 &w, const real cos2theta, const real phi)
{
	const real cos_theta = std::sqrt(cos2theta);
	const real sin_theta = std::sqrt(1 - cos2theta);
	const Vec3 u = (std::abs(w[0]) > real(.1) ? Vec3(0, 1, 0) : Vec3(1, 0, 0)).cross(w).normalized();
	const Vec3 v = w.cross(u);
	return (u * std::cos(phi) * sin_theta + v * std::sin(phi) * sin_theta + w * cos_theta).normalized();
}

Vec3 Sample(const Material *const mat, const Vec3 &n, const Vec3 &wi, Color &weight)
{
  const real R = mat->k_d_.mean() / (mat->k_d_.mean() + mat->k_s_.mean());
  const real r0 = rand01();
  if (r0 < R) { // sample diffuse ray
    weight = mat->k_d_.any() ? mat->k_d_ / R
    return AxisAngle(n, rand01(), rand01() * 2 * PI_);
  }
  else { // sample specular ray
    if (mat->alpha_ >= 0) {
      const Vec3 d = AxisAngle(n * 2 * n.dot(wi) - wi, std::pow(rand01(), real(2) / (mat->alpha_ + 2)), rand01() * 2 * PI_);
      weight = n.dot(d) <= 0 || !mat->k_s_.any() ? Color(0, 0, 0) : mat->k_s_ / (1 - R);
      return d;
    }
    else { // for ideal mirrors
      weight = mat->k_s_.any() ? mat->k_s_ / (1 - R) : Color(0, 0, 0);
      return n * 2 * n.dot(wi) - wi;
    }
  }
}
Sample()
函数返回了当入射光为wi,面元材质为mat,法向量为n时,随机sample路径上下一个ray的方向,同时计算中间损耗能量weight,用于累乘。
先根据specular coefficient 和diffuse coefficient的比例随机下一条ray是漫反射还是镜面反射,
如果是漫反射,在整个半球面上随机一个方向为漫反射出射方向。
如果是镜面反射,考虑物体本身材质,如果物体材质是理想镜面,直接计算镜面反射的出射向量,否则在其镜面反射出射向量的周围辐射区域内随机一个出射方向。
对于其能量衰减权重,采用Russian Roulette方法,有R的概率是漫反射,有1-R概率是镜面反射,则根据轮盘赌公式期望,漫反射返回值除以R,镜面反射除以(1-R)。
AxisAngle()
函数是一个Rodriguez formula的计算过程,计算了以w为轴,从(x=1,z=0)的方向转了cos2theta中的theta度,和w夹角为phi的向量的值,用于在那个面元的半球上以及其镜面反射出射向量附近圆周,快速的解算出Sample中采样的出射ray的方向。
Step2 PathTrace() 补全
Path Tracing的主要代码:
对于一条人眼发出的光,需要返回其随机sample一条光路后,该光路打到人眼里光强;
递归操作,当前ray是否碰到物体,没有,则返回光强0;有,则看是否是光源,是,则返回光强*路径上衰减权重;否,则随机下一层循环的射线方向,衰减权重累乘计算,进行下一层循环。
Color PathTrace(const Scene &scene, Ray ray)
{
  Color weight(1, 1, 1);
  Color color(1, 1, 1);

  for (int depth = 0; depth < 10; depth++) {
    Vec3 pos;
    const Object *obj = scene.Intersect(ray, pos);
    if (!obj) {
      return Color(0,0,0);
    }
    if (obj->Mat()->emissive_) {
      return color * obj->Mat()->k_d_;
    }
    Vec3 wi = (ray.ori_ - pos).normalized();
    ray.dir_ = Sample(obj->Mat(),obj->ClosestNormal(pos),wi,weight);
    ray.ori_ = pos+0.01*ray.dir_;
    if (!weight.any()) return weight;
    else {
      color *= weight;
    }
  }
  return Color(0,0,0);
}
实现效果
个人实现: 样例效果:

渲染10分钟后的结果如左图,
和右图样例相比,可以看出,效果大体一致。
ight;
else {
color *= weight;
}
}
return Color(0,0,0);
}