7.17版本
准备工作
配置域名
cat >> /etc/hosts <<'EOF'
192.168.199.149 elk149daidaiedu.com
192.168.199.150 elk150daidaiedu.com
192.168.199.155 elk155daidaiedu.com
EOF
修改主机名
hostnamectl set-hostname elk155.daidaiedu.com
免密登录
ssh-keygen
ssh-copy-id elk150.daidaiedu.com
ssh-copy-id elk155.daidaiedu.com
安装同步工具rsync
yum install rsync -y
编写同步脚本
vim /usr/local/sbin/data_rsync.sh
#!/bin/bash
if [ $# -ne 1 ];then
echo "Usage: $0 /path/file(绝对路径)"
exit
fi
#判断文件是否存在
if [ ! -e $1 ];then
echo "[ $1 ] dir or file not find!"
exit
fi
#获取父路径
fullpath=`dirname $1`
#获取子路径
basename=`basename $1`
#进入到父目录
cd $fullpath
for ((host_id=102;host_id<=105;host_id+=3))
do
echo ===== rsyncing elk${host_id}.daidaiedu.com: $basename =====
rsync -az $basename `whoami`@elk${host_id}.daidaiedu.com:$fullpath
if [ $? -eq 0 ];then
echo "执行成功"
fi
done
测试rsync是否同步

集群时间同步
yum install ntpdate chrony vim /etc/chrony.conf server ntp.aliyun.com iburst server ntp1.aliyun.com iburst server ntp2.aliyun.com iburst server ntp3.aliyun.com iburst server ntp4.aliyun.com iburst server ntp5.aliyun.com iburst 修改完重启服务 systemtl restart chronyd
查看服务配置文件
systemctl cat elasticsearch
9300端口:各个节点之间相互之间通信,tcp协议,传输层
9200端口:和外部集群通信,http,应用层
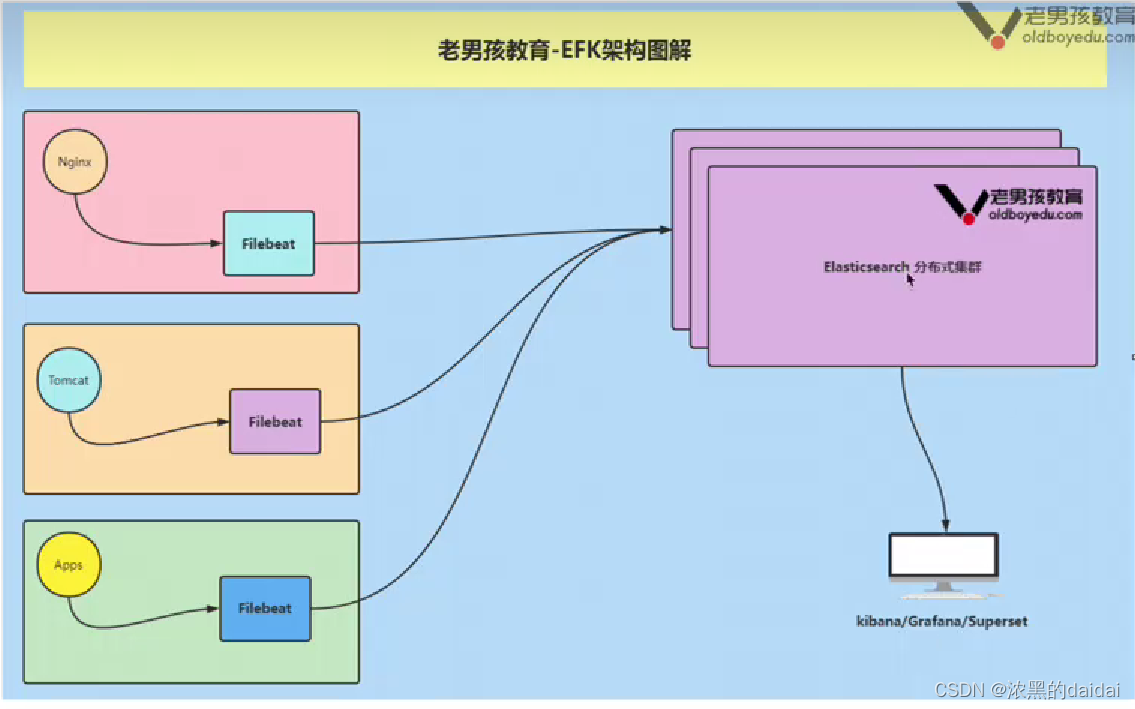
EFK架构
files---->filbeat----->es集群<--------kibana
部署elasticsearch
[root@elk149 ~]# grep -Ev '^$|^#' /etc/elasticsearch/elasticsearch.yml
cluster.name: daidai-elk
node.name: elk149
path.data: /var/lib/elasticsearch
path.logs: /var/log/elasticsearch
network.host: 0.0.0.0
discovery.seed_hosts: ["192.168.199.149","192.168.199.150","192.168.199.155"]
注意:在另外两台服务器上配置,注意修改node.name和network.host,cluster.name必须一致
systemctl restart elasticsearch
完成后测试
curl 192.168.199.149:9200
[root@elk149 ~]# curl 192.168.199.149:9200
{
"name" : "elk149",
"cluster_name" : "daidai-elk",
"cluster_uuid" : "MYa5wN0PQFmi4nH-2T-zlQ",
"version" : {
"number" : "7.17.3",
"build_flavor" : "default",
"build_type" : "rpm",
"build_hash" : "5ad023604c8d7416c9eb6c0eadb62b14e766caff",
"build_date" : "2022-04-19T08:11:19.070913226Z",
"build_snapshot" : false,
"lucene_version" : "8.11.1",
"minimum_wire_compatibility_version" : "6.8.0",
"minimum_index_compatibility_version" : "6.0.0-beta1"
},
"tagline" : "You Know, for Search"
}
或者在浏览器上输入
http://192.168.199.150:9200/_cat/nodes?v
ip heap.percent ram.percent cpu load_1m load_5m load_15m node.role master name
192.168.199.150 40 97 4 0.04 0.04 0.08 cdfhilmrstw - elk150
192.168.199.149 40 98 1 0.00 0.01 0.05 cdfhilmrstw * elk149
192.168.199.155 34 96 4 0.23 0.08 0.08 cdfhilmrstw - elk155
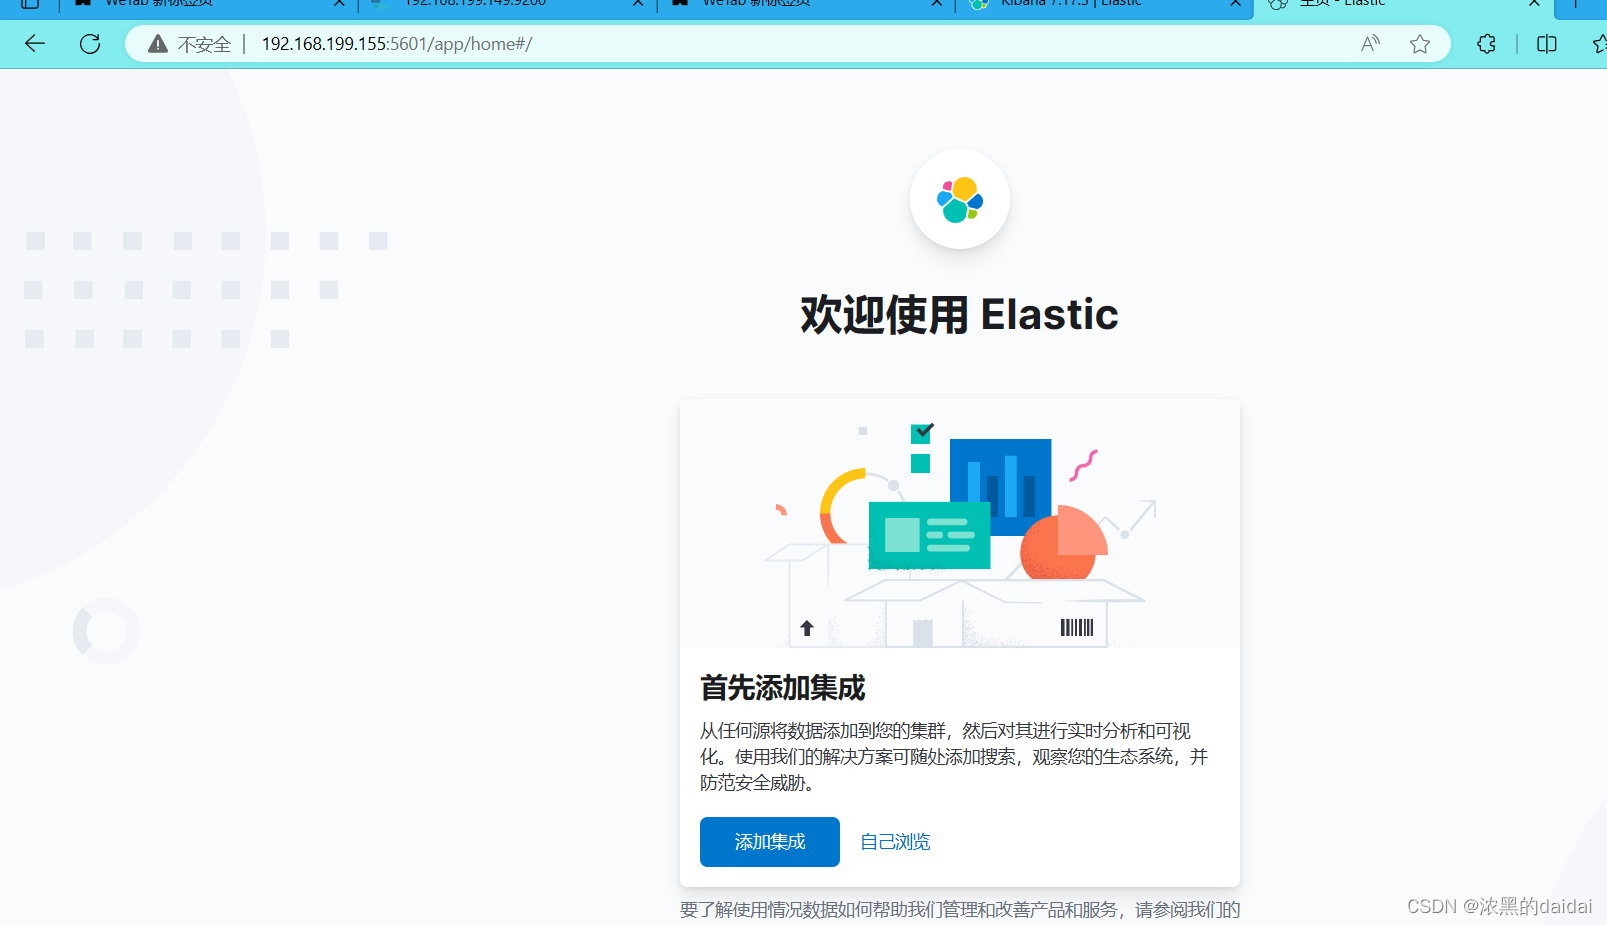
部署Kibana
[root@elk155 kibana]# grep -Ev  '^$|^#' kibana.yml
server.host: "0.0.0.0"
server.name: "daidai-kib"
elasticsearch.hosts: ["http://192.168.199.155:9200","http://192.168.199.149:9200","http://192.168.199.150:9200"]
i18n.locale: "zh-CN"
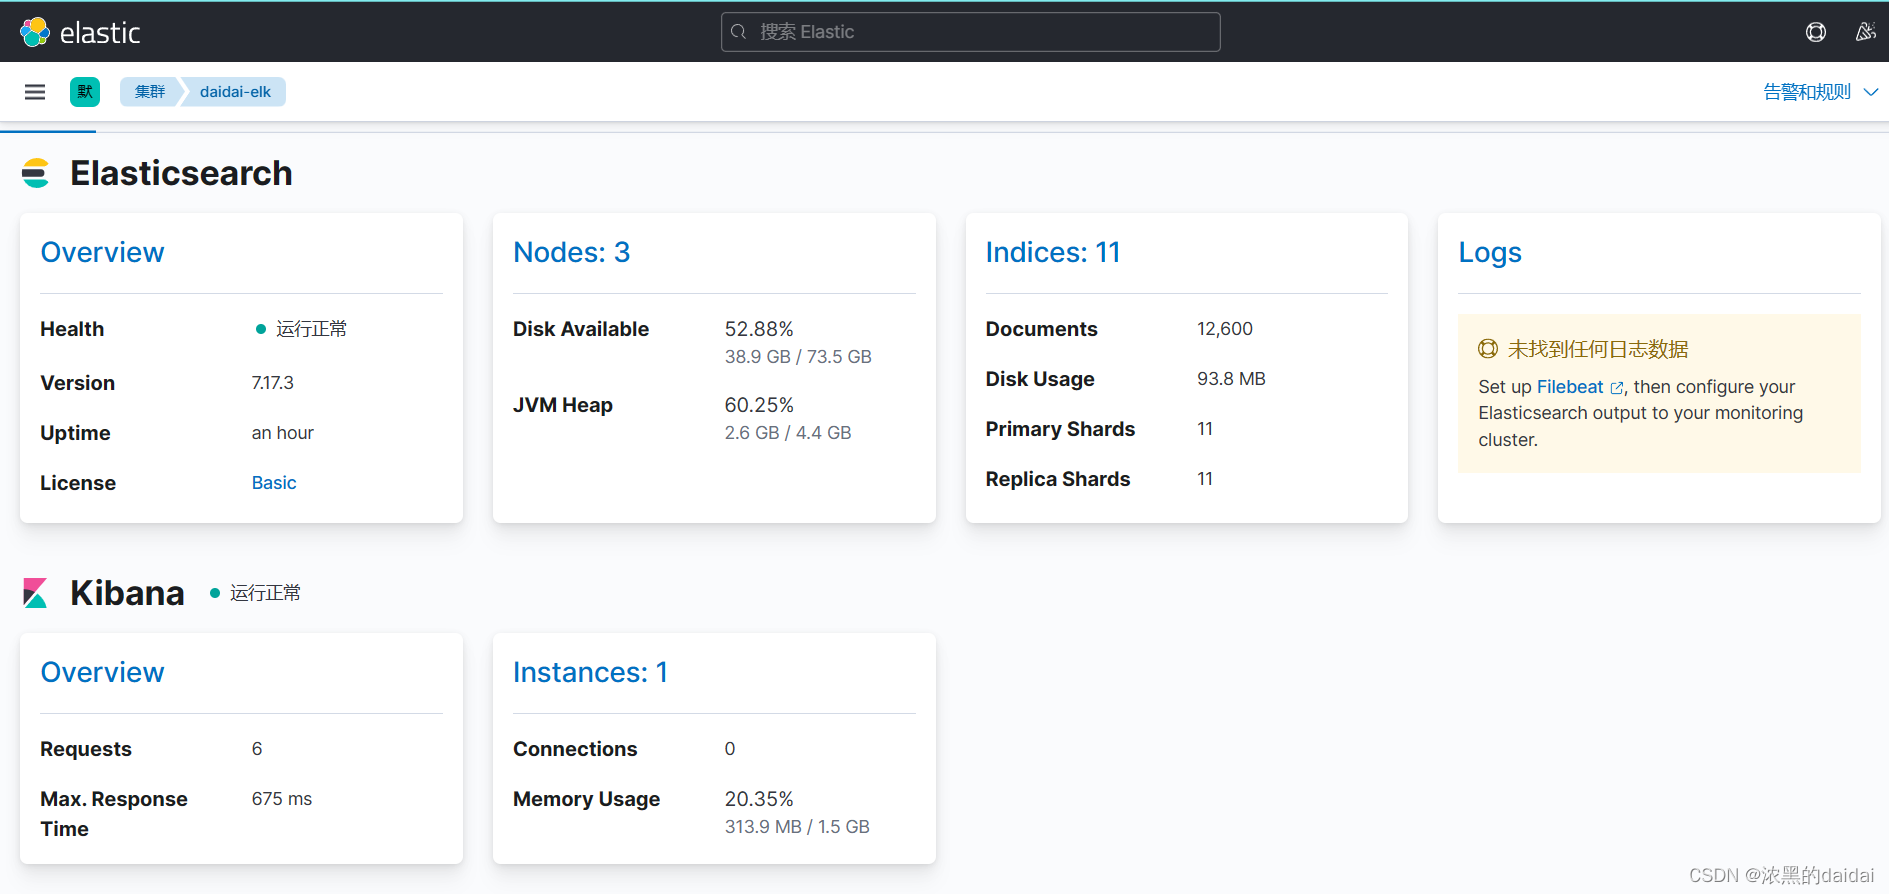
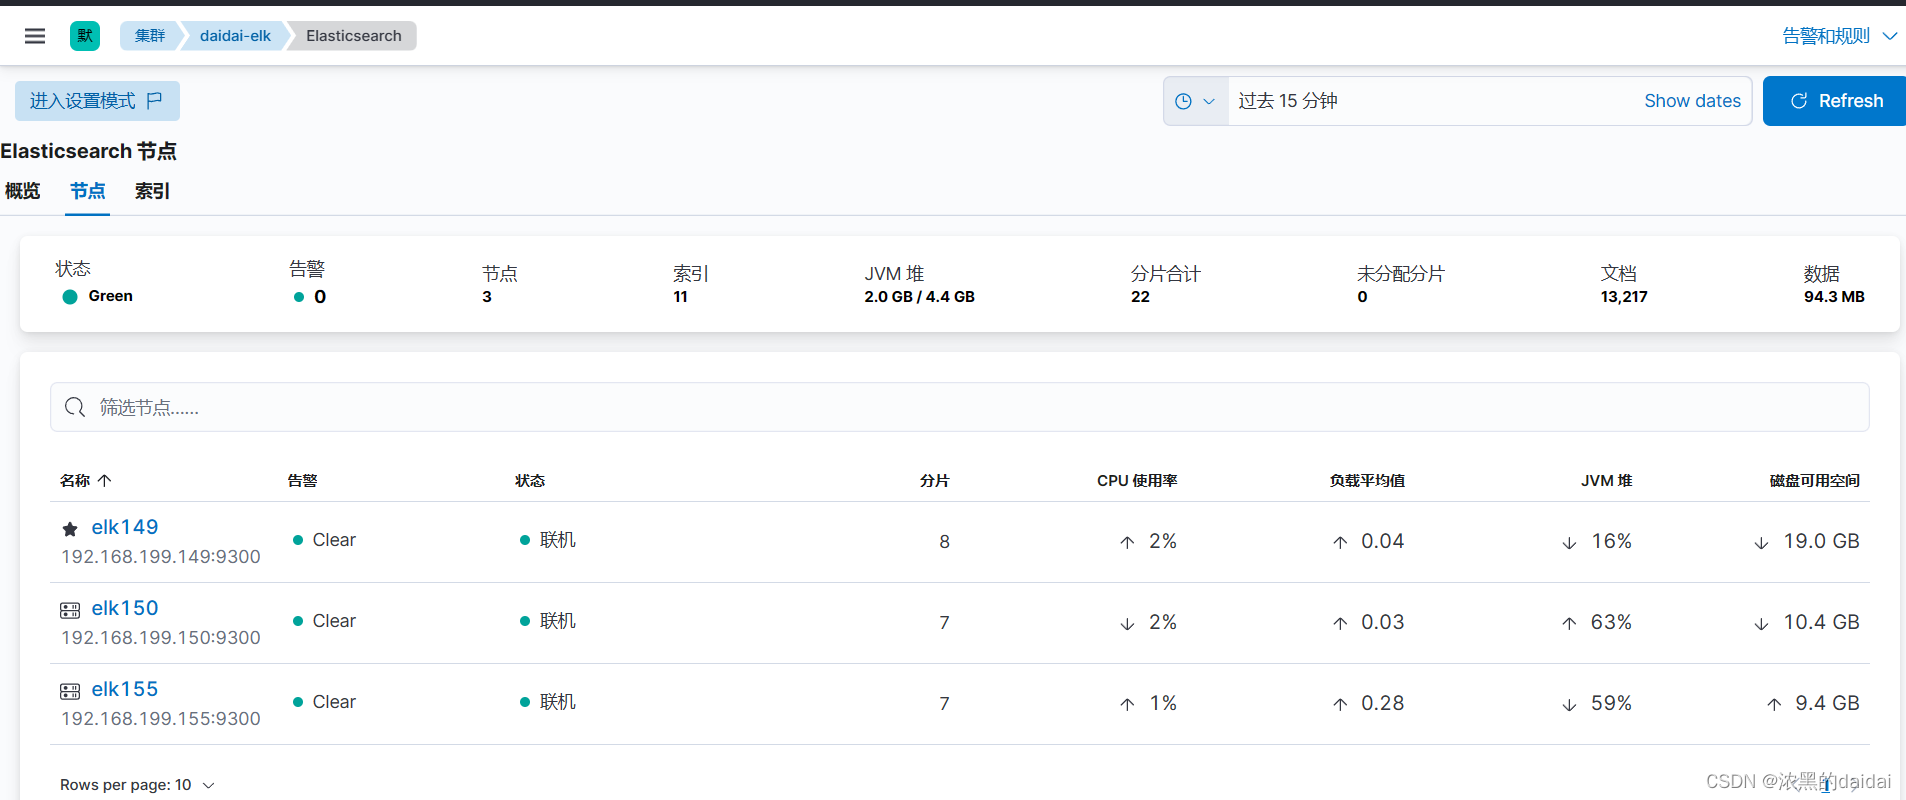
在manager下面找到《堆栈检测》
显示三个节点正常
部署filebate
部署在监控应用的主机上(如检测nginx),按行读取日志
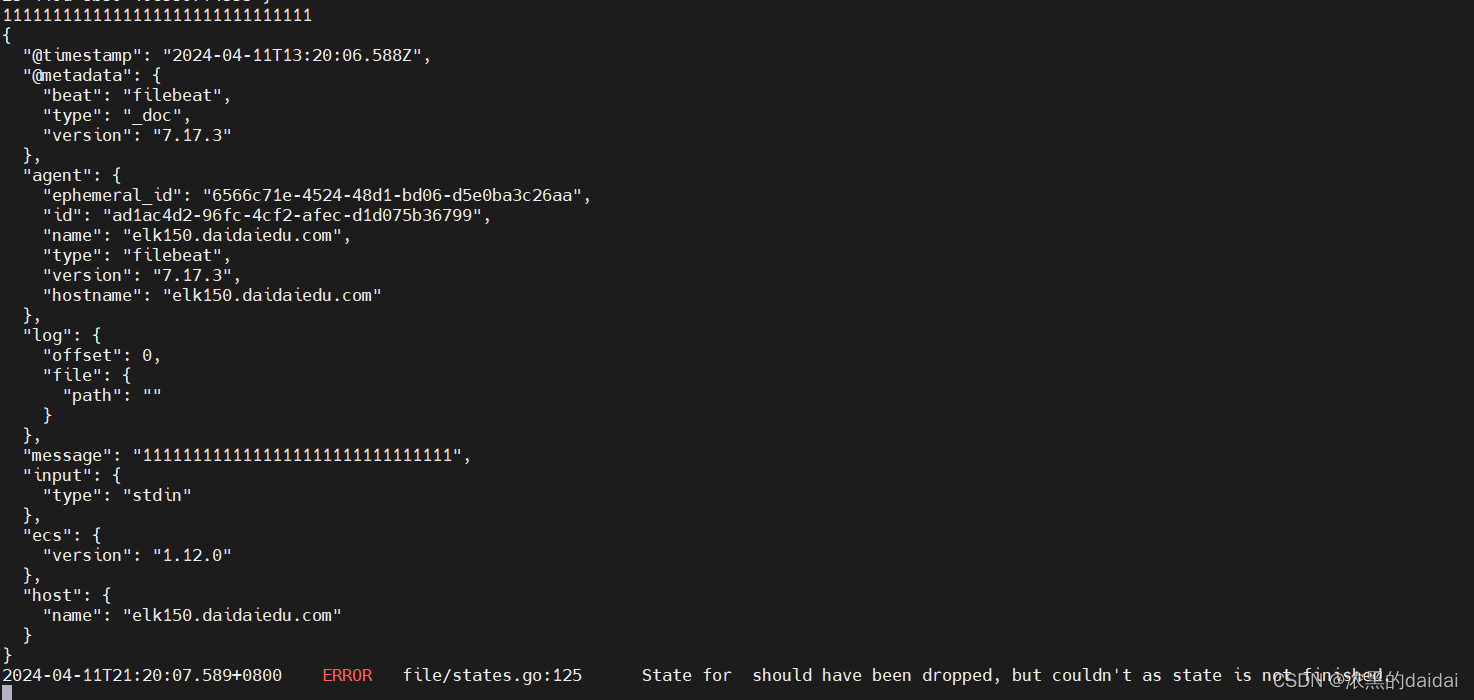
下载filebeat软件
/etc/filebeat/


[root@elk150 filebeat]# cat filebeat.yml
filebeat.inputs:
- type: stdin
output.console:
  pretty: true
#从标准输入上读取数据,返回结果到控制台,下面的error可以省略

执行
filebeat -e -c filebeat.yml
 修改flebeat文件
filebeat会把读取日志的操作记录在log.json日志中,方便下一次继续读取
在启动时会指明该文件的路径
/var/lib/filebeat/registry/filebeat/log.json
格式如下图所示
{"k":"filebeat::logs::native::437853-64768","v":{"type":"log","id":"native::437853-64768","prev_id":"","offset":22,"ttl":-1,"source":"/var/tmp/a.log","timestamp":[2061699874768,1712889188],"FileStateOS":{"inode":437853,"device":64768},"identifier_name":"native"}}
{"op":"set","id":35}
其中"source":"/var/tmp/a.log"代表filebeat从那里读取的日志文件
	"offset":22代表偏移量,用来定位文件中的特定位置,读取数据
[root@elk155 ~]# cat /var/tmp/a.log
111
222
333444
565555
# cat /var/lib/filebeat/registry/filebeat/log.json
{"k":"filebeat::logs::native::437853-64768","v":{"prev_id":"","timestamp":[2062273451290,1712889896],"ttl":-1,"type":"log","FileStateOS":{"inode":437853,"device":64768},"id":"native::437853-64768","source":"/var/tmp/a.log","offset":22,"identifier_name":"native"}}

偏移量:3+3+6+6+4(4个换行符)=22
可以修改/var/lib/filebeat/registry/filebeat/log.json文件中最后一行的offset的值,下次启动时可以从指定位置读取文件
或者删除目录下的log.json文件/删除/var/lib/filebeat/*
enable
vim /etc/filebeat/filebeat.yml
filebeat.inputs:
- type: log
  enable: true	是否启动当前的输入类型,默认启动,false为禁用
  paths:		指定数据路径
    - /tmp/test.log
    - /tmp/test/*.log
- type: log
  enabled: true
  paths:
    - /tmp/test/*.txt
output.console:
  pretty: true
tags
给当前的数据类型加上标签
[root@elk155 tmp]# cat /etc/filebeat/filebeat.yml
filebeat.inputs:
- type: log
  paths:
    - /var/tmp/*.log
  tags: ["运维工程师","python开发","数据库运维"]
- type: log
  paths:
    - /var/tmp/*.txt
  tags: ["python开发","数据库运维","阿李云"]
output.console:
  pretty: true
fileds
#自定义字段
vim filebeat.yml

filebeat.inputs:
- type: log
  paths:
    - /var/tmp/*.log
  tags: ["运维工程师","python开发","数据库运维"]
  fields:
    school: "河南濮阳"
    class: "linux90"
- type: log
  paths:
    - /var/tmp/*.txt
  tags: ["python开发","数据库运维","阿李云"]
output.console:
  pretty: true
运行结果如下
{
  "fields": {
    "school": "河南濮阳",
    "class": "linux90"
  },
  ...
  "tags": [
    "运维工程师",
    "python开发",
    "数据库运维"
  ],
}

fields是键值对
fileds_under_root
把fikeds字段放在顶级字段出,默认为false,放在fileds下,遇上面的对比
 "tags": [
    "运维工程师",
    "python开发",
    "数据库运维"
  ],
  "school": "河南濮阳",
  "input": {
    "type": "log"
  },
创建索引模板index
[root@elk155 filebeat]# cat filebeat.yml.bak3
filebeat.inputs:
- type: log
  paths:
    - /var/tmp/*.log
  tags: ["运维工程师","python开发","数据库运维"]
  fields:
    school: "河南濮阳"
    class: "linux90"
  fields_under_root: true
- type: log
  paths:
    - /var/tmp/*.txt
  tags: ["python开发","数据库运维","阿李云"]
output.elasticsearch:
  hosts: ["192.168.199.149:9200","192.168.199.150:9200","192.168.199.155:9200"]
  index: "daidai-linux-elk-%{+yyy.MM.dd}"

#禁用生命周期
setup.ilm.enabled: false
#设置索引名称
setup.template.name: "daidai-linux"
#设置索引模板的匹配模式
setup.template.pattern: "daidai-linux"
indexs
[root@elk155 filebeat]# cat filebeat.yml
filebeat.inputs:
- type: log
  paths:
    - /var/tmp/*.log
  tags: ["daidai-elk","python开发","数据库运维"]
  fields:
    school: "河南濮阳"
    class: "linux90"
  fields_under_root: true
- type: log
  paths:
    - /var/tmp/*.txt
  tags: ["daidai-python","数据库运维","阿李云"]
output.elasticsearch:
  hosts: ["192.168.199.149:9200","192.168.199.150:9200","192.168.199.155:9200"]
  indices:
    - index: "daidai-elk-%{+yyyy.MM.dd}"
      when.contains:
        tags: "daidai-elk"
    - index: "daidai-python-%{+yyyy.MM.dd}"
      when.contains:
        tags: "daidai-python"
#禁用生命周期
setup.ilm.enabled: false
#设hi索引名称
setup.template.name: "daidai-linux"
#设置索引模板的匹配模式
setup.template.pattern: "daidai-linux"
分片数量不可以修改
副本数量可以修改
设置分片和副本
filebeat.inputs:
- type: log
  paths:
    - /var/tmp/*.log
  tags: ["daidai-elk","python开发","数据库运维"]
  fields:
    school: "河南濮阳"
    class: "linux90"
  fields_under_root: true
- type: log
  paths:
    - /var/tmp/*.txt
  tags: ["daidai-python","数据库运维","阿李云"]
output.elasticsearch:
  hosts: ["192.168.199.149:9200","192.168.199.150:9200","192.168.199.155:9200"]
  indices:
    - index: "daidai-elk-%{+yyyy.MM.dd}"
      when.contains:
        tags: "daidai-elk"
    - index: "daidai-python-%{+yyyy.MM.dd}"
      when.contains:
        tags: "daidai-python"
#禁用生命周期
setup.ilm.enabled: false
#设hi索引名称
setup.template.name: "daidai-linux"
#设置索引模板的匹配模式
setup.template.pattern: "daidai-linux"

#设置分片和副本
setup.template.settings:
  index.number_of_shards: 3
  index.number_of_replicas: 1 	#小于集群数量
setup.ilm和setup.template
setup.ilm.enabled: false 和 setup.template.enabled: false 都是关于 Filebeat 在与 Elasticsearch 通信时的行为的设置,但它们针对的是不同的功能。

setup.ilm.enabled: false:

这个设置禁用了索引生命周期管理(ILM),该功能允许 Elasticsearch 自动管理索引的生命周期,包括创建、删除和归档索引。
禁用 ILM 可能意味着你需要手动管理索引的生命周期,包括索引的创建、关闭和删除等操作。
setup.template.enabled: false:

这个设置禁用了索引模板管理功能,该功能允许 Filebeat 自动创建并加载索引模板到 Elasticsearch 中。
禁用索引模板管理意味着你需要手动管理索引模板,包括创建和加载适合你的数据的索引模板。
因此,区别在于 setup.ilm.enabled: false 主要影响了索引的生命周期管理,而 setup.template.enabled: false 则主要影响了索引模板的创建和加载。
集群颜色问题
绿色:集群的主分片和副本分片可以访问
黄色:集群的部分副本分片可以访问
红色:集群的部分主分片无法访问
Elasticsraerh(简称ES,数据的存储,查询,分析)
索引(index):索引是ES中用于存储数据的逻辑容器,类似于关系数据库中的数据库
分片(shard):分片是索引的物理分割,用于将索引分成多个部分存储在不同的节点上
副本(replica):副本是分片的复制,用于提高数据的可靠性和容错能力。每个分片可以有零个或多个副本,副本存储在不				同的节点上,当主分片不可用时,副本可以顶替成为主分片提供服务
主分片和副本分片:
主分片可以读和写,rw
副本分片只能读,w

kibana(数据查询,监控)
nginx
在149主机上下载nginx服务并且启动,日志文件在/var/log/nginx/access.log
[root@bogon filebeat]# cat filebeat.yml
filebeat.inputs:
- type: log
  paths:
    - /var/log/nginx/access.log
  tags: ["access"]

  #把数据格式换成json格式
  json.keys_under_root: true
  json.add_error_key: true
  json.message_key: log

output.elasticsearch:
  enabled: true
  hosts: ["192.168.199.149:9200","192.168.199.150:9200","192.168.199.155:9200"]
  index: "daidai-nginx-access.log-%{+yyyy.MM.dd}"
#禁用生命周期
setup.ilm.enabled: false
##设hi索引名称
setup.template.name: "daidai-nginx"
##设置索引模板的匹配模式
setup.template.pattern: "daidai-nginx"
##设置分片和副本
setup.template.settings:
  index.number_of_shards: 3
  index.number_of_replicas: 1
执行.yml文件
只收集nginx错误访问日志(添加过滤规则)
[root@bogon nginx]# cat /etc/filebeat/nginx.yml
filebeat.inputs:
- type: log
  enabled: true
  paths:
    - /var/log/nginx/*.log
  include_lines: ["failed","error"]	#过滤信息中包含failed和error的信息

  ...
  ...
  ...
使用filebeat自带nginx模块
在nginx配置文件中修改日志格式
修改如下
yum部署filebeat查看模块
filebeat -c nginx-module.yml  modules list

cat nginx-module.yml
[root@bogon filebeat]# cat nginx-module.yml
filebeat.config.modules:
  path: /etc/filebeat/modules.d/*.yml
  reload.enabled: true

#nginx.yml配置文件在/etc/fileeat/modul.d/下,这里有好多类似的文件,默认后缀名为disabled


[root@bogon filebeat]# filebeat -c nginx-module.yml modules list
Enabled:
nginx

Disabled:
activemq

把模块nginx启用 filebeat -c nginx-module.yml modules enabled nginx
[root@bogon filebeat]# grep -Ev '^$|^*#' modules.d/nginx.yml
- module: nginx
  access:
    enabled: true
    var.paths: ["/var/log/nginx/logs/access.log*"]
  error:
    enabled: true
    var.paths: ["/usr/local/nginx/logs/error.log*"]
  ingress_controller:
    enabled: false
tomcat
收集tomcat访问日志
部署tomcat环境
解压软件包
tar -zxvf apache-tomcat-9.0.21.tar.gz -C /data
启动服务
cd /data/
cd /bin
./startup.sh
#查看端口是否启动
ss -natlp
users:(("java",pid=61025,fd=60))
LISTEN      0      100          [::]:8080        [::]:*
#查看日志文件
格式为localhost_access_log.2024-04-17.txt
启用模块管理
filebeat -c nginx-module.yml modules enable tomcat
nginx-module.yml 为filebeat的modules模块问价的路径,这里启用了tomcat配置文件
#查看都有哪些模块启用,现在又tomcat和nginx
[root@bogon filebeat]# filebeat -c nginx-module.yml modules  list
Enabled:
nginx
tomcat

Disabled:
activemq
配置tomcat.yml
上面启动tomcat模块后,在/etc/filebeat/moduls.d/下面会出现tomacat.yml文件

[root@bogon filebeat]# grep -Ev '^$|^*#' modules.d/tomcat.yml
- module: tomcat
  log:
    enabled: true
    var.input: file
    var.paths:
      - /data/apache-tomcat-9.0.21/logs/*.txt
#注意,tomcat模块中有三种input模式,又tcp,udp,file.默认为UDP,
filebeat -e -c tomcat.yml
过滤字段
可以加上and,or
收集tomcat错误日志
[root@bogon logs]# cat /etc/filebeat/tomcat-error.yml
filebeat.inputs:
- type: log
  paths:
  enabled: false
    - /data/apache-tomcat-9.0.21/logs/*.txt
  json.keys_under_root: true

- type: log
  paths:
    - /data/apache-tomcat-9.0.21/logs/*.out
  #匹配错误信息到一行,这里匹配以日期开头直接到下一个日期为一行
  multiline.type: pattern
  multiline.pattern: '^\d{2}'
  multiline.negate: true
  multiline.match: after

output.elasticsearch:

  enabled: true
  hosts: ["192.168.199.149:9200","192.168.199.150:9200","192.168.199.151:9200"]
  index: "daidai-tomcat-error.log-%{+yyyy.MM.dd}"

#禁用生命周期
setup.ilm.enabled: false
###设hi索引名称
setup.template.name: "daidai-tomcat"
###设置索引模板的匹配模式
setup.template.pattern: "daidai-tomcat"
setup.template.overwrite: true
###设置分片和副本
setup.template.settings:
  index.number_of_shards: 3
  index.number_of_replicas: 0
收集es日志
[root@bogon filebeat]# cat es.log.yml
filebeat.inputs:
- type: log
  paths:
    - /var/log/elasticsearch/my-application.log
  json.keys_under_root: true
output.elasticsearch:
  enabled: true
  hosts: ["192.168.199.149:9200","192.168.199.150:9200","192.168.199.151:9200"]
  index: "daidai-es-access.log-%{+yyyy.MM.dd}"

#禁用生命周期
setup.ilm.enabled: false
###设hi索引名称
setup.template.name: "daidai-es"
###设置索引模板的匹配模式
setup.template.pattern: "daidai-es"
setup.template.overwrite: true
###设置分片和副本
setup.template.settings:
  index.number_of_shards: 3
  index.number_of_replicas: 0
日志过滤
包含指定信息会过滤出来,区分大小写,"^error"过滤以error开头的信息,支持通配符
[root@bogon test]# cat /etc/filebeat/filebeat-console.yml
filebeat.inputs:
- type: log
  enabled: true
  paths:
    - /tmp/test/*.log
  include_lines: ["action","error"]

output.console:
  pretty: true

#include_lines: ['sometext']  包含sometext的行,白名单
#exclude_lines: ['^DBG']  不包含以^DBU的行,黑命单
案例
分别把nginx的访问日志和错误日志放到不同index下
[root@bogon filebeat]# cat  nginx-test.yml
filebeat.inputs:
- type: log
  paths:
    - /var/log/nginx/access.log
  json.keys_under_root: true
  tags: ["access"]

- type: log
  paths:
    - /var/log/nginx/error.log
  onclude_lines: ['\[error\]']	#这里[]需要转意
  tags: ["error"]

output.elasticsearch:
  enabled: true
  hosts: ["192.168.199.149:9200","192.168.199.150:9200","192.168.199.151:9200"]
  indices:
    - index: "daidai-nginx-access.log-%{+yyyy.MM.dd}"
      when.contains:
        tags: "access"
    - index: "daidai-nginx-error.log-%{+yyyy.MM.dd}"
      when.contains:
        tags: "error"

#禁用生命周期
setup.ilm.enabled: false
###设hi索引名称
setup.template.name: "daidai-nginx"
###设置索引模板的匹配模式
setup.template.pattern: "daidai-nginx"
setup.template.overwrite: true
###设置分片和副本
setup.template.settings:
  index.number_of_shards: 3
  index.number_of_replicas: 0
案例二
收集nginx和tomcat访问日志和错误日志
[root@bogon filebeat]# cat nginx-tomcat.yml
filebeat.inputs:
- type: log
  paths:
    - /var/log/nginx/access.log
  tags: ["nginx-access"]
  json.keys_under_root: true

- type: log
  paths:
    - /var/log/nginx/error.log
  include_lines: ['\[error\]']
  tags: ["nginx-error"]

- type: log
  paths:
    - /data/apache-tomcat-9.0.21/logs/*.txt
  tags: ["tomcat-access"]
  json.keys_under_root: true

- type: log
  enabled: true
  paths:
    - /data/apache-tomcat-9.0.21/logs/*.out
#匹配错误信息到一行,这里匹配以日期开头直接到下一个日期为一行

  tags: ["tomcat-error"]
  multiline.type: pattern
  multiline.pattern: '^\d{2}'
  multiline.negate: true
  multiline.match: after

output.elasticsearch:

  enabled: true
  hosts: ["192.168.199.149:9200","192.168.199.150:9200","192.168.199.151:9200"]
  indices:
    - index: "daidai-nginx-access.log-%{+yyyy.MM.dd}"
      when.contains:
        tags: "nginx-access"
    - index: "daidai-nginx-error.log-%{+yyyy.MM.dd}"
      when.contains:
        tags: "nginx-error"

    - index: "daidai-tomcat-access.log-%{+yyyy.MM.dd}"
      when.contains:
        tags: "tomcat-access"
    - index: "daidai-tomcat-error.log-%{+yyyy.MM.dd}"
      when.contains:
        tags: "tomcat-error"
#禁用生命周期
setup.ilm.enabled: false
###设hi索引名称
setup.template.name: "daidai-web"
###设置索引模板的匹配模式
setup.template.pattern: "daidai-web"
setup.template.overwrite: true
###设置分片和副本
setup.template.settings:
  index.number_of_shards: 3
  index.number_of_replicas: 0
新版本:log-----> filestream
加上json解析

filebeat.inputs:
- type: filestream
  ...
  parsers:
    - ndjson:
        target: ""
        message_key: msg
    - multiline:
        type: counter
        lines_count: 3
        ...
        ...
        ...
filebeat.inputs:
- type: filestream
  enabled: true
  paths:
    - /data/apache-tomcat-9.0.21/logs/*.txt
  json.keys_under_root: true

- type: filestream
  paths:
    - /data/apache-tomcat-9.0.21/logs/*.out
  parsers:
  #定义多行匹配
    - multiline:
        type: pattern
        pattern: '^\d{2}'
        negate: true
        match: after
       ...
       ...
       ...
input源配置一旦超过4个,可能会复现出部分数据无法写入的问题
方法一:
	拆成多个filebeat文件,出问题时可以指定数据路径  --path.data string   Data path (default " ")
[root@bogon tmp]# cd test
[root@bogon test]# ll
total 8
-rw-r--r-- 1 root root  39 Apr 18 10:33 a.log
-rw------- 1 root root   0 Apr 18 20:09 filebeat.lock
-rw------- 1 root root 100 Apr 18 20:09 meta.json
drwxr-x--- 3 root root  22 Apr 18 20:09 registry
执行后目录下面会出现新的文件,停止后filebeat.lock文件会消失
方法二:rsyslog
使用rsyslog聚合对文件
yum install rsyslog
rsyslog服务配置文件/etc/rsyslog.conf
#设置所有信息日志都发送到指定文件中
*.*                                                     /var/log/daidai.log
#打开tcp协议(取消前面的注释)
$ModLoad imtcp
$InputTCPServerRun 514
#重启服务
systemctl restart rsyslog