Demo
fragment_blank.xml
<?xml version="1.0" encoding="utf-8"?>
<LinearLayout xmlns:android="http://schemas.android.com/apk/res/android"
    android:layout_width="match_parent"
    android:layout_height="match_parent"
    android:orientation="vertical"
    >
    <TextView
        android:layout_width="match_parent"
        android:layout_height="40dp"
        android:text="@string/app_name"
        android:id="@+id/tv">
    </TextView>
    <Button
        android:layout_width="match_parent"
        android:layout_height="40dp"
        android:id="@+id/btn"/>
</LinearLayout>
fragment_blank.java
package com.example.myapplication;

import android.os.Bundle;

import androidx.annotation.NonNull;
import androidx.fragment.app.Fragment;

import android.view.LayoutInflater;
import android.view.View;
import android.view.ViewGroup;
import android.widget.Button;
import android.widget.TextView;

/**
 * A simple {@link Fragment} subclass.
 * Use the {@link BlankFragment#} factory method to
 * create an instance of this fragment.
 */

public class BlankFragment extends Fragment {

    @Override
    public void onCreate(Bundle savedInstanceState) {
        super.onCreate(savedInstanceState);

    }

    @Override
    public View onCreateView(@NonNull LayoutInflater inflater, ViewGroup container,
                             Bundle savedInstanceState) {
        if(root==null)
        {
            root = inflater.inflate(R.layout.fragment_blank,container,false);
        }
        textView = root.findViewById(R.id.tv);
        Button button = root.findViewById(R.id.btn);
        button.setOnClickListener(new View.OnClickListener()
        {
            @Override
            public void onClick(View v) {
                textView.setText("OK");
            }
        });
        return root;
    }

    private View root;
    private TextView textView;
}
activity_main.xml
<?xml version="1.0" encoding="utf-8"?>
<LinearLayout xmlns:android="http://schemas.android.com/apk/res/android"
    android:layout_height="match_parent"
    android:layout_width="match_parent"
    android:id="@+id/main"
    android:orientation="vertical">
    <androidx.fragment.app.FragmentContainerView android:name="com.example.myapplication.BlankFragment"
        android:layout_width="match_parent"
        android:layout_height="match_parent"
        android:id="@+id/fg"/>
    </LinearLayout>
绑定fragment
动态添加
main_activity.mxl
<?xml version="1.0" encoding="utf-8"?>
<LinearLayout xmlns:android="http://schemas.android.com/apk/res/android"
    android:layout_height="match_parent"
    android:layout_width="match_parent"
    android:orientation="vertical"
    android:id="@+id/main"
    >
    <Button
        android:layout_width="match_parent"
        android:layout_height="wrap_content"
        android:id="@+id/btn1"
        android:text="@string/app_name"/>
    <Button
        android:layout_width="match_parent"
        android:layout_height="wrap_content"
        android:id="@+id/btn2"
        android:text="@string/bottom_sheet_behavior"/>
    <FrameLayout
        android:layout_width="match_parent"
        android:layout_height="match_parent"
        android:id="@+id/fl"
        android:background="@drawable/ic_launcher_background"/>
    </LinearLayout>
Activity_main.java
package com.example.myapplication;
import android.os.Bundle;
import android.view.View;
import android.widget.Button;
import androidx.activity.EdgeToEdge;
import androidx.appcompat.app.AppCompatActivity;
import androidx.core.graphics.Insets;
import androidx.core.view.ViewCompat;
import androidx.core.view.WindowInsetsCompat;
import androidx.fragment.app.Fragment;
import androidx.fragment.app.FragmentManager;
import androidx.fragment.app.FragmentTransaction;
public class MainActivity extends AppCompatActivity implements View.OnClickListener {
@Override
protected void onCreate(Bundle savedInstanceState) {
super.onCreate(savedInstanceState);
EdgeToEdge.enable(this);
setContentView(R.layout.activity_main);
ViewCompat.setOnApplyWindowInsetsListener(findViewById(R.id.main), (v, insets) -> {
Insets systemBars = insets.getInsets(WindowInsetsCompat.Type.systemBars());
v.setPadding(systemBars.left, systemBars.top, systemBars.right, systemBars.bottom);
return insets;
});
Button btn = findViewById(R.id.btn1);
btn.setOnClickListener(this);
Button btn2 = findViewById(R.id.btn2);
btn2.setOnClickListener(this);
}
@Override
public void onClick(View v) {
if(v.getId()==R.id.btn1)
{
replaceFragment(new BlankFragment2());
}
else
{
replaceFragment(new ItemFragment());
}
}
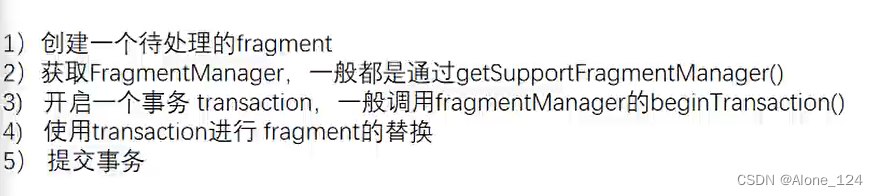
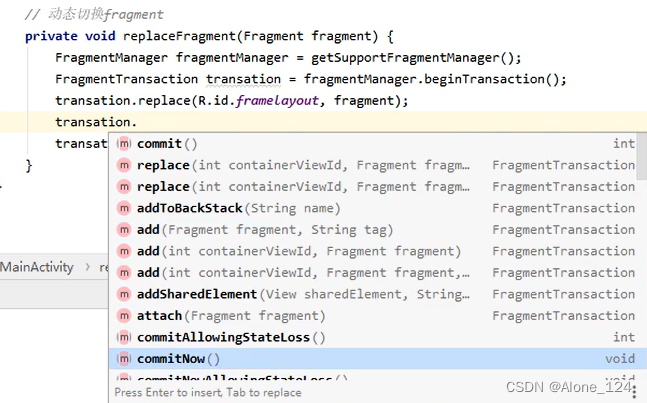
// 动态切换
private void replaceFragment(Fragment blankFragment2) {
FragmentManager fragmentManager = getSupportFragmentManager();
FragmentTransaction transaction = fragmentManager.beginTransaction();
transaction.replace(R.id.fl,blankFragment2);
transaction.commit();
}
} 
点击按钮,Fragment对象会被替换到下方FrameLayout容器上。
除了替换,还有很多操作 Fragment对象的方法。
其中将Fragment压入同一个栈的操作,可以通过按返回键依次出栈:
![]()
Activity和Fragment通信(Bundle方案)
MainActivity.java:
public void onClick(View v) {
        if(v.getId()==R.id.btn1)
        {
            Bundle bundle = new Bundle();
            bundle.putString("111","222");
            BlankFragment2 blankFragment2 = new BlankFragment2();
            blankFragment2.setArguments(bundle);
            replaceFragment(blankFragment2);
        }
        else
        {
            replaceFragment(new ItemFragment());
        }
    }
按按钮之后将数据传给Fragment对象。
BlankFragment2.java
 public View onCreateView(LayoutInflater inflater, ViewGroup container,
                             Bundle savedInstanceState) {
     // Inflate the layout for this fragment
     View view = inflater.inflate(R.layout.fragment_blank2, container, false);
     TextView textView = view.findViewById(R.id.fb2);
     Bundle bundle = this.getArguments();
     assert bundle != null;
     String ret = bundle.getString("111");
     // ret存放的就是传过来的参数的值
     textView.setText(ret);
     return view;
   }
}
生命周期

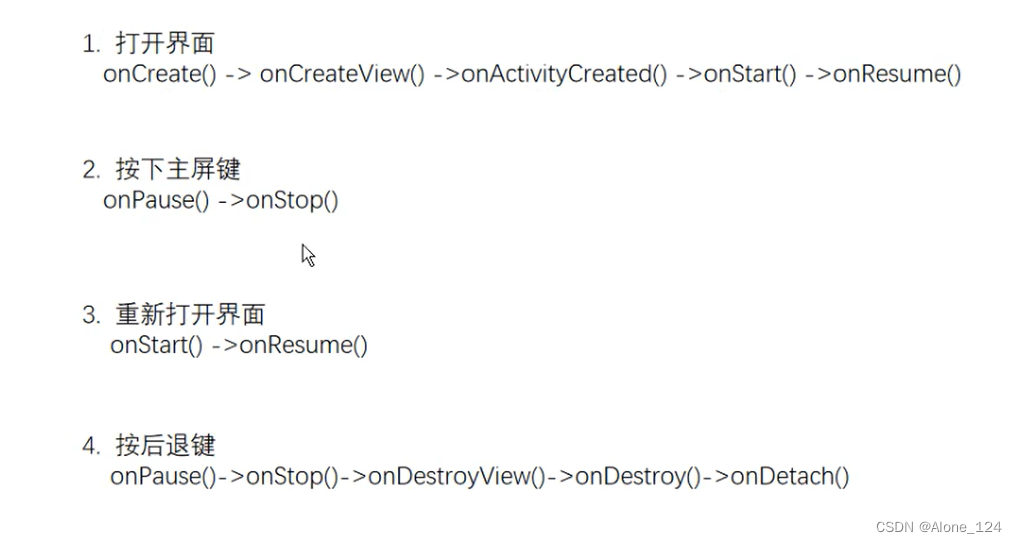
PS:
onDestroyView函数一般在当前UI界面不需要显示时才会调用。而切回主屏幕不会导致UI销毁所以不调用该函数。onCreateView相反。