语音交互大模型的功能越来越受到重视。讯飞语音听写(流式版)为开发者提供了一种高效、准确的语音识别解决方案。本文将基于 Home.vue、iat_xfyun.js 和 sparkChat.js 这三个文档,详细阐述讯飞语音听写(流式版)的开发逻辑、涉及的代码,并提供开发说明、文件结构和分析。
开发说明
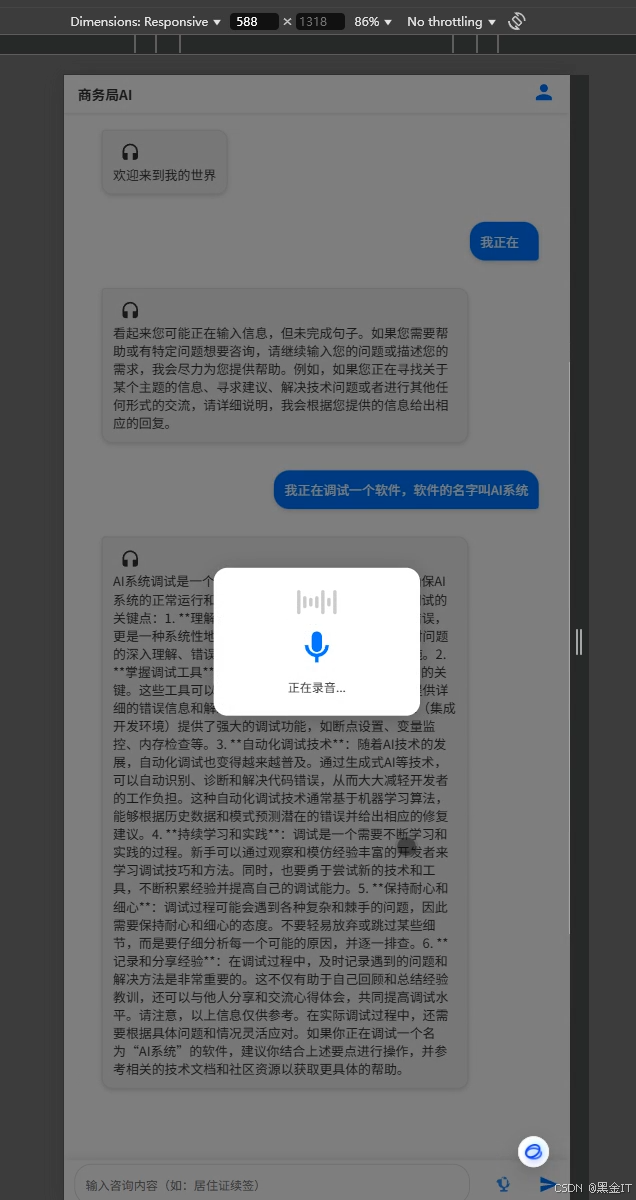
页面示例
功能概述
讯飞语音听写(流式版)允许用户通过麦克风输入语音,实时将语音转换为文字。在本项目中,该功能主要应用于聊天界面,用户可以通过语音输入问题,系统将语音转换为文字后发送给后端进行处理。
环境配置
- 开发环境:Vue.js 3.x、Vite
- 依赖库:
@muguilin/xf-voice-dictation用于实现讯飞语音听写功能
配置步骤
- 安装依赖:在项目根目录下执行以下命令安装
@muguilin/xf-voice-dictation。
npm install @muguilin/xf-voice-dictation
- 配置讯飞 API 信息:在
iat_xfyun.js文件中,配置讯飞语音听写的 API 信息,包括APPID、APIKey和APISecret。
// 讯飞语音识别配置
const xfConfig = {
    APPID: '6acb09d5',
    APIKey: '36fb21a7095db0bb***',
    APISecret: 'MmNhN2VkY2JkMj****',
    host: 'iat-api.xfyun.cn',
    path: '/v2/iat'
}
文件结构
主要文件
Home.vue:聊天界面组件,包含语音输入按钮和语音识别结果显示区域。iat_xfyun.js:封装讯飞语音听写功能的工具文件,提供创建语音识别实例的工厂函数。sparkChat.js:与后端进行 WebSocket 通信的工具文件,负责将语音识别结果发送给后端。
文件关系
Home.vue 组件引入 iat_xfyun.js 中创建的语音识别实例,当用户点击语音输入按钮时,调用语音识别实例的 start 方法开始录音。识别结果通过 onTextChange 回调函数返回,将结果显示在界面上,并通过 sparkChat.js 发送给后端。
开发逻辑
1. 创建语音识别实例
在 iat_xfyun.js 文件中,创建一个工厂函数 createVoiceInstance,用于创建语音识别实例。该函数接受一个回调对象作为参数,包含 onStatusChange、onTextChange 和 onError 三个回调函数。
文件 iat_xfyun.js
import { XfVoiceDictation } from '@muguilin/xf-voice-dictation'

// 讯飞语音识别配置
const xfConfig = {
    APPID: '6acb09d5',
    APIKey: '36fb21a7095db0bb***',
    APISecret: 'MmNhN2VkY2JkMj****',
    host: 'iat-api.xfyun.cn',
    path: '/v2/iat'
}

// 创建语音识别实例的工厂函数
export const createVoiceInstance = (callbacks) => {
    let instance = new XfVoiceDictation({
        ...xfConfig,
        onWillStatusChange: (oldStatus, newStatus) => {
            console.log('语音识别状态变更:', { oldStatus, newStatus })
        },
        onTextChange: (text) => {

            console.log('语音识别结果:', {
                text: text,
                textLength: text ? text.length : 0
            })
            callbacks.onTextChange?.(text)
        },
        onError: (error) => {
            console.error('语音识别错误:', error)
            callbacks.onError?.(error)
        }
    })
    return instance
}
2. 在 Home.vue 中使用语音识别实例
在 Home.vue 组件中,引入 createVoiceInstance 函数,创建语音识别实例,并绑定到语音输入按钮的点击事件上。
<template>
  <!-- ... 其他代码 ... -->
  <div class="input-bar">
    <input v-model="inputMessage" type="text" class="apple-input" placeholder="输入咨询内容(如:居住证续签)"
      @keypress.enter="sendInputMessage(false)" autocapitalize="none" autocomplete="off" spellcheck="false">
    <svg class="input-icon" :class="{ 'recording': isRecording }" viewBox="0 0 24 24" aria-label="语音麦图标"
      @mousedown="checkLoginBeforeAction(startRecording)" @mouseup="checkLoginBeforeAction(stopBtnRecording)">
      <path
        d="M12 15c1.65 0 3-1.35 3-3V6c0-1.65-1.35-3-3-3S9 4.35 9 6v6c0 1.65 1.35 3 3 3zm5.91-4.56c.08.33.13.67.13 1.01 0 2.49-2.01 4.5-4.5 4.5H13v2.5h2c.55 0 1 .45 1 1s-.45 1-1 1H8c-.55 0-1-.45-1-1s.45-1 1-1h2V16H9.59c-2.49 0-4.5-2.01-4.5-4.5 0-.34.05-.68.13-1.01A2.999 2.999 0 0 1 3 9c0-1.66 1.34-3 3-3h3V4c0-.55.45-1 1-1s1 .45 1 1v2h3c1.66 0 3 1.34 3 3 0 1.28-.81 2.36-1.9 2.73l.01-.17z" />
    </svg>
    <div v-show="isRecording" class="recording-tip">
      正在录音...
      <span class="recording-dots"></span>
    </div>
    <svg class="input-icon sendTxtMsg" viewBox="0 0 24 24" aria-label="发送图标"   @click="sendInputMessage(true)">
      <path d="M2.01 21L23 12 2.01 3 2 10l15 2-15 2z" />
    </svg>
  </div>
  <!-- ... 其他代码 ... -->
</template>

<script setup>
import { ref, onBeforeUnmount } from 'vue'
import { createVoiceInstance } from '../utils/voice/iat_xfyun'
import { ElMessage } from 'element-plus'

const isRecording = ref(false)
const recognizedText = ref('')
let times = null

// 创建语音识别实例
const xfVoice = createVoiceInstance({
    onTextChange: (text) => {
        if (text && text.length > 0) {
            const currentTime = Date.now();
            // 防止操作过于频繁
             if (currentTime - lastCallTime.value < 3000) {
                //只要无这段代码message.value.push()会加入一条除了本身语言以外只多了问号或一个点的消息
                //如:你好
                //message数组内会有两条消息:
                //1.你好
                //2.你好?
                //如果有这段代码,message数组内只会有一条消息:
                console.log('操作过于频繁,请等待10秒后再试');
                return;
            }
            lastCallTime.value = currentTime;
            clearTimeout(times);
            xfVoice.stop();
            // 发送识别结果到服务器
            inputMessage.value = text;
            user_message.value = text;
            tmpMsgArr.value = [];
            sendInputMessage(true);
        }
    },
    onError: (error) => {
        if (error.includes('WebSocket')) {
            ElMessage.error('语音识别连接失败,请检查网络');
        } else if (error.includes('authorization')) {
            ElMessage.error('语音识别授权失败,请检查配置');
        } else {
            ElMessage.error('语音识别发生错误:' + error);
        }
        isRecording.value = false;
    }
});

const startRecording = () => {
  if (!isRecording.value) {
    recognizedText.value = '';
    xfVoice.start();
    isRecording.value = true;
  }
}

const stopBtnRecording = () => {
  isRecording.value = false;
  xfVoice.stop();
}

onBeforeUnmount(() => {
    clearTimeout(times);
    if (isRecording.value) {
        xfVoice.stop();
    }
});
</script>
3. 处理语音识别结果
在 onTextChange 回调函数中,处理语音识别结果。当识别到有效文本时,停止录音,并将识别结果发送给后端。
4. 错误处理
在 onError 回调函数中,处理语音识别过程中可能出现的错误,如网络连接失败、授权失败等,并通过 ElMessage 提示用户。
代码分析
iat_xfyun.js
- 优点:将讯飞语音听写功能封装在一个独立的文件中,提高了代码的可维护性和可复用性。
- 缺点:配置信息硬编码在文件中,不利于配置的修改和管理。可以考虑将配置信息提取到环境变量中。
Home.vue
- 优点:在组件中使用语音识别实例,实现了语音输入功能的集成。通过回调函数处理识别结果和错误,代码结构清晰。
- 缺点:语音输入按钮的样式和交互逻辑可以进一步优化,提高用户体验。
sparkChat.js
// 讯飞星火大模型WebSocket通信模块
import axios from 'axios'
import getSparkConfig from '../sparkConfig'

class SparkChatService {
    constructor(callbacks) {
        this.websocket = null
        this.isReconnecting = false
        this.reconnectAttempts = 0
        this.MAX_RECONNECT_ATTEMPTS = 3
        this.RECONNECT_INTERVAL = 2000

        // 获取配置
        const sparkConfig = getSparkConfig()
        this.APPID = sparkConfig.APPID
        this.APISecret = sparkConfig.APISecret
        this.APIKey = sparkConfig.APIKey
        this.host = sparkConfig.host
        this.path = sparkConfig.path
        this.sparkBaseUrl = sparkConfig.getWebSocketUrl()

        // 回调函数
        this.callbacks = callbacks || {}
    }

    // 生成鉴权URL所需的日期
    getAuthorizationDate() {
        return new Date().toUTCString()
    }

    // 生成鉴权URL
    async getAuthUrl() {
        const date = this.getAuthorizationDate()
        const tmp = `host: ${this.host}\ndate: ${date}\nGET ${this.path} HTTP/1.1`

        const encoder = new TextEncoder()
        const key = await window.crypto.subtle.importKey(
            'raw',
            encoder.encode(this.APISecret),
            { name: 'HMAC', hash: 'SHA-256' },
            false,
            ['sign']
        )

        const signature = await window.crypto.subtle.sign(
            'HMAC',
            key,
            encoder.encode(tmp)
        )

        const signatureBase64 = btoa(String.fromCharCode(...new Uint8Array(signature)))
        const authorization_origin = `api_key="${this.APIKey}", algorithm="hmac-sha256", headers="host date request-line", signature="${signatureBase64}"`
        const authorization = btoa(authorization_origin)

        return `${this.sparkBaseUrl}?authorization=${encodeURIComponent(authorization)}&date=${encodeURIComponent(date)}&host=${encodeURIComponent(this.host)}`
    }

    // 检查WebSocket连接状态
    checkWebSocketConnection() {
        return this.websocket && this.websocket.readyState === WebSocket.OPEN
    }

    // 重连WebSocket
    async reconnectWebSocket() {
        if (this.isReconnecting || this.reconnectAttempts >= this.MAX_RECONNECT_ATTEMPTS) return

        this.isReconnecting = true
        this.reconnectAttempts++

        console.log(`尝试重新连接WebSocket (第${this.reconnectAttempts}次)...`)

        try {
            await this.connect()
            this.isReconnecting = false
            this.reconnectAttempts = 0
            console.log('WebSocket重连成功')
        } catch (error) {
            console.error('WebSocket重连失败:', error)
            this.isReconnecting = false

            if (this.reconnectAttempts < this.MAX_RECONNECT_ATTEMPTS) {
                setTimeout(() => this.reconnectWebSocket(), this.RECONNECT_INTERVAL)
            } else {
                console.error('WebSocket重连次数达到上限')
                this.callbacks.onError?.('网络连接异常,请刷新页面重试')
            }
        }
    }

    // 建立WebSocket连接
    async connect() {
        try {
            const url = await this.getAuthUrl()
            this.websocket = new WebSocket(url)

            this.websocket.onopen = () => {
                console.log('WebSocket连接已建立')
                this.isReconnecting = false
                this.reconnectAttempts = 0
                this.callbacks.onOpen?.()
            }

            this.websocket.onmessage = (event) => {
                const response = JSON.parse(event.data)

                if (response.header.code === 0) {
                    if (response.payload.choices.text[0].content) {
                        const content = response.payload.choices.text[0].content.replace(/\r?\n/g, '')
                        this.callbacks.onMessage?.(content)
                    }

                    if (response.header.status === 2) {
                        this.callbacks.onComplete?.()
                    }
                } else {
                    this.callbacks.onError?.(`抱歉,发生错误:${response.header.message}`)
                }
            }

            this.websocket.onerror = (error) => {
                console.error('WebSocket错误:', error)
                if (!this.isReconnecting) {
                    this.reconnectWebSocket()
                }
                this.callbacks.onError?.(error)
            }

            this.websocket.onclose = () => {
                console.log('WebSocket连接已关闭')
                if (!this.isReconnecting) {
                    this.reconnectWebSocket()
                }
                this.callbacks.onClose?.()
            }
        } catch (error) {
            console.error('连接WebSocket失败:', error)
            throw error
        }
    }

    // 发送消息
    async sendMessage(message) {
        if (!this.checkWebSocketConnection()) {
            try {
                await this.reconnectWebSocket()
            } catch (error) {
                console.error('重连失败,无法发送消息')
                throw new Error('网络连接异常,请稍后重试')
            }
        }

        const requestData = {
            header: {
                app_id: this.APPID,
                uid: 'user1'
            },
            parameter: {
                chat: {
                    domain: 'generalv3',
                    temperature: 0.5,
                    max_tokens: 4096
                }
            },
            payload: {
                message: {
                    text: [{ role: 'user', content: message }]
                }
            }
        }

        try {
            this.websocket.send(JSON.stringify(requestData))
        } catch (error) {
            console.error('发送消息失败:', error)
            throw new Error('发送消息失败,请重试')
        }
    }

    // 关闭连接
    close() {
        if (this.websocket) {
            this.websocket.close()
        }
    }
}

export default SparkChatService
虽然该文件主要负责与后端进行 WebSocket 通信,但在语音听写功能中起到了将识别结果发送给后端的重要作用。可以考虑对该文件进行进一步的封装,提高代码的可维护性。
AIChat
语音听写(流式版)WebAPI 文档帮助文档:
https://www.xfyun.cn/doc/asr/voicedictation/API.html#%E6%8E%A5%E5%8F%A3%E8%AF%B4%E6%98%8E
缺点:
语音听写流式接口,用于
1分钟内的即时语音转文字技术,支持实时返回识别结果,达到一边上传音频一边获得识别文本的效果。
整个会话时长最多持续60s,或者超过10s未发送数据,服务端会主动断开连接