网络模块
1.HTTP 模块
咱们来看看 http 模块如何使用
// 1. 导入模块
import { http } from '@kit.NetworkKit'

// 2. 创建请求对象
const request = http.createHttp();

// 3. 调用request方法进行服务器请求
request.request('Url地址?key1=value1&key2=value2',{
  //GET(默认请求方式)、POST、PUT、DELETE,
  method:http.RequestMethod.GET,  // 如果是Get之外的请求->必填
  //OBJECT:服务器返回数据类型自动转换成对象(方便调用)
  // STRING:服务器返回的数据是一个字符串
  expectDataType:http.HttpDataType.OBJECT, // 必填
  // 设置请求头为json格式
  header:{  // 选填:Get请求有参数时(带请求体)+POST+PUT请求必填,其他选填
    'Content-Type':'application/json'
  },
  // 用来给Get,POST,PUT携带参数用
  // Get请求:  url?key=value
  // POST,PUT请求:在请求体中携带
  // 选填:Get请求有参数时+POST+PUT请求必填,其他选填
  extraData:{
    // 'key':'value'  //具体值来自接口文档
    pname:'湖南省'
  }
})
  .then((res:http.HttpResponse)=>{
    // 成功响应
    console.log(JSON.stringify(res.result))
  })
  .catch((err:Error)=>{
    // 失败处理
    console.log(JSON.stringify(err))
  })
注意:
- 预览器 和 模拟器 以及真机都可以发送请求
-
- 预览器无需配置网络权限即可成功发送请求
- 【模拟器】和【真机】需要配置网络权限才能成功发送请求
-
- 需要在项目的src/main/module.json5(模块配置)下添加如下代码
{
  "module": {
    "name": "entry",
    "type": "entry",
    "description": "$string:module_desc",
    "mainElement": "EntryAbility",
    "deviceTypes": [
      "phone",
      "tablet",
      "2in1"
    ],
    "deliveryWithInstall": true,
    "installationFree": false,
    "pages": "$profile:main_pages",
    "requestPermissions": [
      {
        "name": "ohos.permission.INTERNET"
      }
    ],
    "abilities": [
      {
        "name": "EntryAbility",
        "srcEntry": "./ets/entryability/EntryAbility.ets",
        "description": "$string:EntryAbility_desc",
        "icon": "$media:layered_image",
        "label": "$string:EntryAbility_label",
        "startWindowIcon": "$media:startIcon",
        "startWindowBackground": "$color:start_window_background",
        "exported": true,
        "skills": [
          {
            "entities": [
              "entity.system.home"
            ],
            "actions": [
              "action.system.home"
            ]
          }
        ]
      }
    ]
  }
}
1.get 请求演示
获取一条随机笑话:https://api-vue-base.itheima.net/api/joke
import { http } from '@kit.NetworkKit'

@Entry
@Component
struct Notebook_use {
  @State message: string = 'Hello World';

  build() {
    Row() {
      Column() {
        Text(this.message)
          .fontSize(20)
        Button('看笑话')
          .onClick(() => {
            const req = http.createHttp()
            req.request('https://api-vue-base.itheima.net/api/joke',{
              method: http.RequestMethod.GET,
              expectDataType:http.HttpDataType.STRING
            })
              .then((res: http.HttpResponse) => {
                // AlertDialog.show({ message: JSON.stringify(res,null,2) })
                this.message = res.result.toString()
              })
          })
      }
      .width('100%')
    }
    .height('100%')
  }
}获取新闻列表数据:https://hmajax.itheima.net/api/news
import { http } from '@kit.NetworkKit'

interface NewsResponse {
  message: string
  data: News[]
}

interface News {
  id: number
  title: string
  source: string
  cmtcount: number
  img: string
  time: string
}

@Entry
@Component
struct Day01_02_URL {
  @State data: NewsResponse | null = null

  build() {
    Column() {

      Button('获取新闻列表数据')
        .onClick(() => {
          //   1. 创建请求对象
          const req = http.createHttp()
          //   2. 发送请求获取服务器数据
          //   http://hmajax.itheima.net/api/news
          req.request('http://hmajax.itheima.net/api/news', {
            expectDataType: http.HttpDataType.OBJECT
          })
            .then(res => {
              console.log(JSON.stringify(res.result))
              this.data = res.result as NewsResponse
            })
        })
      // Text(JSON.stringify(this.data,null,2))
    }
    .height('100%')
    .width('100%')
  }
}
地址:http://hmajax.itheima.net/api/city
说明获取某个省所有的城市查询
参数名:pname
说明: 传递省份或直辖市名,比如 北京、广东省…
import { http } from '@kit.NetworkKit'

@Entry
@Component
struct Index {
  build() {
    Column() {
      Button('获取城市信息')
        .onClick(() => {
          const req = http.createHttp()
          req.request('http://hmajax.itheima.net/api/city', {
            expectDataType:http.HttpDataType.OBJECT,
            extraData:{
              pname:'广东省'
            }
          })
            .then(res=>{
              console.log(JSON.stringify(res.result))
            })
            .catch((err:Error)=>{
              console.log(JSON.stringify(err,null,2))
            })
        })
    }
    .height('100%')
    .width('100%')
  }
}
2.post 请求
import http from '@ohos.net.http'

const req = http.createHttp()

@Entry
@Component
struct Day01_05_SubmitData {
  @State username: string = 'itheima522'
  @State password: string = '123456'

  build() {
    Column({ space: 15 }) {
      Text('请求方法和数据提交')
        .fontSize(30)
        .fontWeight(FontWeight.Bold)
      TextInput({ text: $$this.username, placeholder: '用户名' })
      TextInput({ text: $$this.password, placeholder: '密码' })
        .type(InputType.Password)

      Button('注册')
        .width('100%')
        .onClick(() => {
          req.request('http://hmajax.itheima.net/api/register', {
            method: http.RequestMethod.POST,
            expectDataType:http.HttpDataType.OBJECT,
            header: {
              contentType: 'application/json'
            },
            extraData: {
              username: this.username,
              password: this.password
            }
          })
            .then(res => {
              AlertDialog.show({ message:JSON.stringify(res.result,null,2) })
            })
        })
    }
    .width('100%')
    .height('100%')
    .padding(20)
  }
}
2.Axios库
1. 下载axios
作为一个第三方库,使用的时候需要先完成下包的操作
打开终端执行命令
# 安装
ohpm i @ohos/axios

# 卸载
ohpm uninstall @ohos/axios
ohpm 是一个包管理工具,用来管理鸿蒙提供的第三方模块

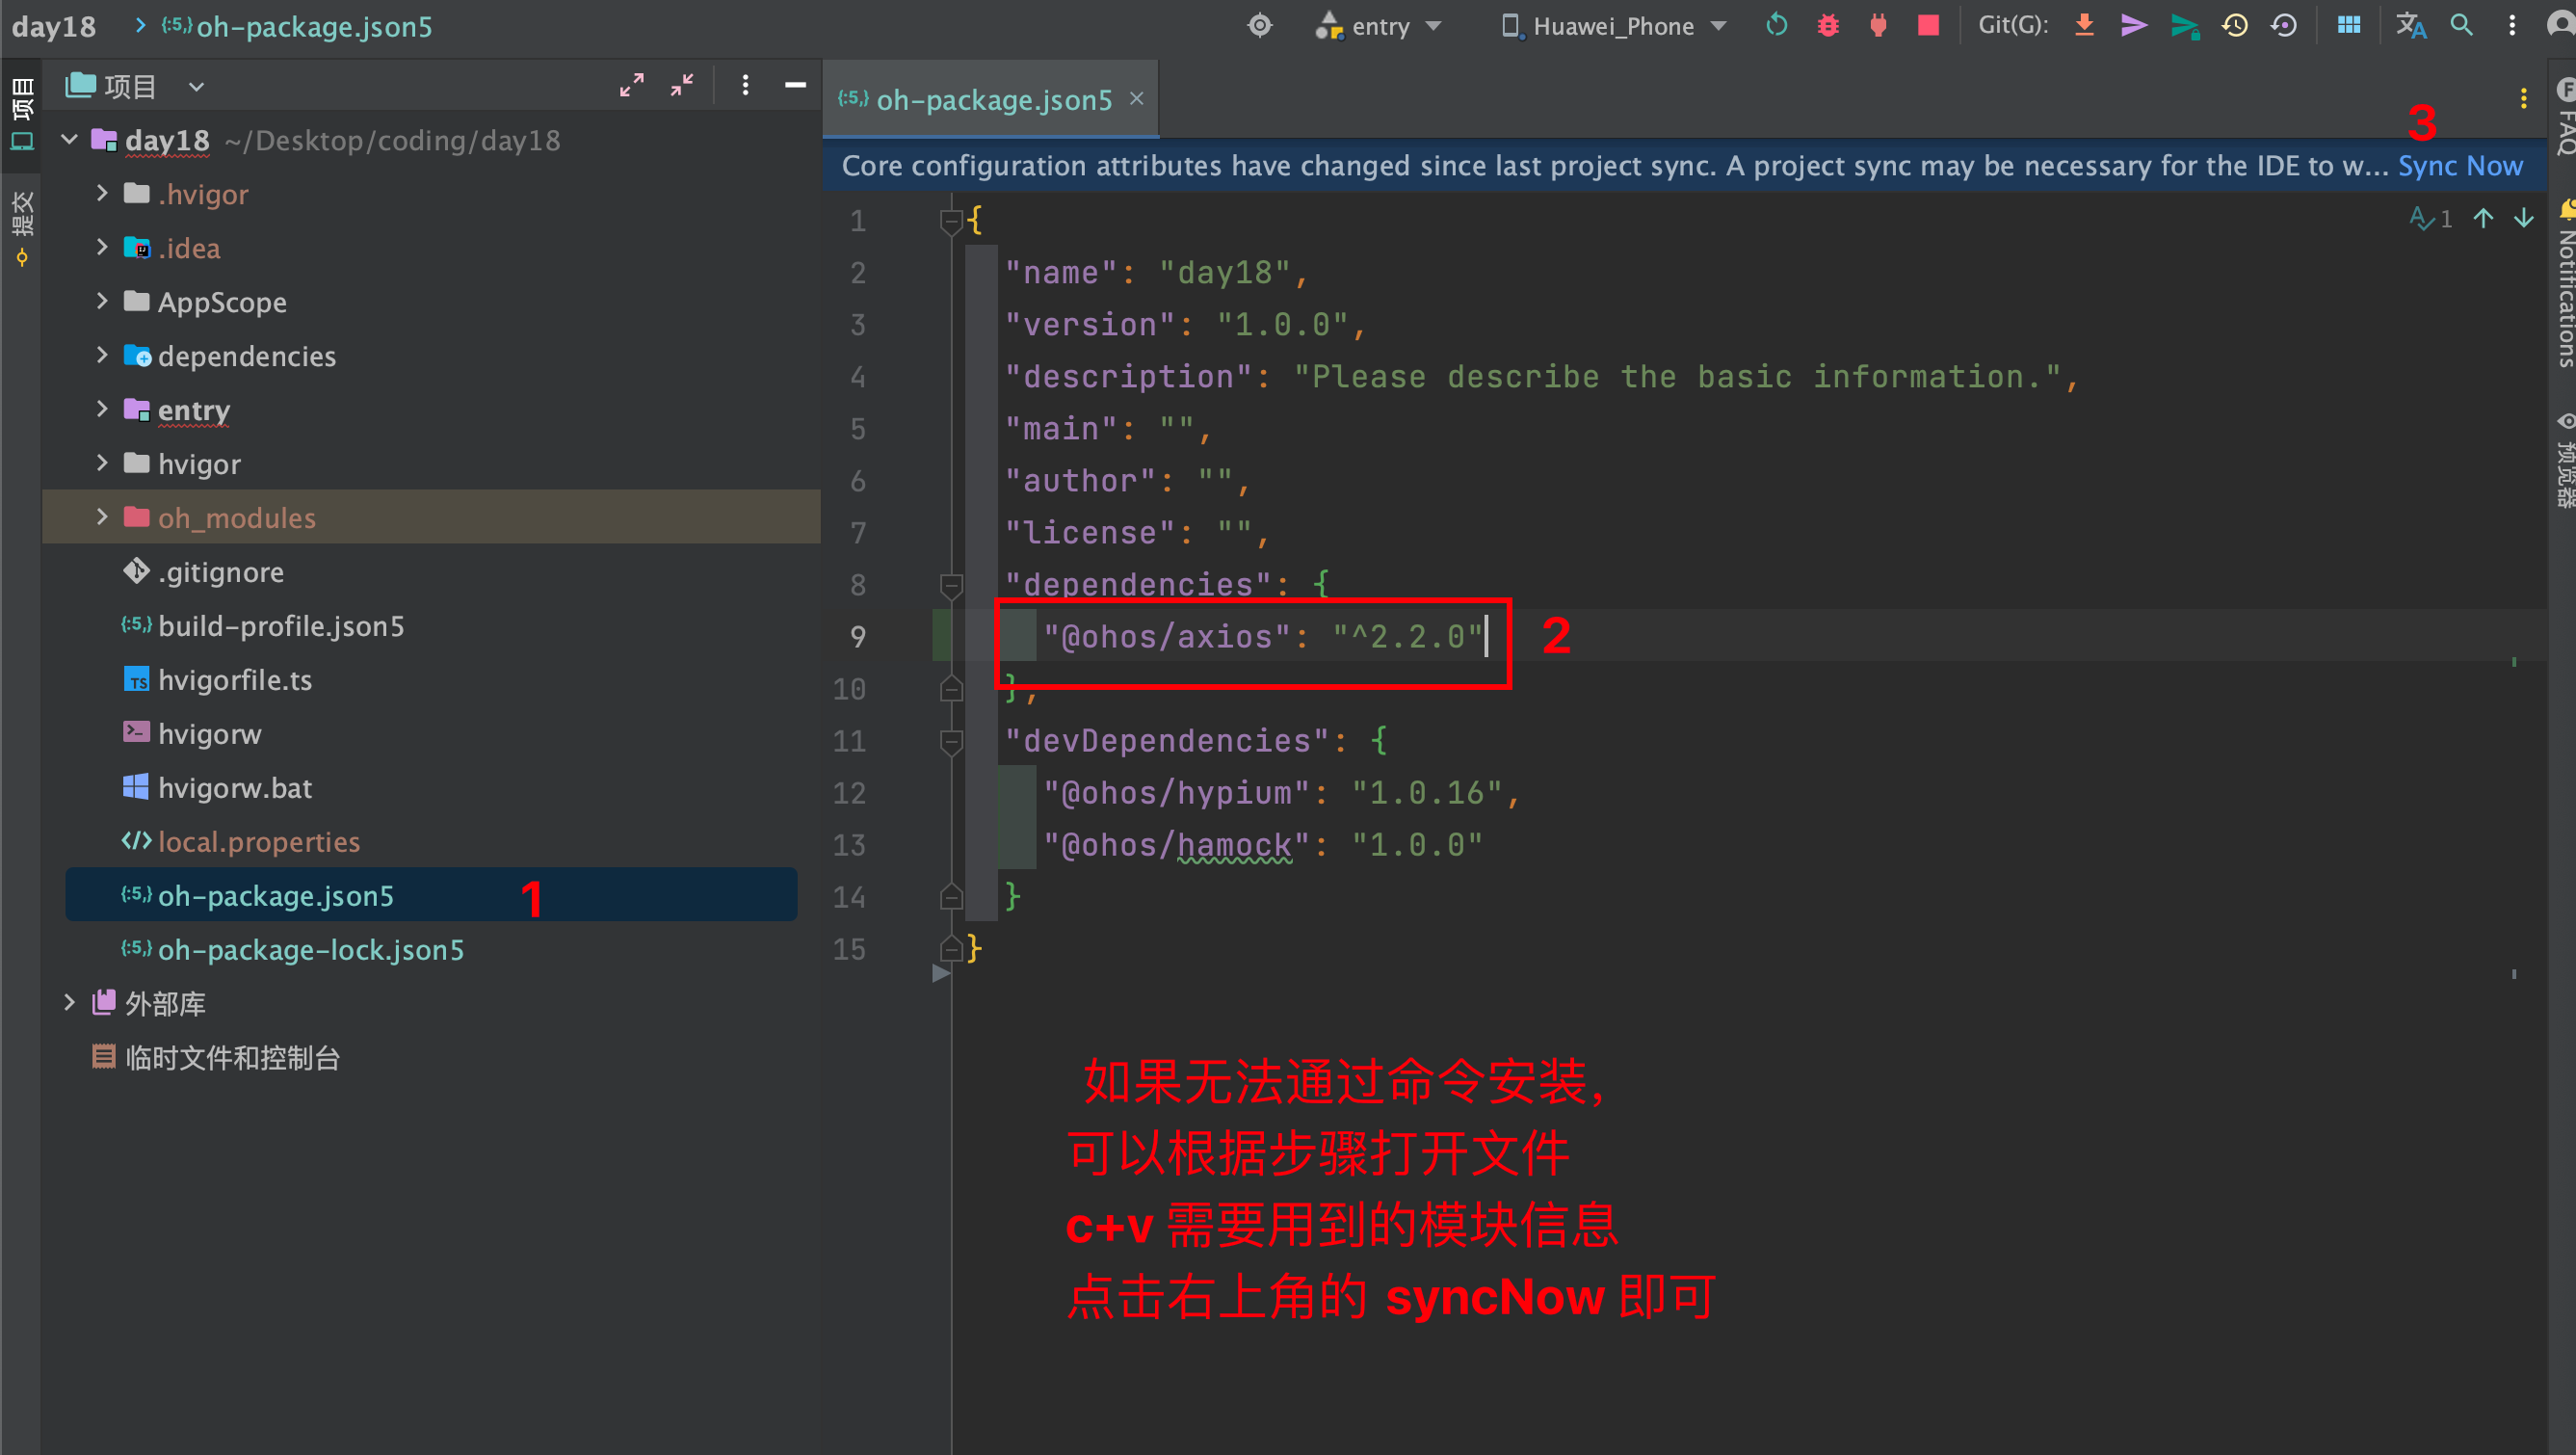
如果无法执行命令,或执行失败,可以使用如下方式来完成安装:
2.使用
// 1. 导入axios
// AxiosError:异常时的数据类型
// 正常时的数据类型AxiosResponse 是一个泛型类型
import axios, { AxiosError, AxiosResponse } from '@ohos/axios'

// 2. 创建axios的对象实例
const req = axios.create()

// 3. 发送POST请求,并提交数据给服务器
const res:AxiosResponse<响应数据类型> =
  await req<响应数据类型(可以写null), AxiosResponse<响应数据类型>, 请求体数据类型>({
    method: 'POST',  // 请求方法
    url: 'https://hmajax.itheima.net/api/login',  //服务器url地址
    data: { // 请求体数据
      username: '黑马no1hello',
      password: '123456'
    }
  })
import axios, { AxiosError, AxiosResponse } from '@ohos/axios'
// 1. 利用axios.create创建请求对象
const reqeust = axios.create({
//配置基地址
baseURL: 'https://hmajax.itheima.net/'
})
export interface iRes {
/**
* 业务状态码, 10000成功, 10004-账号/密码未携带
*/
code: number;
/**
* 响应数据
*/
data: object;
/**
* 响应消息
*/
message: string;
}
export interface iBody {
/**
* 密码, 最少6位
*/
password: string;
/**
* 用户名, 最少8位,中英文和数字组成,
*/
username: string;
}
@Entry
@Component
struct Index {
build() {
Column() {
Button('post请求测试')
.onClick(async () => {
// 2. 发起请求
try {
const res: AxiosResponse<iRes> = await reqeust<null, AxiosResponse<iRes>, iBody>({
method: 'POST',
url: 'api/login',
data: {
username: '黑马no1hello',
password: '123456'
}
})
AlertDialog.show({ message: JSON.stringify(res.data, null, 2) })
} catch (err) {
// 将err异常对象强制转换成 AxiosError
// response就是异常的响应对象
const error: AxiosError = err as AxiosError
AlertDialog.show({ message: JSON.stringify(error.response, null, 2) })
}
})
}
.height('100%')
.width('100%')
.backgroundColor(Color.Pink)
}
}
import axios, { AxiosError, AxiosResponse } from '@ohos/axios'

export interface ApifoxModel {
  /**
   * 响应数据
   */
  data: Data;
  /**
   * 响应消息
   */
  message: string;
}

/**
 * 响应数据
 */
export interface Data {
  /**
   * 顶级分类下属二级分类数组
   */
  children: Child[];
  /**
   * 顶级分类id
   */
  id: string;
  /**
   * 顶级分类名字
   */
  name: string;
  /**
   * 顶级分类图片
   */
  picture: string;
}

export interface Child {
  /**
   * 二级分类id
   */
  id: string;
  /**
   * 二级分类名字
   */
  name: string;
  /**
   * 二级分类图片
   */
  picture: string;
}

@Entry
@Component
struct Index {
  build() {
    Column() {

      Button('axios.get')
        .onClick(async () => {
          // 1. 创建请求实例
          const req = axios.create()

          // 2. async 和 await方式发送get请求(带参数)
          try{
            let res: AxiosResponse<ApifoxModel> = await req({
              method: 'get',
              url: 'https://hmajax.itheima.net/api/category/sub',
              params:{
                id:'1005000'
              }
            })

            // 写法2:
          let res: AxiosResponse<ApifoxModel> = await req.get(
              'https://hmajax.itheima.net/api/category/sub', {
              params: {
                id: '1005000'
              }
            }
            )
            AlertDialog.show({ message: JSON.stringify(res.data, null, 2) })
          } catch (err) {
            let errObj: AxiosError = err
            AlertDialog.show({ message: '出错了:' + JSON.stringify(errObj.message, null, 2) })
          }

          // 3. .then().catch()方式发送请求(带参数)
          // req.request({
          // method: 'get',
          // url: 'https://hmajax.itheima.net/api/category/sub',
          // params:{
          //   id:'1005000'
          // }
          // })
          //   .then((res: AxiosResponse<ApifoxModel>) => {
          //     AlertDialog.show({ message: JSON.stringify(res.data, null, 2) })
          //   })
          //   .catch((err: AxiosError) => {
          //     AlertDialog.show({ message: '出错了:' + JSON.stringify(err, null, 2) })
          //   })

        })
    }
    .height('100%')
    .width('100%')

  }
}