搜索引擎的优势
有了数据库分页查询,为什么还需要搜索引擎?
- 搜索引擎
速度上很快 数据库分页查询,随着数据库数据量增大,页数靠后,会导致搜索速度变慢,但是搜索引擎不会- 搜索引擎支持
分词查询,地理坐标搜索等
搜索引擎排名
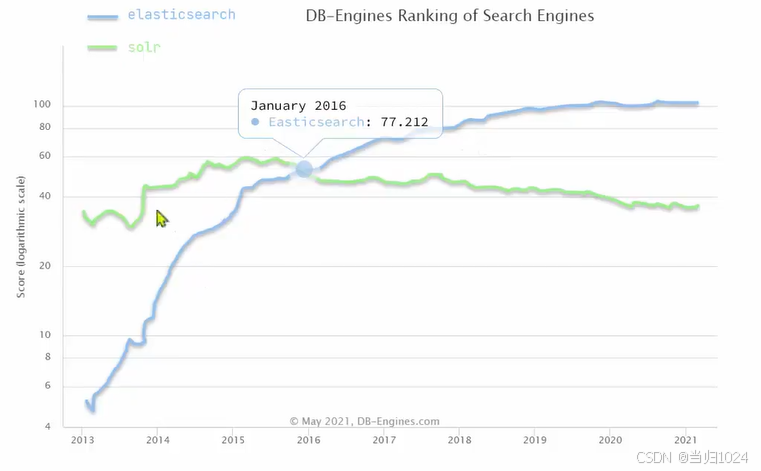
- 搜索引擎技术排名:
- Elasticsearch:搜索引擎
- Splunk:商目
- Solr:Apache
认识与安装elasticSearch
前世
Lucene是一个Java语言的搜索引擎类库,是Apache公司的顶级项目,由DougCutting于1999年研发
Lucene的优势:
- 易扩展
- 高性能(基于倒排索引)
今生
2004年Shay Banon基于Lucene开发了Compass
2010年Shay Banon 重写了Compass,取名为Elasticsearch。
官网地址:https:/www.elastic.co/cn/,目前最新的版本是:8.x.x
elasticsearch具备下列优势:
- 支持
分布式,可水平扩展 - 提供
Restful接口,可被任何语言调用
结合
elasticsearch结合kibana、Logstash、Beats,是一整套技术栈,被叫做ELK。被广泛应用在日志数据分析、实时监控等领域。

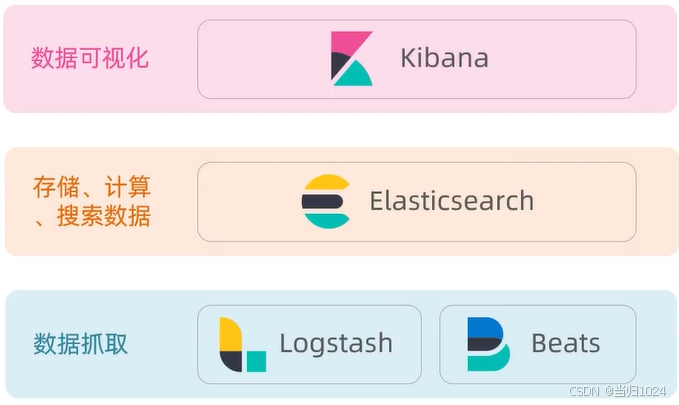
我们要安装的内容包含2部分:
- elasticsearch:存储、搜索和运算
- kibana:图形化展示
首先Elasticsearch不用多说,是提供核心的数据存储、搜索、分析功能的。
然后是Kibana,Elasticsearch对外提供的是Restful风格的API,任何操作都可以通过发送http请求来完成。不过http请求的方式、路径、还有请求参数的格式都有严格的规范。这些规范我们肯定记不住,因此我们要借助于Kibana这个服务。
Kibana是elastic公司提供的用于操作Elasticsearch的可视化控制台。它的功能非常强大,包括:
- 对Elasticsearch数据的搜索、展示
- 对Elasticsearch数据的统计、聚合,并形成图形化报表、图形
- 对Elasticsearch的集群状态监控
- 它还提供了一个开发控制台(DevTools),在其中对Elasticsearch的Restful的API接口提供了
语法提示
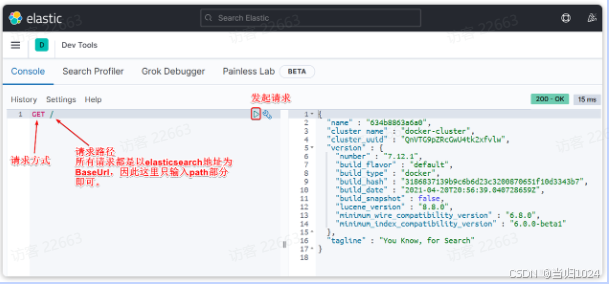
安装elasticSearch
通过下面的Docker命令即可安装单机版本的elasticsearch:
docker run -d \
  --name es \
  -e "ES_JAVA_OPTS=-Xms512m -Xmx512m" \
  -e "discovery.type=single-node" \
  -v es-data:/usr/share/elasticsearch/data \
  -v es-plugins:/usr/share/elasticsearch/plugins \
  --privileged \
  --network hm-net \
  -p 9200:9200 \
  -p 9300:9300 \
  elasticsearch:7.12.1
注意,这里我们采用的是elasticsearch的7.12.1版本,由于8以上版本的JavaAPI变化很大,在企业中应用并不广泛,企业中应用较多的还是8以下的版本。
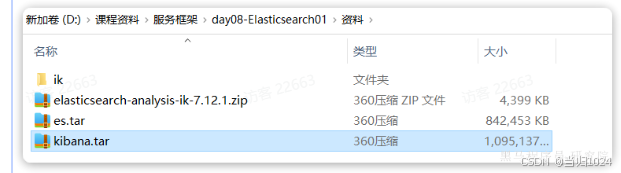
如果拉取镜像困难,可以直接导入课前资料提供的镜像tar包:
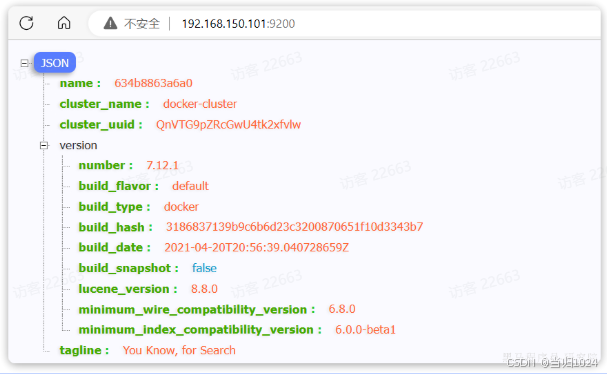
安装完成后,访问9200端口,即可看到响应的Elasticsearch服务的基本信息:
安装Kibana
通过下面的Docker命令,即可部署Kibana:
docker run -d \
--name kibana \
-e ELASTICSEARCH_HOSTS=http://es:9200 \
--network=hm-net \
-p 5601:5601  \
kibana:7.12.1
如果拉取镜像困难,可以直接导入课前资料提供的镜像tar包:
安装完成后,直接访问5601端口,即可看到控制台页面:
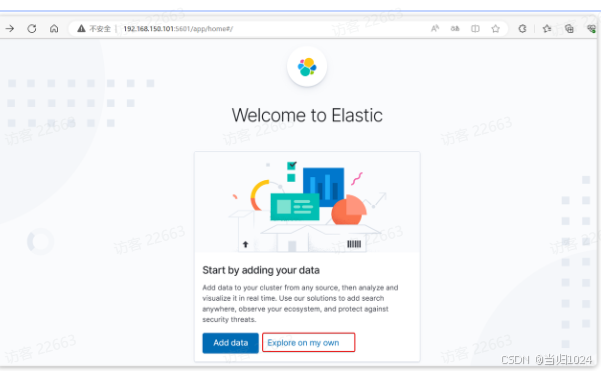
选择Explore on my own之后,进入主页面:
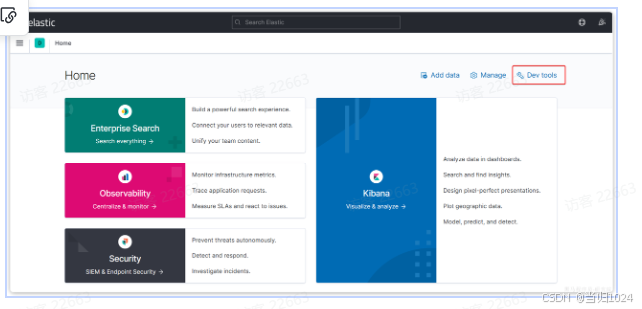
然后选中Dev tools,进入开发工具页面:
倒排索引
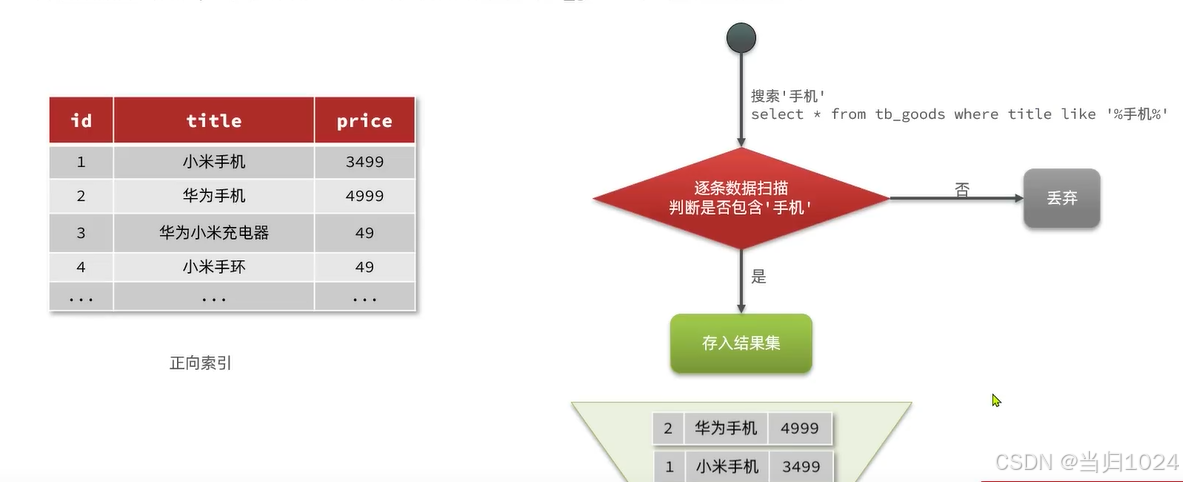
传统数据库
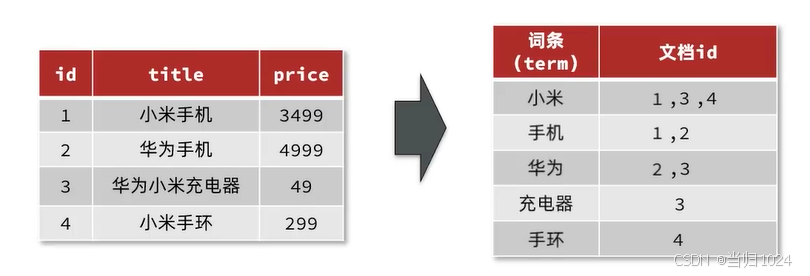
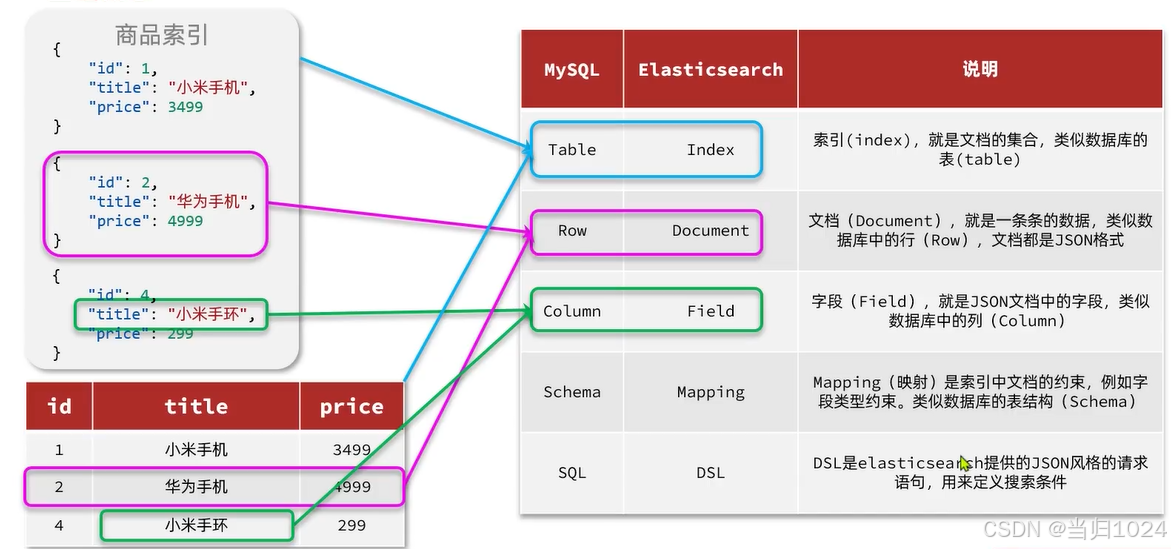
传统数据库(如MySQL)采用正向索引,例如给下表(tb_goods)中的id创建索引:
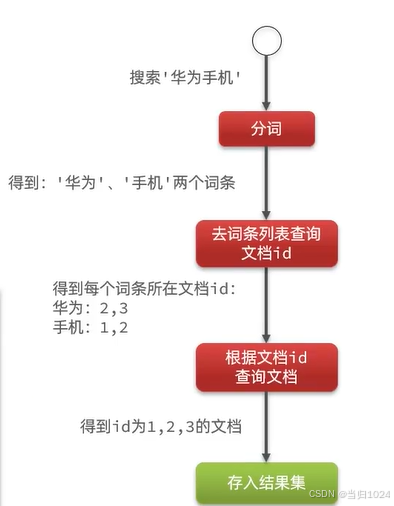
elasticSearch
elasticsearch采用倒排索引:
文档(document):每条数据就是一个文档词条(term):文档按照语义分成的词语
lk分词器
中文分词往往需要根据语义分析,比较复杂,这就需要用到中文分词器,例如IK分词器。IK分词器是林良益在2006年开源发布的,其采用的正向迭代最细粒度切分算法一直沿用至今。
1.安装IK分词器
方案一:在线安装
运行一个命令即可:
docker exec -it es ./bin/elasticsearch-plugin install https://github.com/medcl/elasticsearch-analysis-ik/releases/download/v7.12.1/elasticsearch-analysis-ik-7.12.1.zip
重启
docker restart es
方案二:离线安装
如果网速较差,也可以选择离线安装。
首先,查看之前安装的Elasticsearch容器的plugins数据卷目录:
docker volume inspect es-plugins
结果如下:
[
    {
        "CreatedAt": "2024-11-06T10:06:34+08:00",
        "Driver": "local",
        "Labels": null,
        "Mountpoint": "/var/lib/docker/volumes/es-plugins/_data",
        "Name": "es-plugins",
        "Options": null,
        "Scope": "local"
    }
]
可以看到elasticsearch的插件挂载到了/var/lib/docker/volumes/es-plugins/_data这个目录。我们需要把IK分词器上传至这个目录。
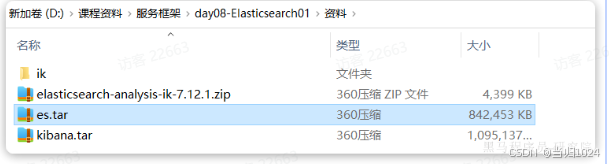
找到课前资料提供的ik分词器插件,课前资料提供了7.12.1版本的ik分词器压缩文件,你需要对其解压:
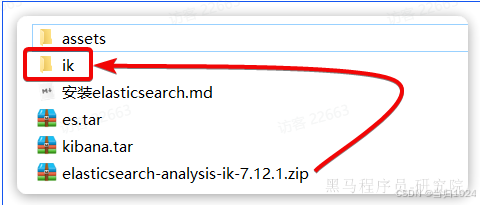
然后上传至虚拟机的/var/lib/docker/volumes/es-plugins/_data这个目录:

最后,重启es容器:
docker restart es
2.使用IK分词器
IK分词器包含两种模式:
- ik_smart:智能语义切分
- ik_max_word:最细粒度切分
我们在Kibana的DevTools上来测试分词器,首先测试Elasticsearch官方提供的标准分词器:
POST /_analyze
{
  "analyzer": "standard",
  "text": "黑马程序员学习java太棒了"
}
结果如下:
{
  "tokens" : [
    {
      "token" : "黑",
      "start_offset" : 0,
      "end_offset" : 1,
      "type" : "<IDEOGRAPHIC>",
      "position" : 0
    },
    {
      "token" : "马",
      "start_offset" : 1,
      "end_offset" : 2,
      "type" : "<IDEOGRAPHIC>",
      "position" : 1
    },
    {
      "token" : "程",
      "start_offset" : 2,
      "end_offset" : 3,
      "type" : "<IDEOGRAPHIC>",
      "position" : 2
    },
    {
      "token" : "序",
      "start_offset" : 3,
      "end_offset" : 4,
      "type" : "<IDEOGRAPHIC>",
      "position" : 3
    },
    {
      "token" : "员",
      "start_offset" : 4,
      "end_offset" : 5,
      "type" : "<IDEOGRAPHIC>",
      "position" : 4
    },
    {
      "token" : "学",
      "start_offset" : 5,
      "end_offset" : 6,
      "type" : "<IDEOGRAPHIC>",
      "position" : 5
    },
    {
      "token" : "习",
      "start_offset" : 6,
      "end_offset" : 7,
      "type" : "<IDEOGRAPHIC>",
      "position" : 6
    },
    {
      "token" : "java",
      "start_offset" : 7,
      "end_offset" : 11,
      "type" : "<ALPHANUM>",
      "position" : 7
    },
    {
      "token" : "太",
      "start_offset" : 11,
      "end_offset" : 12,
      "type" : "<IDEOGRAPHIC>",
      "position" : 8
    },
    {
      "token" : "棒",
      "start_offset" : 12,
      "end_offset" : 13,
      "type" : "<IDEOGRAPHIC>",
      "position" : 9
    },
    {
      "token" : "了",
      "start_offset" : 13,
      "end_offset" : 14,
      "type" : "<IDEOGRAPHIC>",
      "position" : 10
    }
  ]
}
可以看到,标准分词器智能1字1词条,无法正确对中文做分词。
我们再测试IK分词器:
POST /_analyze
{
  "analyzer": "ik_smart",
  "text": "黑马程序员学习java太棒了"
}
执行结果如下:
{
  "tokens" : [
    {
      "token" : "黑马",
      "start_offset" : 0,
      "end_offset" : 2,
      "type" : "CN_WORD",
      "position" : 0
    },
    {
      "token" : "程序员",
      "start_offset" : 2,
      "end_offset" : 5,
      "type" : "CN_WORD",
      "position" : 1
    },
    {
      "token" : "学习",
      "start_offset" : 5,
      "end_offset" : 7,
      "type" : "CN_WORD",
      "position" : 2
    },
    {
      "token" : "java",
      "start_offset" : 7,
      "end_offset" : 11,
      "type" : "ENGLISH",
      "position" : 3
    },
    {
      "token" : "太棒了",
      "start_offset" : 11,
      "end_offset" : 14,
      "type" : "CN_WORD",
      "position" : 4
    }
  ]
}
随着互联网的发展,“造词运动”也越发的频繁。出现了很多新的词语,在原有的词汇列表中并不存在。比如:“泰裤辣”,“传智播客” 等。
IK分词器无法对这些词汇分词,测试一下:
POST /_analyze
{
  "analyzer": "ik_max_word",
  "text": "传智播客开设大学,真的泰裤辣!"
}
结果:
{
  "tokens" : [
    {
      "token" : "传",
      "start_offset" : 0,
      "end_offset" : 1,
      "type" : "CN_CHAR",
      "position" : 0
    },
    {
      "token" : "智",
      "start_offset" : 1,
      "end_offset" : 2,
      "type" : "CN_CHAR",
      "position" : 1
    },
    {
      "token" : "播",
      "start_offset" : 2,
      "end_offset" : 3,
      "type" : "CN_CHAR",
      "position" : 2
    },
    {
      "token" : "客",
      "start_offset" : 3,
      "end_offset" : 4,
      "type" : "CN_CHAR",
      "position" : 3
    },
    {
      "token" : "开设",
      "start_offset" : 4,
      "end_offset" : 6,
      "type" : "CN_WORD",
      "position" : 4
    },
    {
      "token" : "大学",
      "start_offset" : 6,
      "end_offset" : 8,
      "type" : "CN_WORD",
      "position" : 5
    },
    {
      "token" : "真的",
      "start_offset" : 9,
      "end_offset" : 11,
      "type" : "CN_WORD",
      "position" : 6
    },
    {
      "token" : "泰",
      "start_offset" : 11,
      "end_offset" : 12,
      "type" : "CN_CHAR",
      "position" : 7
    },
    {
      "token" : "裤",
      "start_offset" : 12,
      "end_offset" : 13,
      "type" : "CN_CHAR",
      "position" : 8
    },
    {
      "token" : "辣",
      "start_offset" : 13,
      "end_offset" : 14,
      "type" : "CN_CHAR",
      "position" : 9
    }
  ]
}
可以看到,传智播客和泰裤辣都无法正确分词。
所以要想正确分词,IK分词器的词库也需要不断的更新,IK分词器提供了扩展词汇的功能。
1)打开IK分词器config目录:
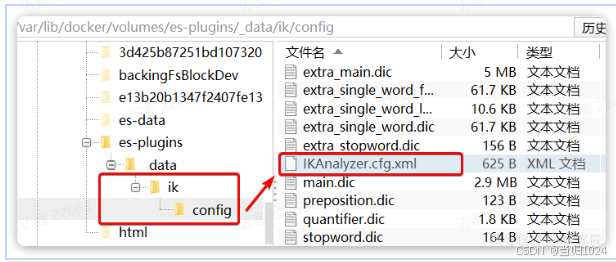
注意,如果采用在线安装的通过,默认是没有config目录的,需要把课前资料提供的ik下的config上传至对应目录。
2)在IKAnalyzer.cfg.xml配置文件内容添加:
<?xml version="1.0" encoding="UTF-8"?>
<!DOCTYPE properties SYSTEM "http://java.sun.com/dtd/properties.dtd">
<properties>
        <comment>IK Analyzer 扩展配置</comment>
        <!--用户可以在这里配置自己的扩展字典 *** 添加扩展词典-->
        <entry key="ext_dict">ext.dic</entry>
</properties>
3)在IK分词器的config目录新建一个 ext.dic,可以参考config目录下复制一个配置文件进行修改
传智播客
泰裤辣
4)重启elasticsearch
docker restart es

# 查看 日志
docker logs -f elasticsearch
再次测试,可以发现传智播客和泰裤辣都正确分词了:
{
  "tokens" : [
    {
      "token" : "传智播客",
      "start_offset" : 0,
      "end_offset" : 4,
      "type" : "CN_WORD",
      "position" : 0
    },
    {
      "token" : "开设",
      "start_offset" : 4,
      "end_offset" : 6,
      "type" : "CN_WORD",
      "position" : 1
    },
    {
      "token" : "大学",
      "start_offset" : 6,
      "end_offset" : 8,
      "type" : "CN_WORD",
      "position" : 2
    },
    {
      "token" : "真的",
      "start_offset" : 9,
      "end_offset" : 11,
      "type" : "CN_WORD",
      "position" : 3
    },
    {
      "token" : "泰裤辣",
      "start_offset" : 11,
      "end_offset" : 14,
      "type" : "CN_WORD",
      "position" : 4
    }
  ]
}
总结
分词器的作用是什么?
- 创建
倒排索引时,对文档分词 - 用户搜索时,对输入的内容分词
IK分词器有几种模式?
- ik_smart:
智能切分,粗粒度 - ik_max_word:最细切分,细粒度
IK分词器如何拓展词条?如何停用词条?
- 利用
config目录的IkAnalyzer.cfg.xml文件添加拓展词典和停用词典 - 在词典中添加
拓展词条或者停用词条
基本概念
- 索引(index):相同类型的文档的
集合 - 映射(mapping):索引中文档的字段约束信息,类似
表的结构约束

数据库和elasticSearch的对比
Mapping的映射属性
mapping是对索引库中文档的约束,常见的mapping属性包括:
- type:字段数据类型,常见的简单类型有:
- 字符串:text(可分词的文本)、keyword(精确值,例如:品牌、国家、ip地址)
- 数值:long、integer、short、byte、double、float、
- 布尔:boolean
- 日期:date
- 对象:object
- index:是否创建索引,默认为true
- analyzer:使用哪种分词器
- properties:该字段的子字段
restful规范
Elasticsearch提供的所有API都是Restful的接口,遵循Restful的基本规范:
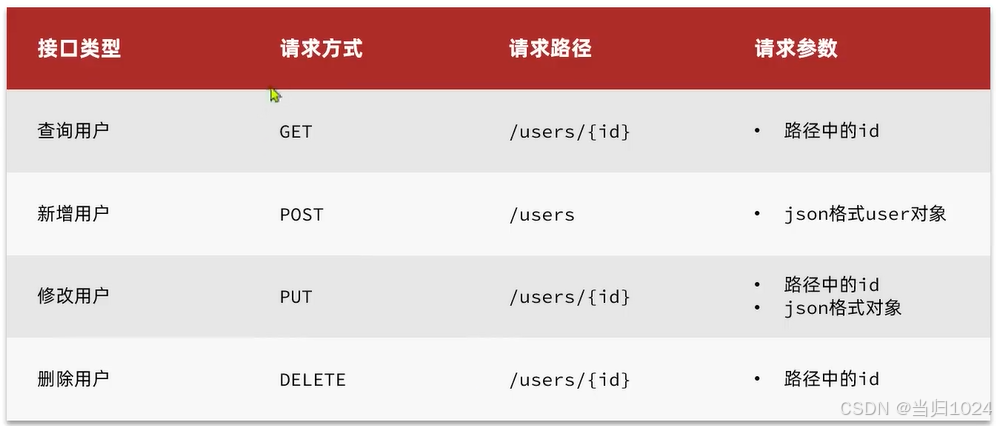
创建索引和mapping
基本语法:
- 请求方式:PUT
- 请求路径:/索引库名,可以自定义
- 请求参数:mapping映射
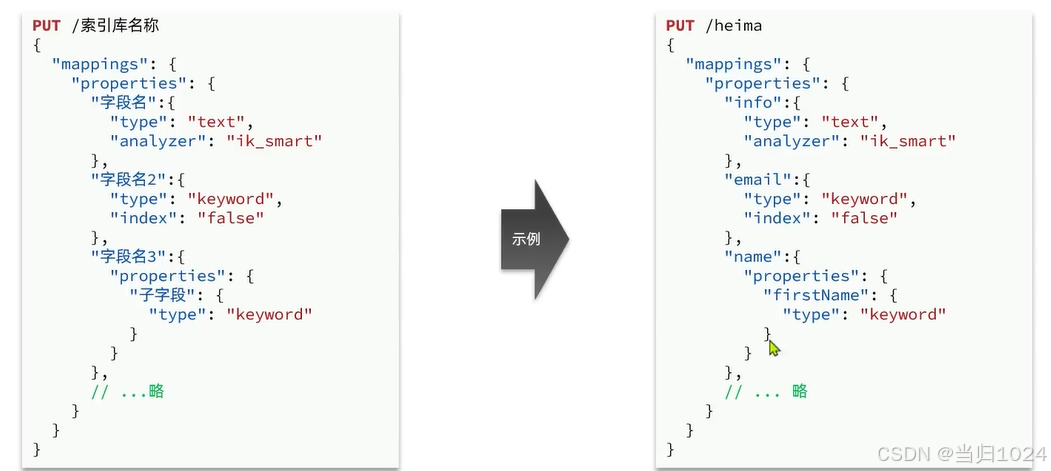
格式:
PUT /索引库名称
{
  "mappings": {
    "properties": {
      "字段名":{
        "type": "text",
        "analyzer": "ik_smart"
      },
      "字段名2":{
        "type": "keyword",
        "index": "false"
      },
      "字段名3":{
        "properties": {
          "子字段": {
            "type": "keyword"
          }
        }
      },
      // ...略
    }
  }
}
示例:
# PUT /heima
{
  "mappings": {
    "properties": {
      "info":{
        "type": "text",
        "analyzer": "ik_smart"
      },
      "email":{
        "type": "keyword",
        "index": "false"
      },
      "name":{
        "properties": {
          "firstName": {
            "type": "keyword"
          }
        }
      }
    }
  }
}
查询索引库
基本语法:
- 请求方式:GET
- 请求路径:/索引库名
- 请求参数:无
格式:
GET /索引库名
示例:
GET /heima
修改索引库
倒排索引结构虽然不复杂,但是一旦数据结构改变(比如改变了分词器),就需要重新创建倒排索引,这简直是灾难。因此索引库一旦创建,无法修改mapping。
虽然无法修改mapping中已有的字段,但是却允许添加新的字段到mapping中,因为不会对倒排索引产生影响。因此修改索引库能做的就是向索引库中添加新字段,或者更新索引库的基础属性。
语法说明:
PUT /索引库名/_mapping
{
  "properties": {
    "新字段名":{
      "type": "integer"
    }
  }
}
示例:
PUT /heima/_mapping
{
  "properties": {
    "age":{
      "type": "integer"
    }
  }
}
删除索引库
语法:
- 请求方式:DELETE
- 请求路径:/索引库名
- 请求参数:无
格式:
DELETE /索引库名
示例:
DELETE /heima
总结
索引库操作有哪些?
- 创建索引库:PUT /索引库名
- 查询索引库:GET /索引库名
- 删除索引库:DELETE /索引库名
- 修改索引库,添加字段:PUT /索引库名/_mapping
可以看到,对索引库的操作基本遵循的Restful的风格,因此API接口非常统一,方便记忆。
文档操作
crud操作
有了索引库,接下来就可以向索引库中添加数据了。
Elasticsearch中的数据其实就是JSON风格的文档。操作文档自然保护增、删、改、查等几种常见操作,我们分别来学习。
1.新增文档
语法:
POST /索引库名/_doc/文档id
{
    "字段1": "值1",
    "字段2": "值2",
    "字段3": {
        "子属性1": "值3",
        "子属性2": "值4"
    },
}
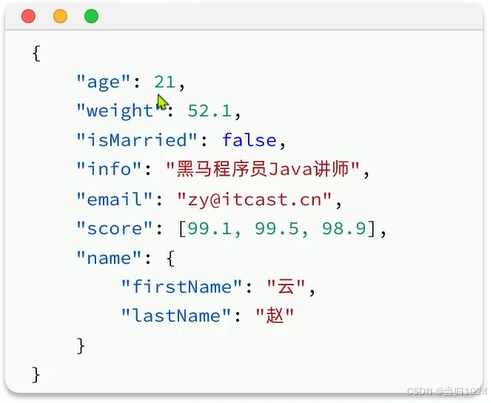
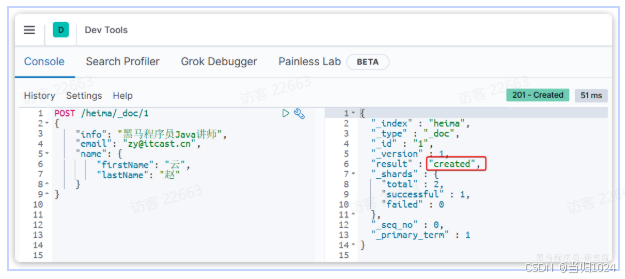
示例:
POST /heima/_doc/1
{
    "info": "黑马程序员Java讲师",
    "email": "zy@itcast.cn",
    "name": {
        "firstName": "云",
        "lastName": "赵"
    }
}
响应:
2.查询文档
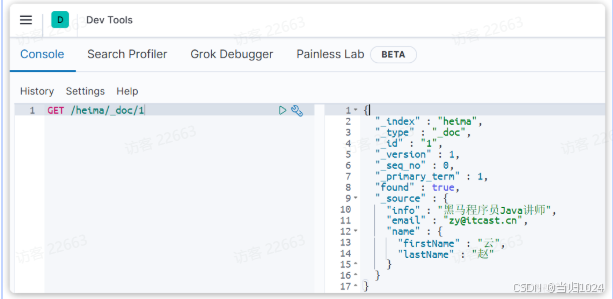
根据rest风格,新增是post,查询应该是get,不过查询一般都需要条件,这里我们把文档id带上。
语法:
GET /{索引库名称}/_doc/{id}
示例:
GET /heima/_doc/1
查看结果:
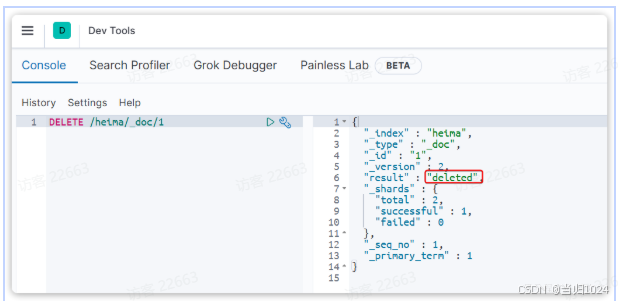
3.删除文档
删除使用DELETE请求,同样,需要根据id进行删除:
语法:
DELETE /{索引库名}/_doc/id值
示例:
DELETE /heima/_doc/1
结果:
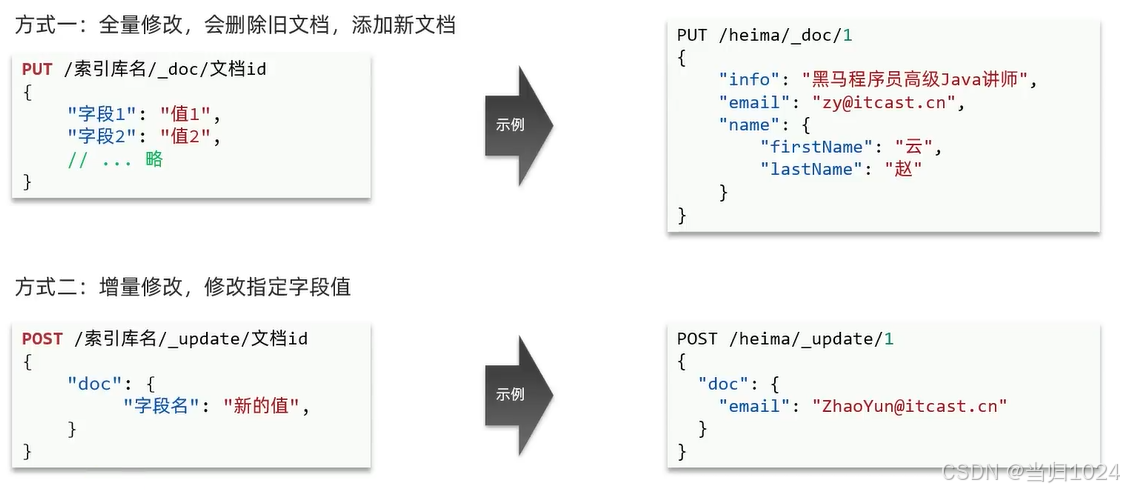
4.修改文档
修改有两种方式:
- 全量修改:直接覆盖原来的文档
- 局部修改:修改文档中的部分字段
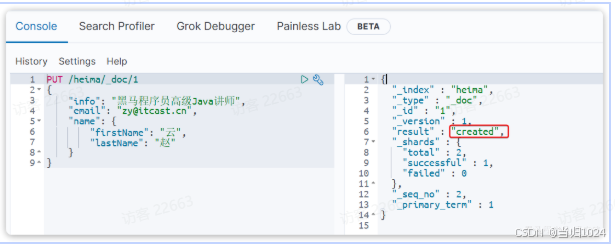
4.1.全量修改
全量修改是覆盖原来的文档,其本质是两步操作:
- 根据指定的id删除文档
- 新增一个相同id的文档
注意:如果根据id删除时,id不存在,第二步的新增也会执行,也就从修改变成了新增操作了。
语法:
PUT /{索引库名}/_doc/文档id
{
    "字段1": "值1",
    "字段2": "值2",
    // ... 略
}
示例:
PUT /heima/_doc/1
{
    "info": "黑马程序员高级Java讲师",
    "email": "zy@itcast.cn",
    "name": {
        "firstName": "云",
        "lastName": "赵"
    }
}
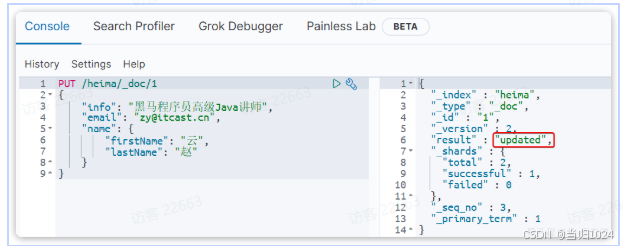
由于id为1的文档已经被删除,所以第一次执行时,得到的反馈是created:
所以如果执行第2次时,得到的反馈则是updated:
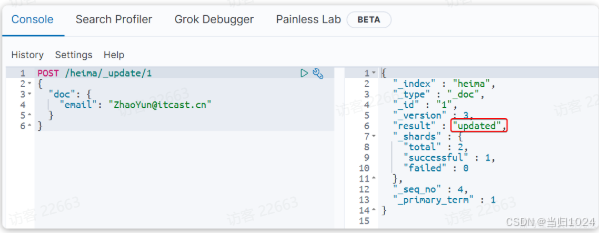
4.2.局部修改
局部修改是只修改指定id匹配的文档中的部分字段。
语法:
POST /{索引库名}/_update/文档id
{
    "doc": {
         "字段名": "新的值",
    }
}
示例:
POST /heima/_update/1
{
  "doc": {
    "email": "ZhaoYun@itcast.cn"
  }
}
执行结果:
批处理
批处理采用POST请求,基本语法如下:
POST _bulk
{ "index" : { "_index" : "test", "_id" : "1" } }
{ "field1" : "value1" }
{ "delete" : { "_index" : "test", "_id" : "2" } }
{ "create" : { "_index" : "test", "_id" : "3" } }
{ "field1" : "value3" }
{ "update" : {"_id" : "1", "_index" : "test"} }
{ "doc" : {"field2" : "value2"} }
其中:
- index代表新增操作
- _index:指定索引库名
- _id指定要操作的文档id
- { “field1” : “value1” }:则是要新增的文档内容
- delete代表删除操作
- _index:指定索引库名
- _id指定要操作的文档id
- update代表更新操作
- _index:指定索引库名
- _id指定要操作的文档id
- { “doc” : {“field2” : “value2”} }:要更新的文档字段
示例,批量新增:
POST /_bulk
{"index": {"_index":"heima", "_id": "3"}}
{"info": "黑马程序员C++讲师", "email": "ww@itcast.cn", "name":{"firstName": "五", "lastName":"王"}}
{"index": {"_index":"heima", "_id": "4"}}
{"info": "黑马程序员前端讲师", "email": "zhangsan@itcast.cn", "name":{"firstName": "三", "lastName":"张"}}
批量删除:
POST /_bulk
{"delete":{"_index":"heima", "_id": "3"}}
{"delete":{"_index":"heima", "_id": "4"}}
小结
文档操作有哪些?
- 创建文档:POST /{索引库名}/_doc/文档id { json文档 }
- 查询文档:GET /{索引库名}/_doc/文档id
- 删除文档:DELETE /{索引库名}/_doc/文档id
- 修改文档:
- 全量修改:PUT /{索引库名}/_doc/文档id { json文档 }
- 局部修改:POST /{索引库名}/_update/文档id { “doc”: {字段}}
Java客户端操作索引库
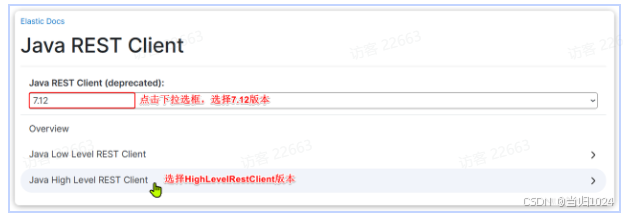
Elasticsearch目前最新版本是8.0,其java客户端有很大变化。不过大多数企业使用的还是8以下版本,所以我们选择使用早期的JavaRestClient客户端来学习。官方文档地址:Elasticsearch Clients|Elastic

然后选择7.12版本,HighLevelRestClient版本:
初始化client
在elasticsearch提供的API中,与elasticsearch一切交互都封装在一个名为RestHighLevelClient的类中,必须先完成这个对象的初始化,建立与elasticsearch的连接。
分为三步:
1)在item-service模块中引入es的RestHighLevelClient依赖:
<dependency>
    <groupId>org.elasticsearch.client</groupId>
    <artifactId>elasticsearch-rest-high-level-client</artifactId>
</dependency>
2)因为SpringBoot默认的ES版本是7.17.10,所以我们需要覆盖默认的ES版本:
  <properties>
      <maven.compiler.source>11</maven.compiler.source>
      <maven.compiler.target>11</maven.compiler.target>
      <elasticsearch.version>7.12.1</elasticsearch.version>
  </properties>
3)初始化RestHighLevelClient:
初始化的代码如下:
RestHighLevelClient client = new RestHighLevelClient(RestClient.builder(
        HttpHost.create("http://192.168.150.101:9200")
));
这里为了单元测试方便,我们创建一个测试类IndexTest,然后将初始化的代码编写在@BeforeEach方法中:
package com.hmall.item.es;

import org.apache.http.HttpHost;
import org.elasticsearch.client.RequestOptions;
import org.elasticsearch.client.RestClient;
import org.elasticsearch.client.RestHighLevelClient;
import org.elasticsearch.client.indices.CreateIndexRequest;
import org.elasticsearch.common.xcontent.XContentType;
import org.junit.jupiter.api.AfterEach;
import org.junit.jupiter.api.BeforeEach;
import org.junit.jupiter.api.Test;

import java.io.IOException;

public class ElasticSearchTest {

    private RestHighLevelClient client;

    @BeforeEach
    void setUp() {
        this.client = new RestHighLevelClient(RestClient.builder(
                HttpHost.create("http://192.168.88.130:9200")
        ));
    }

    @Test
    void testConnect() {
        System.out.println(client);
    }

    @AfterEach
    void tearDown() throws IOException {
        this.client.close();
    }


}
1.创建索引库
由于要实现对商品搜索,所以我们需要将商品添加到Elasticsearch中,不过需要根据搜索业务的需求来设定索引库结构,而不是一股脑的把MySQL数据写入Elasticsearch.
1.1.Mapping映射
搜索页面的效果如图所示:

实现搜索功能需要的字段包括三大部分:
- 搜索过滤字段
- 分类
- 品牌
- 价格
- 排序字段
- 默认:按照更新时间降序排序
- 销量
- 价格
- 展示字段
- 商品id:用于点击后跳转
- 图片地址
- 是否是广告推广商品
- 名称
- 价格
- 评价数量
- 销量
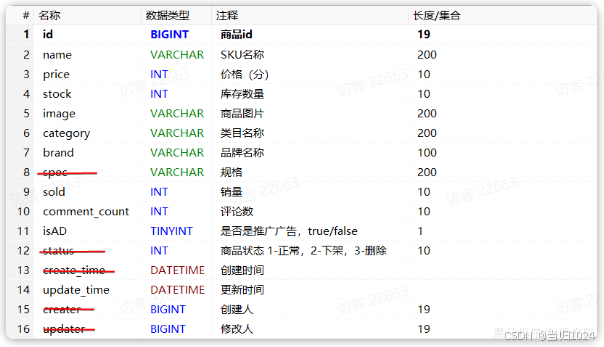
对应的商品表结构如下,索引库无关字段已经划掉:
结合数据库表结构,以上字段对应的mapping映射属性如下:
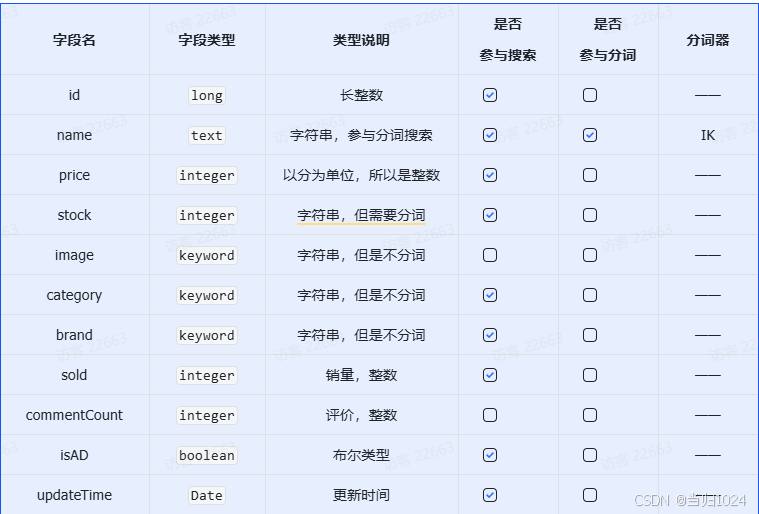
因此,最终我们的索引库文档结构应该是这样:
PUT /items
{
  "mappings": {
    "properties": {
      "id": {
        "type": "keyword"
      },
      "name":{
        "type": "text",
        "analyzer": "ik_max_word"
      },
      "price":{
        "type": "integer"
      },
      "stock":{
        "type": "integer"
      },
      "image":{
        "type": "keyword",
        "index": false
      },
      "category":{
        "type": "keyword"
      },
      "brand":{
        "type": "keyword"
      },
      "sold":{
        "type": "integer"
      },
      "commentCount":{
        "type": "integer",
        "index": false
      },
      "isAD":{
        "type": "boolean"
      },
      "updateTime":{
        "type": "date"
      }
    }
  }
}
1.2.创建索引
创建索引库的API如下:
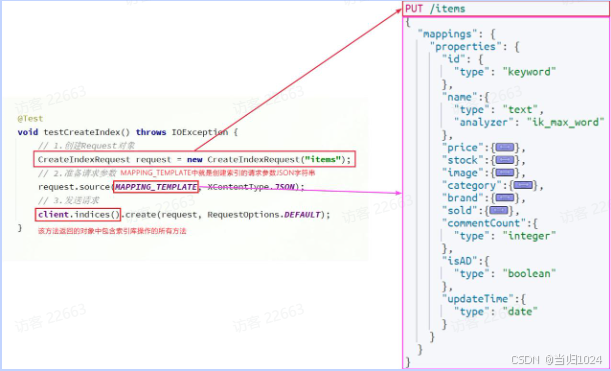
代码分为三步:
- 1)创建Request对象。
- 因为是创建索引库的操作,因此Request是
CreateIndexRequest。
- 因为是创建索引库的操作,因此Request是
- 2)添加请求参数
- 其实就是Json格式的Mapping映射参数。因为json字符串很长,这里是定义了静态字符串常量
MAPPING_TEMPLATE,让代码看起来更加优雅。
- 其实就是Json格式的Mapping映射参数。因为json字符串很长,这里是定义了静态字符串常量
- 3)发送请求
client.indices()方法的返回值是IndicesClient类型,封装了所有与索引库操作有关的方法。例如创建索引、删除索引、判断索引是否存在等
在item-service中的IndexTest测试类中,具体代码如下:
@Test
void testCreateIndex() throws IOException {
    // 1.创建Request对象
    CreateIndexRequest request = new CreateIndexRequest("items");
    // 2.准备请求参数
    request.source(MAPPING_TEMPLATE, XContentType.JSON);
    // 3.发送请求
    client.indices().create(request, RequestOptions.DEFAULT);
}

static final String MAPPING_TEMPLATE = "{\n" +
            "  \"mappings\": {\n" +
            "    \"properties\": {\n" +
            "      \"id\": {\n" +
            "        \"type\": \"keyword\"\n" +
            "      },\n" +
            "      \"name\":{\n" +
            "        \"type\": \"text\",\n" +
            "        \"analyzer\": \"ik_max_word\"\n" +
            "      },\n" +
            "      \"price\":{\n" +
            "        \"type\": \"integer\"\n" +
            "      },\n" +
            "      \"stock\":{\n" +
            "        \"type\": \"integer\"\n" +
            "      },\n" +
            "      \"image\":{\n" +
            "        \"type\": \"keyword\",\n" +
            "        \"index\": false\n" +
            "      },\n" +
            "      \"category\":{\n" +
            "        \"type\": \"keyword\"\n" +
            "      },\n" +
            "      \"brand\":{\n" +
            "        \"type\": \"keyword\"\n" +
            "      },\n" +
            "      \"sold\":{\n" +
            "        \"type\": \"integer\"\n" +
            "      },\n" +
            "      \"commentCount\":{\n" +
            "        \"type\": \"integer\"\n" +
            "      },\n" +
            "      \"isAD\":{\n" +
            "        \"type\": \"boolean\"\n" +
            "      },\n" +
            "      \"updateTime\":{\n" +
            "        \"type\": \"date\"\n" +
            "      }\n" +
            "    }\n" +
            "  }\n" +
            "}";
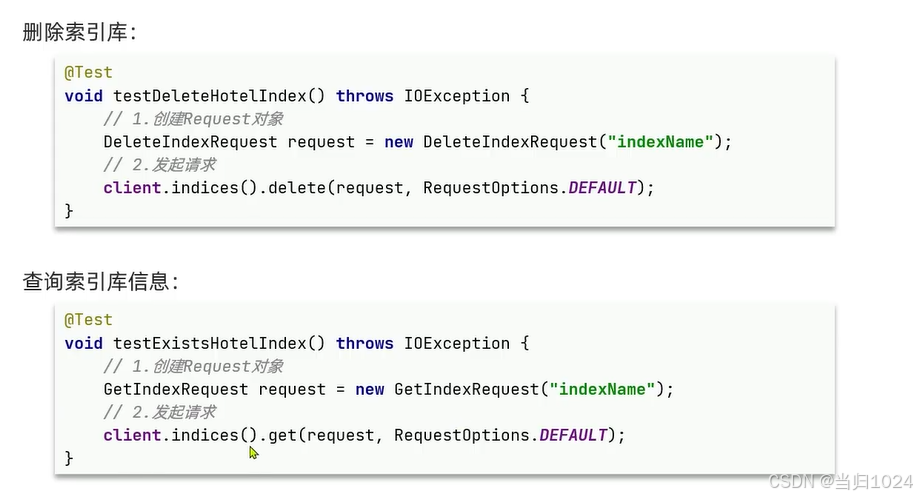
2.删除索引库
删除索引库的请求非常简单:
DELETE /hotel
与创建索引库相比:
- 请求方式从PUT变为DELTE
- 请求路径不变
- 无请求参数
所以代码的差异,注意体现在Request对象上。流程如下:
- 1)创建Request对象。这次是DeleteIndexRequest对象
- 2)准备参数。这里是无参,因此省略
- 3)发送请求。改用delete方法
在item-service中的IndexTest测试类中,编写单元测试,实现删除索引:
@Test
void testDeleteIndex() throws IOException {
    // 1.创建Request对象
    DeleteIndexRequest request = new DeleteIndexRequest("items");
    // 2.发送请求
    client.indices().delete(request, RequestOptions.DEFAULT);
}
3.判断索引库是否存在
判断索引库是否存在,本质就是查询,对应的请求语句是:
GET /hotel
因此与删除的Java代码流程是类似的,流程如下:
- 1)创建Request对象。这次是GetIndexRequest对象
- 2)准备参数。这里是无参,直接省略
- 3)发送请求。改用exists方法
@Test
void testExistsIndex() throws IOException {
    // 1.创建Request对象
    GetIndexRequest request = new GetIndexRequest("items");
    // 2.发送请求
    boolean exists = client.indices().exists(request, RequestOptions.DEFAULT);
    // 3.输出
    System.err.println(exists ? "索引库已经存在!" : "索引库不存在!");
}
4.总结
JavaRestClient操作elasticsearch的流程基本类似。核心是client.indices()方法来获取索引库的操作对象。
索引库操作的基本步骤:
- 初始化
RestHighLevelClient - 创建XxxIndexRequest。XXX是
Create、Get、Delete - 准备请求参数(
Create时需要,其它是无参,可以省略) - 发送请求。调用RestHighLevelClient#indices().xxx()方法,xxx是create、exists、delete
5.1.新增文档
我们需要将数据库中的商品信息导入elasticsearch中,而不是造假数据了。
5.1.1.实体类
索引库结构与数据库结构还存在一些差异,因此我们要定义一个索引库结构对应的实体。
在hm-service模块的com.hmall.item.domain.dto包中定义一个新的DTO:
package com.hmall.item.domain.po;

import io.swagger.annotations.ApiModel;
import io.swagger.annotations.ApiModelProperty;
import lombok.Data;

import java.time.LocalDateTime;

@Data
@ApiModel(description = "索引库实体")
public class ItemDoc{

    @ApiModelProperty("商品id")
    private String id;

    @ApiModelProperty("商品名称")
    private String name;

    @ApiModelProperty("价格(分)")
    private Integer price;

    @ApiModelProperty("商品图片")
    private String image;

    @ApiModelProperty("类目名称")
    private String category;

    @ApiModelProperty("品牌名称")
    private String brand;

    @ApiModelProperty("销量")
    private Integer sold;

    @ApiModelProperty("评论数")
    private Integer commentCount;

    @ApiModelProperty("是否是推广广告,true/false")
    private Boolean isAD;

    @ApiModelProperty("更新时间")
    private LocalDateTime updateTime;
}
5.1.2.API语法
新增文档的请求语法如下:
POST /{索引库名}/_doc/1
{
    "name": "Jack",
    "age": 21
}
对应的JavaAPI如下:
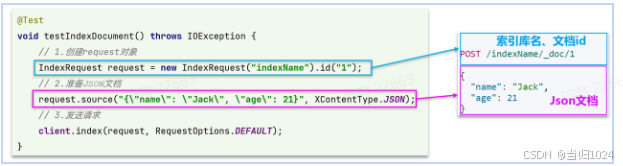
可以看到与索引库操作的API非常类似,同样是三步走:
- 1)创建Request对象,这里是IndexRequest,因为添加文档就是创建倒排索引的过程
- 2)准备请求参数,本例中就是Json文档
- 3)发送请求
变化的地方在于,这里直接使用client.xxx()的API,不再需要client.indices()了。
5.1.3.完整代码
我们导入商品数据,除了参考API模板“三步走”以外,还需要做几点准备工作:
- 商品数据来自于数据库,我们需要先查询出来,得到Item对象
- Item对象需要转为ItemDoc对象
- ItemDTO需要序列化为json格式
因此,代码整体步骤如下:
- 1)根据id查询商品数据Item
- 2)将Item封装为ItemDoc
- 3)将ItemDoc序列化为JSON
- 4)创建IndexRequest,指定索引库名和id
- 5)准备请求参数,也就是JSON文档
- 6)发送请求
在item-service的DocumentTest测试类中,编写单元测试:
package com.heima.item.es;

import cn.hutool.core.bean.BeanUtil;
import cn.hutool.json.JSONUtil;
import com.hmall.item.ItemApplication;
import com.hmall.item.domain.po.Item;
import com.hmall.item.domain.po.ItemDoc;
import com.hmall.item.service.IItemService;
import org.apache.http.HttpHost;
import org.elasticsearch.action.index.IndexRequest;
import org.elasticsearch.client.RequestOptions;
import org.elasticsearch.client.RestClient;
import org.elasticsearch.client.RestHighLevelClient;
import org.elasticsearch.common.xcontent.XContentType;
import org.junit.jupiter.api.AfterEach;
import org.junit.jupiter.api.BeforeEach;
import org.junit.jupiter.api.Test;
import org.springframework.beans.factory.annotation.Autowired;
import org.springframework.boot.test.context.SpringBootTest;

import java.io.IOException;

@SpringBootTest(
        classes = ItemApplication.class
        ,properties = "spring.profiles.active=local")
public class DocumentTest {

    private RestHighLevelClient client;

    @Autowired
    private IItemService itemService;

    @BeforeEach
    void setUp() {
        this.client = new RestHighLevelClient(RestClient.builder(
                HttpHost.create("http://192.168.88.130:9200")
        ));
    }

    @Test
    void testConnect() {
        System.out.println(client);
    }

    @AfterEach
    void tearDown() throws IOException {
        this.client.close();
    }


    @Test
    void testAddDocument() throws IOException {
        // 1.根据id查询商品数据
        Item item = itemService.getById(100002644680L);
        // 2.转换为文档类型
        ItemDoc itemDoc = BeanUtil.copyProperties(item, ItemDoc.class);
        // 3.将ItemDTO转json
        String doc = JSONUtil.toJsonStr(itemDoc);

        // 1.准备Request对象
        IndexRequest request = new IndexRequest("items").id(itemDoc.getId());
        // 2.准备Json文档
        request.source(doc, XContentType.JSON);
        // 3.发送请求
        client.index(request, RequestOptions.DEFAULT);
    }

}
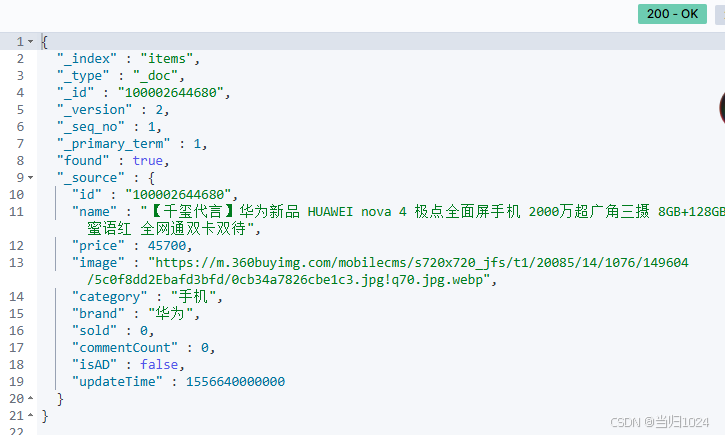
GET /items/_doc/100002644680