文章目录
前言
集成配置系统的主要目的是将应用程序的配置信息与代码分离,使得配置信息可以在不需要修改代码的情况下进行维护。这样可以提高应用程序的灵活性和可维护性。
ASP.NET Core 提供了一种灵活的配置系统,可以轻松地将配置信息从不同的来源加载到应用程序中,并且可以根据环境变量、命令行参数、JSON 文件、XML 文件、环境变量等不同来源来管理配置。
一、配置源与默认设置
- ASP.NET Core默认通过CreateDefaultBuilder方法预配置了多种配置源,优先级从低到高依次为:
- appsettings.json
- appsettings.{Environment}.json
- 用户机密(开发环境)
- 环境变量
- 命令行参数
二、使用步骤
1)创建项目并添加配置
项目结构:
- AspNetCoreConfiguration
- Controllers/
- TestConfigurationController.cs
- Entity/
- AppConfig.cs
- SmtpSettings.cs
- appsettings.json
- appsettings.Development.json
- config.xml
- Program.cs
- Controllers/
2)配置文件
appsettings.json
{
  "Logging": {
    "LogLevel": {
      "Default": "Information",
      "Microsoft.AspNetCore": "Warning"
    }
  },
  "AllowedHosts": "*",
  "AppConfig": {
    "ApiName": "My API",
    "MaxRecords": 100,
    "EnableCaching": false
  }
}
appsettings.Development.json(开发环境专用)
{
  "AppConfig": {
    "EnableCaching": true
  },
  "Logging": {
    "LogLevel": {
      "Default": "Information",
      "Microsoft.AspNetCore": "Warning"
    }
  }
}
config.xml(自定义XML配置源)
<?xml version="1.0" encoding="utf-8" ?>
<configuration>
	<AppConfig>
		<ApiName>XMLApiName热重载222</ApiName>
		<MaxRecords>200</MaxRecords>
		<EnableCaching>false</EnableCaching>
	</AppConfig>
</configuration>
3)强类型配置类
- AppConfig.cs
namespace AspNetCoreConfiguration.Entity { public class AppConfig { public string ApiName { get; set; } public int MaxRecords { get; set; } public bool EnableCaching { get; set; } } } - SmtpSettings.cs
namespace AspNetCoreConfiguration.Entity
{
    public record SmtpSettings
    {
        public string Server { get; set; }

        public string UserName { get; set; }

        public string Password {  get; set; }
    }
}
4)配置Program.cs
- 示例
var builder = WebApplication.CreateBuilder(args);
//注册配置文件及它们的优先级
builder.Configuration
    .AddJsonFile("mysettings.json", optional: true, reloadOnChange: true)
    .AddXmlFile("config.xml", optional: true, reloadOnChange: true)
    .AddEnvironmentVariables("MyEnvironment_")
    .AddCommandLine(args);
builder.Services.AddControllers();
builder.Services.AddEndpointsApiExplorer();
builder.Services.AddSwaggerGen();

//配置数据库
builder.WebHost.ConfigureAppConfiguration((hostCtx, configBuilder) =>
{
    string connStr = builder.Configuration.GetSection("ConnectionString").Value;
    configBuilder.AddDbConfiguration(() => new SqlConnection(connStr), reloadOnChange: true, reloadInterval: TimeSpan.FromSeconds(2));

});

//配置Redis
builder.Services.AddSingleton<IConnectionMultiplexer>(sp => {
    return ConnectionMultiplexer.Connect(builder.Configuration.GetSection("Redis").Value);
});

//绑定配置节到类
builder.Services.Configure<AppConfig>(builder.Configuration.GetSection("AppConfig"));
builder.Services.Configure<SmtpSettings>(builder.Configuration.GetSection("Smtp"));

var app = builder.Build();

if (app.Environment.IsDevelopment())
{
    app.UseSwagger();
    app.UseSwaggerUI();
    //开发环境加载用户机密
    builder.Configuration.AddUserSecrets<Program>();
}
app.UseHttpsRedirection();

app.UseAuthorization();

app.MapControllers();

app.Run();
5)控制器中使用配置
- TestConfigurationController.cs
using AspNetCoreConfiguration.Entity;
using Microsoft.AspNetCore.Mvc;
using Microsoft.Extensions.Options;
using StackExchange.Redis;

namespace AspNetCoreConfiguration.Controllers
{
    [Route("api/[controller]/[action]")]
    [ApiController]
    public class TestConfigurationController : ControllerBase
    {
        private readonly IWebHostEnvironment _webHostEnvironment;
        private readonly AppConfig appconfig;
        private readonly SmtpSettings smtpConfig;
        private readonly IConfiguration _configuration;
        private readonly ILogger<TestConfigurationController> logger;
        private readonly IConnectionMultiplexer connectionMultiplexer;

        public TestConfigurationController(IWebHostEnvironment webHostEnvironment,
            IOptionsSnapshot<AppConfig> options,//支持配置热重载
            IConfiguration configuration,
            ILogger<TestConfigurationController> logger,
            IConnectionMultiplexer connectionMultiplexer,
            IOptionsSnapshot<SmtpSettings> smtpConfigOptions)
        {
            _webHostEnvironment = webHostEnvironment;
            appconfig = options.Value;
            _configuration = configuration;
            this.logger = logger;
            this.connectionMultiplexer = connectionMultiplexer;
            smtpConfig = smtpConfigOptions.Value;
        }

        [HttpGet]
        public string GetRedisOrSmtpConfig() {
            var pingDataBase = connectionMultiplexer.GetDatabase(0).Ping();
            logger.LogInformation($"DatabaseBase:{pingDataBase}");
            logger.LogInformation($"Smtp:{smtpConfig}");
            return "";

        }
        [HttpGet]
        public IActionResult GetConfigInfo()
        {
            //return Ok(new {
            //    ApiName=appconfig.ApiName,
            //    MaxRecords = appconfig.MaxRecords,
            //    EnableCaching = appconfig.EnableCaching
            //});
            logger.LogInformation($"强类型访问appconfig.XXX:{appconfig.ApiName},{appconfig.MaxRecords},{appconfig.EnableCaching}");
            logger.LogInformation($"直接访问_configuration[AppConfig:xxx]:{_configuration["AppConfig:ApiName"]},{_configuration["AppConfig:MaxRecords"]},{_configuration["AppConfig:EnableCaching"]}");
            return Ok(_configuration["AppConfig:ApiName"]+ _configuration["AppConfig:MaxRecords"] + _configuration["AppConfig:EnableCaching"]);

        }
        [HttpGet]
        public string GetEnvironmentConfigValue()
        {
            return _webHostEnvironment.EnvironmentName;
        }
    }
}
6)配置优先级测试
通过不同方式覆盖配置值
命令行参数 (最高优先级):
AppConfig:ApiName=Bat_ApiName AppConfig:MaxRecords=1000 AppConfig:EnableCaching=true
环境变量 (使用双下划线 __):
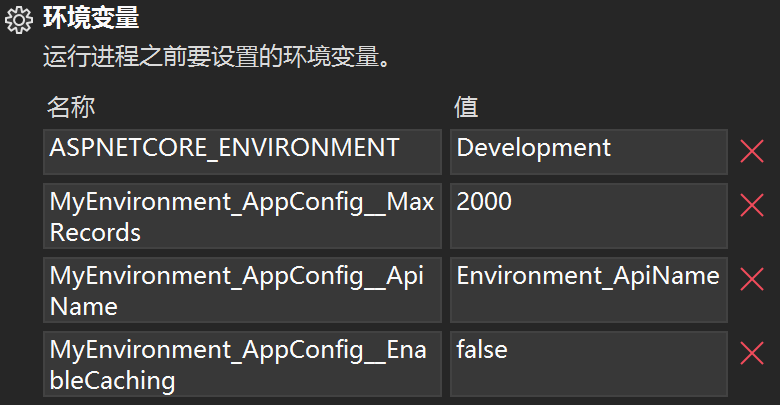
用户机密 (仅Development环境):
//配置secrets.json
 {
	"AppConfig:ApiName": "user_Secrets_ApiName",
	"AppConfig:MaxRecords": "3000",
  	"AppConfig:EnableCaching": "true",
  }
7)动态重载配置测试
- 修改 appsettings.json 或 config.xml 中的值。
- 无需重启应用,刷新接口即可看到更新后的值(通过 IOptionsSnapshot<T> 注入)。
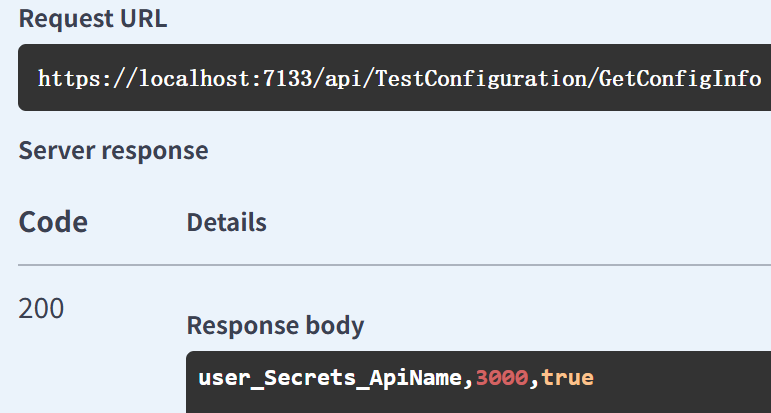
8)运行结果示例
- 假设配置优先级生效顺序为:用户机密>命令行 > 环境变量 > XML > appsettings.json
- 请求响应:
总结
- 配置源优先级:后添加的源优先级更高,用户机密 > 命令行 > 环境变量 > 自定义XML >
appsettings.{Environment}.json > appsettings.json。 - 强类型绑定:通过 services.Configure() 注册,使用
IOptions<T>/IOptionsSnapshot<T> 注入。 - 热重载:确保 reloadOnChange: true,并使用 IOptionsSnapshot<T> 或
IOptionsMonitor<T>。 - 环境变量:使用双下划线 __ 替代层级符号(如 AppSettings__Title)。
- 用户机密:仅用于开发环境,通过 dotnet user-secrets 管理。