目录
一、list介绍
在 C++ 中,std::list 是标准模板库(STL)提供的 双向链表容器,适用于需要高效插入/删除但无需随机访问的场景。使用时需要包含<string>头文件。
主要特点:
- list是可以在O(1)内在任意位置进行插入和删除的序列式容器,并且该容器可以前后双向迭代。
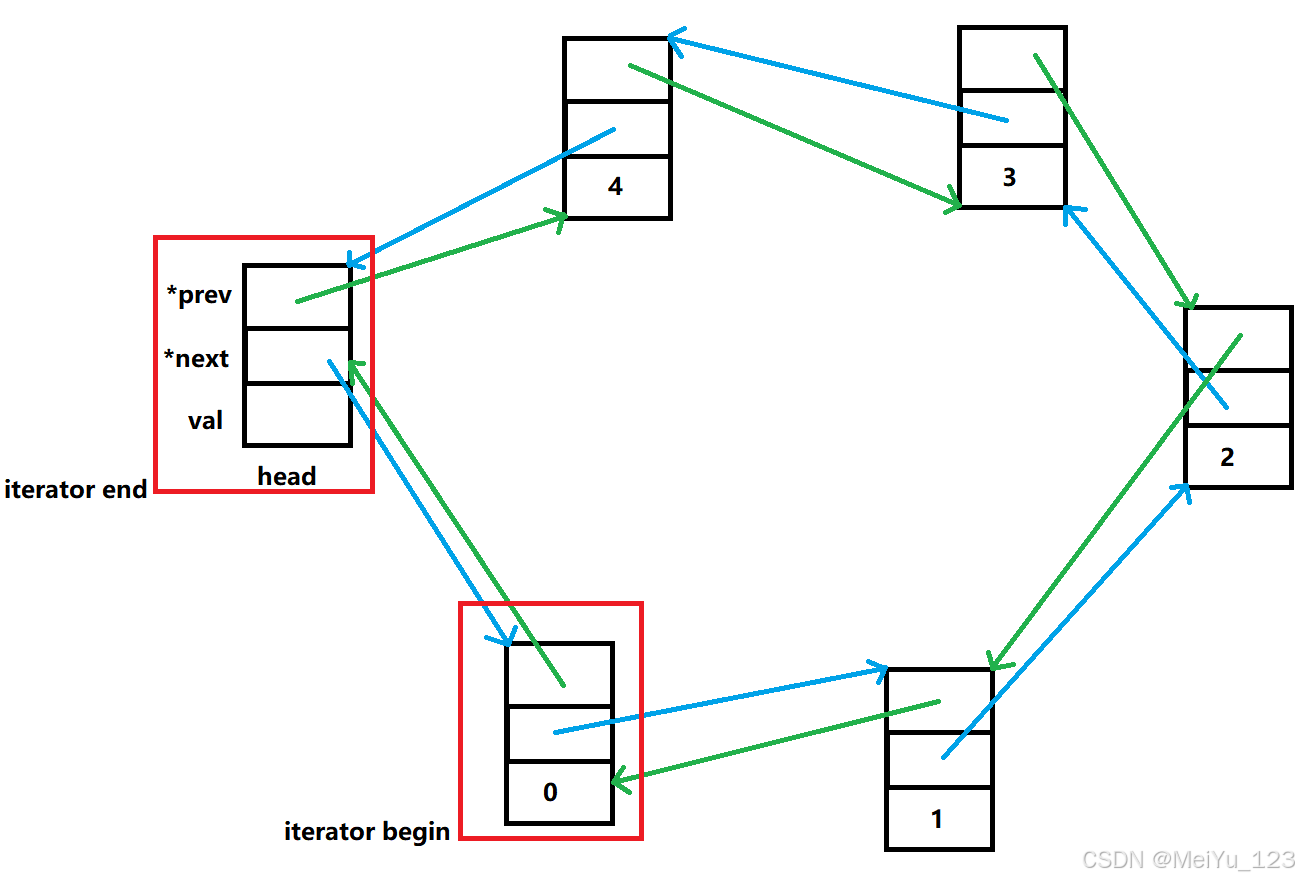
- list的底层是双向链表结构,双向链表中每个元素存储在互不相关的独立节点中,在节点中通过指针指向其前一个元素和后一个元素。
- list与forward_list非常相似:最主要的不同在于forward_list是单链表,只能朝前迭代,已让其更简单高效。
- 与其他的序列式容器相比(array,vector,deque),list通常在任意位置进行插入、移除元素的执行效率更好。
- 与其他序列式容器相比,list和forward_list最大的缺陷是不支持任意位置的随机访问,list还需要一些额外的空间,以保存每个节点的相关联信息。
二、list常见的接口
2.1 常见的构造函数
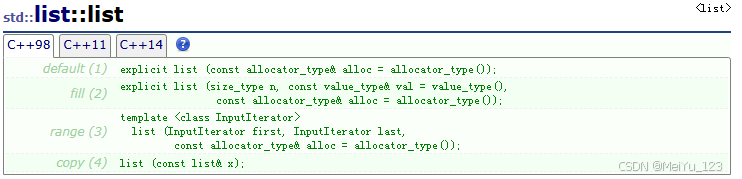
- 无参构造函数:list()
构造一个空的list
- 带参构造函数:list (size_type n, const value_type& val = value_type())
用n个值为val的元素构造list
- 拷贝构造:list(const list& lt)
利用实例化的list对象来创建新list类对象
- 迭代器构造list:list (InputIterator first, InputIterator last)
利用list对象的一段区间来构造新的list对象
示例:
void TestList1()
{
	list<int> lt1;        // 无参构造
	list<int> lt2(5, 1);  // 用n个val构造一个list对象
	list<int> lt3(lt2);   // 拷贝构造
	list<int> lt4(lt2.begin(), lt2.end());// 用一段区间的元素构造list

	cout << "lt1:";
	PrintList(lt1);       // 遍历打印链表的函数

	cout << "lt2:";
	PrintList(lt2);

	cout << "lt3:";
	PrintList(lt3);

	cout << "lt4:";
	PrintList(lt4);
}
2.2 list的迭代器
list 的迭代器本质是一个封装了链表节点指针的类对象,通过重载运算符(如 ++、--、* 等)模拟指针的行为,但内部隐藏了链表节点间的复杂指针跳转逻辑。
- begin() + end()
返回第一个元素的迭代器+返回最后一个元素下一个位置的迭代器
- rbegin() + rend()
返回第一个元素的reverse_iterator,即end位置,返回最后一个元素下一个位置的reverse_iterator,即begin位置
注意:
- begin与end为正向迭代器,对迭代器执行++操作,迭代器向后移动
- rbegin(end)与rend(begin)为反向迭代器,对迭代器执行++操作,迭代器向前移动
2.3 对象的遍历
- begin + end
list<int>::iterator it = lt.begin();
while (it != lt.end())
{
	cout << *it << " ";
	++it;
}- rbegin + rend
list<int>::reverse_iterator rit = lt.rbegin();
while (rit != lt.rend())
{
	cout << *rit << " ";
	++rit;
}- 范围for
for (auto e : lt)
{
    cout << e << " ";
}
2.4 对象的增删查改
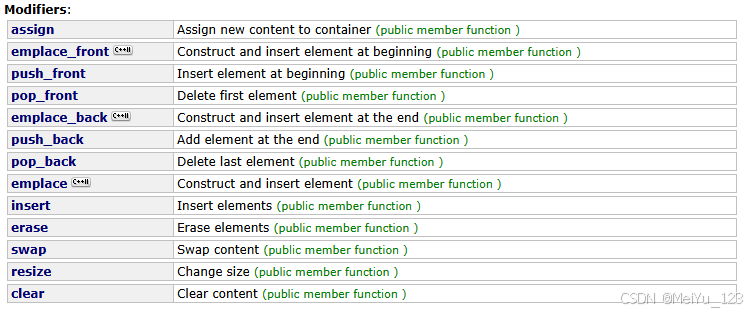
这里主要介绍几个常用的:
- push_back()
在list尾部插入一个数据
- pop_back()
删除list尾部的一个数据
- push_front()
在list头部插入一个数据
- pop_front()
删除list头部的一个数据
- insert()
在pos位置插入一个或多个数据,或者插入一个list对象中的多个数据
- erase()
删去pos位置的一个元素
- swap()
交换两个list中的元素,一般使用非成员函数的swap进行交换
- clear()
清理list的有效元素


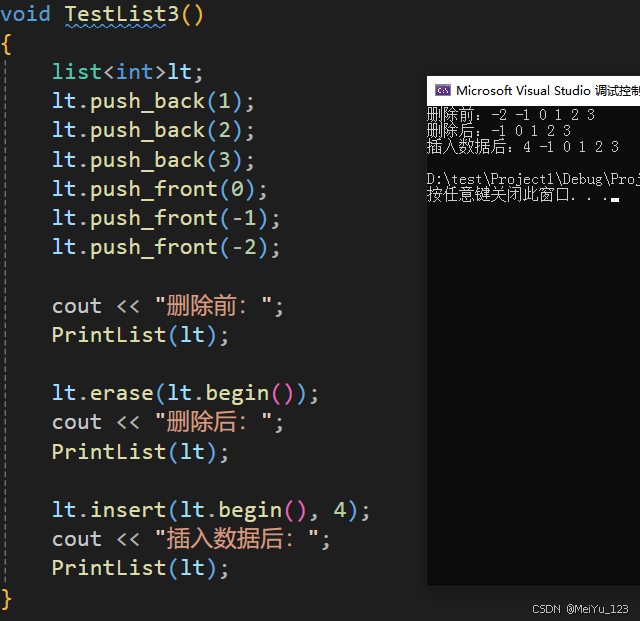
示例:
void TestList3()
{
	list<int>lt;
	lt.push_back(1);
	lt.push_back(2);
	lt.push_back(3);
	lt.push_front(0);
	lt.push_front(-1);
	lt.push_front(-2);

	cout << "删除前:";
	PrintList(lt);

	lt.erase(lt.begin());
	cout << "删除后:";
	PrintList(lt);

	lt.insert(lt.begin(), 4);
	cout << "插入数据后:";
	PrintList(lt);
}
2.5 对象的数据获取和容量操作
由于list不能随机存取数据,因此在获取数据这方面只能实现最前面和最后面的数据获取:

- front()
返回list的第一个节点中值的引用
- back()
返回list的最后一个节点中值的引用
容量操作:

- empty()
判断容器是否为空
- size()
获取容器有效节点的个数
2.6 迭代器失效
迭代器失效即迭代器所指向的节点的无效,即该节点被删除了。因为list的底层结构为带头结点的双向循环链表,因此在list中进行插入时是不会导致list的迭代器失效的,只有在删除时才会失效,并且失效的只是指向被删除节点的迭代器,其他迭代器不会受到影响。
与vector的迭代器失效相比:
vector容器插入数据是会导致迭代器失效,因为vector涉及增容问题,而list却不存在增容问题,所以迭代器指向的位置是有效的。删除数据会导致迭代器指向的位置是无效的,所以迭代器会失效。
三、list模拟实现
list中的元素为一个个的节点,我们需要先定义出一个节点的结构,然后list类中的成员变量只需要一个头结点。
3.1 list类的成员变量
template<class T>
struct list_node
{
	list_node<T>* _prev;
	list_node<T>* _next;
	T _data;

	list_node(const T& val = T())
		: _next(nullptr)
		, _prev(nullptr)
		, _data(val)
	{}
};

template<class T>
class list
{
	typedef list_node<T> Node;
public:
private:
	Node* _head;
};
3.2 构造函数
list()
{
	_head = new Node;
	_head->_next = _head;
	_head->_prev = _head;
}
很简单的双向循环链表的头结点,让下一个元素的指针指向自己,让上一个元素的指针也指向自己。
3.3 迭代器的实现
由于迭代器不再是一个简单的指针,因此我们需要将其封装成一个类,来实现基本的功能。
1. 基本结构
template <class T, class Ref, class Ptr>
struct list_iterator
{
	typedef ListNode<T> Node;
	typedef list_iterator<T, Ref, Ptr> Self;
	Node* _node;

	list_iterator(Node* node)
		:_node(node)
	{ }
};
这里为了不造成代码冗余,通过三个参数实现普通迭代器和const迭代器,使得代码可以复用,只需要在list类中做如下操作即可:
typedef list_iterator<T, T&, T*> iterator;
typedef list_iterator<T, const T&, const T*> const_iterator;
2. 迭代器的运算符操作
- 解引用操作
Ref& operator*()
{
	return _node->_data;
}- -> 操作
Ptr* operator->()
{
	return &_node->_data;
}- 前置++
Self operator++()
{
	_node = _node->_next;

	return *this;
}- 后置++
Self operator++(int)
{
	Self tmp(*this);

	++(*this);    // 复用前置++

	return tmp;
}- 前置--
Self operator--()
{
	_node = _node->_prev;

	return *this;
}- 后置--
Self operator--( int)
{
	Self tmp(*this);

	--(*this);

	return tmp;
}- operator!=
bool operator!=(const Self& it)
{
	return _node != it._node;
}
list类中begin和end的实现:
iterator begin()
{
	return iterator(_head->_next);
}

iterator end()
{
	return iterator(_head);
}

const_iterator begin() const
{
	return const_iterator(_head->_next);
}

const_iterator end() const
{
	return const_iterator(_head);
}
3.4 析构函数
在实现析构函数之前需要实现一个资源清理的函数,将list中的节点空间释放。
void clear()
{
	iterator it = begin();
	while (it != end())
	{
		erase(it++);
    }
}
~list()
{
clear();
delete _head;
_head = nullptr;
}3.5 对象的增删查改操作
- insert
void insert(iterator pos, const T& x)
{
	Node* cur = pos._node;
	Node* prev = cur->_prev;

	Node* newnode = new Node(x);

	prev->_next = newnode;
	newnode->_prev = prev;
	newnode->_next = cur;
	cur->_prev = newnode;
}- erase
iterator erase(iterator pos)
{
	assert(_head->_next != _head);
	assert(pos != end());

	Node* node = pos._node;
	Node* prev = node->_prev;
	Node* next = node->_next;

	delete node;
	node = nullptr;

	prev->_next = next;
	next->_prev = prev;

	return iterator(next);
}
- push_back
void push_back(const T& x)
{
	Node* newnode = new Node(x);
	Node* tail = _head->_prev;

	tail->_next = newnode;
	newnode->_prev = tail;
	newnode->_next = _head;
	_head->_prev = newnode;
}
- pop_back
void pop_back()
{
	assert(_head != _head->_next);

	Node* tail = _head->_prev;
	Node* prevTail = tail->_prev;
	delete tail;
	tail = prevTail;

	tail->_next = _head;
	_head->_prev = tail;
}
- push_front
void push_front(const T& x)
{
	Node* newnode = new Node(x);
	Node* firstNode = _head->_next;

	_head->_next = newnode;
	newnode->_prev = _head;
	newnode->_next = firstNode;
	firstNode->_prev = newnode;
}
- pop_front
void pop_front()
{
	assert(_head->_next != _head);

	Node* firstNode = _head->_next;
	Node* secondNode = firstNode->_next;

	delete firstNode;
	firstNode = nullptr;

	_head->_next = secondNode;
	secondNode->_prev = _head;
}
这里的push_back 和 push_front都可以复用insert,提高代码的复用性,减少更新成本:
void push_back(const T& x)
{
	insert(end(), x);
}

void push_front(const T& x)
{
	insert(begin(), x);
}
同理pop_back和pop_front也可以复用erase :
void push_back(const T& x)
{
	insert(end(), x);
}

void push_front(const T& x)
{
	insert(begin(), x);
}- front
T front()
{
	assert(_head->_next != _head);
	return _head->_next->_data;
}- back
T back()
{
	assert(_head->_next != _head);
	return _head->_prev->_data;
}- find
iterator find(const T& value, iterator begin = begin(), iterator end = end())
{
    for (iterator it = begin; it != end; ++it)
    {
        if (*it == value)
        {
            return it;   // 找到则返回当前迭代器
        }
    }

    return end;          // 未找到返回 end
}
3.6 拷贝构造函数和赋值运算符重载
- 拷贝构造函数
list(const list<T>& lt)
{
	_head = new Node;
	_head->_next = _head;
	_head->_prev = _head;

	for (auto e : lt)
	    push_back(e);
}- operator=
list<T>& operator=(list<T> lt)
{
	swap(_head, lt._head);

	return *this;
}
这里的swap函数可以自己实现,也可以直接用库中的。
四、list与vector对比
| vector | list | |
| 底层结构 | 动态顺序表 | 带有头结点的双向链表 |
| 随机访问 | 支持 | 不支持 |
| 插入和删除 | 尾插和尾删是O(1),其它都是O(n),且插入的时候还需要考虑扩容 | 任意位置插入删除都是O(1),但是需要提前知道节点的位置,这个操作需要O(n) |
| 空间利用率 | 动态开辟的连续空间,不容易出现内存碎片,空间利用率高,缓存利用率高 | 节点是动态开辟的,在内存空间中不连续,容易造成内存碎片,空间利用率低,缓存利用率低 |
| 迭代器 | 原生指针 | 节点进行封装 |
| 迭代器失效 | 插入时扩容导致迭代器指向的空间无效,或者是删除使得迭代器指向的数据无效 | 插入不会导致迭代器无效,删除时会使当前迭代器无效 |
| 使用场景 | 需要随机存取的,不关心插入删除的效率,或者很少进行插入删除的操作 | 大量的插入删除操作,基本上用来存储数据,不关心随机访问 |
结语
这篇文章主要讲解了list的常见接口和模拟实现,其中list的迭代器的封装如果大家是第一次接触的话会有些难以理解,需要多看几次,理解其中的思想:就是统一容器的迭代方式。vector和list的比较也需要大家掌握,这两个的区别其实就是数据结构中顺序表和链表的区别,只不过list是一个带头双向链表,比单链表更加高效。
下一篇将会介绍STL-stack和queue相关的知识,有兴趣的朋友可以关注一下。