一 . STL简介
1.1 什么是STL
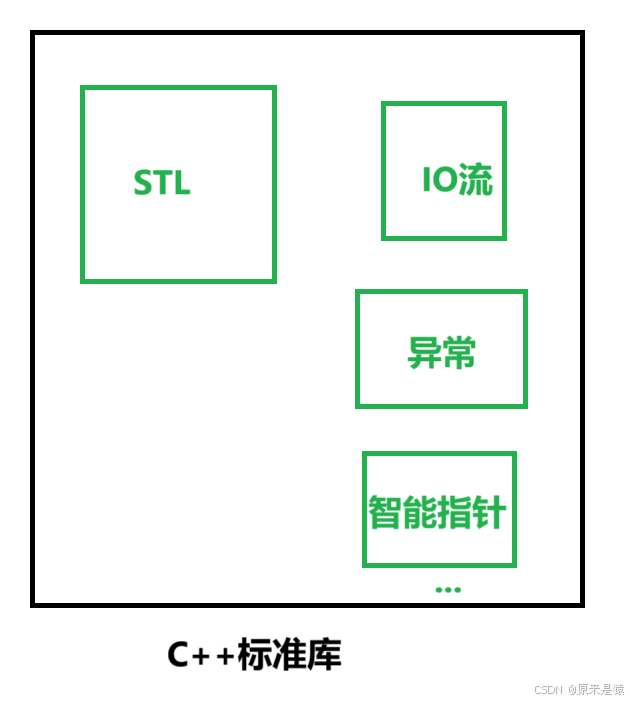
STL(standard template libaray - 标准模板库) : 是C++标准库的重要组成部分 , 不仅是一个可复用的组件库 , 而且是一个包罗 数据结构 与 算法 的软件框架 。
注意 : 是标准库的一部分 !C++标准库还包括其他的库 ,比方如下:
1.2 STL的版本
- 原始版本
Alexander Stepanov、Meng Lee 在惠普实验室完成的原始版本,本着开源精神,他们声明允许
任何人任意运用、拷贝、修改、传播、商业使用这些代码,无需付费。唯一的条件就是也需要向原
始版本一样做开源使用。 HP 版本--所有STL实现版本的始祖。
做一个小的知识扩展:(比较出名的闭源和开源有)
闭源 : windows mac os , Oracle
开源 : linux git
- P. J. 版本
由P. J. Plauger开发,继承自HP版本,被Windows Visual C++采用,不能公开或修改,缺陷:可读性比较低,符号命名比较怪异。
- RW版本
由Rouge Wage公司开发,继承自HP版本,被C+ + Builder 采用,不能公开或修改,可读性一
般。
- SGI版本
由Silicon Graphics Computer Systems,Inc公司开发,继承自HP版 本。被GCC(Linux)采用,可
移植性好,可公开、修改甚至贩卖,从命名风格和编程 风格上看,阅读性非常高。我们后面学习
STL要阅读部分源代码,主要参考的就是这个版本。
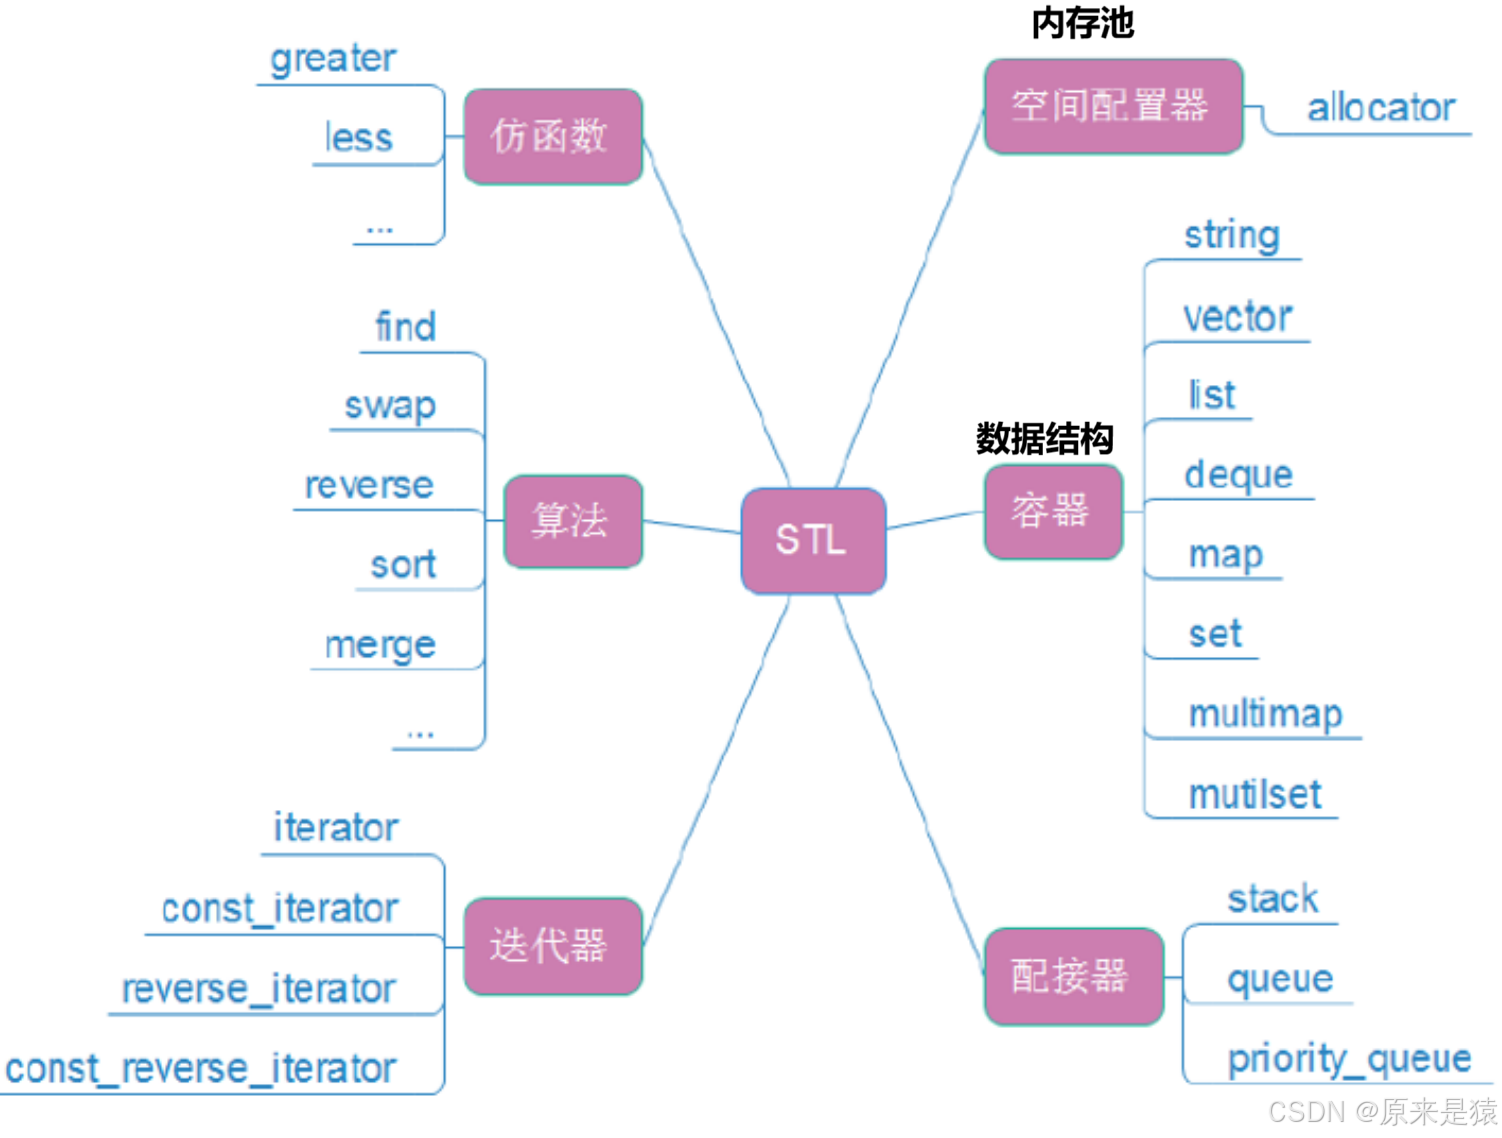
1.3 STL的六大组件
1.4 STL的重要性
网上有句话说:“不懂STL,不要说你会C++”。STL是C++中的优秀作品,有了它的陪伴,许多底层 的数据结构以及算法都不需要自己重新造轮子,站在前人的肩膀上,健步如飞的快速开发。
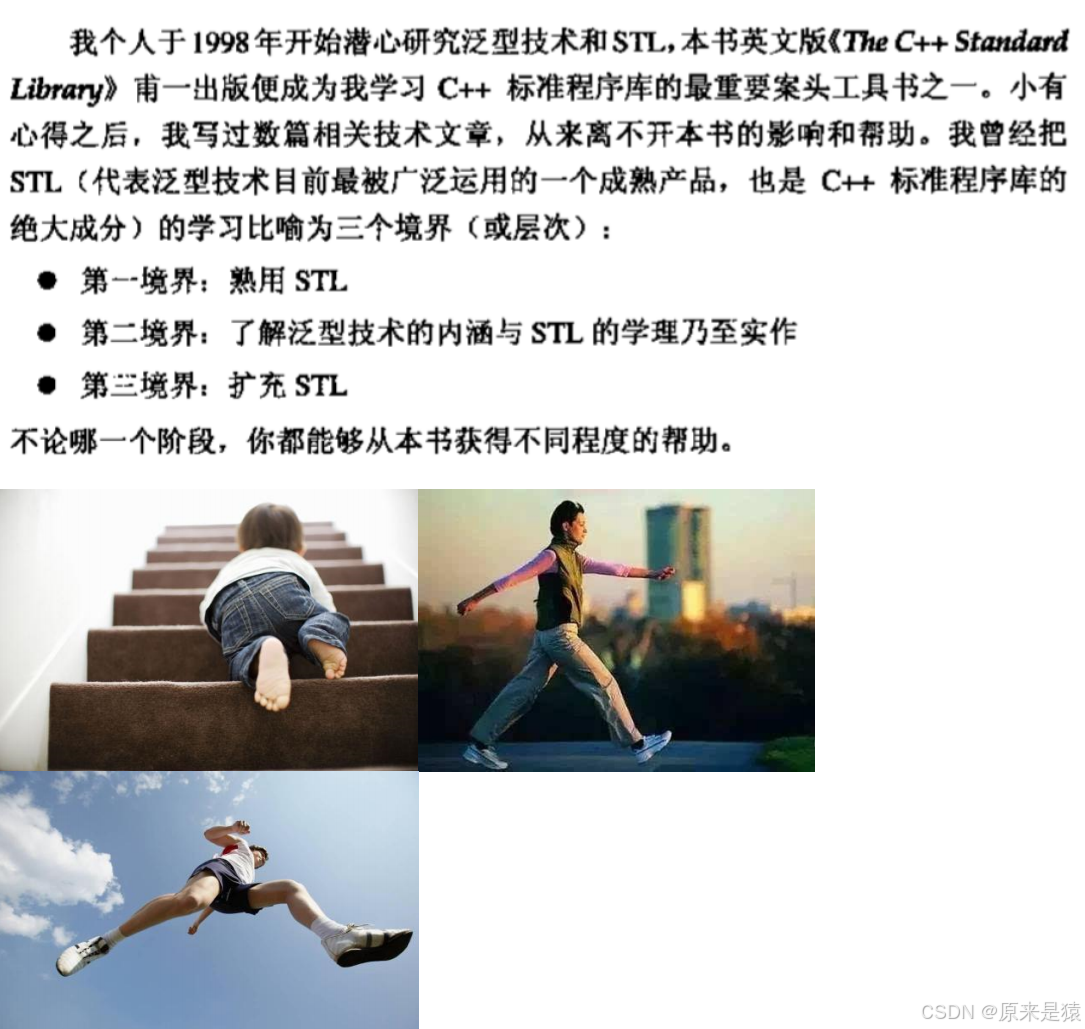
1.5 如何学习STL
学习STL的三个境界:能用,明理,能扩展
二 . 标准库中的string 类
注 :这里会比较详细的介绍string 类 , 以及文档怎样详细阅读 。记住 , 死记硬背是不可取的 , 理解并且熟悉使用才是根本 , 不懂的时候 , 可以在文档里查找。
2.1 string 类(了解)
string 类的文档介绍 :string - C++ Reference
在使用string 类时 , 必须包含 #include 头文件以及 using namespace std;
2.2 auto 和 范围 for
这里补充两个C++的小语法 , 方便我们后续的学习 。
auto 关键字

- 在早期C/C++中的auto 的含义是 : 使用auto修饰的变量 , 是具有自动存储器的局部变量 , 后来这个不重要了 。 C++11中 ,标准委员会变废为宝赋予了auto 全新的含义 即:auto 不再是一个存储类型的指示符 , 而是作为一个新的类型指示符来指示编译器 , auto 声明的变量必须又编译器在编译时期推导而得 。
- 用auto 声明指针类型时 , 用auto 和 auto* 没有任何区别 , 但用auto 声明引用类型时则必须加 &
- 当在同一行声明多个变量时 , 这些变量必须是相同类型 , 否则编译器将会报错 , 因为编译器实际只对第一个类型进行推导 。 然后用推导出来的类型定义其他变量 。
- auto 不能作为函数的参数(后面一点的语法会支持) , 可以做返回值 , 但是建议谨慎使用
- auto 不能 直接用来声明数组
#define _CRT_SECURE_NO_WARNINGS 1
#include <iostream>
using namespace std;
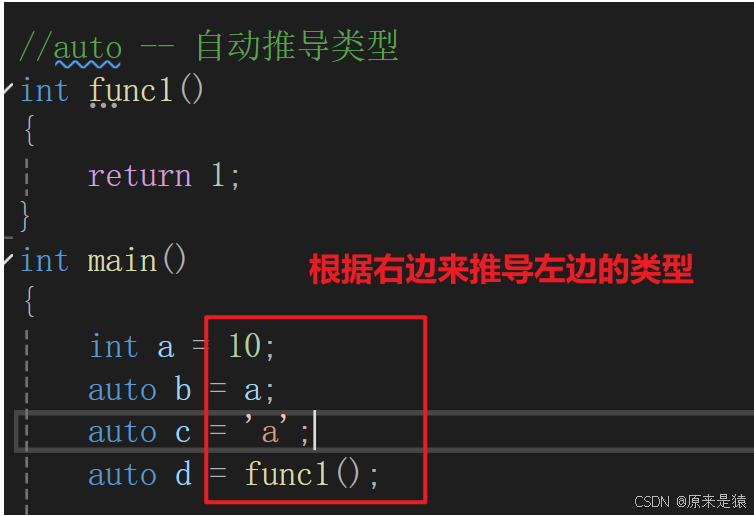
//auto -- 自动推导类型
int func1()
{
return 1;
}
int main()
{
int a = 10;
auto b = a;
auto c = 'a';
auto d = func1();
//编译报错: error C3531: “e”: 类型包含“auto”的符号必须具有初始值设定项
//auto e;
int x = 10;
auto y = &x;
//右边必须是指针
auto* z = &x;
auto& k = x;
auto aa = 1, bb = 2;
//编译报错:error C3538: 在声明符列表中,“auto”必须始终推导为同一类型
//auto cc = 1,dd = 2.0;
//编译报错:error C3318: “auto []”: 数组不能具有其中包含“auto”的元素类型
//auto a[] = { 1,2,3 };
return 0;
}
一般内置类型直接写就好了,没必要转化为 auto , 那么时候使用auto?
替代长类型

#include<iostream>
#include <string>
#include <map>
using namespace std;
int main()
{
	std::map<std::string, std::string> dict = { { "apple", "苹果" },{ "orange",
	"橙子" }, {"pear","梨"} };
	// auto的用武之地
	//std::map<std::string, std::string>::iterator it = dict.begin();
	auto it = dict.begin();
	while (it != dict.end())
	{
		cout << it->first << ":" << it->second << endl;
		++it;
	}
	return 0;
}
auto 做返回值,层层推导的时候 很不方便 ,要么就把注释写清楚 ,提高代码的可读性 ,下面代码如果想要知道 ret 是什么类型的 ,要经过 fun3 -> func2 ->func1 , 层层推导出 int , 如果代码很长 , 就不方便阅读代码
#define _CRT_SECURE_NO_WARNINGS 1
#include <iostream>
using namespace std;

//auto 做返回类型层层推导的时候,很不方便...
int func1()
{
	return 1;
}
auto func2()
{
	return func1();
}
auto func3()
{
	return func2();
}
int main()
{
	auto ret = func3();
	return 0;
}
范围 for (语法糖)
在学习中 , 会听过类似语法糖的词汇 , 就是某个语法 用起来很 “甜” , 很方便 , 玩起来很开心
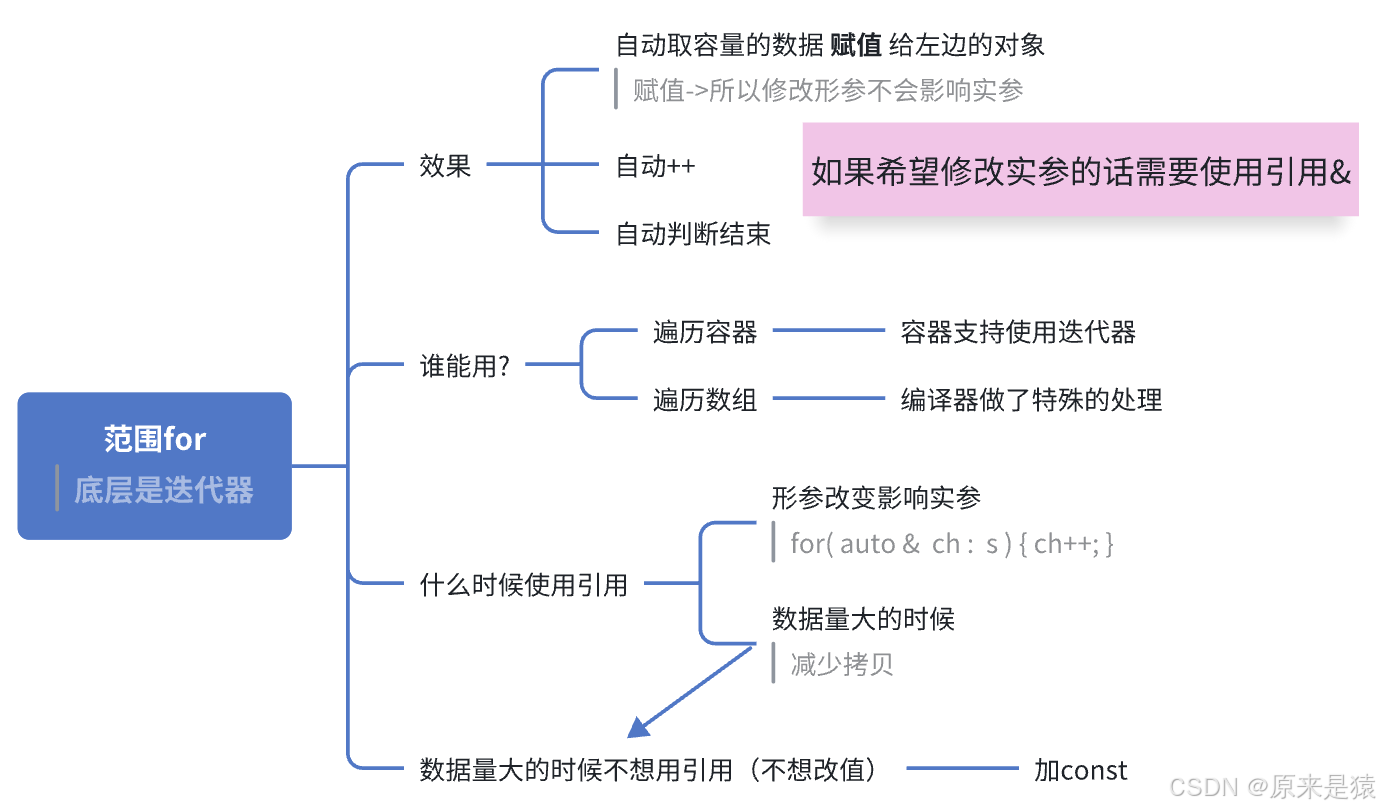
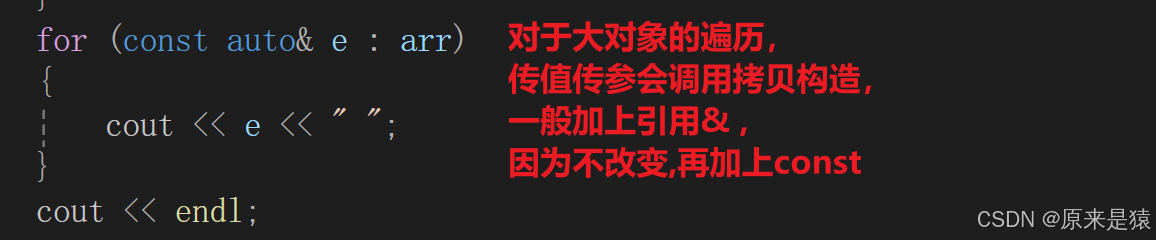
- 对于一个有范围的集合而言 , 由程序员来说明循环的范围是多余的 , 有时候还会容易错误 , 因此 C++11中引入了基于范围的 for 循环 。 for循环后的括号由冒号 " : " 分为两部分 : 第一部分是范围内用于迭代的变量 , 第二个部分则标识被迭代的范围 , 自动迭代 , 自动取数据 , 自动判断结束 。
- 范围 for 可以用作用到 数组 和 容器对象 上进行遍历
- 范围 for 的底层很简单 , 容器遍历实际就是替换为迭代器 , 这个从汇编层也可以看到。
#include<iostream>
#include <string>
#include <map>
using namespace std;
int main()
{
int array[] = { 1, 2, 3, 4, 5 };
// C++98的遍历
for (int i = 0; i < sizeof(array) / sizeof(array[0]); ++i)
{
array[i] *= 2;
}
for (int i = 0; i < sizeof(array) / sizeof(array[0]); ++i)
{
cout << array[i] << " ";
}
cout << endl;
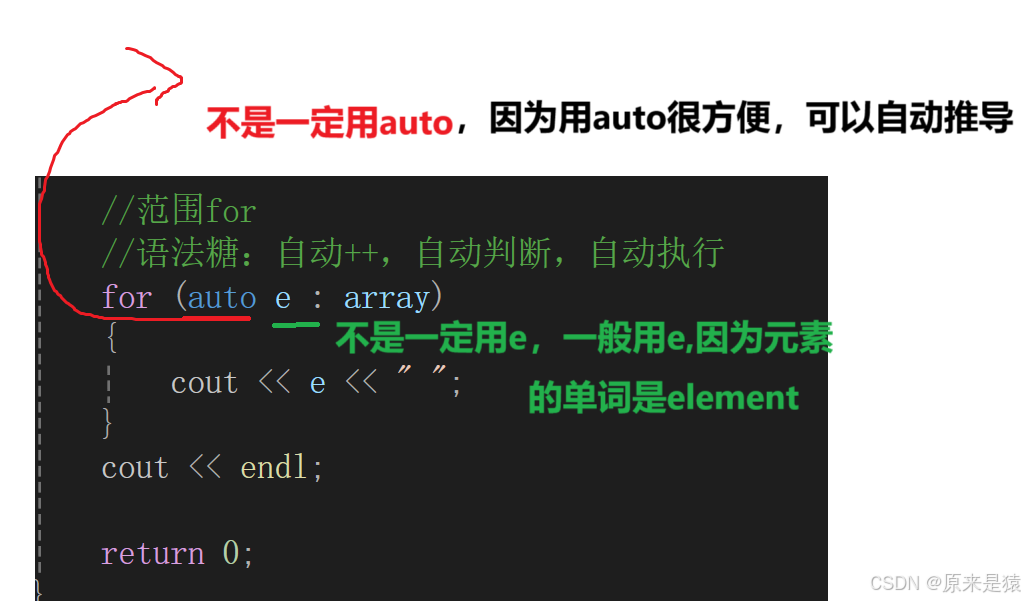
//范围for
//语法糖:自动++,自动判断,自动执行
for (auto & e : array)
{
e *= 2;
}
for (auto e : array)
{
cout << e << " ";
}
cout << endl;
return 0;
}
2.3 string 类的常用接口说明
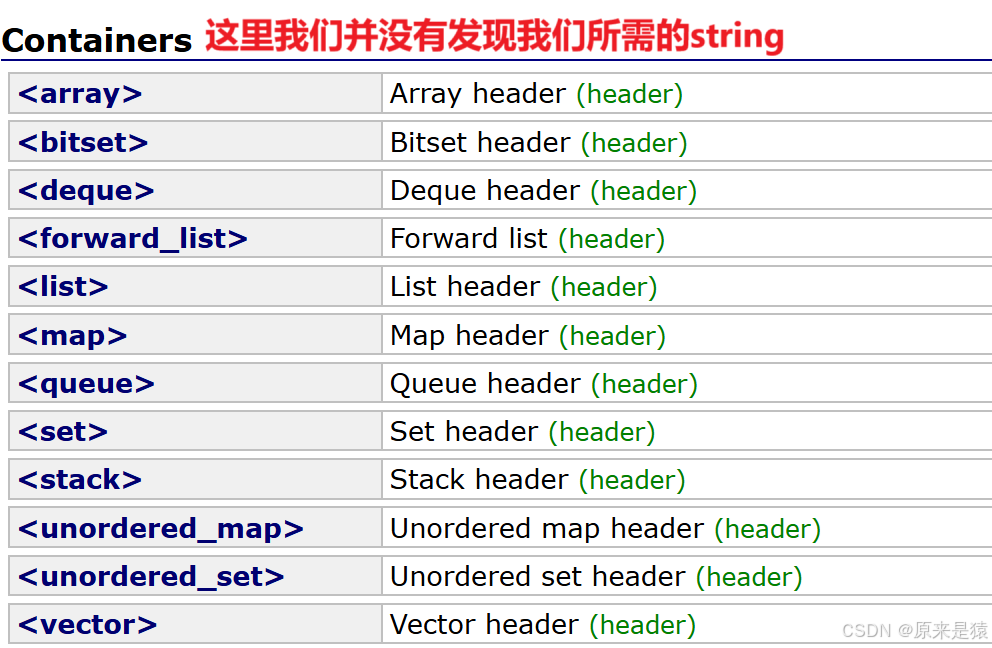
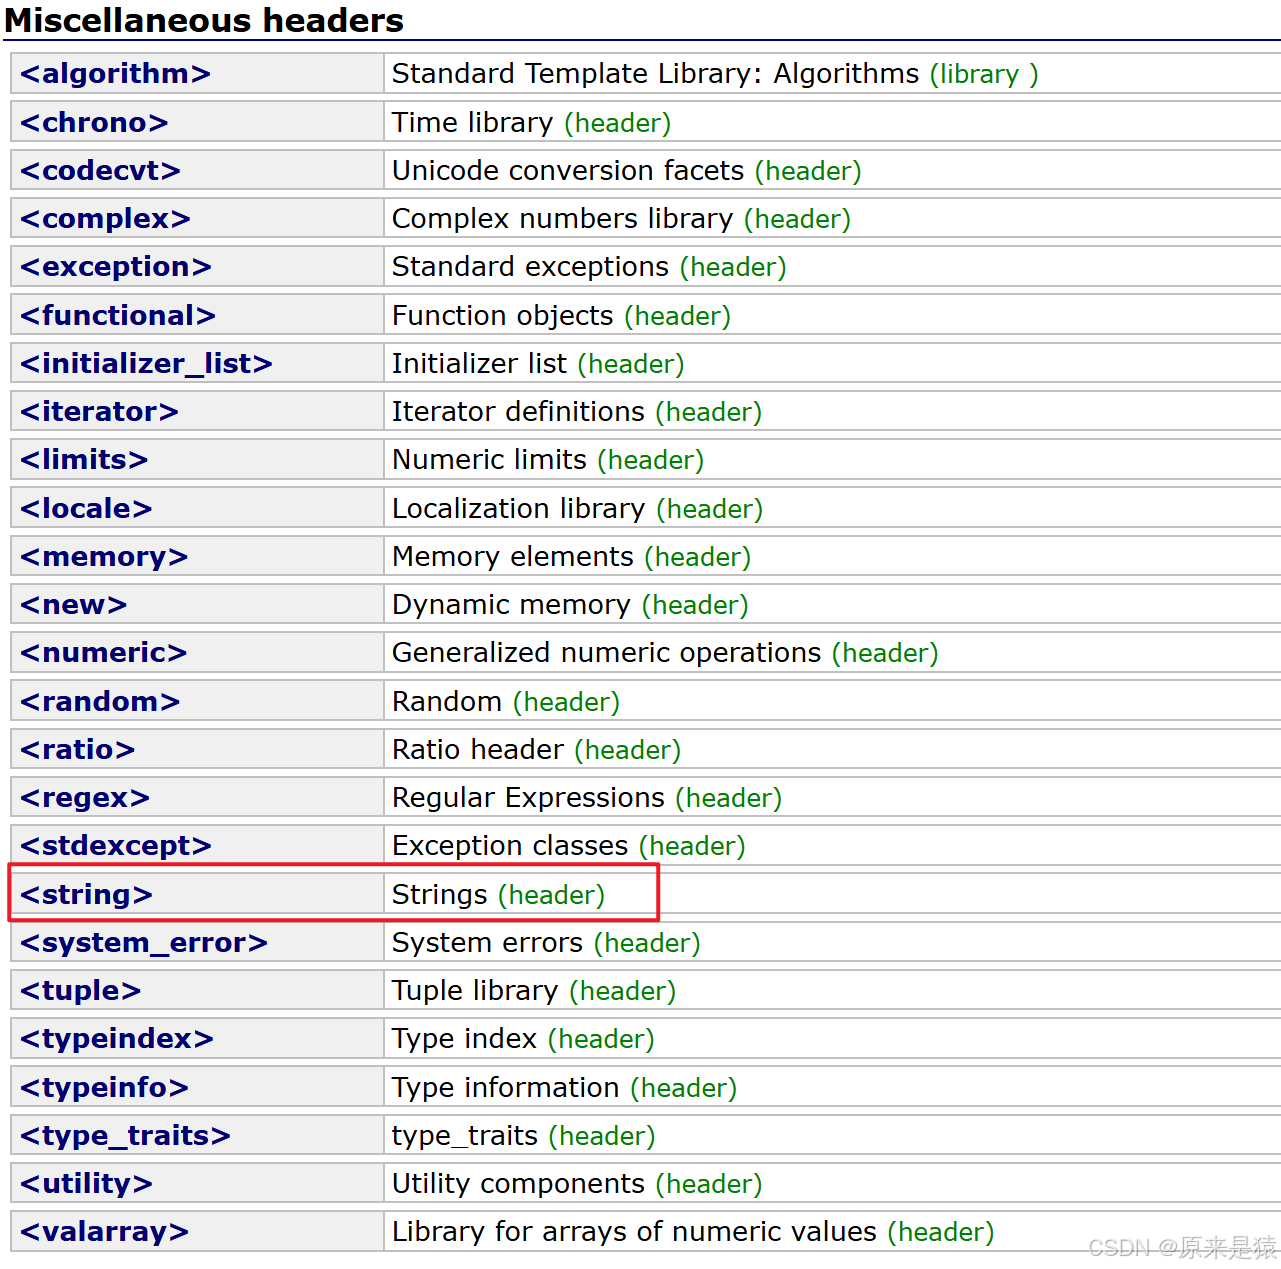
通过文档 , 我们发现string 没在containers , 这是由于历史的原因导致的 , string 出现比STL早 , 但是string 的功能角度看 , 可以把string 归纳到 containers
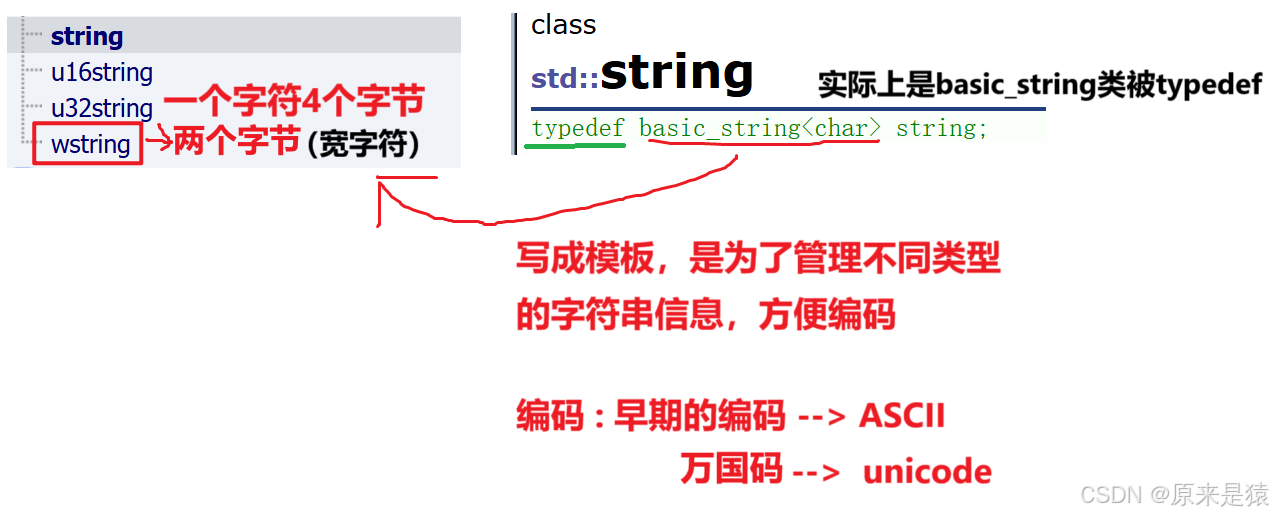
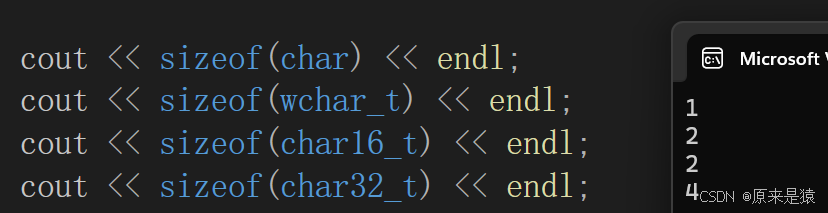
我们点开string 来看 , 发现string 实际上是basic_string 类被 typedef , 这里重点学string , 因为接口的高度相似,并且用的最多的是string , 因为string 方便存储在utf8
#define _CRT_SECURE_NO_WARNINGS 1
#include <iostream>
using namespace std;

int main()
{
	cout << sizeof(char) << endl;
	cout << sizeof(wchar_t) << endl;
	cout << sizeof(char16_t) << endl;
	cout << sizeof(char32_t) << endl;
	return 0;
}
1 . string 类对象的常见构造
string::string - C++ Reference
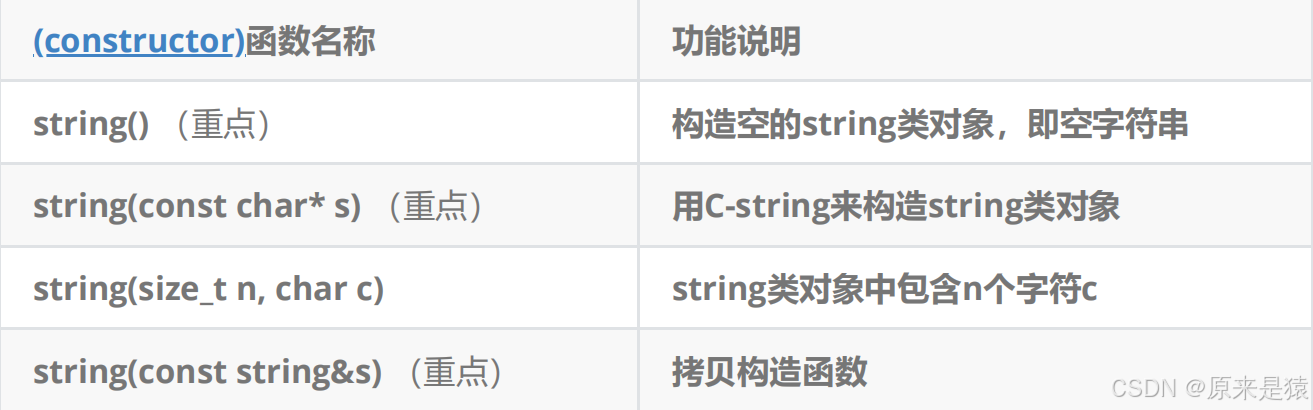

析构的话 , 底层会自动释放,自动调用
string 的构造有很多 , 需要记住是无参构造,有参构造,拷贝构造,其他的了解即可,使用时忘记随时查阅文档 , 无需刻意记忆 , 多练
2 . string类对象的容量操作
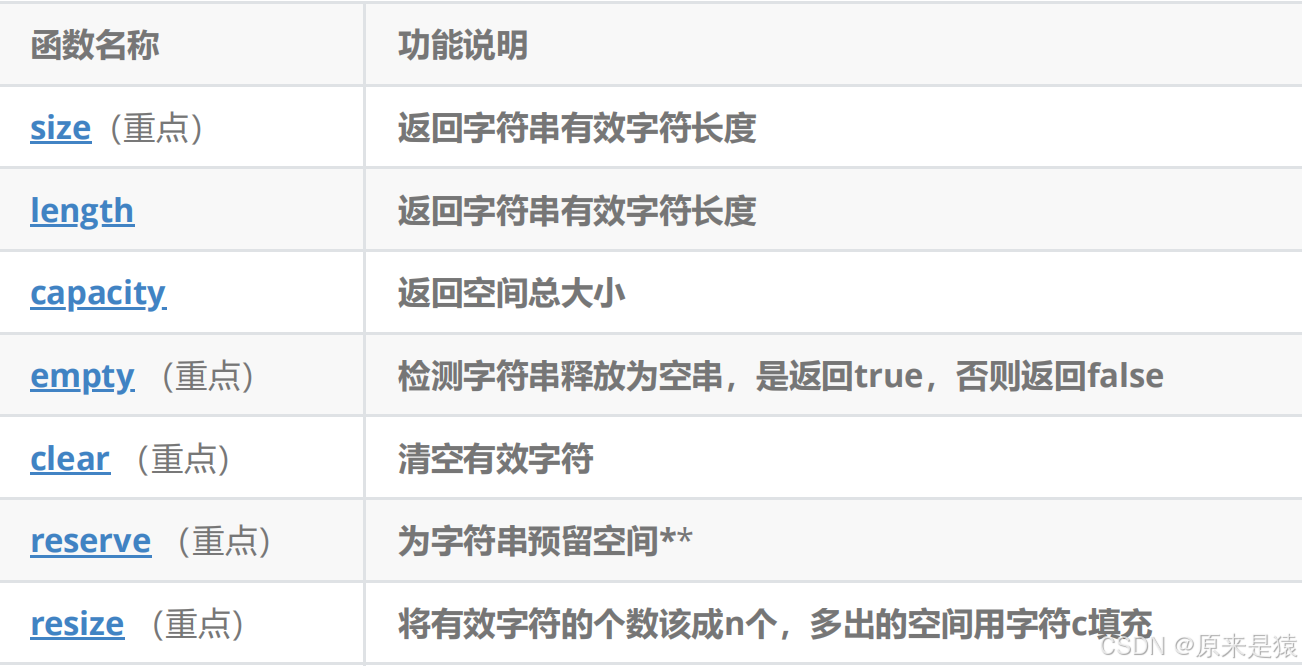
注意 :
1 . size() 与 length() : 方法底层实现原理完全相同 , 引入size()的原因 是为了与其他容器的接口保持一致 , 一般情况下基本都是用size()。
2 . max_size() : 没什么实际意义 ,因为实际中开不了这么大的空间 。
3 . clear() : 只是将string中有效字符清空 , 不改变底层空间大小
4 . capacity() : 返回容量 , 不包含'/0';

5 . shrink_to_fit :
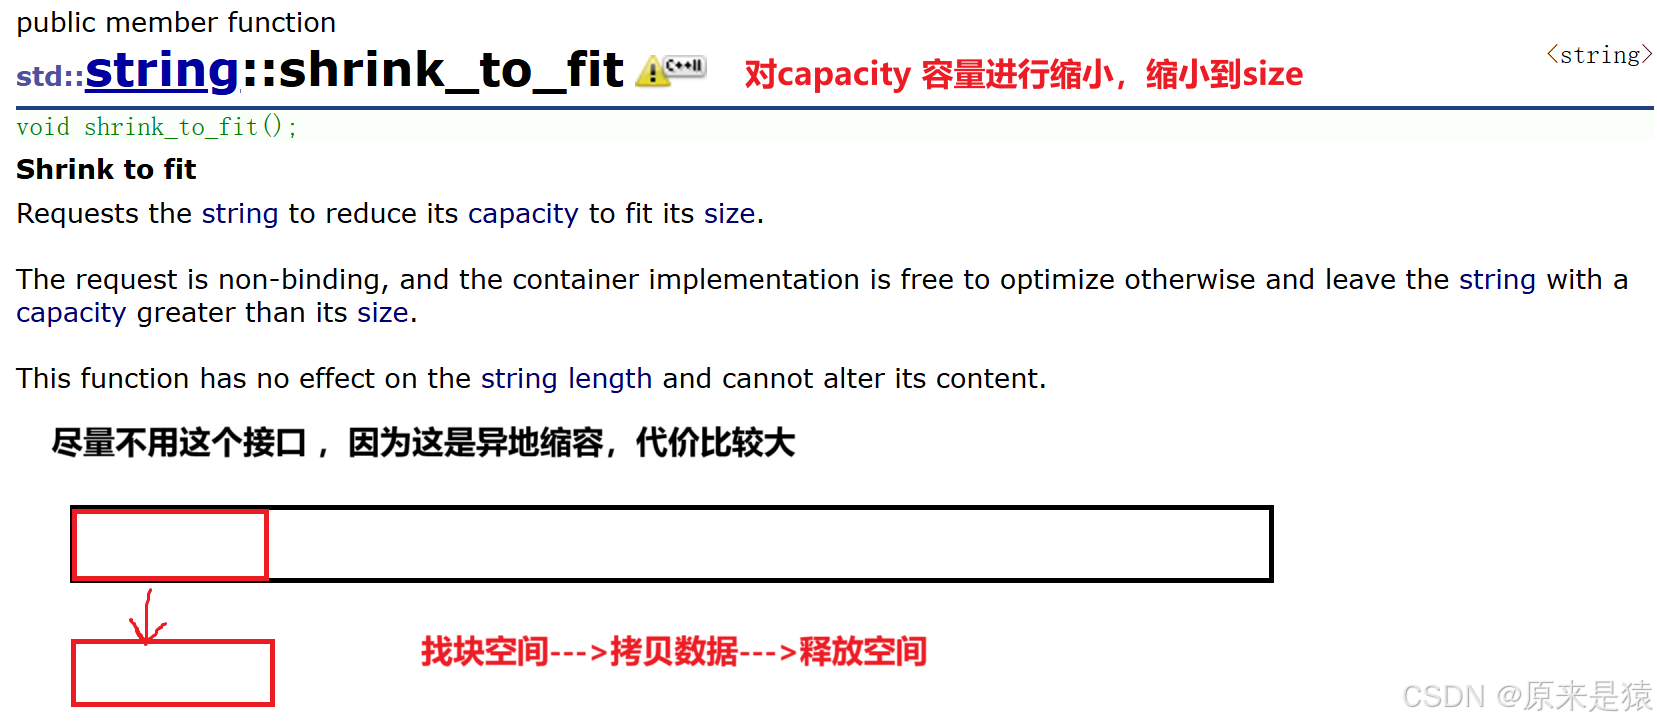
6. reserve(size_t res_arg=0) : 为string 预留空间 , 不改变有效元素个数 , 当reserve 的参数小于string 的底层空间总大小时 , reserve 不会改变容量大小 。

#define _CRT_SECURE_NO_WARNINGS 1
#include <iostream>
using namespace std;
#include <string>
void Test_String1()
{
string s("hello world!");
cout << s.size() << endl;
cout << s.capacity() << endl;
//测试reserve是否会改变string中有效元素个数
s.reserve(100);
cout << s.size() << endl;
cout << s.capacity() << endl;
//测试reserve参数小于string的底层空间大小时,是否会将空间缩小
s.reserve(5);
cout << s.size() << endl;
cout << s.capacity() << endl;
//利用reserve提高插入数据的效率,避免增容带来的开销
}
int main()
{
Test_String1();
return 0;
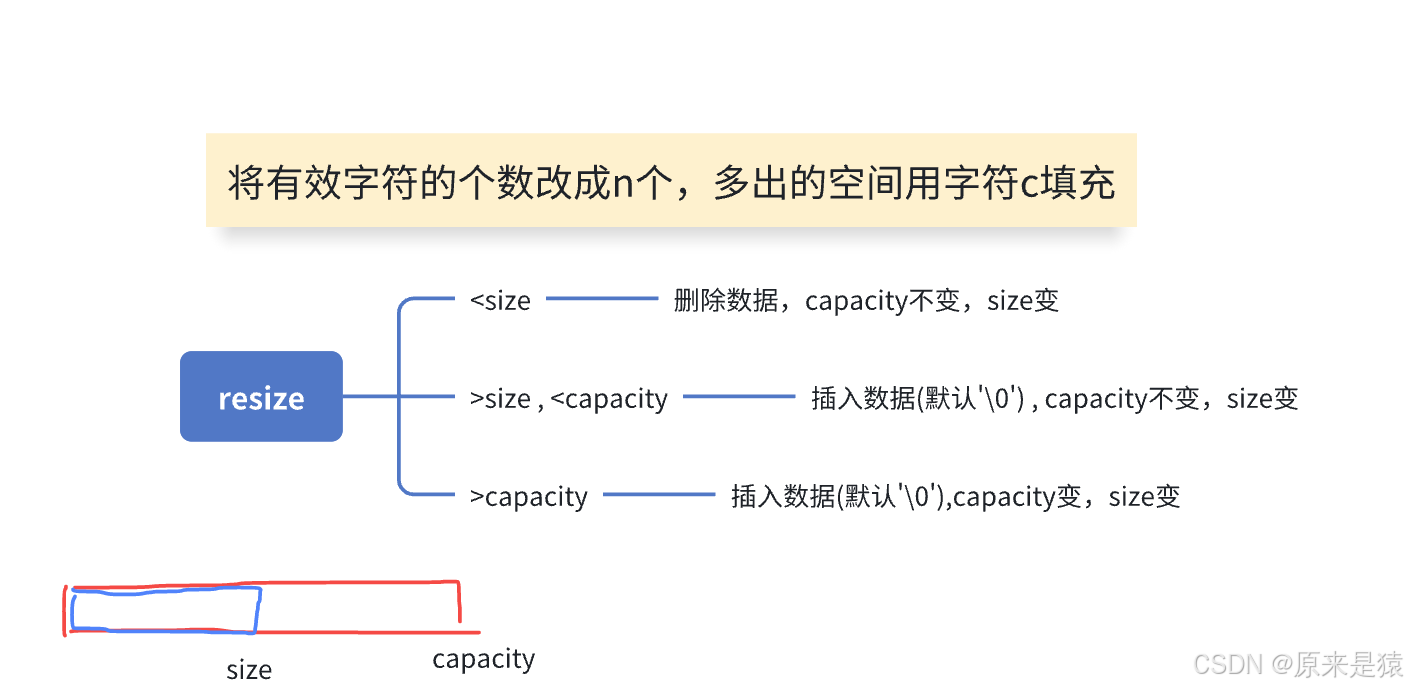
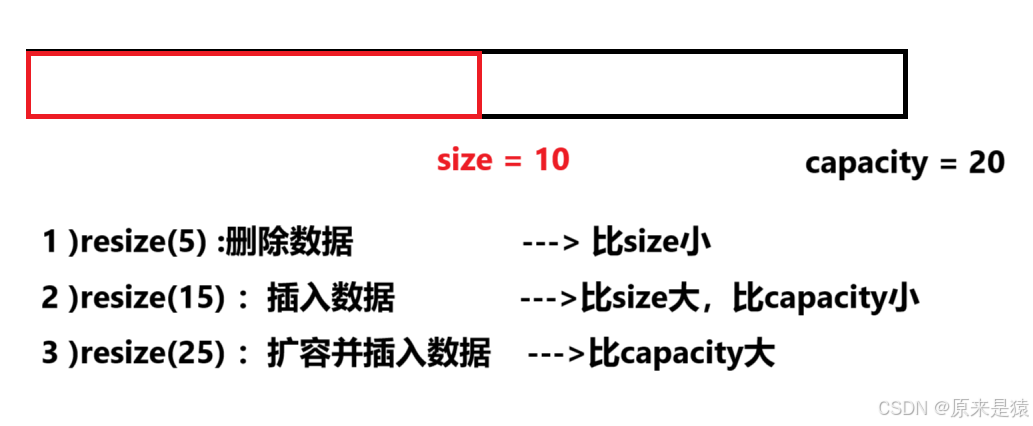
}7 . resize(size_t n ) 与 resize(size n , char c) : 都是将字符串有效字符个数改变到 n 个 , 不同的是当字符个数增多时 , resize(n) 用 0 来填充多出的元素空间 , resize(size_t n , char c)用字符 c 来填充多出的元素空间 。 注意resize在改变元素个数时 , 如果时将元素个数增多 , 可能会改变底层容量的大小 , 如果将元素个数减少 , 底层空间总大小不变 。
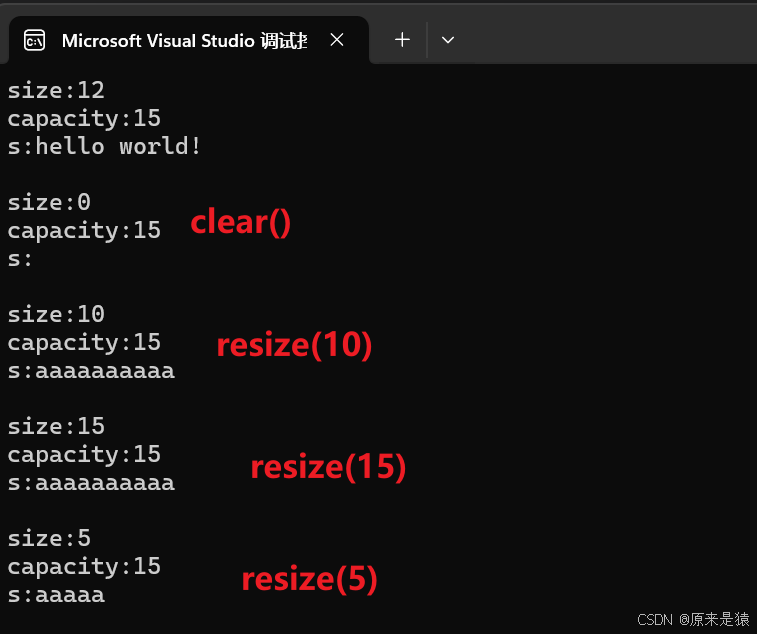
void Test_String2()
{
	string s("hello world!");
	cout << "size:"<< s.size() << endl;
	cout << "capacity:"<<s.capacity() << endl;
	cout << "s:" << s << endl;
	cout << endl;

	//将s中的字符串清空,注意清空时只是将size清0,不改变底层空间
	s.clear();
	cout << "size:" << s.size() << endl;
	cout << "capacity:" << s.capacity() << endl;
	cout << "s:" << s << endl;
	cout  << endl;

	//将s中有效字符个数增加到10个,多出位置用'a'进行填充
	s.resize(10, 'a');
	cout << "size:" << s.size() << endl;
	cout << "capacity:" << s.capacity() << endl;
	cout << "s:" << s << endl;
	cout << endl;

	//将s中有效字符个数增加到15个,多出位置用缺省值'\0'进行补充
	s.resize(15);
	cout << "size:" << s.size() << endl;
	cout << "capacity:" << s.capacity() << endl;
	cout << "s:" << s << endl;
	cout << endl;

	//将s中有效字符个数缩小到5个
	s.resize(5);
	cout << "size:" << s.size() << endl;
	cout << "capacity:" << s.capacity() << endl;
	cout << "s:" << s << endl;
	cout << endl;
}
3. string类对象的访问 及 遍历 操作
1 )string 类访问对象 : 使用 [] , 或者at
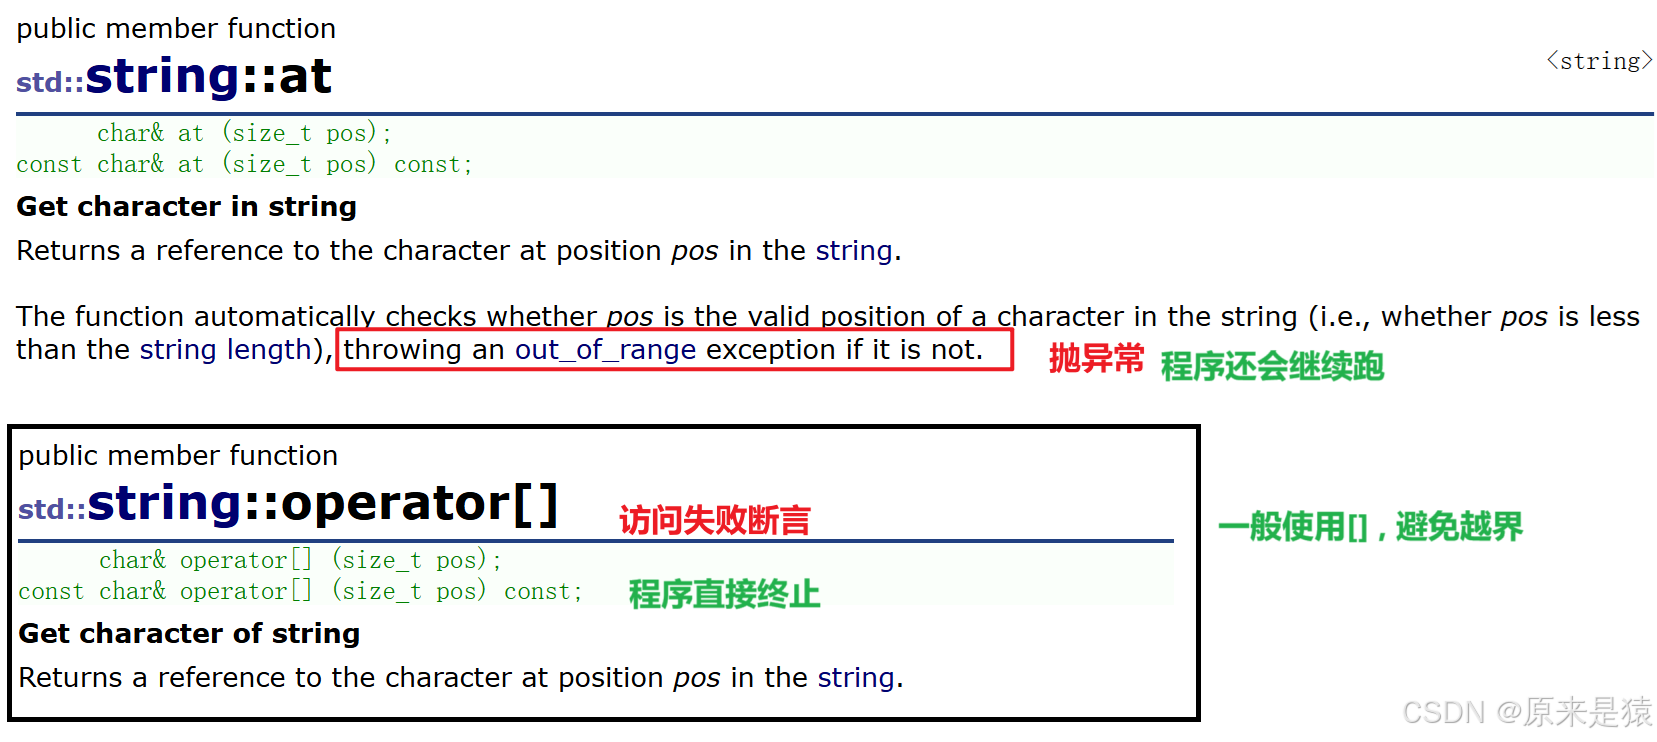
不同点就是 访问失败 的时候返回形式不同 ,at 访问失败会抛异常(程序还会继续跑,比较温和的方式) , [] 访问失败 , 断言(直接结束程序运行 , 比较暴力的方式)
2 ) 遍历string 对象的方式 :
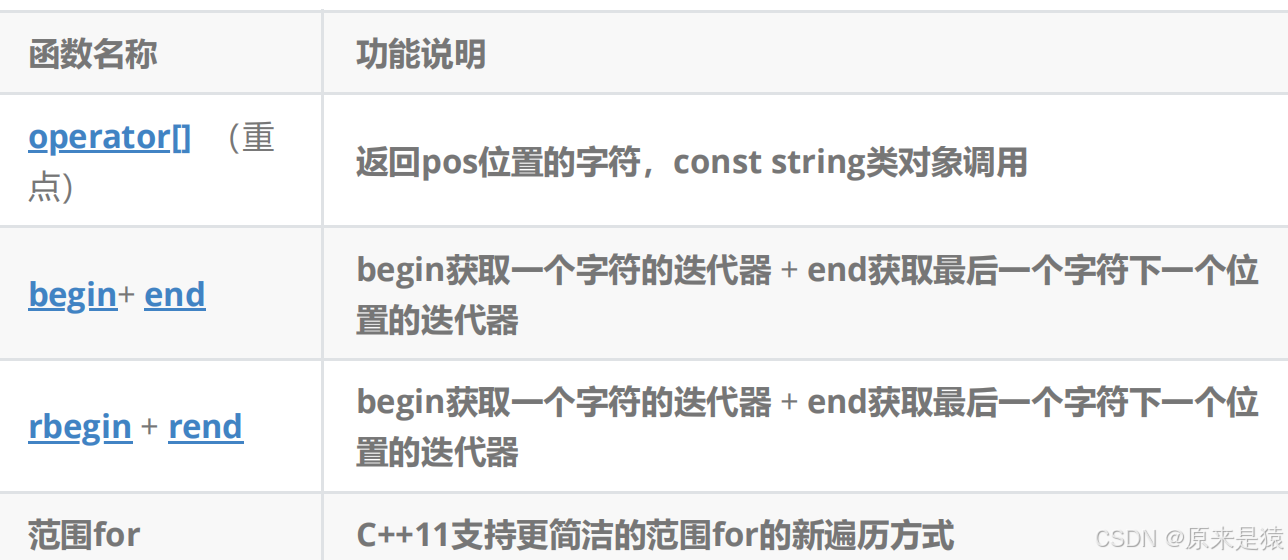
1 . 下标 + [ ] : 运算符重载operaror[]
2 . 迭代器
3 . 范围 for
先来看 下标 + [] 的遍历方式 :
#include <string>
int main()
{
//无参的构造
string st1;
//带参的构造
string st2("Hello World!");
//拷贝构造
string st3(st2);
string st4(st2, 6, 1000);
cout << st1 << endl;
cout << st2 << endl;
cout << st3 << endl;
cout << st4 << endl;
//1.下标+[]
for (size_t i = 0; i < st2.size(); i++)
{
st2[i] += 1;
}
for (size_t i = 0; i < st2.size(); i++)
{
cout << st2[i] << " ";
}
cout << endl;
return 0;
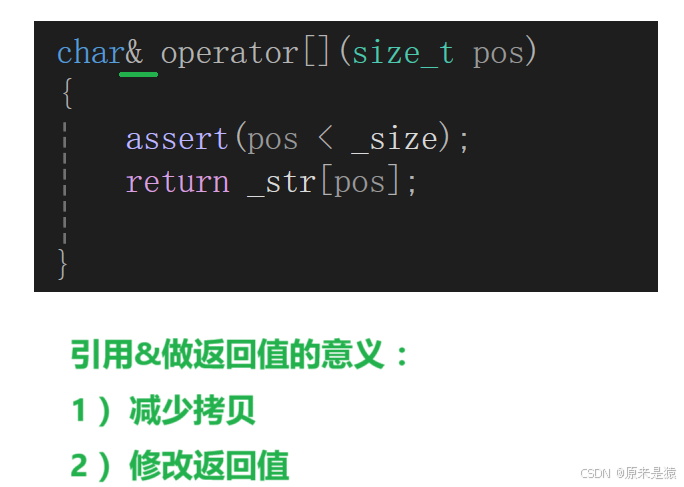
}实际上是重载了[] 运算符 , 能够使string 能像数组一样被访问 , 底层的operator[] 如下 :
namespace bit
{
	class string
	{
	public:
		char& operator[](size_t pos)
		{
			assert(pos < _size);
			return _str[pos];

		}
	private:
		char* _str;
		size_t _size;
		size_t _capacity;
	};
}
这里我们就能深刻体会到 引用&作为返回值 的意义 :
再来看 迭代器遍历 :
	//2 .迭代器
	// [ )
	string::iterator it = st2.begin();
	while (it != st2.end())
	{
		cout << *it << " ";
		++it;
	}
	cout << endl;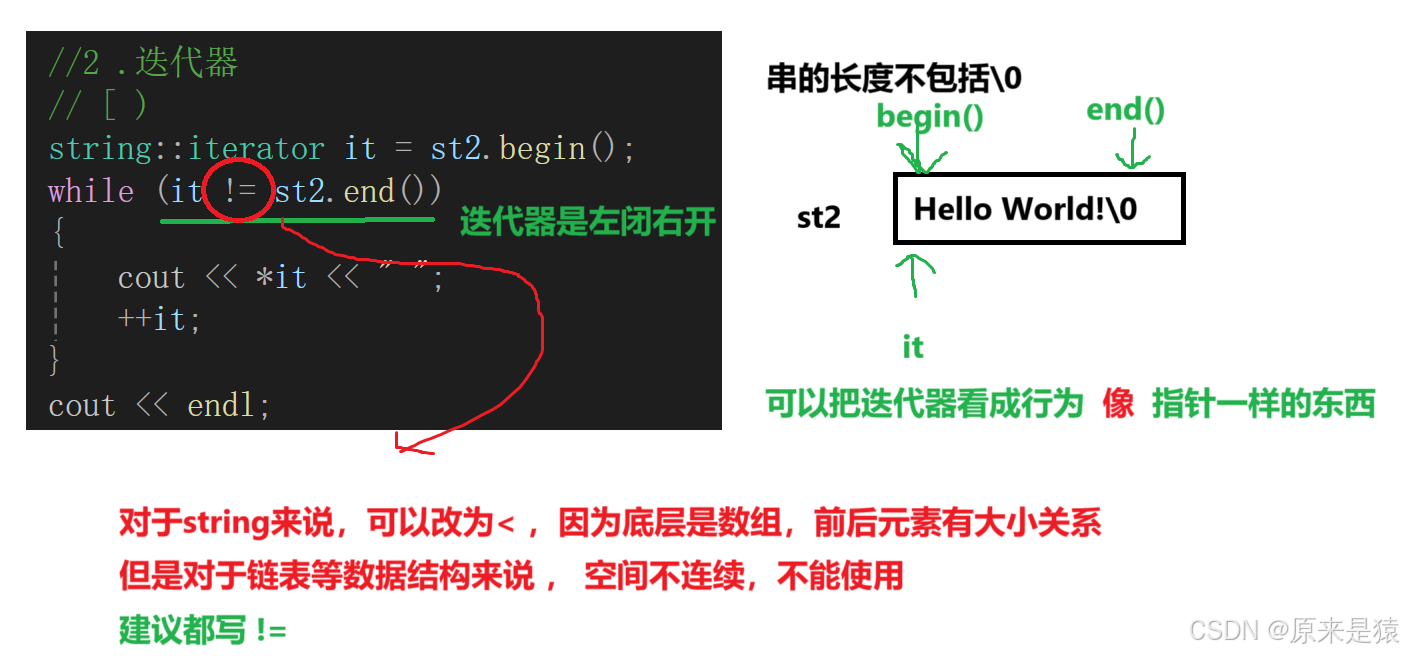
思考 : 为什么有了 下标 + [] 的遍历方式还需要有 迭代器 呢 ? 前者明明用到更顺。
因为下标 + [] 限制底层必须是数组,像链表就被限制了 , 但迭代器是通用的!
倒着遍历 : 反向迭代器(链表不一定有反向迭代器)
	string::reverse_iterator rit = st2.rbegin();
	while (rit != st2.rend())
	{
		cout << *rit << endl;
		++rit;
	}
	cout << endl;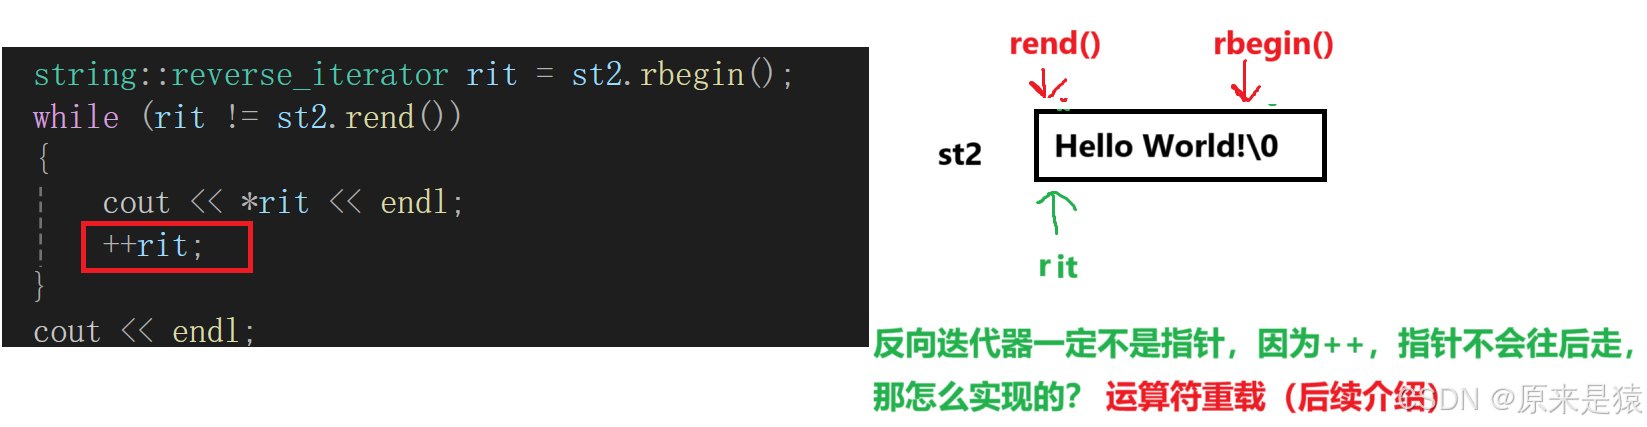
迭代器有四种 :
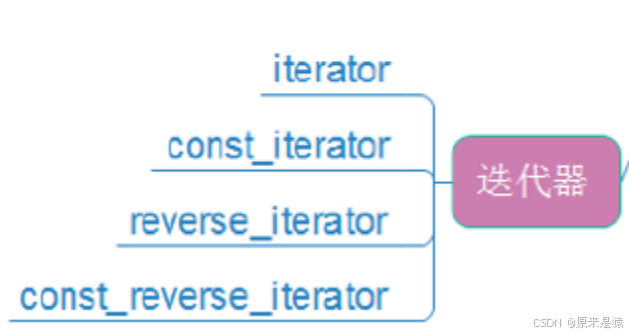
范围for 遍历 :
	//范围for -- 底层是迭代器
	for (auto ch : st2)
	{
		cout << ch << " ";
	}
	cout << endl;
编译器编译 范围for 的时候 , 替换为迭代器 。
所以从上层看有三种遍历方式:下标+[] , 迭代器,返回for , 底层就只有两种遍方式 : 下标+[] 和迭代器!
4. string类对象的修改操作
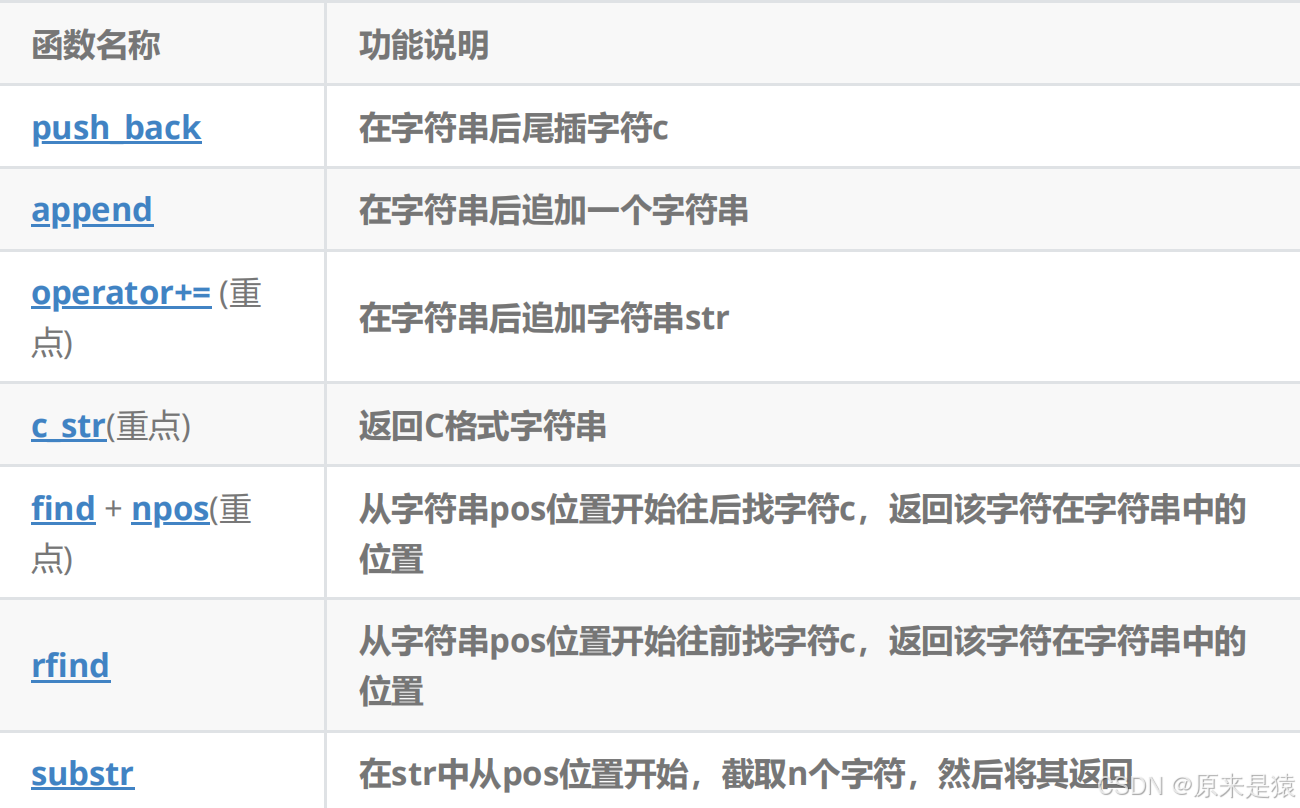
1 ) push_back() / append() / opeartor+=() 都是在 字符串后追加 (尾插)
#define _CRT_SECURE_NO_WARNINGS 1
#include <iostream>
using namespace std;

#include <string>
void Test_string1()
{
	string s1;
	cout << s1.max_size() << endl;
}
void Test_string2()
{
	string s1;
	string s2("hello world");

	cout << s2.size() << endl;
	cout << s2.capacity() << endl;
}
void Test_string3()
{
	string s1;
	s1.push_back('x');
	s1.push_back('x');
	s1.push_back('x');

	s1.append("yyy");

	string s2("hello world");
	s1.append(s2.begin(), s2.end());
	//迭代区间可以取字符串的一部分
	s1.append(s2.begin() + 6, s2.end());
	cout << s1 << endl;

	//实际上,push_back与append不常用,+=最常用
	//类似c的 strcat , 1)从字符串开始找到'\0'后再追加
	//2)不会对原始空间扩容,追加会比较容易越界
	s1 += ' ';
	s1 += "zzz";
	s1 += s2;
	cout << s1 << endl;

}

int main()
{
	//Test_string1();
	//Test_string2();
	Test_string3();
	return 0;
}
2) insert 从某个位置开始插入 : 谨慎使用,头插数据时候 , 后面的数据需要全部往后挪
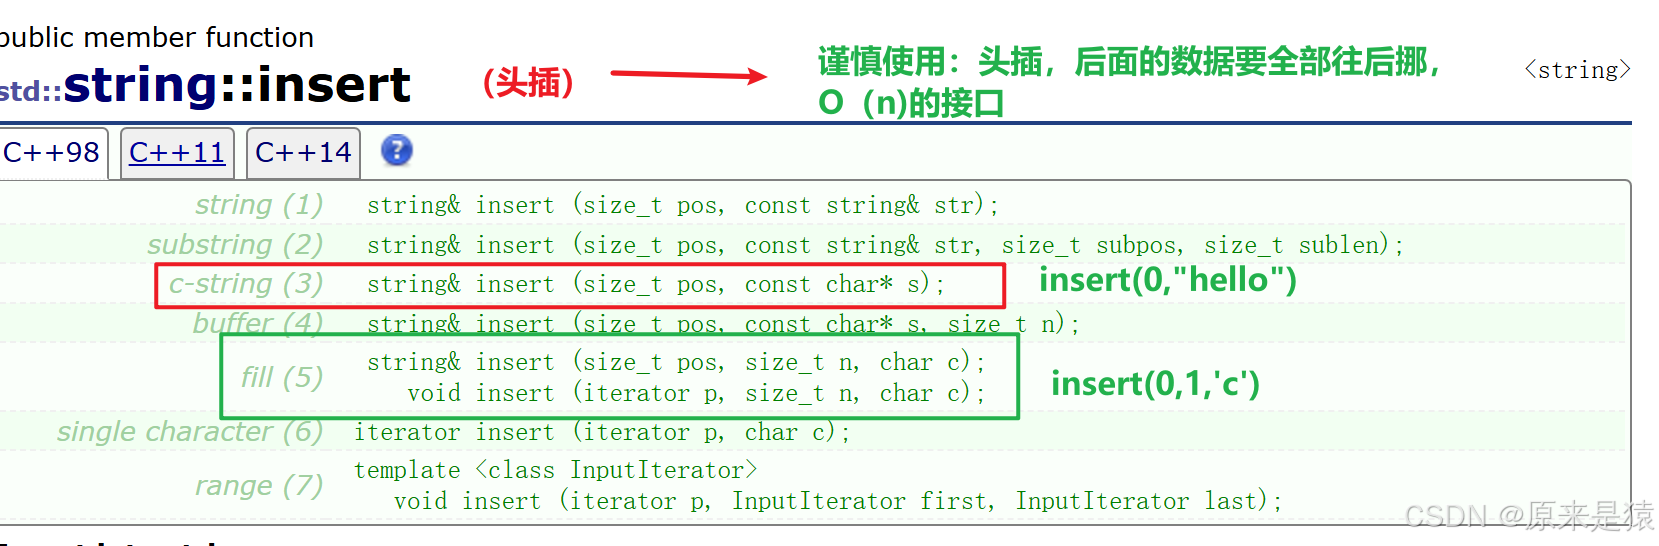
void Test_String3()
{
	string s("hello world!");
	s.insert(0, "xxx,");
	cout << "s:" << s << endl;

	s.insert(0, 1, 'a');
	cout << "s:" << s << endl;

}
注意 :
1 . 在string 尾部追加字符时 , s.push_back(c) / s.append(1,c) /s+='c‘三种的实现方式差不多,一般情况下string类的+=操作用的比较多 , +=操作不仅可以连接单个字符 , 还可以连接字符串 。
2 . 对string 操作时 , 如果能够预估到放多少个字符 , 可以先通过 reserve 把空间预留好 。
3 ) erase: 删除数据
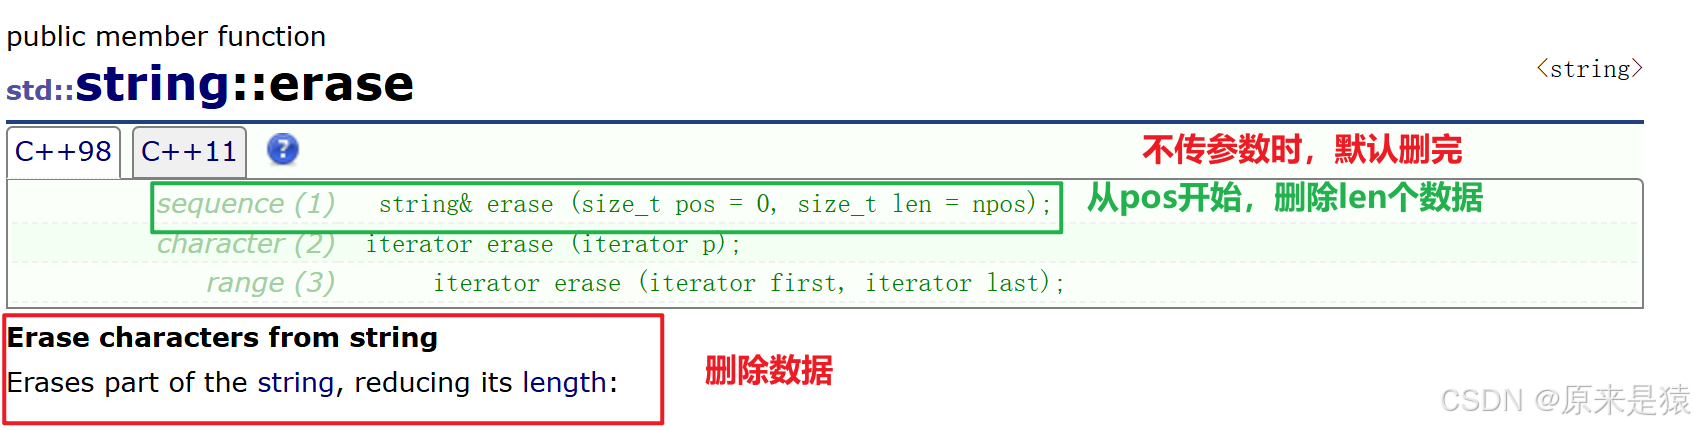
void Test_String4()
{
string s("hello world!");
//从第0个位置,删除一个字符
s.erase(0, 1);
cout << "s:" << s << endl;
//头删一个数据
s.erase(s.begin());
cout << "s:" << s << endl;
//不传参数时,默认从头开始,删完
s.erase();
cout << "s:" << s << endl;
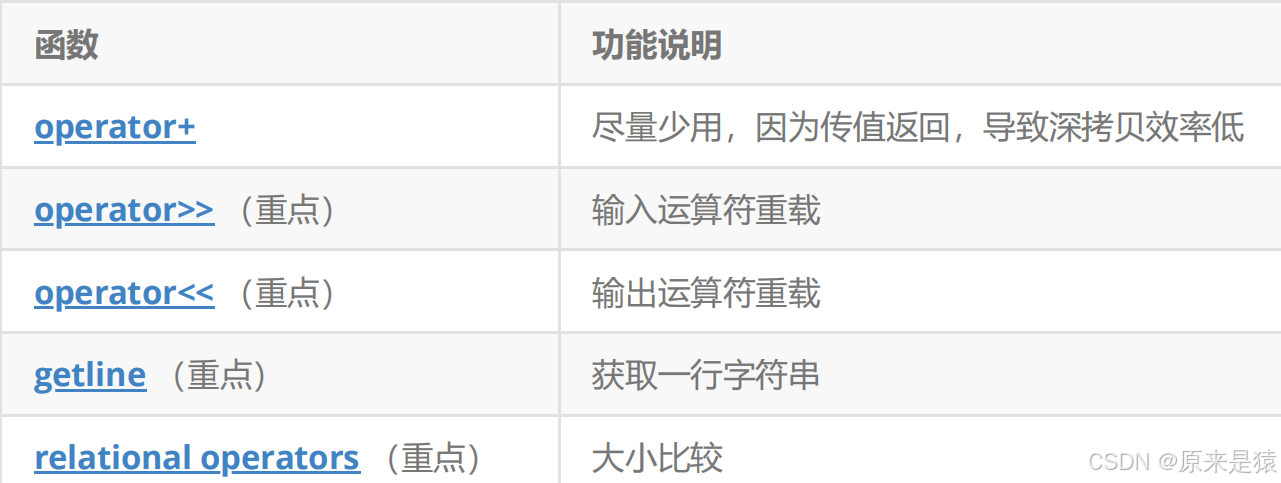
}5. string类非成员函数