本章用于介绍如何创建Book List Page。
TBD
1. 汇总
ABP-Book Store Application中文讲解-汇总-CSDN博客
2. 前一章
ABP-Book Store Application中文讲解 - Part 1: Creating the Server Side
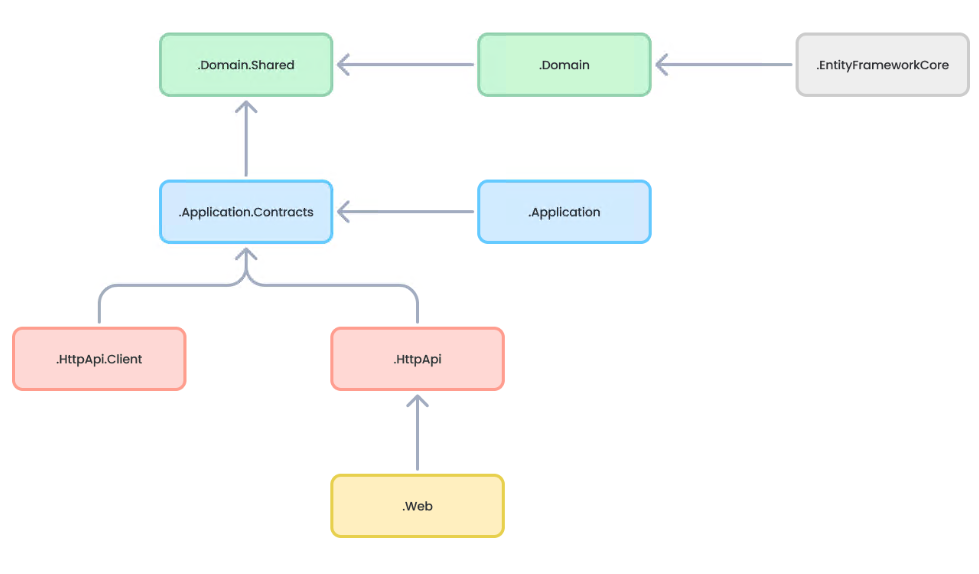
项目之间的引用关系。
目录
5. Angular推荐使用全独立模式避免NgModule的干扰
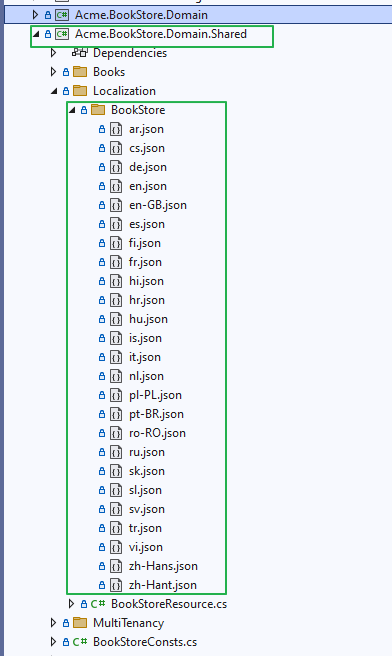
1. 多语言配置
在开始做UI的开发前,我们需要对UI端的一些信息做多语言处理。Localization\BookStore里面有很多json文件。
zh-Hans.json简体中文
zh-Hant.json繁体中文
en.json English
此处根据自己需要自行添加。不用的语言可以自行删除。
需要注意的是要保证你所更改的json文件里面的key一一对应。
1.1 zh-Hans.json
{
  "culture": "zh-Hans",
  "texts": {
    "AppName": "BookStore",
    "Menu:Home": "首页",
    "Welcome": "欢迎",
    "LongWelcomeMessage": "欢迎使用本应用程序。这是一个基于 ABP 框架的启动项目。更多信息,请访问 abp.io。",
    // 以下内容是新增内容
    "Menu:BookStore": "Book Store",
    "Menu:Books": "Books",
    "Actions": "操作",
    "Close": "关闭",
    "Delete": "删除",
    "Edit": "编辑",
    "PublishDate": "发布日期",
    "NewBook": "新增书",
    "Name": "名字",
    "Type": "类型",
    "Price": "价格",
    "CreationTime": "新建日期",
    "AreYouSure": "你确定吗?",
    "AreYouSureToDelete": "你确定你要删除此条目吗?",
    "Enum:BookType.0": "未定义",
    "Enum:BookType.1": "冒险",
    "Enum:BookType.2": "传记",
    "Enum:BookType.3": "反乌托邦",
    "Enum:BookType.4": "奇幻",
    "Enum:BookType.5": "恐怖",
    "Enum:BookType.6": "科学",
    "Enum:BookType.7": "科幻",
    "Enum:BookType.8": "诗歌"
  }
}
1.2 en.json
{
  "Culture": "en",
  "Texts": {
    "Menu:Home": "Home",
    "Welcome": "Welcome",
    "LongWelcomeMessage": "Welcome to the application. This is a startup project based on the ABP. For more information, visit abp.io.",
    // 以下内容是新增内容
    "Menu:BookStore": "Book Store",
    "Menu:Books": "Books",
    "Actions": "Actions",
    "Close": "Close",
    "Delete": "Delete",
    "Edit": "Edit",
    "PublishDate": "Publish date",
    "NewBook": "New book",
    "Name": "Name",
    "Type": "Type",
    "Price": "Price",
    "CreationTime": "Creation time",
    "AreYouSure": "Are you sure?",
    "AreYouSureToDelete": "Are you sure you want to delete this item?",
    "Enum:BookType.0": "Undefined",
    "Enum:BookType.1": "Adventure",
    "Enum:BookType.2": "Biography",
    "Enum:BookType.3": "Dystopia",
    "Enum:BookType.4": "Fantastic",
    "Enum:BookType.5": "Horror",
    "Enum:BookType.6": "Science",
    "Enum:BookType.7": "Science fiction",
    "Enum:BookType.8": "Poetry"
  }
}
2. 添加proxy
2.1 前置条件
打开cmd.exe,输入ng --version查看是否安装了@angular/cli,如果没安装,可通过以下命令安装。
npm install -g @angular/cli利用abp的命令自动生成proxy。此时有个前置条件是abp的命令只能调用dotnet tool下的API启动方式,无法调用基于IIS Express启动下的API。
即需要将Acme.BookStore.HttpApi.Host启动模式选择Acme.BookStore.HttpApi.Host
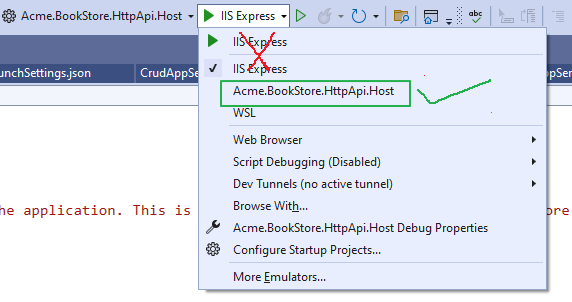
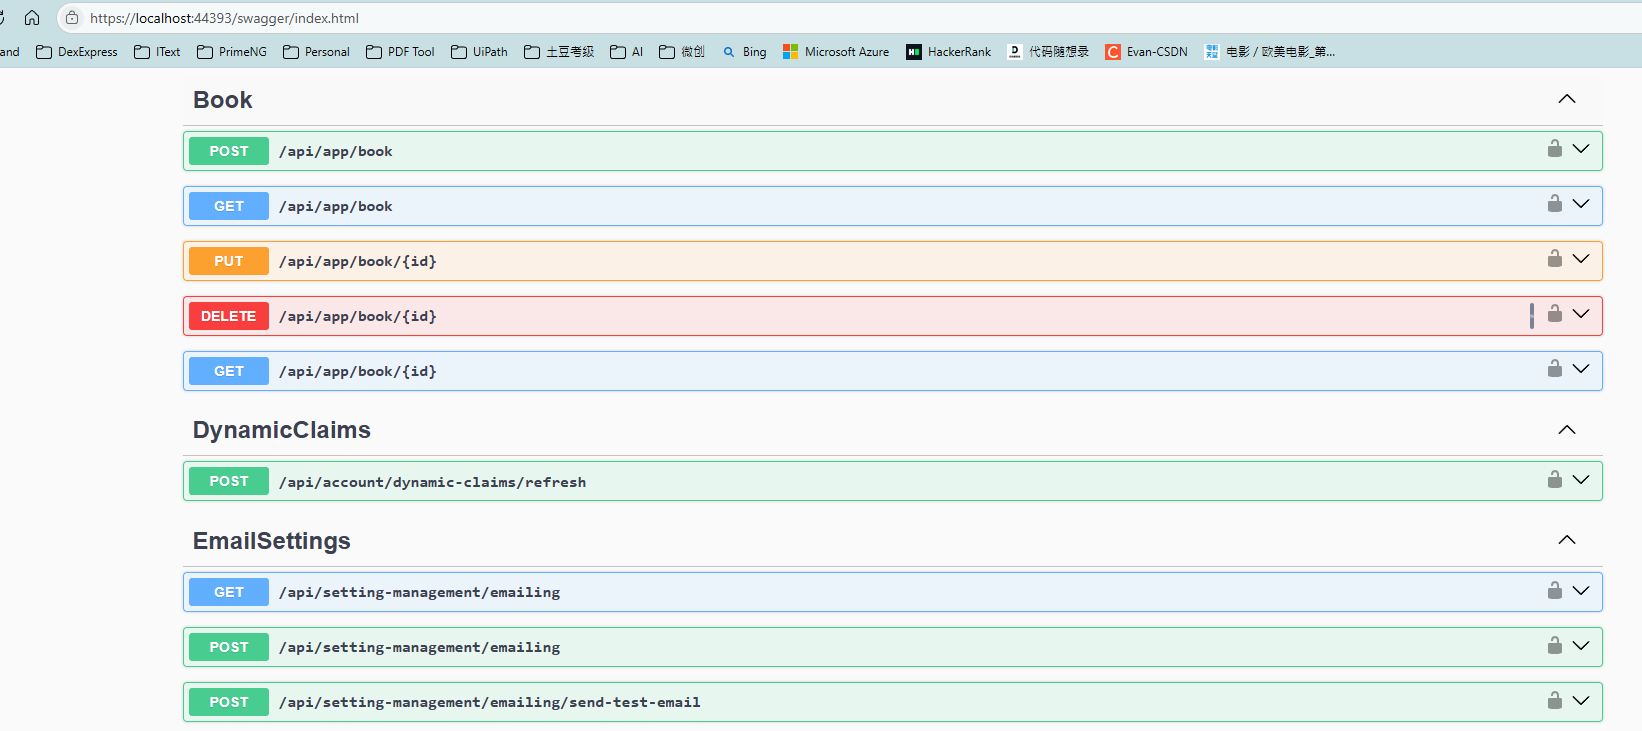
设置好后,点击F5启动程序。
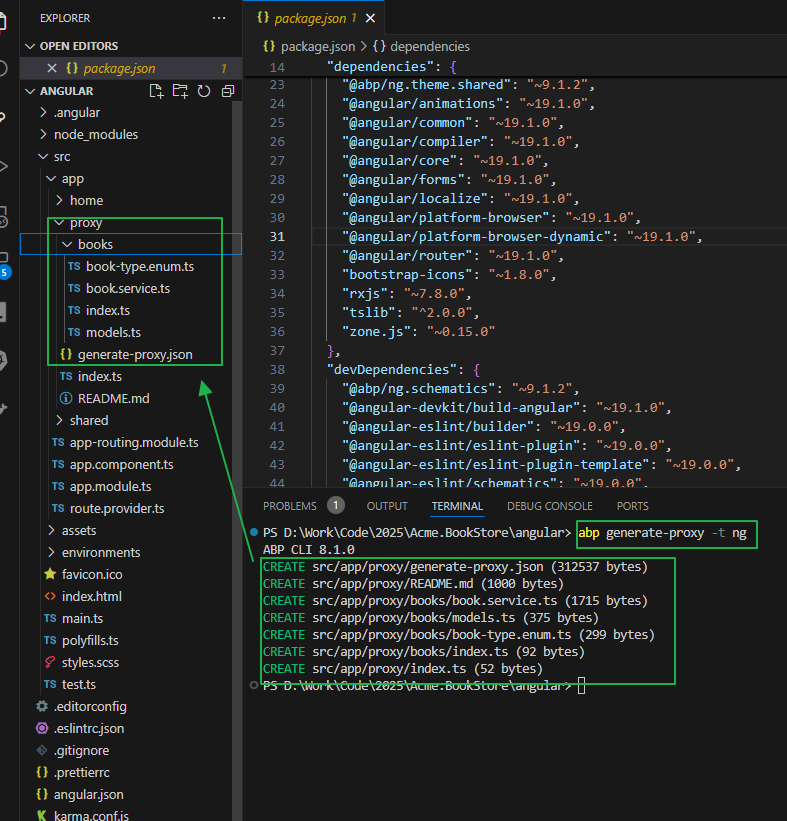
2.2 利用abp自动生成angular端的service
vs code 打开angular目录,ctrl+`打开Terminal window, 然后输入一下命令敲回车。
3. 创建Books页面
此处UI组件用的是Ng Bootstrap, datatable组件用的是Ngx-Datatable.或者你可以使用PrimeNG - Angular UI Component Library
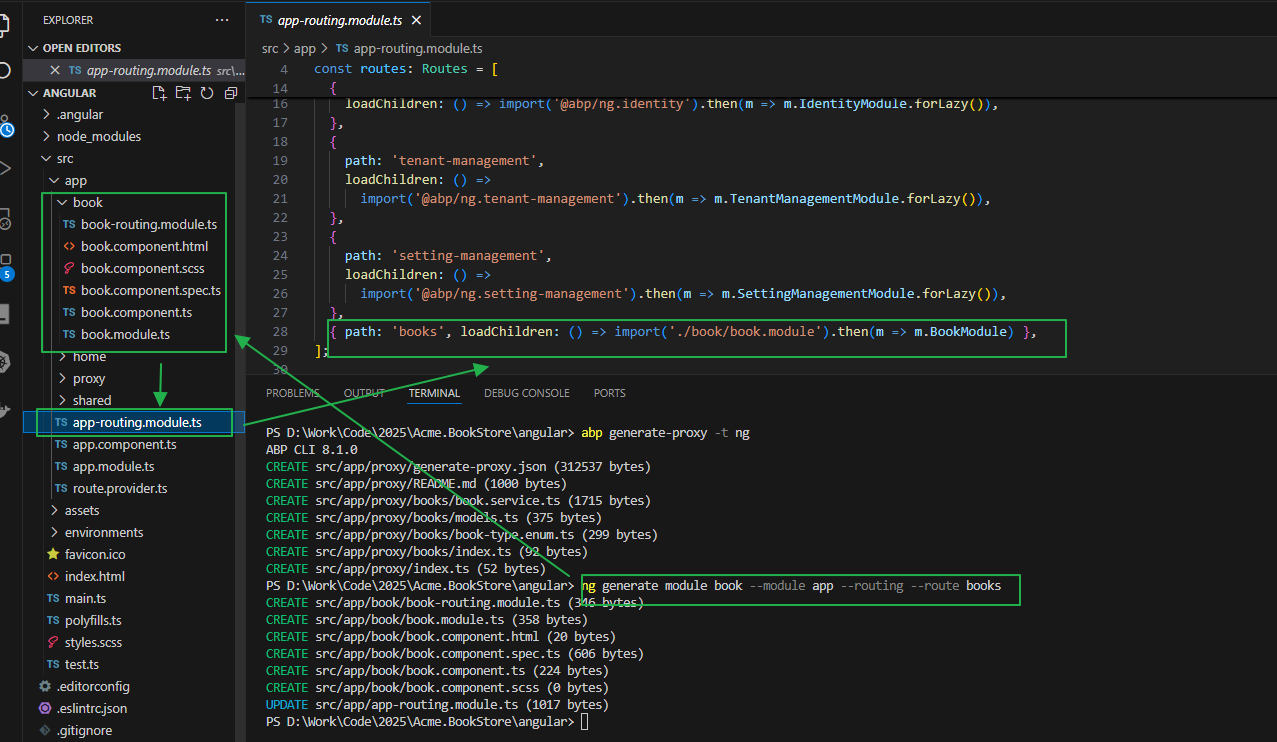
3.1 利用ng generate生成页面组件
此处利用ng命令去自动生成相关的ts文件。
ng generate module book --module app --routing --route books以上代码创建book module和routing并指定route是books,并自动创建book相关的component,module和router,router会被自动添加到app-routing.module.ts中。
如果是你手动创建的component或者module,需要自己手动添加到app-routing.module.ts中。
loadChildren: () => import('./book/book.module').then(m => m.BookModule)这种方式是lazy-load的方式,只有在用户点击对应的页面的时候才会加载对应页面的js、css、html等。
3.2 在route.provider.ts中配置菜单
打开src/app/route.provider.ts,添加book-store 和books.
RoutesService是ABP用于配置主菜单和路径的,不是angualr原生。
path访问此页面的URLname本地化菜单名字(localization document ).如果你不需要本地化,直接写死也可以的iconClass菜单图标 (你可以从Font Awesome 上面找到你需要的icons).order菜单的顺序.layoutBooksModule's routes布局方式 (提供了三种布局方式:eLayoutType.application,eLayoutType.accountoreLayoutType.empty).后面我会单独针对ABP的前端UI-Angular UI写一系列的文章ABP User Interface-Angular UI中文详解-CSDN博客。
import { RoutesService, eLayoutType } from '@abp/ng.core';
import { APP_INITIALIZER } from '@angular/core';

export const APP_ROUTE_PROVIDER = [
  { provide: APP_INITIALIZER, useFactory: configureRoutes, deps: [RoutesService], multi: true },
];

function configureRoutes(routesService: RoutesService) {
  return () => {
    routesService.add([
      {
        path: '/',
        name: '::Menu:Home',
        iconClass: 'fas fa-home',
        order: 1,
        layout: eLayoutType.application,
      },
      {
        path: '/book-store',
        name: '::Menu:BookStore',
        iconClass: 'fas fa-book',
        order: 2,
        layout: eLayoutType.application,
      },
      {
        path: '/books',
        name: '::Menu:Books',
        // iconClass: 'fas fa-user',
        parentName: '::Menu:BookStore',
        order: 3,
        layout: eLayoutType.application,
      }
    ]);
  };
}
3.2 添加页面内容到BookComponent
添加页面内容。
导入并注册BookService和ListService.
BookService是利用ng generate-proxy生成的服务
ListService是ABP团队创建的,提供了分页、排序和查询。ListService不是注册在root级别,他是component级别的,即component销毁后,当前页面的ListService会同步销毁。
具体可以在Working with Lists | ABP.IO Documentation中找到,后序我会在ABP User Interface-Angular UI中文详解-CSDN博客提供中文版本的使用说明。
3.2.1 book.component.ts
3.2.1.1 非standalone模式
import { Component, OnInit } from '@angular/core';
import { ListService, PagedResultDto } from '@abp/ng.core';  // Import ListService and PagedResultDto
import { BookService, BookDto } from '../proxy/books';  // Import your BookService and BookDto model
import { SharedModule } from '../shared/shared.module';

@Component({
  selector: 'app-book',
  templateUrl: './book.component.html',
  styleUrl: './book.component.scss',
  standalone: false, // 标记为独立组件
  // imports: [SharedModule], // 导入需要的模块
  providers: [ListService]  // Provide ListService for this component
})
export class BookComponent implements OnInit {
  book = { items: [], totalCount: 0 } as PagedResultDto<BookDto>;  // Initialize books as an empty PagedResultDto

  constructor(private bookService: BookService, public readonly list: ListService) { }  // Inject BookService and ListService

  ngOnInit() {  // Use ngOnInit to fetch books when the component initializes
    this.list.hookToQuery(this.bookService.getList).subscribe((response) => {  // Hook to the query and subscribe to the response
      this.book = response;  // Assign the response to books
    });
  }
}
还需要在book.module.ts声明BookComponent
import { NgModule } from '@angular/core';
// import { CommonModule } from '@angular/common';

import { SharedModule } from '../shared/shared.module';
import { BookRoutingModule } from './book-routing.module';
import { BookComponent } from './book.component';

@NgModule({
  declarations: [
    BookComponent
  ],
  imports: [
    BookRoutingModule,
    SharedModule// shared module already export CommonModule, so we don't need to import it again.
  ]
})
export class BookModule { }
3.2.1.2 standalone 模式 (推荐此模式)
如果使用的是Angualr 14+, 则需要改成如下所示:
import { Component, OnInit } from '@angular/core';
import { ListService, PagedResultDto } from '@abp/ng.core';  // Import ListService and PagedResultDto
import { BookService, BookDto } from '../proxy/books';  // Import your BookService and BookDto model
import { SharedModule } from '../shared/shared.module';

@Component({
  selector: 'app-book',
  templateUrl: './book.component.html',
  styleUrl: './book.component.scss',
  standalone: true, // 标记为独立组件
  imports: [SharedModule], // standalone: true导入需要的模块
  providers: [ListService]  // Provide ListService for this component
})
export class BookComponent implements OnInit {
  book = { items: [], totalCount: 0 } as PagedResultDto<BookDto>;  // Initialize books as an empty PagedResultDto

  constructor(private bookService: BookService, public readonly list: ListService) { }  // Inject BookService and ListService

  ngOnInit() {  // Use ngOnInit to fetch books when the component initializes
    this.list.hookToQuery(this.bookService.getList).subscribe((response) => {  // Hook to the query and subscribe to the response
      this.book = response;  // Assign the response to books
    });
  }
}
book.module.ts移除BookComponent声明
import { NgModule } from '@angular/core';
import { SharedModule } from '../shared/shared.module';
import { BookRoutingModule } from './book-routing.module';

@NgModule({
  declarations: [
  ],
  imports: [
    BookRoutingModule,
    SharedModule// shared module already export CommonModule, so we don't need to import it again.
  ]
})
export class BookModule { }
3.2.2 book.component.html
Tips: 比如你想实现<div class="card"></div>, 此时你只需要输入div.card然后直接敲Tab,vs code可以帮你自动生成。
类似的输入h5.card-title敲Tab自动生成<h5 class="card-title"></h5>
4.启动项目
后端API需要先启动。
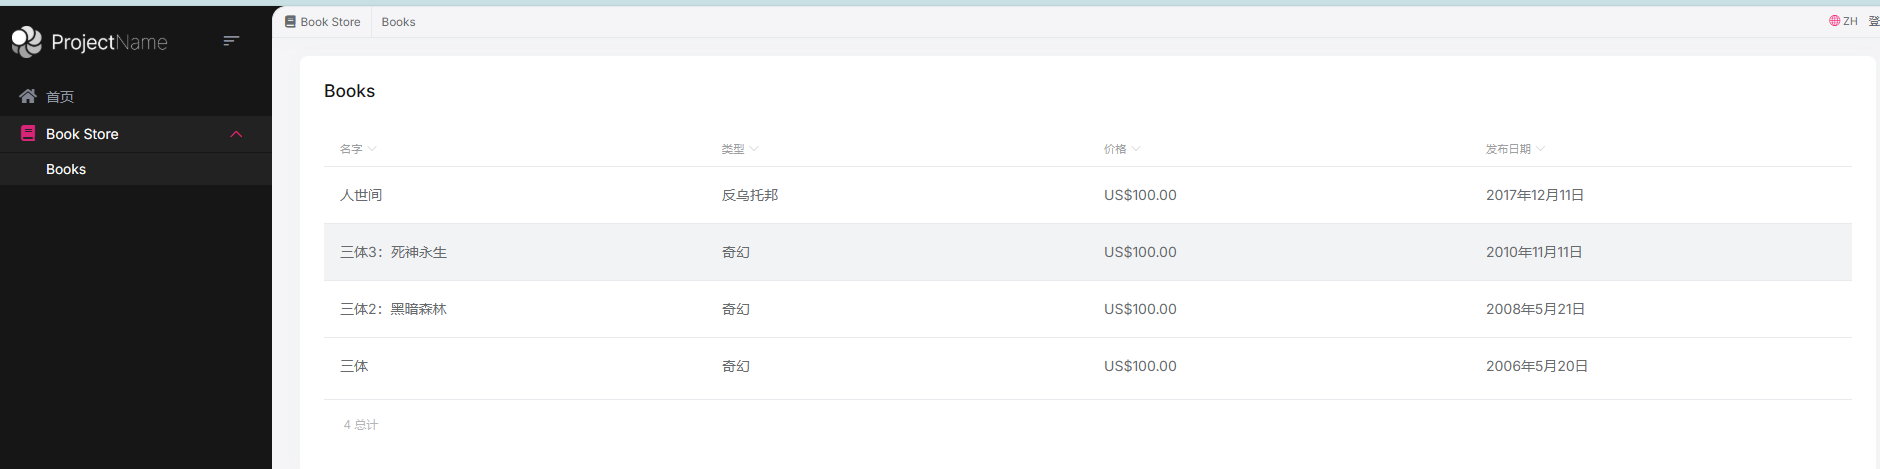
npm start重新编译后,浏览器会自动打开,然后左侧会显示Book Store菜单。
展开后选择Books,加载数据完成如下图所示:
5. Angular推荐使用全独立模式避免NgModule的干扰
// AppComponent.ts(独立根组件)
import { Component } from '@angular/core';
import { BookComponent } from './book/book.component';
import { BrowserModule } from '@angular/platform-browser'; // 若需导入模块,需在 imports 中声明

@Component({
  selector: 'app-root',
  template: `<app-book></app-book>`,
  imports: [BrowserModule, BookComponent], // 导入依赖的模块和独立组件。类似把app.module.ts中的imports都放在此处
  standalone: true // 根组件标记为独立
})
export class AppComponent { }
6. 继续学习
ABP-Book Store Application中文讲解 - Part 3: Creating, Updating and Deleting Books