前面已经了解了怎么使用RabbitMQ的JDK原生客户端,现在我们来了解Spring Boot中如何使用RabbitMQ,在学习之前,先做好准备工作:
1. 添加依赖
在Spring Boot中使用RabbitMQ,需要使用如下依赖:
	<dependency>
		<groupId>org.springframework.boot</groupId>
		<artifactId>spring-boot-starter-amqp</artifactId>
	</dependency>
2. 添加RabbitMQ相关配置
#配置rabbitmq相关信息
#amqp://username:password@Ip:port/virtual-host
  rabbitmq:
    addresses: amqp://study:study@110.41.17.130:5672/java113
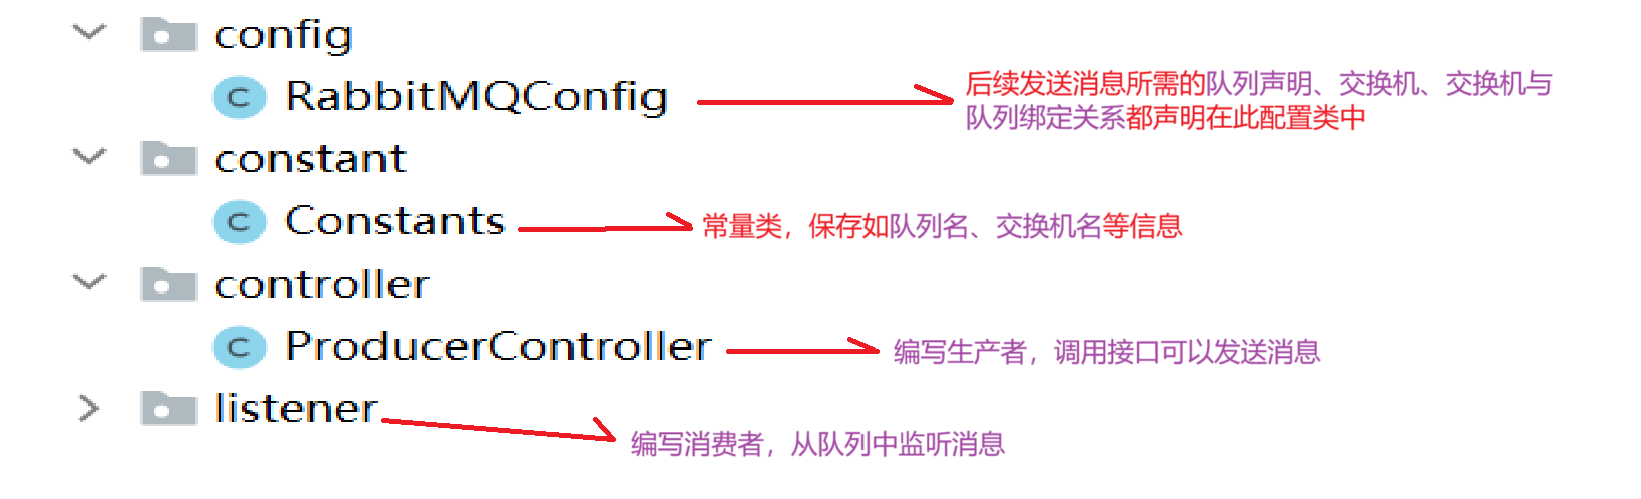
3. 创建好对应的包
完成准备工作后,我们来学习Spring Boot中如何使用RabbitMQ,这里只学习常用的4中工作模式(工作队列、公开/订阅、路由、通配符)
一、Work Queue(工作队列)
一·、在Constants类中编写常量信息
public static final String WORK_QUEUE = "work.queue";
二、在RabbitMQConfig中填写配置信息
这里我们使用内置交换机,故只需声明队列
/* * 声明队列 */ @Bean("workQueue") public Queue workQueue(){ return QueueBuilder.durable(Constants.WORK_QUEUE).build(); }durable表示持久化(服务器重启后保留),参数表示的是要声明的队列名是什么。
三、编写生产者代码
 @Autowired
    private RabbitTemplate rabbitTemplate;

    @RequestMapping("/work")
    public String work(){
        for (int i = 0; i < 10; i++) {
            rabbitTemplate.convertAndSend("", Constants.WORK_QUEUE,"hello spring amqp: work... " + i);
        }
        return "发送成功";
    }
通过RabbitTemplate中的converAndSend方法发送消息,其中第一个参数表示交换机的名称(使用内置交换机为空字符串)、第二个参数表示routingKey,使用内置交换机默认为队列名、第三个参数表示要发送的消息
四、编写消费者代码
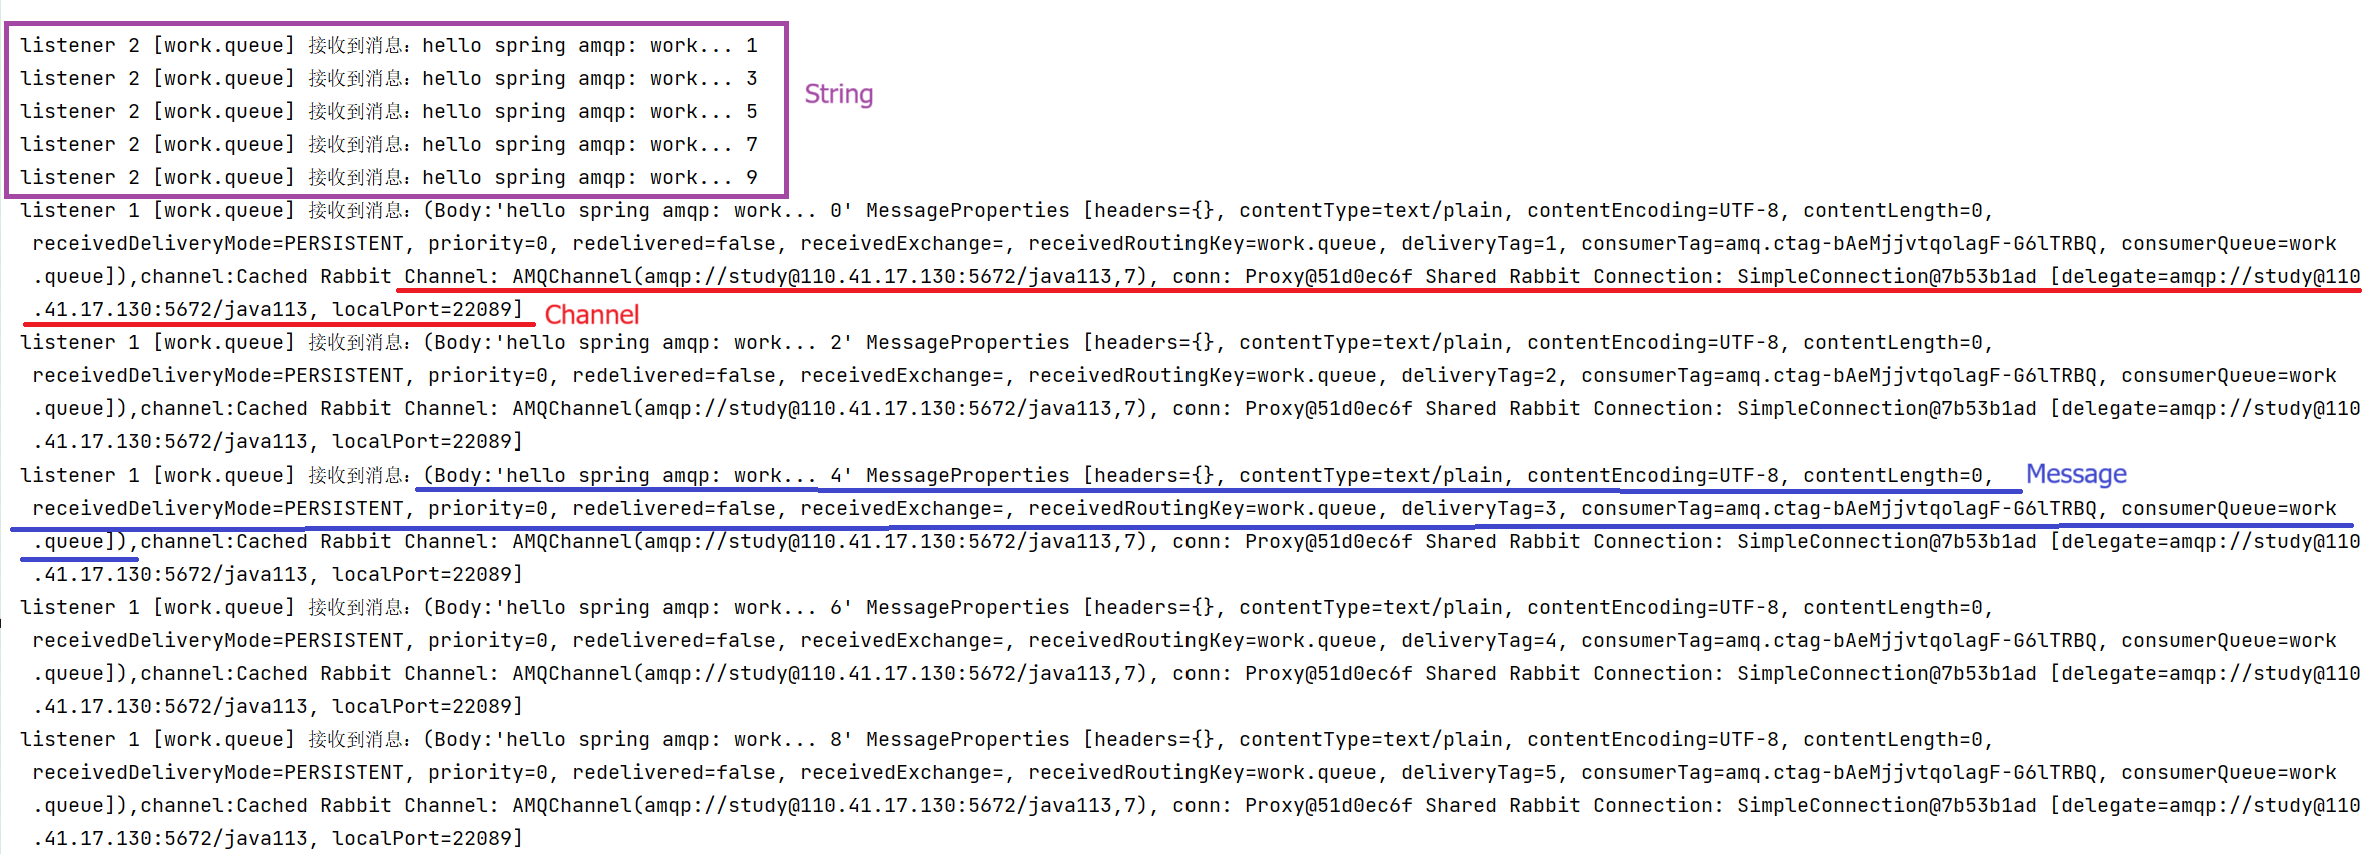
@Component
public class WorkListener {
    //@RabbitListener修饰的方法对应一个消费者
    @RabbitListener(queues = Constants.WORK_QUEUE)//指定消费的四哪一个队列
    public void queueListener1(Message message, Channel channel){
        System.out.println("listener 1 ["+Constants.WORK_QUEUE+"] 接收到消息:" + message  + ",channel:" + channel);
    }

    @RabbitListener(queues = Constants.WORK_QUEUE)//指定消费的四哪一个队列
    public void queueListener2(String message){
        System.out.println("listener 2 ["+Constants.WORK_QUEUE+"] 接收到消息:" + message);
    }
}
在实际开发中,一个消费者就应该对应一个类,这里为了方便就写在同一个类中了,在消费者代码中,需要注意的有:
1. 通过@RabbitListener注解指定需要消费的是那个队列;
2. 对应方法的参数有3种,分别为Channel、Message、String,其中 String 返回消息内容(生产者发送的消息)、Message 返回原始消息体及消息的属性,如ID、内容、队列信息、
Channel 返回的是RabbitMQ的通道对象,可用于手动确认等。
五、运行程序,发送消息
二、publish/subscribe(公开/订阅)
一、在Constants类中编写常量信息
    public static final  String FANOUT_QUEUE1 = "fanout.queue1";
    public static final  String FANOUT_QUEUE2 = "fanout.queue2";
    public static final String FANOUT_EXCHANGE = "fanout.exchange";
二、在RabbitMQConfig中填写配置信息
//公开/订阅模式 @Bean("fanoutQueue1") public Queue fanoutQueue1(){ return QueueBuilder.durable(Constants.FANOUT_QUEUE1).build(); } @Bean("fanoutQueue2") public Queue fanoutQueue2(){ return QueueBuilder.durable(Constants.FANOUT_QUEUE2).build(); } /* * 声明交换机*/ @Bean("fanoutExchange") public FanoutExchange fanoutExchange(){ return ExchangeBuilder.fanoutExchange(Constants.FANOUT_EXCHANGE).durable(true).build(); } /* * 声明队列与交换机的绑定关系*/ @Bean("fanoutQueueBinding1") public Binding fanoutQueueBinding1(@Qualifier("fanoutExchange") FanoutExchange fanoutExchange,@Qualifier("fanoutQueue1") Queue queue){ return BindingBuilder.bind(queue).to(fanoutExchange); } @Bean("fanoutQueueBinding2") public Binding fanoutQueueBinding2(@Qualifier("fanoutExchange") FanoutExchange fanoutExchange,@Qualifier("fanoutQueue2") Queue queue){ return BindingBuilder.bind(queue).to(fanoutExchange); }在声明交换机与队列绑定关系时,需要注意使用@Qualifier注解指定要将哪个队列注入到参数queue中,否者会报错,因为spring中管理了多个Queue对象(前面声明了多个队列)。
三、编写生产者代码
@RequestMapping("/fanout") public String fanout(){ rabbitTemplate.convertAndSend(Constants.FANOUT_EXCHANGE,"","hello spring amqp: fanout..."); return "发送成功"; }发布订阅模式只需要将routingKey指定为空字符串(" ")即可将消息发送到所有与交换机绑定的队列中。
四、编写消费者代码
@Component
public class FanoutListener2 {
    @RabbitListener(queues = Constants.FANOUT_QUEUE2)//指定消费的四哪一个队列
    public void queueListener2(String message){
        System.out.println("队列 ["+Constants.WORK_QUEUE+"] 接收到消息:" + message);
    }

    @RabbitListener(queues = Constants.FANOUT_QUEUE1)
    public void queueListener1(String message){
        System.out.println("队列 ["+Constants.WORK_QUEUE+"] 接收到消息:" + message);
    }
}
三、 Routing(路由)
一、在Constants类中编写常量信息
  public static final String DIRECT_QUEUE1 = "direct.queue1";
  public static final String DIRECT_QUEUE2 = "direct.queue2";
  public static final String DIRECT_EXCHANGE = "direct.exchange";
二、在RabbitMQConfig中填写配置信息
//路由模式 //1.声明队列 @Bean public Queue directQueue1(){ return QueueBuilder.durable(Constants.DIRECT_QUEUE1).build(); } @Bean public Queue directQueue2(){ return QueueBuilder.durable(Constants.DIRECT_QUEUE2).build(); } //2.声明交换机 @Bean public DirectExchange directExchange(){ return ExchangeBuilder.directExchange(Constants.DIRECT_EXCHANGE).durable(true).build(); } //2.队列与交换机的绑定关系 @Bean public Binding directQueueBinding1(DirectExchange directExchange,@Qualifier("directQueue1") Queue queue){ return BindingBuilder.bind(queue).to(directExchange).with("orange"); } @Bean public Binding directQueueBinding2(DirectExchange directExchange,@Qualifier("directQueue2") Queue queue){ return BindingBuilder.bind(queue).to(directExchange).with("orange"); } @Bean public Binding directQueueBinding3(DirectExchange directExchange,@Qualifier("directQueue2") Queue queue){ return BindingBuilder.bind(queue).to(directExchange).with("black"); }通过with方法设置交换机与队列绑定的bindingKey(routingKey)
三、编写生产者代码
    @RequestMapping("/direct/{routingKey}")
    public String direct(@PathVariable("routingKey") String routingKey){
        rabbitTemplate.convertAndSend(Constants.DIRECT_EXCHANGE,routingKey,"hello spring amqp: direct , routingKey is :" + routingKey);
        return "发送成功";
    }
四、编写消费者代码
@Component
public class DirectListener {

    @RabbitListener(queues = Constants.DIRECT_QUEUE1)//指定消费的四哪一个队列
    public void queueListener1(String message){
        System.out.println("队列 ["+Constants.DIRECT_QUEUE1+"] 接收到消息:" + message);
    }


    @RabbitListener(queues = Constants.DIRECT_QUEUE2)//指定消费的四哪一个队列
    public void queueListener2(String message){
        System.out.println("队列 ["+Constants.DIRECT_QUEUE2+"] 接收到消息:" + message);
    }
}
四、Topics(通配符)
一、在Constants类中编写常量信息
    public static final String TOPIC_EXCHANGE = "topic.exchange";
    public static final String TOPIC_QUEUE1 = "topic.queue1";
    public static final String TOPIC_QUEUE2 = "topic.queue2";
二、在RabbitMQConfig中填写配置信息
  //通配符模式
    //1.声明队列
    @Bean
    public Queue topicQueue1(){
        return QueueBuilder.durable(Constants.TOPIC_QUEUE1).build();
    }
    @Bean
    public Queue topicQueue2(){
        return QueueBuilder.durable(Constants.TOPIC_QUEUE2).build();
    }
    //2.声明交换机
    @Bean
    public TopicExchange topicExchange(){
        return ExchangeBuilder.topicExchange(Constants.TOPIC_EXCHANGE).durable(true).build();
    }
    //3.交换机与队列绑定
    @Bean
    public Binding topicQueueBinding1(TopicExchange topicExchange,@Qualifier("topicQueue1") Queue queue){
        return BindingBuilder.bind(queue).to(topicExchange).with("*.orange.*");
    }
    @Bean
    public Binding topicQueueBinding2(TopicExchange topicExchange,@Qualifier("topicQueue2") Queue queue){
        return BindingBuilder.bind(queue).to(topicExchange).with("*.*.rabbit");
    }
    @Bean
    public Binding topicQueueBinding3(TopicExchange topicExchange,@Qualifier("topicQueue2") Queue queue){
        return BindingBuilder.bind(queue).to(topicExchange).with("lazy.#");
    }
三、编写生产者代码
    @RequestMapping("/topic/{routingKey}")
    public String topic(@PathVariable("routingKey") String routingKey){
        //rabbitTemplate内部自动处理了channel的连接和释放
        rabbitTemplate.convertAndSend(Constants.TOPIC_EXCHANGE,routingKey,"hello spring amqp: topic , routingKey is :" + routingKey);
        return "发送成功";
    }
四、编写消费者代码
@Component
public class TopicListener {

    @RabbitListener(queues = Constants.TOPIC_QUEUE1)//指定消费的是哪一个队列
    public void queueListener1(String message){
        System.out.println("队列 ["+Constants.TOPIC_QUEUE1+"] 接收到消息:" + message);
    }


    @RabbitListener(queues = Constants.TOPIC_QUEUE2)//指定消费的是哪一个队列
    public void queueListener2(String message){
        System.out.println("队列 ["+Constants.TOPIC_QUEUE2+"] 接收到消息:" + message);
    }
}
五、总结
与JDK相比,在Spring Boot中使用RabbitMQ:
1. 无需手动创建连接(connection)和声明信道(channel);
2. 对于重复的操作,如填写用户名密码、ip、port、虚拟机,都已经在配置文件中配置好,无需手动编写,需要做的只有 声明队列、声明交换机、声明交换机与队列的绑定关系;
3. JDK原生客户端通过 queueDeclare、exchangeDeclare、queueBind 声明队列、交换机以及队列与交换机的绑定关系,而Spring Boot 中 通过QueueBuilder、ExchangeBuilder、BindingBuilder来声明队列、交换机以及队列与交换机的绑定关系;
4. JDK中使用basicPublish发送消息,bascConsume接收消息,而Spring Boot中使用@RabbitListener注解接收指定队列消息,通过RabbitTemplate对象向队列发送消息。