一、实现方案
本实验方案参考「RabbitMQ消息可靠性深度解析|从零构建高可靠消息系统的实战指南」
1、业务层幂等处理:
每个消息携带一个全局唯一ID,在业务处理过程中,首先检查这个ID是否已经被处理过。例如,将已处理消息的ID记录到数据库的“已处理消息表”中,下次收到同样ID的消息时直接返回成功而不进行实际操作。
对于更新型操作,可以使用乐观锁或分布式锁来保证同一事务多次执行结果相同,例如通过版本号(version)控制更新操作,只有当版本号未变时才执行更新。
对于创建型操作,确保即使多次调用也不会生成多个资源,例如通过查询是否存在相同的唯一键来决定是否创建新的资源。
2、确认模式选择:
使用acknowledgement模式,消费者接收到消息后必须发送确认给RabbitMQ,只有收到确认后RabbitMQ才会从队列中移除消息,否则会在连接恢复后重新投递。
设置publisher confirms,生产者可以得到消息发布的确认,确保消息确实到达了MQ服务器并持久化存储。
3、死信队列与重试策略:
配置死信交换机和死信队列,对于那些重复投递依然无法正确处理的消息,可以转移到死信队列,并设置相应的重试策略及最大重试次数,超过限制则记录日志、报警或手动介入处理。
4、幂等服务设计:
设计能够应对重复调用的服务接口,这些接口内部应该包含足够的逻辑判断以识别重复请求并作出正确的响应。
5、事务与补偿机制:
对于涉及多个系统的分布式事务场景,可以考虑采用TCC(Try-Confirm-Cancel)模式或其他分布式事务解决方案,使得整个流程具有幂等性。
总结来说,在RabbitMQ中实现幂等性主要依赖于业务逻辑层面的改造和优化,同时配合RabbitMQ自身的消息确认机制来确保消息不会因为异常情况而重复处理。
二、代码实战
1、通过雪花算法生成分布式唯一ID
在这里插入代码片
1、通过雪花算法生成分布式唯一ID
/**
 * SnowflakeIdWorker雪花算法
 *
 * @author huahua
 * @DATE 2025/5/25
 **/
@Component
public class SnowflakeIdWorker {
    // 起始的时间戳 (2010-01-01)
    private final long twepoch = 1288834974657L;

    // 机器标识位数
    private final long workerIdBits = 5L;
    private final long datacenterIdBits = 5L;

    // 序列号位数
    private final long sequenceBits = 12L;

    // 工作机器ID最大值
    private final long maxWorkerId = -1L ^ (-1L << workerIdBits);
    // 数据中心ID最大值
    private final long maxDatacenterId = -1L ^ (-1L << datacenterIdBits);

    // 每一部分向左的偏移量
    private final long workerIdShift = sequenceBits;
    private final long datacenterIdShift = sequenceBits + workerIdBits;
    private final long timestampLeftShift = sequenceBits + workerIdBits + datacenterIdBits;

    // 时间戳边界值
    private long lastTimestamp = -1L;

    // 工作节点ID(0~31)
    @Value("${snowConfig.workerId}")
    private long workerId;

    // 数据中心ID(0~31)
    @Value("${snowConfig.datacenterId}")
    private long datacenterId;

    // 每个节点每毫秒内的序列号
    private AtomicLong sequence = new AtomicLong(0L);

    /**
     * 通过专属工作节点ID和数据中心ID构建专属的雪花算法工具类
     */
    public SnowflakeIdWorker() {
        if (this.workerId > maxWorkerId || this.workerId < 0) {
            throw new IllegalArgumentException(String.format("worker Id can't be greater than %d or less than 0", maxWorkerId));
        }
        if (this.datacenterId > maxDatacenterId || this.datacenterId < 0) {
            throw new IllegalArgumentException(String.format("datacenter Id can't be greater than %d or less than 0", maxDatacenterId));
        }
    }

    /**
     * 分布式唯一ID生成
     * @return
     */
    public synchronized long nextId() {
        long timestamp = timeGen();

        // 如果当前时间小于上一次ID生成的时间戳,说明系统时钟回退过这个时候应当抛出异常
        if (timestamp < lastTimestamp) {
            throw new RuntimeException(
                String.format("Clock moved backwards.  Refusing to generate id for %d milliseconds", lastTimestamp - timestamp));
        }

        // 如果是同一时间生成的,则进行序列号的自增
        if (lastTimestamp == timestamp) {
            sequence.incrementAndGet();
            // 判断是否溢出
            if (sequence.get() > (-1L ^ (-1L << sequenceBits))) {
                // 阻塞到下一个时间戳
                timestamp = tilNextMillis(lastTimestamp);
            }
        } else {
            // 时间戳改变,重置序列号
            sequence.set(0L);
        }

        // 上次生成ID的时间截
        lastTimestamp = timestamp;

        // 移位并通过或运算拼到一起组成64位的ID
        return ((timestamp - twepoch) << timestampLeftShift) |
            (datacenterId << datacenterIdShift) |
            (workerId << workerIdShift) | sequence.get();
    }

    /**
     * 从给定的最后时间戳中获取下一个时间戳
     *
     * @param lastTimestamp 最后时间戳
     * @return 下一个时间戳
     */
    protected long tilNextMillis(long lastTimestamp) {
        long timestamp = timeGen();
        while (timestamp <= lastTimestamp) {
            timestamp = timeGen();
        }
        return timestamp;
    }

    /**
     * 生成当前时间的毫秒数。
     *
     * @return 当前时间的毫秒数。
     */
    protected long timeGen() {
        return System.currentTimeMillis();
    }
}
2、通过枚举类,设计Message消费状态
/**
 * Message消费状态
 *
 * @author huahua
 * @DATE 2025/5/30
 **/
public enum RabbitStatusEnum {
    CONSUME(0, "待消费"),
    BEGIN(1, "开始消费"),
    SUCCESS(2, "成功"),
    FAIL(3, "失败");

    private Integer code;

    private String message;

    RabbitStatusEnum(Integer code, String message) {
        this.code = code;
        this.message = message;
    }

    public int getCode() {
        return code;
    }

    public void setCode(Integer code) {
        this.code = code;
    }

    public String getMessage() {
        return message;
    }

    /**
     * 获取需要执行的状态集合
     *
     * @return
     */
    public static List<Integer> getNeedExecuteList() {
        return Arrays.asList(CONSUME.getCode(), FAIL.getCode());
    }

    /**
     * 获取不需要执行的状态集合
     *
     * @return
     */
    public static List<Integer> getCompletionExecuteList() {
        return Arrays.asList(CONSUME.getCode(), FAIL.getCode());
    }
}
3、自定义RedisKey
/**
 * 自定义RedisKey
 *
 * @author
 * @DATE 2025/5/30
 **/
public enum RedisKeyEnum {
    MQ_STATUS("mq:messageId");
    private String key;

    RedisKeyEnum(String key) {
        this.key = key;
    }

    public String getKey() {
        return key;
    }

    public void setKey(String key) {
        this.key = key;
    }
}
4、MQConfig
将自定义"direct.exchange"和"direct.queue1"通过"direct.key"进行绑定
@Configuration
public class MQConfig {
    / direct消息 start ///
    /**
     * 声明direct交换机
     */
    @Bean
    public DirectExchange directExchange(){
        return new DirectExchange("direct.exchange");
    }

    /**
     * 声明direct队列:direct.queue1
     */
    @Bean
    public Queue directQueue1(){
        return new Queue("direct.queue1");
    }

    /**
     * 将direct.queue1队列绑定到交换机上
     */
    @Bean
    public Binding bindingDirectQueue1(Queue directQueue1, DirectExchange directExchange) {
        return BindingBuilder.bind(directQueue1).to(directExchange).with("direct.key");
    }

    @Bean
    public MessageConverter jsonMessageConverter(ObjectMapper objectMapper) {
        return new Jackson2JsonMessageConverter(objectMapper);
    }
}
5、生产者RabbitMQProducer
生产者发送消息时,生成专属分布式唯一业务ID,通过Redis记录消息的消费状态。
/**
 * 生产者
 *
 * @author
 * @DATE 2025/5/31
 **/
@RestController
@Slf4j
public class RabbitMQProducer {
    @Autowired
    private RabbitTemplate rabbitTemplate;

    @Resource
    private SnowflakeIdWorker snowflakeIdWorker;

    @Autowired
    private RedisTemplate<String,Object> redisTemplate;

    /**
     * 批量发送消息
     *
     * @param message
     */
    @RequestMapping("/sendQueueBatch")
    public void sendQueueBatch(String message) {
        //请求头设置消息id(messageId)
        Map<String, Object> map = new HashMap<>();
        map.put("message", message);
        for (int i = 0; i < 3; i++) {
            long id = snowflakeIdWorker.nextId();
            map.put("id", id);
            JSONObject entries = JSONUtil.parseObj(map);
            redisTemplate.opsForValue().set(RedisKeyEnum.MQ_STATUS.getKey() + id, RabbitStatusEnum.CONSUME.getCode());
            rabbitTemplate.convertAndSend("direct.exchange", "direct.key", entries);
        }
        log.info("3个消息都发送成功");
    }
}
6、消费者RabbitMqConsumer
在@RabbitListener注解中设置了ackMode=“MANUAL”,这意味着消息确认将由开发者手动完成。当接收到消息时,可以通过获取的Channel对象调用basicAck()、basicNack()或basicReject()方法来进行消息确认或者拒绝操作。
消息开始消费时,记录开始消费的状态
消息成功完成后,记录成功消费的状态
这里是为了避免在消息开始消费后,RabbitMq宕机了,此时MQ并不知道这个消息最终有没有消费完成,因此重启MQ之后,MQ会重新消费这条消息。
因此我们只运行执行“待消费”和“消费失败”状态的消息。
如果在执行消费的过程中,出错了(抛出Exception),则记录消费失败的状态,MQ会再次尝试去进行消费。我们可以设置最多重试次数,以及两次重试消费的间隔时间。
/**
 * RabbitMqConsumer消费者
 *
 * @author huahua
 * @DATE 2025/5/25
 **/
@Slf4j
@Service
public class RabbitMqConsumer implements ChannelAwareMessageListener {
    @Autowired
    private RedisTemplate<String,Object> redisTemplate;

    /**
     * 记录消费次数
     */
    private int n = 0;

    @Override
    @RabbitListener(queues = "direct.queue1", ackMode = "MANUAL")
    public void onMessage(Message message, Channel channel) throws Exception {
        String msg = new String(message.getBody());
        if(StringUtils.isEmpty( msg)){
            System.out.println("消息为空:");
            return;
        }
        JSONObject entries = JSONUtil.parseObj(new String(message.getBody()));
        Integer status = (Integer) redisTemplate.opsForValue().get(RedisKeyEnum.MQ_STATUS.getKey() + entries.get("id"));
        try {
            //只有待消费和消费失败的能进行消费
            if (RabbitStatusEnum.getNeedExecuteList().contains(status)) {
                //记录开始消费
                redisTemplate.opsForValue().set(RedisKeyEnum.MQ_STATUS.getKey() + entries.get("id"), RabbitStatusEnum.BEGIN.getCode());
                // 处理消息逻辑
                processMessage(entries);
                System.out.println("执行成功了:" + entries.get("id"));
                //记录消费成功
                redisTemplate.opsForValue().set(RedisKeyEnum.MQ_STATUS.getKey() + entries.get("id"), RabbitStatusEnum.SUCCESS.getCode());
                // 成功处理后手动确认消息
                long deliveryTag = message.getMessageProperties().getDeliveryTag();
                channel.basicAck(deliveryTag, false);
            }
        } catch (Exception e) {
            // 处理失败,可以选择重新入队列(取决于业务需求)
            if (shouldRequeueOnFailure()) {
                long deliveryTag = message.getMessageProperties().getDeliveryTag();
                channel.basicNack(deliveryTag, false, true);
                System.out.println("执行失败了:" + entries.get("id"));
                //记录消费失败
                redisTemplate.opsForValue().set(RedisKeyEnum.MQ_STATUS.getKey() + entries.get("id"), RabbitStatusEnum.FAIL.getCode());
            } else {
                long deliveryTag = message.getMessageProperties().getDeliveryTag();
                channel.basicReject(deliveryTag, false);
            }
        }
    }

    /**
     * 根据业务需求决定是否重新入队列
     * @return boolean
     */
    private boolean shouldRequeueOnFailure() {
        return true;
    }

    /**
     * 消费逻辑
     *
     * @param entries
     * @throws Exception
     */
    private void processMessage(JSONObject entries) throws Exception {
        n++;
        //模拟MQ消费时长
        Thread.sleep(8000);
        //消费
        System.out.println("Processing id: " + RedisKeyEnum.MQ_STATUS.getKey() + entries.get("id"));
        System.out.println("Processing message: " + entries.get("message"));
        System.out.println("第" + n + "次消费");
    }
}
三、测试验证
1、本地启动Redis和RabbitmMQ
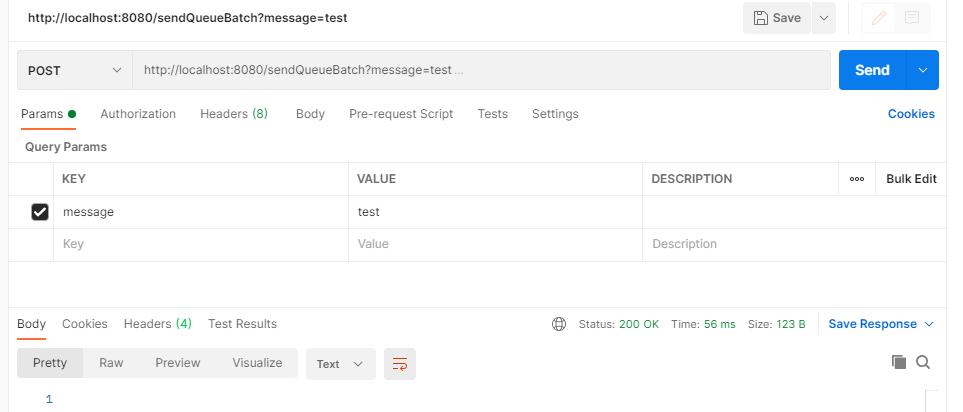
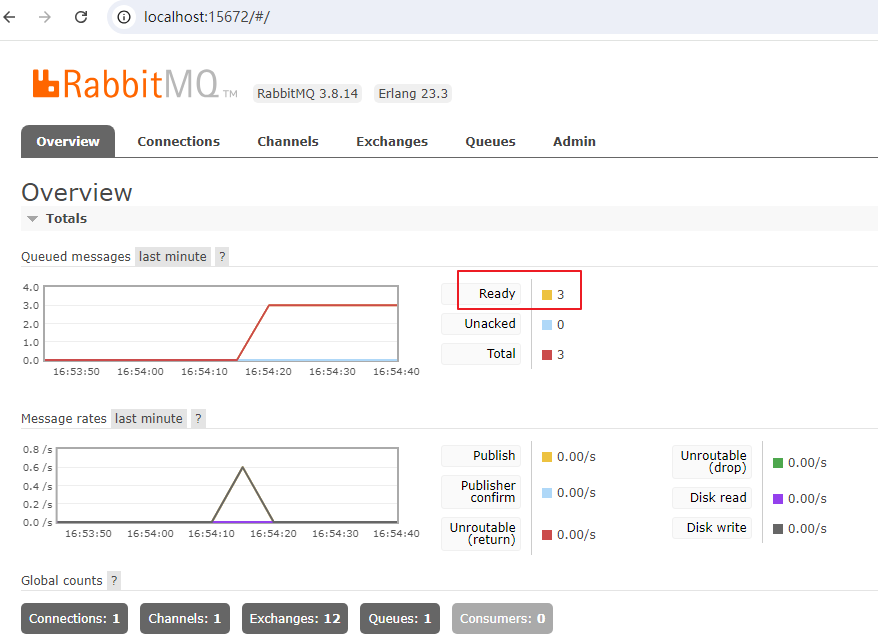
2、启动生产者工程ProviderApplication,利用postman调用接口生产3个消息

观察RabbitmMQ消息状态
3、启动消费者,在消费完第2个消息后,手动关闭RabbitmMQ服务,模拟宕机/网络波动。之后再手动重启RabbitmMQ服务,查看之前未完成消费的消息是否能重新执行成功。
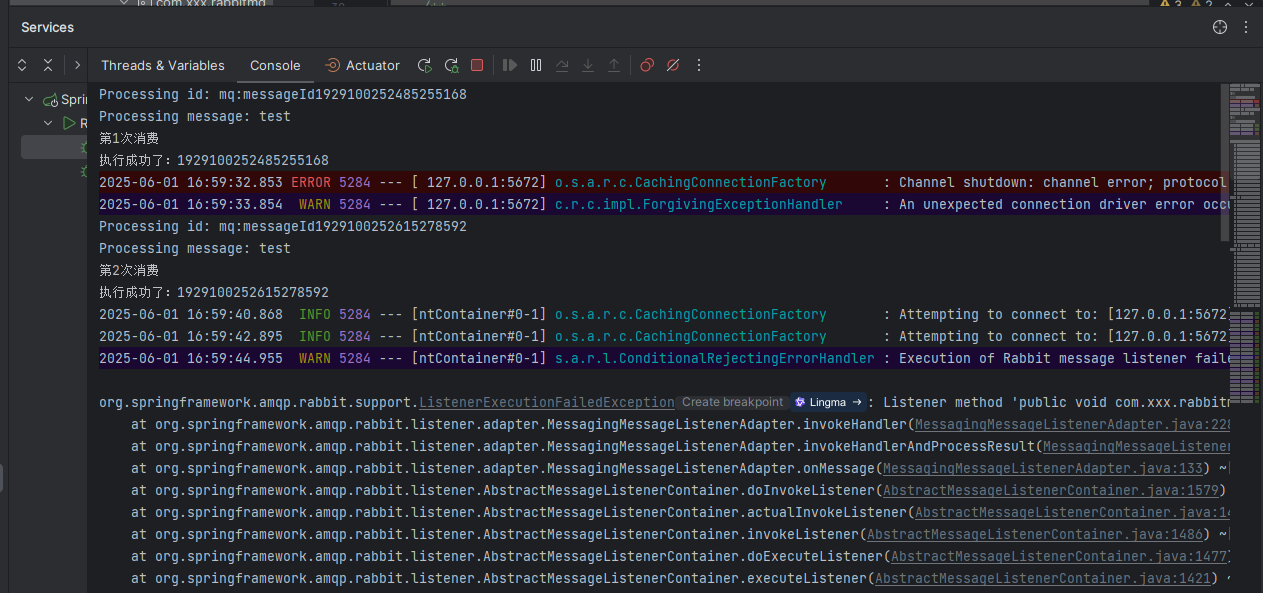
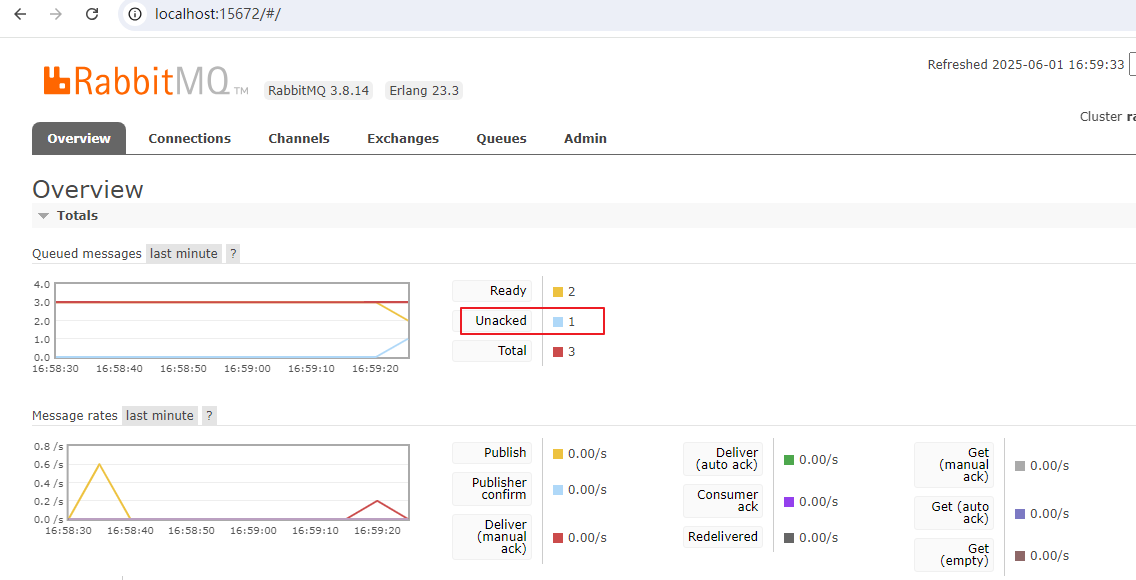
可以看到消费者服务,消费完第2个消息后,由于RabbitMQ宕机,本地服务报错,无法消费第3个消息。而且界面上显示还有1个消息等待被消费。
4、再次手动重启RabbitMQ服务,观察第3个消息消费情况
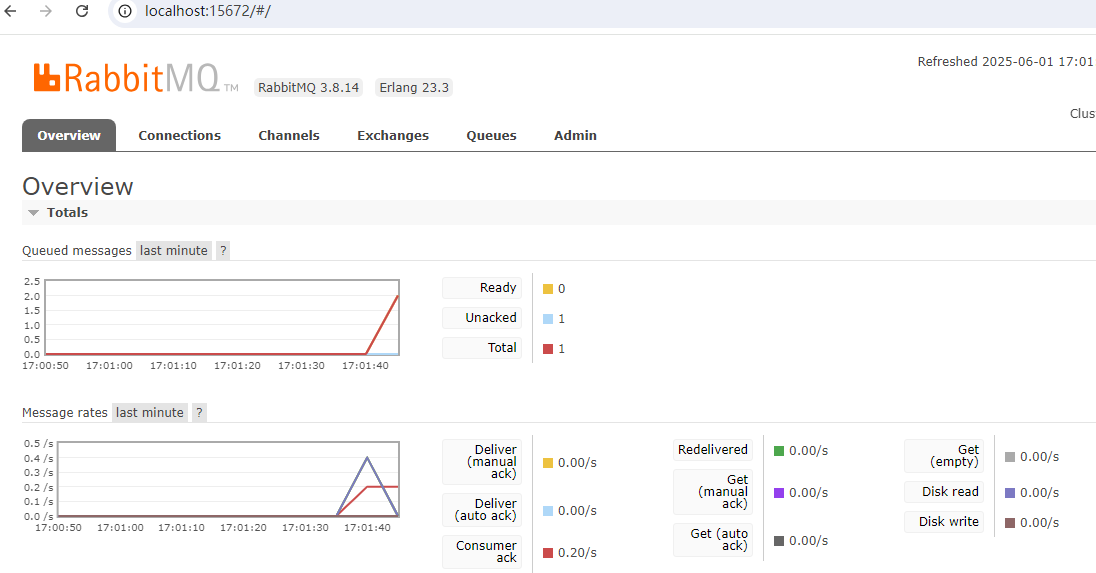
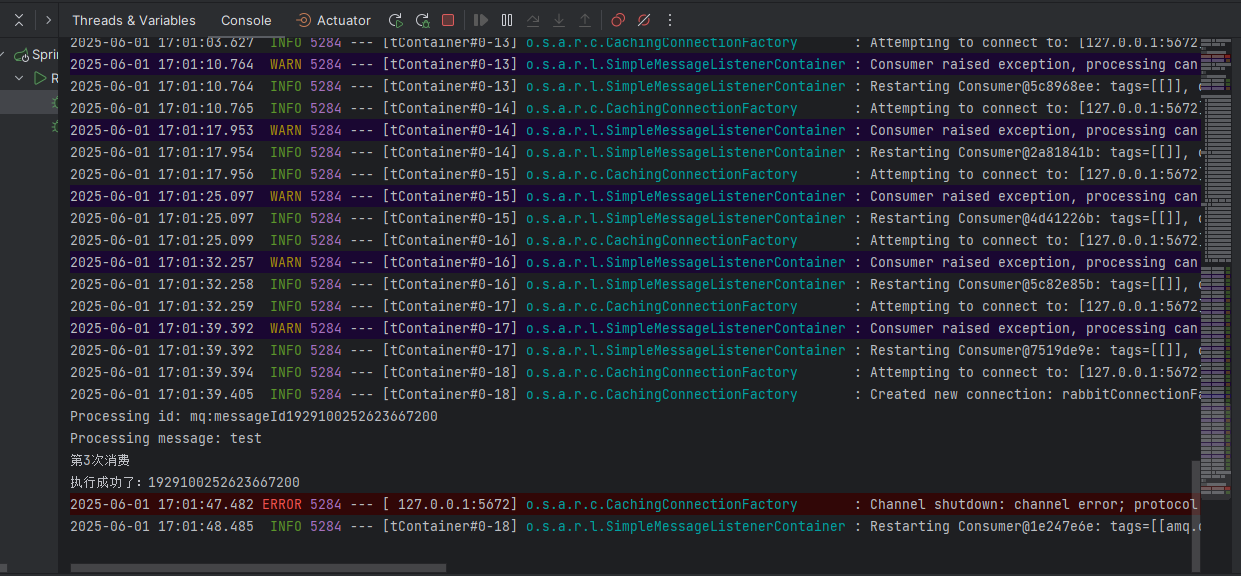
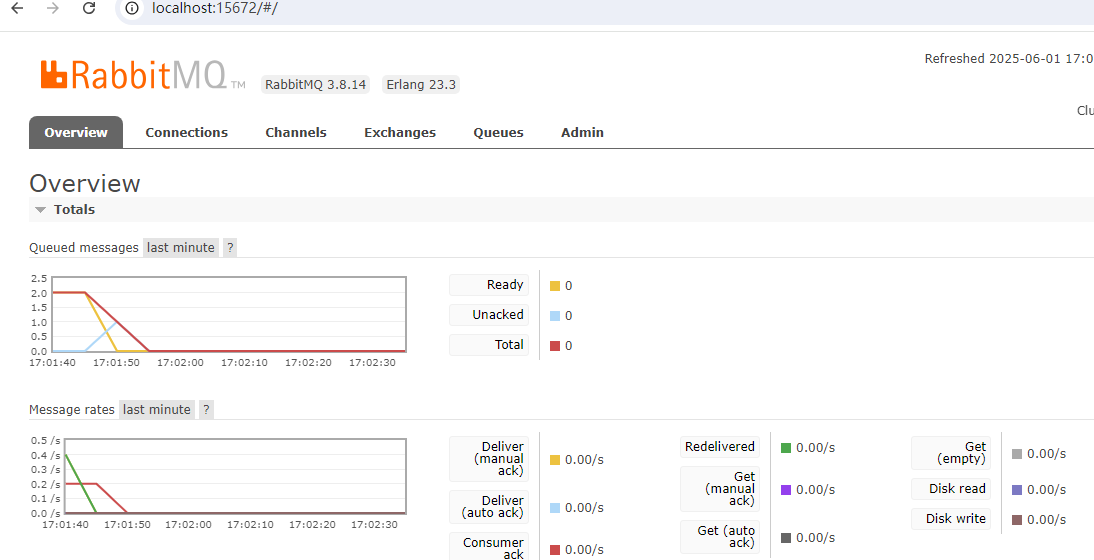
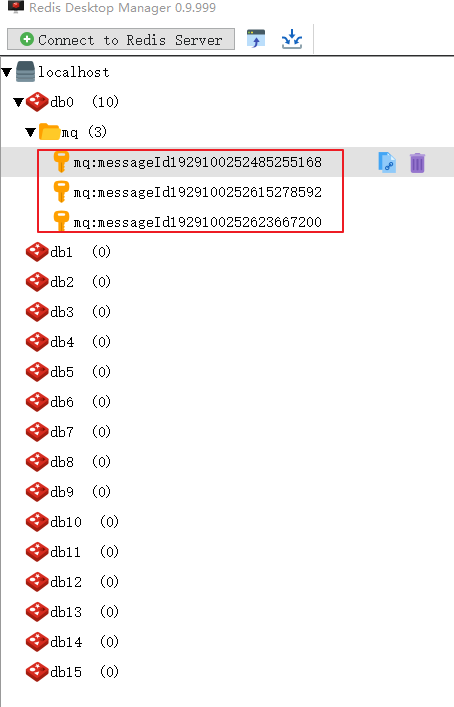
可以看到,手动重启完RabbitMQ服务后,第3个消息被正确消费完成而且Redis服务中生成了3个唯一消息id。
通过上述方案,基本解决了服务宕机或网络波动导致的重复消费问题,
三、项目结构及源码
项目结构及源码如下,欢迎Star!
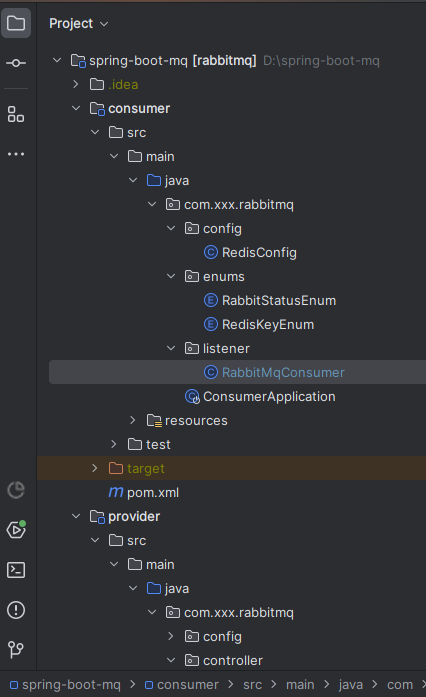
源码下载,欢迎Star!