1.登录模块-小程序快捷登录
- 定义接口,封装
import { http } from '@/utils/http'

type loginParams = {
  code: string
  encryptedData: string
  iv: string
}
export const postLoginWxMinAPI = (data: loginParams) => {
  return http({
    method: 'POST',
    url: '/login/wxMin',
    data,
  })
}
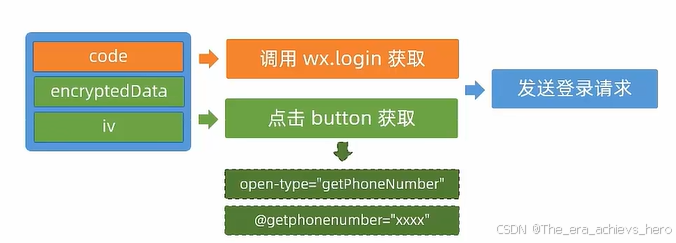
- 获取登录凭证和手机号并登录
// 获取code登录凭证
let code = ''
onLoad(async () => {
  const res = await wx.login()
  code = res.code
})
// 获取用户手机号码
const onGetphonenumber: UniHelper.ButtonOnGetphonenumber = async (ev) => {
  const encryptedData = ev.detail!.encryptedData!
  const iv = ev.detail!.iv!
  const res = await postLoginWxMinAPI({
    code,
    encryptedData,
    iv,
  })
}


  <!-- 小程序端授权登录 -->
      <button class="button phone" @getphonenumber="onGetphonenumber">
        <text class="icon icon-phone"></text>
        手机号快捷登录
      </button>
注意:获取手机号功能针对非个人开发者,且完成认证 的小程序开放
2.模拟快捷登录
- 封装模拟手机号,小程序内测版
// 小程序内测版
export const postLoginWxMinSimpleAPI = (phoneNumber: string) => {
  return http({
    method: 'POST',
    url: '/login/wxMin/simple',
    data: {
      phoneNumber,
    },
  })
}
- 模拟手机号快捷登录
// 模拟手机号快捷登录
const postLoginWxMinSimple = async () => {
  const res = await postLoginWxMinSimpleAPI('13815869691')
  uni.showToast({
    icon: 'none',
    title: '登录成功',
  })
}
3.保存登录信息
- 类型声明
/** 小程序登录 登录用户信息 */
export type LoginResult = {
  /** 用户ID */
  id: number
  /** 头像  */
  avatar: string
  /** 账户名  */
  account: string
  /** 昵称 */
  nickname?: string
  /** 手机号 */
  mobile: string
  /** 登录凭证 */
  token: string
}
- 状态管理
// 定义 Store
export const useMemberStore = defineStore(
  'member',
  () => {
    // 会员信息
    const profile = ref<LoginResult>()

    // 保存会员信息,登录时使用
    const setProfile = (val: LoginResult) => {
      profile.value = val
    }
)
- 成功提示
- 页面跳转
// 获取用户手机号码
const onGetphonenumber: UniHelper.ButtonOnGetphonenumber = async (ev) => {
  const encryptedData = ev.detail!.encryptedData!
  const iv = ev.detail!.iv!
  const res = await postLoginWxMinAPI({
    code,
    encryptedData,
    iv,
  })
  loginSuccess(res.result)
}
// 模拟手机号快捷登录
const postLoginWxMinSimple = async () => {
  const res = await postLoginWxMinSimpleAPI('13815869691')
  loginSuccess(res.result)
}

const loginSuccess = (profile: LoginResult) => {
  // 保存会员信息
  const memberStore = useMemberStore()
  memberStore.setProfile(profile)
  // 成功提示
  uni.showToast({
    icon: 'success',
    title: '登录成功',
  })
  setTimeout(() => {
    // 页面跳转
    //小程序开发页面可以分为tabbar页面和普通页面,普通页面可以用navigateTo,tabbar页面要用switchtab
    uni.switchTab({ url: '/pages/my/my' })
  }, 500)
}
小程序开发页面可以分为tabbar页面和普通页面,普通页面可以用navigateTo,tabbar页面要用switchtab
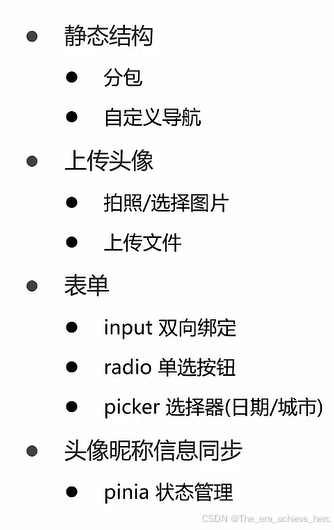
4.会员信息展示
- 静态结构
- 自定义导航
	{
			"path": "pages/my/my",
			"style": {
        "navigationStyle": "custom",
        "navigationBarTextStyle": "white",
				"navigationBarTitleText": "我的"
			}
		},
- 渲染会员信息
const memberStore = useMemberStore()

  <!-- 情况1:已登录 -->
      <view class="overview" v-if="memberStore.profile">
        <navigator url="/pagesMember/profile/profile" hover-class="none">
          <image class="avatar" mode="aspectFill" :src="memberStore.profile.avatar"></image>
        </navigator>
        <view class="meta">
          <view class="nickname">
            {{ memberStore.profile.nickname || memberStore.profile.account  }}
          </view>
          <navigator class="extra" url="/pagesMember/profile/profile" hover-class="none">
            <text class="update">更新头像昵称</text>
          </navigator>
        </view>
      </view>
5.猜你喜欢分页加载
- 获取组件实例
- 滚动触底事件
- 加载分页数据
- 将这三个封装成组合式函数
composables/index.vue
import { ref } from 'vue'
import { XtxGuessInstance } from '@/types/component'

export const useGuessList = () => {
  // 获取猜你喜欢组件实例
  const guessRef = ref<XtxGuessInstance>()

  // 滚动触底
  const onScrolltolower = () => {
    guessRef.value?.getMore()
  }
  // 返回
  return {
    guessRef,
    onScrolltolower,
  }
}
my.vue
const { guessRef, onScrolltolower } = useGuessList()
6.设置分包和预下载
新建分包页面,配置分包预下载
// 分包加载规则
	"subPackages": [
		{
			"root": "pagesMember",
      // 页面路径和窗口表现
			"pages": [
				{
					"path": "settings",
					"style": {
						"navigationBarTitleText": "设置"
					}
				}
			]
		}
	],
  // 分包预下载规则
  "preloadRule": {
    "pages/my/my": {
      "network": "all",
      "packages": ["pagesMember"]
    }
  }
经验:分包一般是按照项目的业务模块划分,如会员模块分包、订单模块分包等
7.会员中心-退出登录
通过模态框进行二次确认

<script setup lang="ts">
import { useMemberStore } from '@/stores'

const memberStore = useMemberStore()
//退出登录
const onLogout = () => {
  //模态弹窗
  uni.showModal({
    content: '是否退出登录?',
    success: (res) => {
      if (res.confirm) {
        // 清理用户信息
        memberStore.clearProfile()
        // 返回上一级
        uni.navigateBack()
      }
    },
  })
}
</script>

<view @tap="onLogout" class="button">退出登录</view>
8.个人信息-准备工作
- 新建分包页面
- 静态结构
- 自定义导航
{
					"path": "profile",
					"style": {
            "navigationStyle": "custom",
            "navigationBarTextStyle": "white",
						"navigationBarTitleText": "个人信息"
					}
}
9.个人信息展示-获取和渲染
- 封装API接口
import { http } from '@/utils/http'
import { ProfileDetail } from '@/types/member'

export const getMemberProfileAPI = () => {
  return http<ProfileDetail>({
    method: 'GET',
    url: '/member/profile',
  })
}
- 初始化调用
// 获取个人信息
const profile = ref<ProfileDetail>()
const getMemberProfileData = async () => {
  const res = await getMemberProfileAPI()
  profile.value = res.result
}
// 页面加载时调用
onLoad(() => {
  getMemberProfileData()
})
- 定义类型
类型的通用性封装
type BasseProfile = {
  /** 用户ID */
  id: number
  /** 头像  */
  avatar: string
  /** 账户名  */
  account: string
  /** 昵称 */
  nickname?: string
}

/** 小程序登录 登录用户信息 */
export type LoginResult = BasseProfile & {
  /** 手机号 */
  mobile: string
  /** 登录凭证 */
  token: string
}

/** 个人信息 用户详情信息 */
export type ProfileDetail = BasseProfile & {
  /** 性别 */
  gender?: Gender
  /** 生日 */
  birthday?: string
  /** 省市区 */
  fullLocation?: string
  /** 职业 */
  profession?: string
}
/** 性别 */
export type Gender = '女' | '男'
- 页面渲染
<template>
  <view class="viewport">
    <!-- 导航栏 -->
    <view class="navbar" :style="{ paddingTop: safeAreaInsets?.top + 'px' }">
      <navigator open-type="navigateBack" class="back icon-left" hover-class="none"></navigator>
      <view class="title">个人信息</view>
    </view>
    <!-- 头像 -->
    <view class="avatar">
      <view class="avatar-content">
        <image class="image" :src="profile?.avatar" mode="aspectFill" />
        <text class="text">点击修改头像</text>
      </view>
    </view>
    <!-- 表单 -->
    <view class="form">
      <!-- 表单内容 -->
      <view class="form-content">
        <view class="form-item">
          <text class="label">账号</text>
          <text class="account">{{ profile?.account }}</text>
        </view>
        <view class="form-item">
          <text class="label">昵称</text>
          <input class="input" type="text" placeholder="请填写昵称" :value="profile?.nickname" />
        </view>
        <view class="form-item">
          <text class="label">性别</text>
          <radio-group>
            <label class="radio">
              <radio value="男" color="#27ba9b" :checked="profile?.gender === '男'" />
              男
            </label>
            <label class="radio">
              <radio value="女" color="#27ba9b" :checked="profile?.gender === '女'" />
              女
            </label>
          </radio-group>
        </view>
        <view class="form-item">
          <text class="label">生日</text>
          <picker
            class="picker"
            mode="date"
            start="1900-01-01"
            :end="new Date()"
            :value="profile?.birthday"
          >
            <view v-if="profile?.birthday">{{ profile.birthday }}</view>
            <view class="placeholder" v-else>请选择日期</view>
          </picker>
        </view>
        <view class="form-item">
          <text class="label">城市</text>
          <picker class="picker" mode="region" :value="profile?.fullLocation?.split(' ')">
            <view v-if="profile?.fullLocation">{{ profile.fullLocation }}</view>
            <view class="placeholder" v-else>请选择城市</view>
          </picker>
        </view>
        <view class="form-item">
          <text class="label">职业</text>
          <input class="input" type="text" placeholder="请填写职业" :value="profile?.profession" />
        </view>
      </view>
      <!-- 提交按钮 -->
      <button class="form-button">保 存</button>
    </view>
  </view>
</template>
温馨提示:新注册的用户信息是缺失的,个人信息可使用账号13123456789,个人信息修改时候换成自己手机号
10.修改用户头像
- 调用拍照/选择图片的API
- 获取图片路径
- 上传到服务器
- 更新头像
// 修改头像
const OnAvatarChange = () => {
  //调用拍照/选择图片
  uni.chooseMedia({
    // 个数
    count: 1,
    // 类型
    mediaType: ['image'],
    success: (res) => {
      // 本地路径
      const { tempFilePath } = res.tempFiles[0]
      // 文件上传
      uni.uploadFile({
        url: '/member/profile/avatar',
        name: 'file',
        filePath: tempFilePath,
        success: (res) => {
          if (res.statusCode === 200) {
            const avatar = JSON.parse(res.data).result.avatar
            profile.value!.avatar = avatar
            uni.showToast({ icon: 'success', title: '更新成功' })
          } else {
            uni.showToast({ icon: 'error', title: '出错了' })
          }
        },
      })
    },
  })
}

 <!-- 头像 -->
    <view class="avatar">
      <view @tap="OnAvatarChange" class="avatar-content">
        <image class="image" :src="profile?.avatar" mode="aspectFill" />
        <text class="text">点击修改头像</text>
      </view>
    </view>
11.修改用户昵称
- 封装API接口
// 修改个人信息
export const putMemberProfileAPI = (data: ProfileParams) => {
  return http({
    method: 'PUT',
    url: '/member/profile',
    data,
  })
}
- 定义参数类型
//个人信息 修改请求体参数
export type ProfileParams = Pick<
  ProfileDetail,
  'nickname' | 'gender' | 'birthday' | 'profession'
> & {
  // 省份编码
  provinceCode?: string
  // 城市编码
  cityCode?: string
  // 区、县编码
  countyCode?: string
}
- 点击保存调用
// 获取个人信息, 修改个人信息需提供初始值
const profile = ref<ProfileDetail>({} as ProfileDetail)

  <view class="form-item">
          <text class="label">昵称</text>
          <input class="input" type="text" placeholder="请填写昵称" v-model="profile!.nickname" />
        </view>
- 成功提示
// 提交
const onSubmit = async () => {
  const res = await putMemberProfileAPI({
    nickname: profile.value?.nickname,
  })
  uni.showToast({ icon: 'success', title: '保存成功' })
}
12.更新Store信息
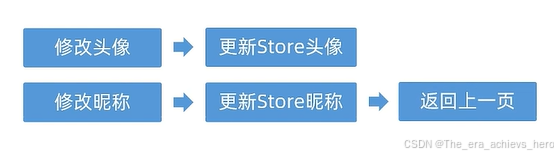
const MemberStore = useMemberStore()
// 修改头像
const OnAvatarChange = () => {
  //调用拍照/选择图片
  uni.chooseMedia({
    // 个数
    count: 1,
    // 类型
    mediaType: ['image'],
    success: (res) => {
      // 本地路径
      const { tempFilePath } = res.tempFiles[0]
      // 文件上传
      uni.uploadFile({
        url: '/member/profile/avatar',
        name: 'file',
        filePath: tempFilePath,
        success: (res) => {
          if (res.statusCode === 200) {
            const avatar = JSON.parse(res.data).result.avatar
            // store页更新
            MemberStore.profile!.avatar = avatar
            // 个人信息页更新
            profile.value!.avatar = avatar
            uni.showToast({ icon: 'success', title: '更新成功' })
          } else {
            uni.showToast({ icon: 'error', title: '出错了' })
          }
        },
      })
    },
  })
}
// 提交表单
const onSubmit = async () => {
  const res = await putMemberProfileAPI({
    nickname: profile.value?.nickname,
  })
  // 更新store昵称
  MemberStore.profile!.nickname = res.result.nickname
  uni.showToast({ icon: 'success', title: '保存成功' })
  setTimeout(() => {
    uni.navigateBack()
  }, 500)
}
13.个人信息- 修改性别
- 单选事件
- 获取性别
- 提交更新
<radio-group @change="onGenderChange">

// 修改性别
const onGenderChange: UniHelper.RadioGroupOnChange = (ev) => {
// 要用断言
  profile.value.gender = ev.detail.value as Gender
}

// 提交表单
const onSubmit = async () => {
  const res = await putMemberProfileAPI({
    nickname: profile.value?.nickname,
    gender: profile.value.gender,
  })
  // 更新store昵称
  MemberStore.profile!.nickname = res.result.nickname
  uni.showToast({ icon: 'success', title: '保存成功' })
  setTimeout(() => {
    uni.navigateBack()
  }, 500)
}
14.修改生日
- picker事件
<picker
            @change="onBirthdayChange"
            class="picker"
            mode="date"
            start="1900-01-01"
            :end="new Date()"
            :value="profile?.birthday"
          >
- 获取日期
//修改生日
const onBirthdayChange: UniHelper.DatePickerOnChange = (ev) => {
  profile.value.birthday = ev.detail.value
}
- 提交更新
// 提交表单
// 后端的更新
const onSubmit = async () => {
  const { nickname, gender, birthday } = profile.value
  const res = await putMemberProfileAPI({
    nickname,
    gender,
    birthday,
  })
  // 更新store昵称
  MemberStore.profile!.nickname = res.result.nickname
  uni.showToast({ icon: 'success', title: '保存成功' })
  setTimeout(() => {
    uni.navigateBack()
  }, 500)
}
15.会员中心-修改城市
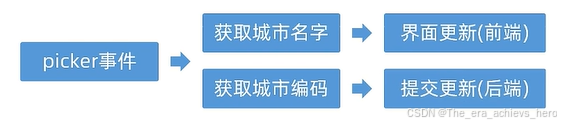
先给picker绑定change事件
// 修改地区
let fullLocationCode: [string, string, string] = ['', '', '']
const onFullLocationChange: UniHelper.RegionPickerOnChange = (ev) => {
  // 修改为字符串模式
  // 修改前端页面
  profile.value.fullLocation = ev.detail.value.join(' ')
  // 提交后端更新
  fullLocationCode = ev.detail.code!
}

// 提交表单
// 后端的更新
const onSubmit = async () => {
  const { nickname, gender, birthday } = profile.value
  const res = await putMemberProfileAPI({
    nickname,
    gender,
    birthday,
    provinceCode: fullLocationCode[0],
    cityCode: fullLocationCode[1],
    countyCode: fullLocationCode[2],
  })
  // 更新store昵称
  MemberStore.profile!.nickname = res.result.nickname
  uni.showToast({ icon: 'success', title: '保存成功' })
  setTimeout(() => {
    uni.navigateBack()
  }, 500)
}
16. 个人信息页总结