目录
写进程池前的理论扫盲
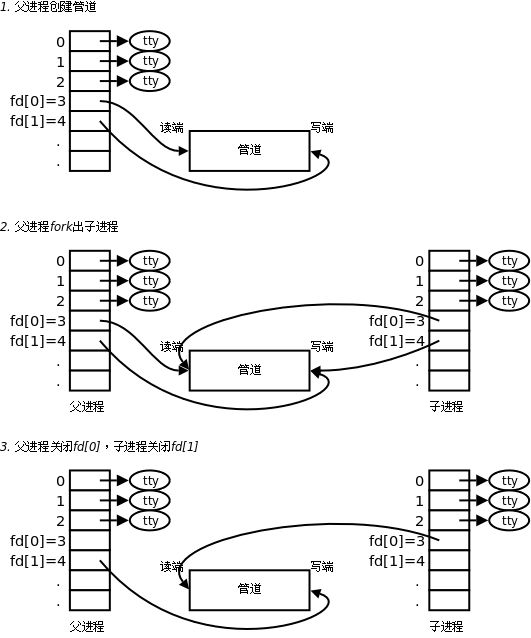
父进程创建子进程,父子俩都看见同一片资源,这片资源被俩进程利用,用来通信,这片资源就是管道,如图所示,能很好地诠释管道。
那么什么是进程池呢?
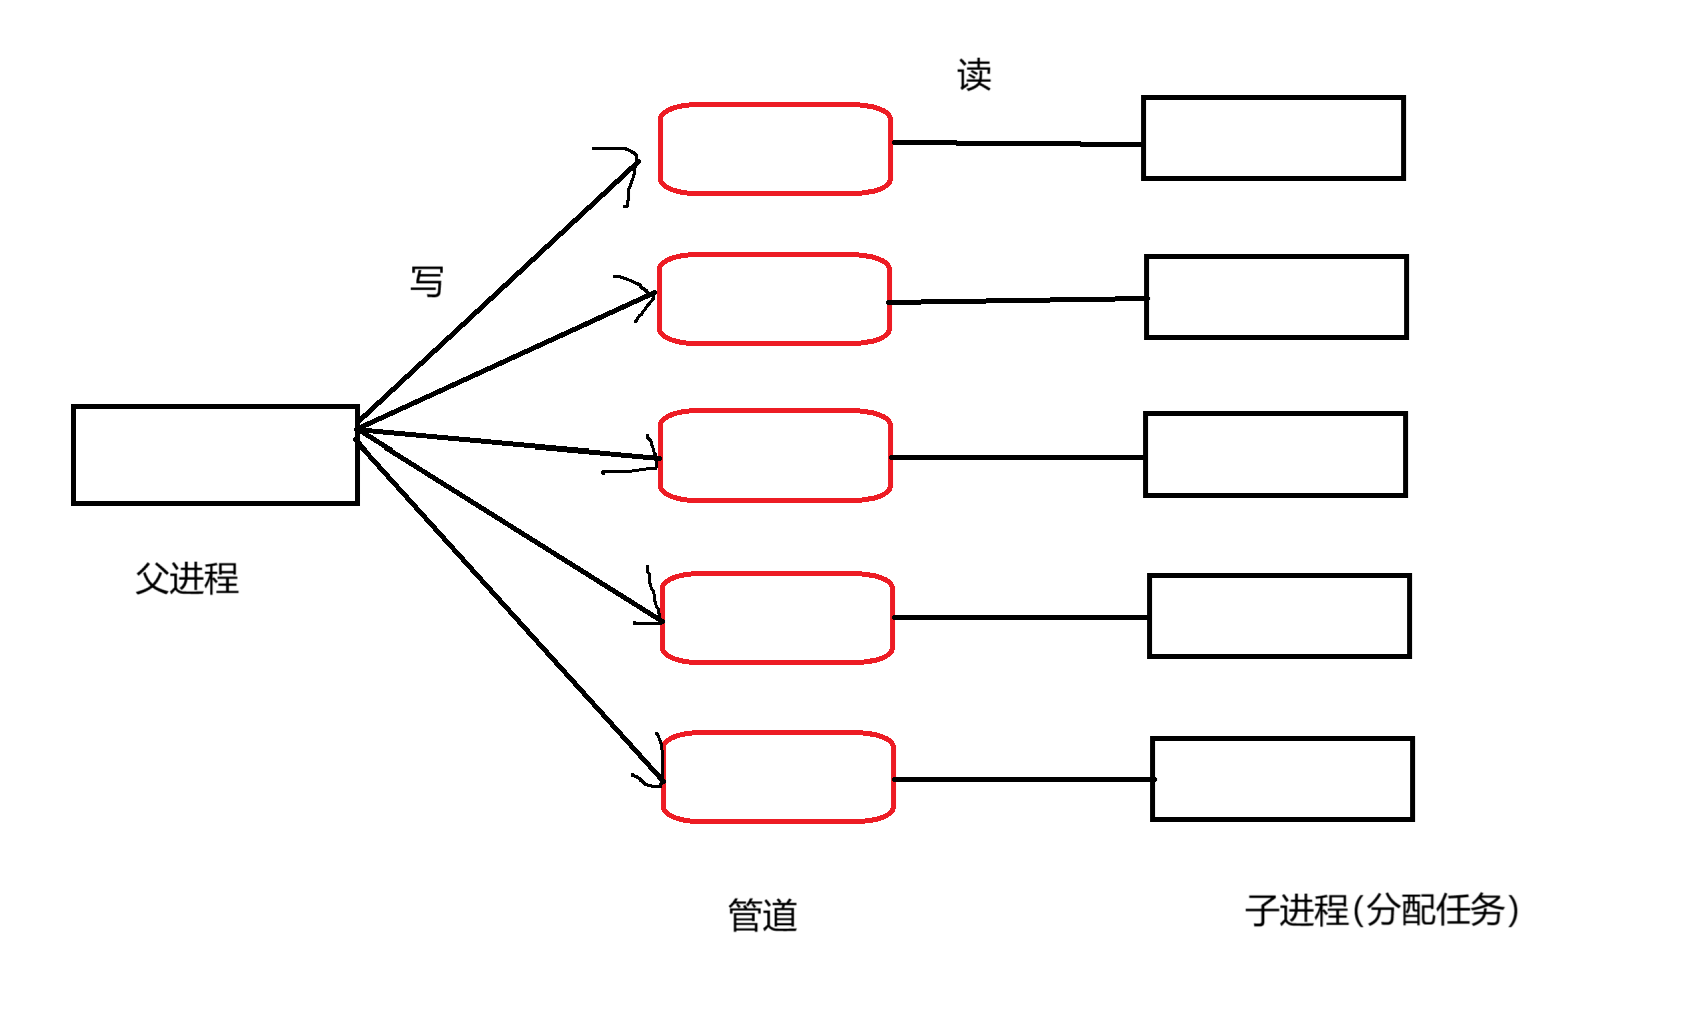
我画了一副图,这幅图也很好的解释了什么是进程池,父进程通过管道给子进程分配任务,或者通信,有多个进程,就叫作进程池。
而我们开始之前,已经将编译器转换成了vscode,环境变成了Ubuntu,语言使用C++。按照上图来,父进程向管道写,子进程从管道读。
进程池的实现
进程池最重要的就是管道,首先就要在头文件里面写类,首先就是管道类,然后是管道组织类,因为我们要把管道组织起来,最后就是进程池类,我们需要对进程池实现一些函数,首先,有一个头文件 .hpp和 .cc文件.
#include<iostream>
#include<vector>

//管道类,先描述
class channel
{
public:
    channel(){}
    ~channel(){}

private:

};

const int gdefaultnum = 5;//管道数量,暂时定为5个

//管道管理类,再组织
class ChannelManage
{
public:
    ChannelManage(){}
    ~ChannelManage(){}
private:
    std::vector<channel> _Channels;
};

//进程池类
class ProcessPool
{
public:
    ProcessPool(){}
    ~ProcessPool(){}
private:
    ChannelManage _cm;
};
管道管理类的变量就是一个内容为 channel 的 vector ,名字叫 _Channels,而进程池类的变量就是这个vector。我们还定义了一个全局变量,gdefaultnum,表示为管道数量。
接下来,我们该创建管道了。将函数定为start,我们看看怎么写的。
#ifndef _PROCESS_POOL_HPP_
#define _PROCESS_POOL_HPP_

#include<iostream>
#include<vector>
#include<unistd.h>
#include<cstdlib>


//管道类,先描述,建立信道
class channel
{
public:
    channel(int fd,pid_t pid)
    :_wfd(fd)
    ,pid(pid)
    {
        std::cout << "channel-" <<std::to_string(_wfd)+std::to_string(pid);
    }
    ~channel(){}

private:
    int _wfd;
    pid_t pid;
    std::string name;

};

const int gdefaultnum = 5;//管道数量,暂时定为5个

//管道管理类,再组织
class ChannelManage
{
public:
    ChannelManage(){}


    void BuildChannel(int wfd,pid_t pid )
    {
        //vector的一个函数,不需要构建临时对象,直接就可以尾插到vector里面
        _Channels.emplace_back(wfd,pid);
    }


    ~ChannelManage(){}
private:
    std::vector<channel> _Channels;
};

//进程池类
class ProcessPool
{
public:
    ProcessPool()
    :_process_num(gdefaultnum)
    {}

    void Work(int rfd)
    {
        std::cout<<"子进程工作" <<std::endl;
    }

    bool Start()
    {
        for (int i = 0; i < _process_num; i++)
        {
            //1.创建管道
            int pipefd[2] = {0};
            int n = pipe(pipefd);
            if(n < 0)
                return false;

            //2.创建进程
            pid_t pid = fork();
            if(pid < 0)
            {
                //创建进程失败
                return false;
            }
            else if(pid == 0)
            {
                //子进程
                //我们要求的是父进程去写,子进程去读,所以我们要关掉不要用的读写端,0是读,1是写
                close(pipefd[1]);//子进程关掉写
                //建立子进程,那么子进程就要工作,先不弄太复杂,就简单写个函数
                Work(pipefd[0]);

                close(pipefd[0]);//到最后都要关掉
            }
            else
            {
                //父进程
                //关掉读
                close(pipefd[0]);
                //父进程创建子进程之后,我们要给子进程建立一个通信信道
                _cm.BuildChannel(pipefd[1],pid);

                close(pipefd[1]);//到最后都要关掉
            }

        }
        return true;
    }

    ~ProcessPool(){}
private:
    ChannelManage _cm;
    int _process_num;//管道数量
};

#endif
- 创建管道,使用pipe函数(记得要包的头文件哈!),然后创建进程,子进程负责完成任务,父进程负责为子进程开通管道,自然而然地,有了BuildChannel函数。
- 我们看到管理管道类里面的BuildChannel函数,我们虽然使用了vector的emplace_back函数,可以不用创建临时对象的,但是我们应该明白底层逻辑是什么样的,
- 底层逻辑就是创建了一个channel(管道)临时对象,将他尾插到_cm里面之后,再将其销毁。而创建管道是需要父进程的写入端和子进程的pid。
我们创建了子进程,并为他开创了信道之后,就可以得到命令,然后去执行命令了,但是要执行命令,也要选择合适的子进程,让合适的子进程去执行任务。所以下一步需要解决的就是选择合适的子进程执行命令。
那么,怎么挑选合适的子进程呢?有一种常用的方法,轮询,这个方法就是从第一个子进程开始,依次往下执行,直到结束,然后再从第一个开始,我们就使用轮询的方法吧。
#ifndef _PROCESS_POOL_HPP_
#define _PROCESS_POOL_HPP_

#include<iostream>
#include<vector>
#include<unistd.h>
#include<cstdlib>


//管道类,先描述,建立信道
class channel
{
public:
    channel(int fd,pid_t pid)
    :_wfd(fd)
    ,pid(pid)
    {
        std::cout << "channel-" <<std::to_string(_wfd)+std::to_string(pid);
    }
    ~channel(){}

private:
    int _wfd;
    pid_t pid;
    std::string name;

};

const int gdefaultnum = 5;//管道数量,暂时定为5个

//管道管理类,再组织
class ChannelManage
{
public:
    ChannelManage()
    :next(0)
    {}


    void BuildChannel(int wfd,pid_t pid )
    {
        //vector的一个函数,不需要构建临时对象,直接就可以尾插到vector里面
        _Channels.emplace_back(wfd,pid);
    }

    //挑选合适的子进程去执行命令
    channel& Select()
    {
        //轮询
        auto& c = _Channels[0];
        next++;
        next %= _Channels.size();
        return c;
    }

    ~ChannelManage(){}
private:
    std::vector<channel> _Channels;
    int next;
};

//进程池类
class ProcessPool
{
public:
    ProcessPool()
    :_process_num(gdefaultnum)
    {}

    void Work(int rfd)
    {
        std::cout<<"子进程工作" <<std::endl;
    }

    bool Start()
    {
        for (int i = 0; i < _process_num; i++)
        {
            //1.创建管道
            int pipefd[2] = {0};
            int n = pipe(pipefd);
            if(n < 0)
                return false;

            //2.创建进程
            pid_t pid = fork();
            if(pid < 0)
            {
                //创建进程失败
                return false;
            }
            else if(pid == 0)
            {
                //子进程
                //我们要求的是父进程去写,子进程去读,所以我们要关掉不要用的读写端,0是读,1是写
                close(pipefd[1]);//子进程关掉写
                //建立子进程,那么子进程就要工作,先不弄太复杂,就简单写个函数
                Work(pipefd[0]);

                close(pipefd[0]);//到最后都要关掉
            }
            else
            {
                //父进程
                //关掉读
                close(pipefd[0]);
                //父进程创建子进程之后,我们要给子进程建立一个通信信道
                _cm.BuildChannel(pipefd[1],pid);

                close(pipefd[1]);//到最后都要关掉
            }

        }
        return true;
    }

    void Run()
    {
        auto &c = _cm.Select();
    }

    ~ProcessPool(){}
private:
    ChannelManage _cm;
    int _process_num;//管道数量
};

#endif
我们已经完成了开创信道,选择子进程,接下来的任务就是写向写入端写入命令。
class channel
{
public:
    channel(int fd,pid_t pid)
    :_wfd(fd)
    ,pid(pid)
    {
        std::cout << "channel-" <<std::to_string(_wfd)+std::to_string(pid);
    }

    void Send(int code)
    {
        int n = write(_wfd,&code,sizeof(code));
        (void)n;
    }

    ~channel(){}

private:
    int _wfd;
    pid_t pid;
    std::string name;

};
void Run()
{
int task_code = 0;
//选择一个子进程
auto &c = _cm.Select();
//向写入端发送命令
c.Send(task_code);
}上面我们还不知道需要发送什么命令,所以就随便设置了一个0,现在我们需要一套完整的命令了,直接写一个task.hpp文件,设置一套完整的命令。下面是task.hpp的代码编写
#pragma once

#include<iostream>
#include<vector>
#include<ctime>

typedef void (*task_t)();

////////////////执行任务///////////////////////////////////////////////////////
void Printlog()
{
    std::cout << "我是一个打印日志的任务"<<std::endl;
}

void Download()
{
    std::cout << "我是一个下载的任务"<<std::endl;
}

void Upload()
{
    std::cout << "我是一个上传的任务"<<std::endl;
}

///////////////////////////////////////////////////////////////////////////////

class TaskManager
{
public:
    TaskManager()
    {
        srand(time(nullptr));
    }

    //将执行函数放进去
    void Register(task_t t)
    {
        _tasks.push_back(t);
    }

    int Code()
    {
        return rand() % _tasks.size();
    }

    void Execute(int code)
    {
        if(code >=0 && code < _tasks.size())
        {
            _tasks[code];
        }
    }

    ~TaskManager(){}

private:
    std::vector<task_t> _tasks;
};
写了任务表了,那就要让子进程在读取管道信息的时候接收到这个任务命令,那么将变动Work函数,让他工作。下面是将命令融合到整个程序里去的代码
#ifndef _PROCESS_POOL_HPP_
#define _PROCESS_POOL_HPP_

#include<iostream>
#include<vector>
#include<unistd.h>
#include<cstdlib>
#include"task.hpp"


//管道类,先描述,建立信道
class channel
{
public:
    channel(int fd,pid_t pid)
    :_wfd(fd)
    ,pid(pid)
    {
        std::cout << "channel-" <<std::to_string(_wfd)+std::to_string(pid);
    }

    void Send(int code)
    {
        int n = write(_wfd,&code,sizeof(code));
        (void)n;
    }

    ~channel(){}

    int getwfd()
    {
       return _wfd;
    }

    pid_t getpid()
    {
        return pid;
    }

    std::string getname()
    {
        return name;
    }

private:
    int _wfd;
    pid_t pid;
    std::string name;

};

const int gdefaultnum = 5;//管道数量,暂时定为5个

//管道管理类,再组织
class ChannelManage
{
public:
    ChannelManage()
    :next(0)
    {}


    void BuildChannel(int wfd,pid_t pid )
    {
        //vector的一个函数,不需要构建临时对象,直接就可以尾插到vector里面
        _Channels.emplace_back(wfd,pid);
    }

    //挑选合适的子进程去执行命令
    channel& Select()
    {
        //轮询
        auto& c = _Channels[0];
        next++;
        next %= _Channels.size();
        return c;
    }

    ~ChannelManage(){}
private:
    std::vector<channel> _Channels;
    int next;
};

//进程池类
class ProcessPool
{
public:
    ProcessPool()
    :_process_num(gdefaultnum)
    {
        //注册任务
        _tm.Register(Printlog);
        _tm.Register(Download);
        _tm.Register(Upload);

    }

    void Work(int rfd)
    {
        while(true)
        {
            int code = 0;
            size_t n = read(rfd,&code,sizeof(code));//从读端读到了code,之前父进程写进管道的任务码
            if(n > 0)
            {
                if(n != sizeof(code))
                {
                    continue;
                }
                //读到规范的了
                std::cout << "进程: "<<getpid()<<"收到一个任务码: "<<code<<std::endl;
                _tm.Execute(code);
            }
            else if(n == 0)
            {
                std::cout<<"子进程退出"<<std::endl;
            }
            else
            {
                std::cout<<"读取错误"<<std::endl;
            }
        }
    }

    bool Start()
    {
        for (int i = 0; i < _process_num; i++)
        {
            //1.创建管道
            int pipefd[2] = {0};
            int n = pipe(pipefd);
            if(n < 0)
                return false;

            //2.创建进程
            pid_t pid = fork();
            if(pid < 0)
            {
                //创建进程失败
                return false;
            }
            else if(pid == 0)
            {
                //子进程
                //我们要求的是父进程去写,子进程去读,所以我们要关掉不要用的读写端,0是读,1是写
                close(pipefd[1]);//子进程关掉写
                //建立子进程,那么子进程就要工作,先不弄太复杂,就简单写个函数
                Work(pipefd[0]);

                close(pipefd[0]);//到最后都要关掉
            }
            else
            {
                //父进程
                //关掉读
                close(pipefd[0]);
                //父进程创建子进程之后,我们要给子进程建立一个通信信道
                _cm.BuildChannel(pipefd[1],pid);

                close(pipefd[1]);//到最后都要关掉
            }

        }
        return true;
    }

    void Run()
    {
        int task_code = _tm.Code();//随机生成的一个code

        //选择一个子进程
        auto &c = _cm.Select();
        std::cout <<"选择了一个子进程: "<<c.getname() <<std::endl;


        //向写入端发送命令
        c.Send(task_code);
        std::cout <<"发送了一个任务码: "<<task_code <<std::endl;

    }

    ~ProcessPool(){}
private:
    ChannelManage _cm;
    int _process_num;//管道数量
    TaskManager _tm;//命令管理
};

#endif
尤其可以注意一下Work的变动。
上面所实现的就是我们需要的功能,现在我们需要实现一些关闭和等待的功能,我们的管道和进程都是需要实现关闭功能的。
    void Close(int wfd)
    {
        close(_wfd);
    }

    void Wait()
    {
        pid_t id = waitpid(pid,nullptr,0);
        (void)id;
    }
void StopSubProcess()
{
for(auto& channel : _Channels)
{
channel.Close();
std::cout<<"关闭:"<<channel.getname()<<std::endl;
}
}
void WaitSubProcess()
{
for(auto& channel : _Channels)
{
channel.Wait();
std::cout<<"回收子进程" <<std::endl;
}
} void Stop()
{
_cm.StopSubProcess();
_cm.WaitSubProcess();
}这就是三个类分别的关闭等待代码,从下往上,是不是感受到了层层调用?
至此,我们的代码已经写完了,我会将完整代码包括测试代码链接贴在下面,大家自行取用。