一、视频资料
禹神:三小时快速上手TypeScript,TS速通教程_哔哩哔哩_bilibili
1 ts介绍
- ts
静态代码检查,—运行前进行检查,简言之:把运行时的错误前置
2.ts编译:
浏览器是不能直接运行ts代码,需要编译为js再由浏览器解析
两种编译方式
1.命令行编译
npm i typescript -g
就可以执行tsc了
tsc helloworld.ts
就可以把helloworld.ts转化成js了,直接引入js就可以运行了
缺点:是每次更改都需要在编译
2.自动化编译
tsc --init
生成一个tsconfig.json配置文件—后期配置这个就行
{
  // Visit https://aka.ms/tsconfig to read more about this file
  "compilerOptions": {
    // File Layout
    // "rootDir": "./src",
    // "outDir": "./dist",

    // Environment Settings
    // See also https://aka.ms/tsconfig/module
    "module": "es6",
    "target": "es6",
    "types": [],
    // For nodejs:
    // "lib": ["esnext"],
    // "types": ["node"],
    // and npm install -D @types/node

    // Other Outputs
    "sourceMap": true,
    "declaration": true,
    "declarationMap": true,

    // Stricter Typechecking Options
    "noUncheckedIndexedAccess": true,
    "exactOptionalPropertyTypes": true,

    // Style Options
    // "noImplicitReturns": true,
    // "noImplicitOverride": true,
    // "noUnusedLocals": true,
    // "noUnusedParameters": true,
    // "noFallthroughCasesInSwitch": true,
    // "noPropertyAccessFromIndexSignature": true,

    // Recommended Options
    "strict": true,
    "jsx": "react-jsx",
    "isolatedModules": true,
    "noUncheckedSideEffectImports": true,
    "skipLibCheck": true,
  }
}
监视自动编译就使用:如果要针对某个文件就直接在后面加文件名,不加的话就默认全部js文件
tsc --watch
当然后期vue,react这种就直接开箱即用,不用自己配置
- tsc --help 可以查找他的mingling
3.语法

注意:
1.小写的string和大写的区别–string,number,boolean同理–推荐使用string小写的
- new String就是对象,会占用内存比简单数据类型
let str1:string
str1 = "hello world"
str1 = new String("hello world") // 这里报错,就是因为string这种只能赋值string这种原始类型,不能包装对象中的这种写法
console.log(str1)

let str2:String
str2 = "hello world"
str2 = new String("hello world") // 这里正常
console.log(str2)
二 常用类型
1.any
- 尽量不用any,要不用ts也没有意义了
- any有个坑就是可以赋值给任意类型eg下面这种不报错
let str1:string
let num1:any = 11
str1 = num1
console.log(str1)
2.unknown
- unknown :未知类型
- unknown 可以理解为一个类型安全的any,适用于不确定的具体类型
针对any示例, 变成unknow就不行了,下面这种str1就飘红了
let str1:string
let num1:unknown = 11
str1 = num1
console.log(str1)
解决方式可以断言
str1 = num1 as string
或
str1 = <string>num1
3.never
- never的含义是:任何值都不是,简而言之就是不能优质,undefined,null,‘’,0都不行
- 所以
1.不用never去限制任何变量,因为没有意义
2.never主要是用于那种永远不会用到的时候,eg
function getNum():never {
    throw new Error('Function never returns')
}
3.永远不会走到的时候。ts主动推断出来的是never
let str:string="hello world"
if (typeof str==="string") {
    console.log(str.toUpperCase());
} else {
    console.log(str); // 默认str是never,就相当于永远不会走到
}
4.void
- void是针对
函数的,不写return的(不写其实有隐式的return undefined),也可以写return undefined,但是不能针对函数返回值哪怕是undefined做任何操作
5.object
- 关于object(array,function都可以),和Object(能.toString()的都可以赋值,string都行,比object限制的范围还大,其实就是除了null和undefined,跟any差不多) 范围太大,实际开发中不使用
- 1.声明对象类型
let obj:{ name: string, age?: number, [key:string]: any } = {
    name: '张三',
    lalal: 'lalal',
    lulul: 'lulu'
}
- 2.声明函数类型
let count: (a: number, b: number) => number
count = (a, b) => {
    return a + b
}

//函数声明法
function run():string{
    return '123'
}
//匿名函数
var fun2 = function():number{
    return 123
}
// 多个参数
function sum(a:number, ...result:number[]):number{
    var sum = 0;
    for(var i=0; i<result.length;i++){
        sum+=result[i]
    }
    return sum
}
alert(sum(1,2,3,4))
- 3.声明数组类型
let arr1:string[] = ['a','b','c'];
let arr2:Array<string> = ['a','b','c'];
6.元祖tuple
- 元祖是一种特殊的数组类型
let arr1:[string, number] = ['hello', 1];
let arr2: [string, number?] = ['hello'];
let arr3: [string, ...number[]] = ['hello', 1, 2, 3]; // 可以有无线多个数字类型
7.枚举enum
- 1.枚举主要解决的问题是比如以下这种情况可能在定义函数里面left等
拼错,或者调用时候有人拼错
function walk(str: string) {
    if (str === 'up') {
        console.log('向上走')
    } else if (str === 'left') { // 这里说不准会拼错
        console.log('向左走')
    } else {
        console.log('向下或者向右走')
    }
}

walk('la') // 这里可能会传的拼错
为了解决此问题可以使用enum
enum Direction {
    up,
    down,
    left,
    right
}
function walk(str: Direction) {
    if (str === Direction.up) {
        console.log('向上走')
    } else if (str === Direction.left) {
        console.log('向左走')
    } else {
        console.log('向下或者向右走')
    }
}

walk(Direction.up)
- 2.如果是直接打印Direction,里面这个有映射和反映射,从0开始的,如果你不想从0开始可以, 当然也可以是字符串就是没有反映射了
enum Direction {
    up,
    down,
    left,
    right
}
console.log(Direction)


enum Direction {
    up,
    down = 3,
    left,
    right
}
console.log(Direction)


enum Direction {
    up = "up",
    down = "sjhshjs",
    left = "sdasfd",
    right = "asdas"
}
console.log(Direction)
对应的打印

- 3.注意的点
enum Direction {
    up,
    down,
    left,
    right
}
console.log(Direction.up);
上面这种写法会编译成以下这种,我枚举的这些,但是真正使用只有up,现在都给我编译出来了
"use strict";
var Direction;
(function (Direction) {
    Direction[Direction["up"] = 0] = "up";
    Direction[Direction["down"] = 1] = "down";
    Direction[Direction["left"] = 2] = "left";
    Direction[Direction["right"] = 3] = "right";
})(Direction || (Direction = {}));
console.log(Direction.up);
//# sourceMappingURL=index.js.map
如果想改变就加一个const ----当然ts配置中
"preserveConstEnums": false,
ts
const enum Direction {
    up,
    down,
    left,
    right
}
console.log(Direction.up)
编译的js
"use strict";
console.log(0 /* Direction.up */);
//# sourceMappingURL=index.js.map
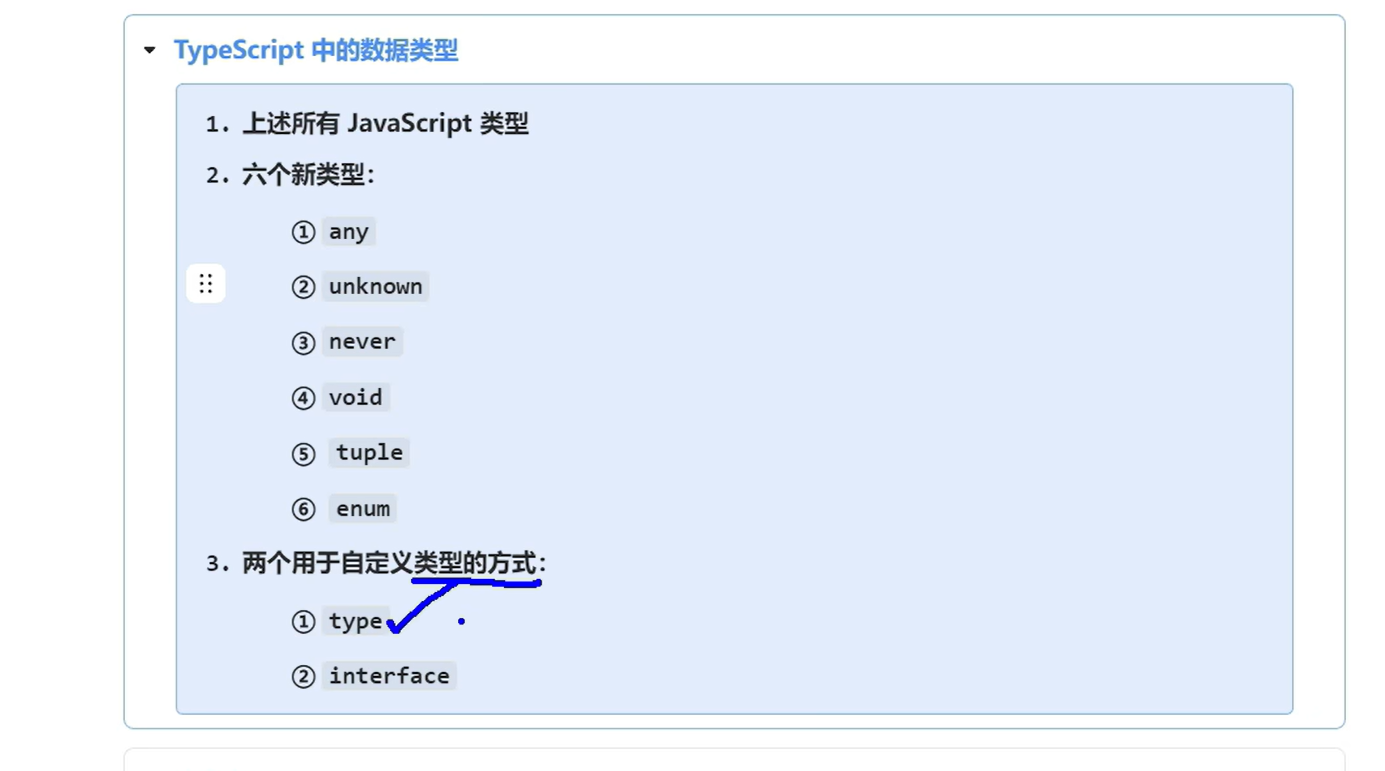
8.type
- type可以理解为别名
- 1.可以定义多重类型
type Status = number | string;
const aaa: Status = 200
const bbb: Status = '200'


type Status = '男' | '女';
const aaa: Status = "女" // 只能写男或者女了
- 2.联合类型
type Area = {
    height: number,
    width: number
}
type Position = {
    x: number,
    y: number
}
type Rectangle = Area & Position

// 联合类型,得同时有满足Area和Position里面的值
const rectangle: Rectangle = {
    height: 10,
    width: 20,
    x: 5,
    y: 5
}
- 3.一种特殊情况
function demo():void{
  console.log('demo');
  return '111' // 报错
};
换成这种形式写法就不报错了,ts并不会严格要求函数返回为void
type logFunc = ()=>void;
const demo:logFunc = function (){
  console.log('demo');
  return '111' // 就不报错了
};
原因官网有解释就是为了foreach等函数内部只有一行的时候可以省略{},要不省略了自动就是return了,都报错那就比较麻烦了,但是你拿到这个返回值后期也不能做任何操作
9.复习类相关知识
1.类
class Person {
    name: string
    age:number
    constructor(name: string, age: number) {
        this.name = name
        this.age = age
    }
    speak() {
        console.log(`我的名字${this.name},年龄${this.age}`) // 我的名字ZHAO,年龄18
    }
}

const p = new Person('ZHAO', 18)
p.speak()
2.继承类
class Person {
    name: string
    age:number
    constructor(name: string, age: number) {
        this.name = name
        this.age = age
    }
    speak() {
        console.log(`我的名字${this.name},年龄${this.age}`)
    }
}

class Student extends Person{
    grade: string
    constructor(name: string, age: number, grade: string) { // 如果不多加属性就不用constructor了
        super(name, age)
        this.grade = grade
    }
    study() {
        console.log(`${this.name}正在努力学习中`)
    }
    override speak() { // 想重载最好写上override, 不写也行,写上避免拼错这个函数名speak
        console.log(`wodenianji${this.grade}`)
    }
}

const s = new Student('LALA', 18, '高一')
s.speak() // wodenianji高一
3.类的修饰符
都可以即修饰属性,又可以修饰方法
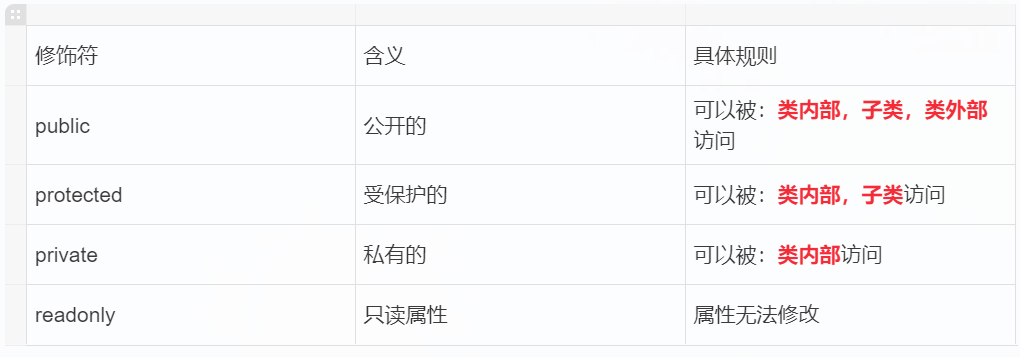
- 1.public其实你不写默认就是public-主要看那里是内部,外部,子类
class Person {
    public name: string
    public age:number
    constructor(name: string, age: number) {
        this.name = name
        this.age = age
    }
    public speak() { // 在Person里面的这些都是类的内部
        console.log(`我的名字${this.name},年龄${this.age}`)
    }
}


// 子类中访问
class Student extends Person {
    public study() {
        console.log(`我正在学习第${this.name}年级`)
    }
}

// 这里就是外部访问
const p = new Person('张三', 18)
p.name
- 2.属性的简写形式
原写法
class Person {
    public name: string
    public age:number
    constructor(name: string, age: number) {
        this.name = name
        this.age = age
    }
}
const p = new Person('Tom', 18)
console.log(p.name)
简化后—记得一定要写修饰符,只要简写就得用修饰符
class Person {
    constructor(public name: string, public age: number) {} // 注意这里需要写上public哦
}

const p = new Person('Tom', 18)
console.log(p.name)
以下就使用简写形式写了哈, 都同理
直接看readonly吧
class Person {
    constructor(
        public name: string,
        public readonly age: number
    ) {}
}

const p = new Person('Tom', 18)
p.name = 'zhaohui'
p.age = 19  // 这里就报错了
static
class Person{
    static sex="男"
    static print(){
        alert('111'+Person.sex)//这里面就没法直接用this了,没法调用类里面的属性,如果想要用,就定义一个静态属性,但是不用this昂
    }
}
Person.print()
10.抽象类
- 抽象类
不能实例化new *** - 主要意义是
被继承,抽象类里面可以有通用方法或属性,也可以抽象方法(相当于制定规则,后期必须有此方法及实现)
eg 快递有标准快递,有特快快递
abstract class Package {
    constructor(public weight: number) {}
    // 抽象方法,计算运费, 后期继承的必须要有这个方法
    abstract getCost(): number;
    // 具体实现
    print() {
        console.log(`运费为:${this.getCost()}`);
    }
}
// 普通快递
class NormalPackage extends Package {
    // 这里的public或其他修饰符必须写呦-简写属性必须写修饰符,别忘了
    constructor(weight: number, public unitPrice: number) {
        super(weight);
    }
    getCost(): number {
        return this.weight * this.unitPrice;
    }
}

// 快件
class FastPackage extends Package {
    // 要是没有多余属性就不用写constructor
    getCost(): number {
        return this.weight *100;
    }
}

const normalPackage = new NormalPackage(10, 5);
normalPackage.print(); // 运费为:50


const fastPackage = new FastPackage(10);
fastPackage.print(); // 运费为:1000

// const package = new Package(10); // 报错,因为不能new 抽象类
11.interface接口
interface是定义结构的一种方式,主要用于
类,对象,函数等规定的一种契约。注意的是接口是只能定义格式,不能包含任何实现。对于项目中类,对象等无脑冲这个接口就行,项目中经常用到的就是接口1.定义类结构
interface PersonInterface {
  name: string;
  age: number;
  sing(): void;
}

class Person implements PersonInterface {
  constructor(public name: string, public age: number) {}
  sing() {
    console.log("I am singing");
  }
}
- 2.对象
interface UserInterface {
  name: string;
  email?: string;
  readonly password: string;
  run(): void;
}

const user: UserInterface = {
  name: "John",
  password: "123",
  run() {
    console.log("run");
  },
};
- 3.函数
interface CountInterface {
  (a: number, b: number): number;
}
const count: CountInterface = (a, b) => {
  return a + b;
};
- 4.接口有继承
interface PersonInterface {
  name: string;
  age: number;
}
interface StudentInterface extends PersonInterface {
  grade: string;
}

const student: StudentInterface = {
  name: "John",
  age: 16,
  grade: "A",
};
- 5.接口的自动合并(相同名字)
interface PersonInterface {
  name: string;
  age: number;
}
interface PersonInterface {
  grade: string;
}

const student: PersonInterface = {
  name: "John",
  age: 16,
  grade: "A",
};
12.interface和type的区别
- 相同点: interface和type都可以定义对象,很多情况下可以直接互换的
- 不同点
- interface:更专注于定义对象和类的结构,支持继承,合并
- type:可以定义类型别名,联合类型,交叉类型,不可以继承和合并
13.interface和抽象类的区别
- 相同点:都用于定义类的格式
- 不同点:
- 接口:只能描述结构,不能有任何实现。一个类可以实现多个接口
- 抽象类:既可以包含抽象方法,也可以包含具体实现。一个类只能继承一个抽象类
// 类可以实现多个接口
interface FlyInterface {
  flyIn(): void;
}
interface SwimInterface {
  swimIn(): void;
}
class Bird implements FlyInterface,SwimInterface {
  flyIn() {
    console.log('I can fly');
  }
  swimIn() {
    console.log('I can swim');
  }
}
14.泛型
- 我觉得就想一个
变量,比如定义函数的时候我确实不知道传什么参数,只有在使用的时候才规范参数
eg - 1.泛型函数
function logData<T, U>(data:T, data2: U): T|U {
   return Date.now() % 2 === 0 ? data : data2
}

logData<number, string>(1, '2')
logData<string, boolean>('1', false)
- 2.泛型接口
interface PersonInterface<T> {
  name: string;
  age: number;
  skills: T;
}
const person1: PersonInterface<string[]> = {
  name: "Mike",
  age: 30,
  skills: ["JavaScript", "TypeScript"],
};
const person2: PersonInterface<{ skill: string }> = {
  name: "Mike",
  age: 30,
  skills: { skill: "JavaScript" },
};
const person3: PersonInterface<number> = {
  name: "Mike",
  age: 30,
  skills: 1,
};

type JobInfo = { job: string };

const person4: PersonInterface<JobInfo> = {
  name: "Mike",
  age: 30,
  skills: { job: "Developer" },
};
- 3.泛型类
class Person<T> {
  constructor(public name: T, public age: number) {}
}
const p = new Person<string>('Tom', 18);
15.类型声明文件
.d.ts文件,主要为现有的js代码提供类型信息,使得ts能都对这些js做类型检查和提示
比如一个js文件先写了
moni.js
export function add(a, b) {
    return a+b
}
然后再ts中使用,没有类型提示,所以就
moni.d.ts
declare function add(a: number, b: number): number;
export { add };
就有提示了
16.装饰器
- 装饰器就是一种
特殊的函数-可以理解为给类,属性等添加一些方法或属性啥的 - 装饰器是一个
实验性质的特性,需要更改配置。ts5.0可以直接用类装饰器,不用改配置,其他的不保证 - 装饰器有5中:
类装饰器,属性。。。,方法,,,访问器,,,参数。。。
// 启用装饰器支持
"experimentalDecorators": true,
// 启用装饰器元数据支持(可选)
"emitDecoratorMetadata": true,
1.类装饰器
/**
 *
 * @param target: 就是Person类
 */
function CustomString(target: Function) {
    target.prototype.toString = function () {
        return JSON.stringify(this);
    }
}

@CustomString
class Person {
    constructor(public name: string) {
        this.name = name;
    }
}

const p = new Person('Jane');
console.log(p.toString()) // [object Object],有装饰器后{"name":"Jane"}
关于返回值如果装饰器中返回一个类,就会替换被装饰的类
function demo(target: Function) {
    return class {
        run() {
            console.log('run')
        }
    }
}

@demo
class Person {
    test() {
        console.log('test')
    }
}

console.log('Person', Person)  // 打印的是那个run的类
关于构造类型Funtion 这个类型比较宽泛,包括:普通函数、箭头函数、构造函数等等,我想只让传可以new的构造函数,定义这么写
// 单独定义构造函数
type Constructor = new (...args: any[]) => any;

function test(fn: Constructor) {}
class Person{}
test(Person);
// 定义构造函数,并且里面有个wife静态属性
type Constructor = {
    new (...arg: any[]): {};
    wife: string
};

function test(fn: Constructor) {}
class Person{
    static wife: 'mama'
}
test(Person);
替换被装饰的类
给这个类属性加一个属性,和方法
type Constructor = new (...args: any[]) => {}
// 要么下面调用getTime 报错
interface Person {
    getTime():void
}
function logTime<T extends Constructor>(target: T) {
    return class extends target {
        createTime: Date
        constructor(...args: any[]) {
            super(...args);
            this.createTime = new Date();
        }
        getTime() {
        return `创建时间为${this.createTime}`
        }
    }
}


@logTime
class Person {
    constructor(public name: string) {}
    greet() {
        console.log(`Hello, my name is ${this.name}`);
    }
}
const p = new Person('Jane');
console.log(p, p.getTime())

2.装饰器工厂
- 可以理解为装饰器工厂可以接收
自定义参数,然后返回一个装饰器 - eg,传入几就打印几次
function logInfo(num: number) {
    return function(target: Function) {
        target.prototype.introduce = function() {
            for(let i = 0; i < num; i++) {
                console.log(`I am ${this.name}`);
            }
        }
    }
}
interface Person {
    introduce():void
}

@logInfo(3)
class Person {
    constructor(public name: string) {}
}
const p = new Person('Jim');
p.introduce() // 调用一次就可以打印三次了
3.装饰器组合
如果有装饰器,又有装饰器工厂,那么执行顺序是从上往下先执行工厂函数,然后再从下往上执行装饰器
function test1(target: Function) {
    console.log('test1装饰器')
}
function test2() {
    console.log('test2装饰器工厂')
    return function (target: Function) {
        console.log('test2装饰器')
    }
}

function test3() {
    console.log('test3装饰器工厂')
    return function (target: Function) {
        console.log('test3装饰器')
    }
}

function test4(target: Function) {
    console.log('test4装饰器')
}

@test1
@test2()
@test3()
@test4
class Test {}
// 执行顺序
// test2装饰器工厂
// test3装饰器工厂
// test4装饰器
// test3装饰器
// test2装饰器
// test1装饰器
4.属性装饰器
先了解taget的不一样
// target 如果是普通类属性就是指类的原型对象, 如果是静态属性,target就是类
// propertyKey就是属性名
function Demo(target: any, propertyKey: string) {
    console.log(target, propertyKey);
}
class Person {
    @Demo name: String;
    @Demo static age: Number;
    constructor(name: String) {
        this.name = name;
    }
}
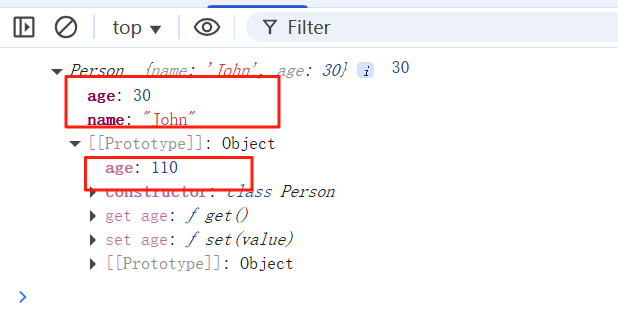
关于属性遮蔽问题
- 比如new 实例在上面,Object.defineProperty在下面,肯定就是先往自己属性放个age30,再在原型上放age110
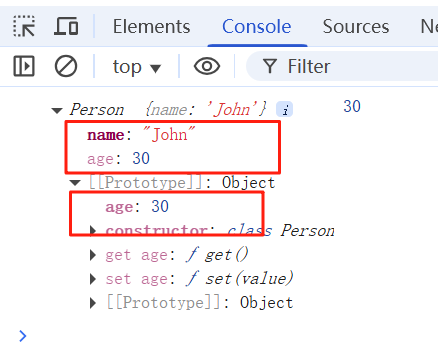
- 如果相反,比如先往原型上放个age110,在new往属性上加个age30,它会先顺着原型链找,找到都更改了
class Person {
    constructor(public name: string, public age: number) {}
}

const person = new Person('John', 30);
let ageValue = 110
Object.defineProperty(Person.prototype, 'age', {
    get() {
        return ageValue
    },
    set(value) {
        ageValue = value;
    }
})

console.log(person, person.age);
class Person {
    constructor(public name: string, public age: number) {}
}

let ageValue = 110
Object.defineProperty(Person.prototype, 'age', {
    get() {
        return ageValue
    },
    set(value) {
        ageValue = value;
    }
})

const person = new Person('John', 30);

console.log(person, person.age);
应用: eg: 监视属性的修改
在修改name的时候先打印一下,
function state(target: any, propertyKey: string) {
    Object.defineProperty(target, propertyKey, {
        get: function () {
            return this['_' + propertyKey];
        },
        set: function (newValue) {
            console.log('set ' + propertyKey + ' to ' + newValue);
            this['_' + propertyKey] = newValue;
        }
    });
}

class Person {
    @state name: string;
    constructor(name: string) {
        this.name = name;
    }
}

const p = new Person('xiaoming'); // set name to xiaoming
p.name = 'llalalll' // set name to llalalll
5.方法装饰器
/**
 *
 * @param target 如果是类普通方法就是,target就是原型对象, 如果是静态方法,target就是类对象--同属性装饰器
 * @param name 方法名 speak --同属性装饰器
 * @param descriptor 方法描述对象
 * @returns
 */
function demo(target:any, name:any, descriptor: any) {
    console.log(target, name, descriptor);
    return descriptor;
}
class Person {
    @demo
    speak() {
        console.log("hello world");
    }
    static walk() {
        console.log("walking");
    }
}
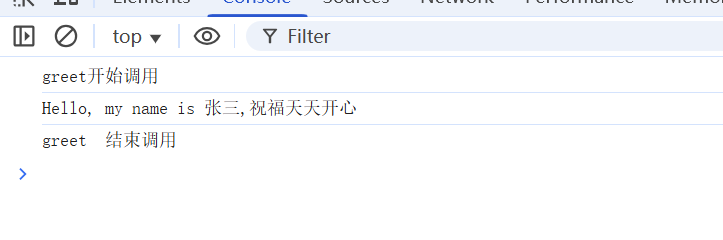
应用: 在调用方法前和后写一下逻辑
function demo(target: any, propertyKey: string, descriptor: PropertyDescriptor) {
    const original = descriptor.value;
    descriptor.value = function(...args: any[]) {
        console.log(`${propertyKey}开始调用`);
        const result = original.apply(this, args);
        console.log(`${propertyKey}  结束调用`,);
        return result
    };
}
class Person {
    constructor(public name: string) {}
    @demo greet(zhufun: string) {
        console.log(`Hello, my name is ${this.name},祝福${zhufun}`);
    }
}
const person = new Person('张三');
person.greet('天天开心');
6.访问器装饰器(get, set)和参数装饰器就应用不多了,后面遇到再看
17.模块和命名空间
模块,公共功能
比如模块,我新建一个文件夹modules, 里面建一个index.ts文件
里面暴露export
然后在需要的ts文件中引入,也用import就行,然后等运行,变成js的时候会变成es5的就是exports和require,因为浏览器不能识别,所以这边就可以用node来运行,方法就是
打开所在文件夹,进入到js文件中,然后输入命令 node index.js
这里面一定要注意js和ts昂
命名空间,命名空间可以做成模块的,也是可以export命名空间
namespace A{

}
namespace B{
    这里面的名字和A里面的可以一样,不会造成命名冲突
    这里面是私有的
    如果在外面访问还是需要export暴露的呦,但是在外面就不需要import了
    也可以不暴露,直接用B.Cat这种就行
    eg
    export class Dog {

    }
        class Cat{

        }
}
var d = new Dog()
var c=new B.Cat()