Vue仿微信过度动画
使用过度动画的原理:牢牢的抓住vue中的transition动画的使用方式,并配合动画的几个过度效果
贴一张官网的图和动画的说明
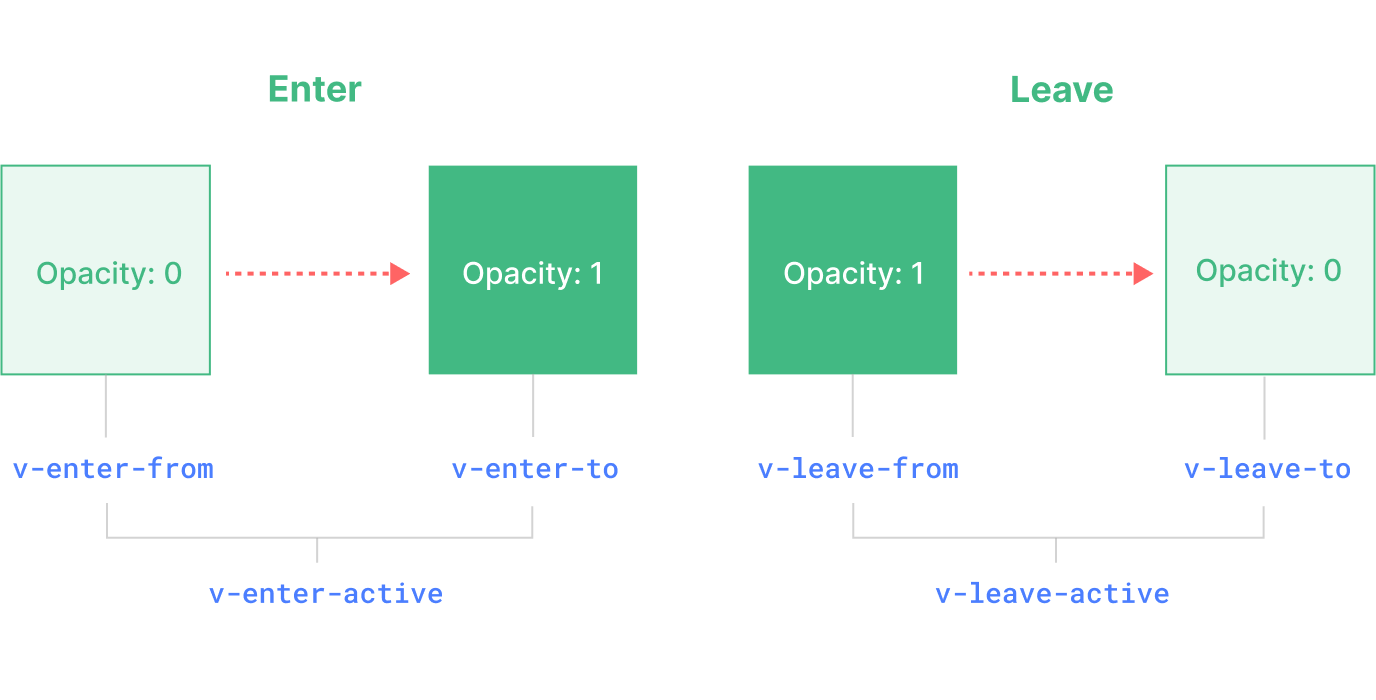
v-enter-from进入动画的起始状态。在元素插入之前添加,在元素插入完成后的下一帧移除。v-enter-to进入动画的结束状态。在元素插入完成后的下一帧被添加 (也就是v-enter-from被移除的同时),在过渡或动画完成之后移除。v-enter-active进入动画的生效状态。应用于整个进入动画阶段。在元素被插入之前添加,在过渡或动画完成之后移除。这个 class 可以被用来定义进入动画的持续时间、延迟与速度曲线类型。v-leave-from离开动画的起始状态。在离开过渡效果被触发时立即添加,在一帧后被移除。v-leave-to离开动画的结束状态。在一个离开动画被触发后的下一帧被添加 (也就是v-leave-from被移除的同时),在过渡或动画完成之后移除。v-leave-active离开动画的生效状态。应用于整个离开动画阶段。在离开过渡效果被触发时立即添加,在过渡或动画完成之后移除。这个 class 可以被用来定义离开动画的持续时间、延迟与速度曲线类型。
1. 在Vue2中的使用方式
分三个文件说明
1.1 App.vue文件内容
<template>
  <div class="box">
    <transition :name="routerAnimationName">
        <router-view />
      </transition>
  </div>
</template>

<script>
export default {
  data () {
    return {
      routerAnimationName: 'slide-left'
    }
  },
  watch: {
    '$route' (from, to) {
      // console.log(from, to)
      this.routerAnimationName = Number(to.meta.index) > Number(from.meta.index) ? 'slide-right' : 'slide-left'
    }
  }
}
</script>


<style>
* {
  padding: 0;
  margin: 0;
}

body {
  overflow: hidden;
}

.box {
  width: 100%;
  height: 100vh;
  position: relative;
}

.bg1,
.bg2 {
  width: 100%;
  height: 100%;
  display: flex;
  flex-direction: column;
  align-items: center;
  justify-content: center;
}

.bg1 {
  background-color: aquamarine;
}

.bg2 {
  background-color: antiquewhite;
}

.slide-left-enter-active,
.slide-left-leave-active,
.slide-right-enter-active,
.slide-right-leave-active {
  transition: all 0.3s;
  position: absolute;
  left: 0;
  top: 0;
  width: 100%;
  height: 100%;
}

.slide-left-leave,
.slide-left-enter-to {
  transform: translateX(0);
  /* z-index: -1; */
}

/** 父页面 */
.slide-left-leave-to,
.slide-right-enter {
  transform: translateX(-100%);
}

/** 子页面 */
.slide-left-enter,
.slide-right-leave-to {
  transform: translateX(100%);
}
</style>
1.2 router/index.js文件源码
import Vue from 'vue'
import VueRouter from 'vue-router'
import HomeView from '../views/HomeView.vue'

Vue.use(VueRouter)

const routes = [
  {
    path: '/',
    name: 'home',
    component: HomeView,
    meta: {
      index: 1
    }
  },
  {
    path: '/about',
    name: 'about',
    // route level code-splitting
    // this generates a separate chunk (About.[hash].js) for this route
    // which is lazy-loaded when the route is visited.
    component: () => import('../views/AboutView.vue'),
    meta: {
      index: 2
    }
  }
]

const router = new VueRouter({
  routes
})

export default router
1.3 HomeView.vue文件源码
<template>
  <div class="bg1">
    <h1>home page</h1>
    <router-link to="/about">About</router-link>
  </div>
</template>
1.4 AboutView.vue文件源码
<template>
  <div class="bg2">
    <h1>This is an about</h1>
    <router-link to="/">Home</router-link>
  </div>
</template>
2. 在Vue3中的使用方式
2.1. App.vue文件源码
<script setup lang="ts">
import { ref, watch } from 'vue'
import router from '@/router'

const routerAnimationName = ref('slide-left')

watch(router.currentRoute, (from, to) => {
  routerAnimationName.value = Number(to.meta.index) > Number(from.meta.index) ? 'slide-right' : 'slide-left'
})
</script>

<template>
  <div class="box">
    <router-view v-slot="{Component}">
      <transition :name="routerAnimationName">
        <component :is="Component" />
      </transition>
    </router-view>
  </div>
</template>

<style>
* {
  padding: 0;
  margin: 0;
}
body {
  overflow: hidden;
}
.box {
  width: 100%;
  height: 100vh;
  position: relative;
}
.bg1,
.bg2 {
  width: 100%;
  height: 100%;
  display: flex;
  flex-direction: column;
  align-items: center;
  justify-content: center;
}
.bg1 {
  background-color: aquamarine;
}

.bg2 {
  background-color: antiquewhite;
}

.slide-left-enter-active,
.slide-left-leave-active,
.slide-right-enter-active,
.slide-right-leave-active {
  transition: all 0.3s;
  position: absolute;
  left: 0;
  top: 0;
  width: 100%;
  height: 100%;
}

.slide-left-leave,
.slide-left-enter-to {
  transform: translateX(0);
  z-index: -1;
}

/** 父页面 */
.slide-left-leave-to,
.slide-right-enter-from {
  transform: translateX(-100%);
}

/** 子页面 */
.slide-left-enter-from,
.slide-right-leave-to {
  transform: translateX(100%);
}
</style>
2.2 router/index.ts文件源码
import { createRouter, createWebHistory } from 'vue-router'
import HomeView from '../views/HomeView.vue'

const router = createRouter({
  history: createWebHistory(import.meta.env.BASE_URL),
  routes: [
    {
      path: '/',
      name: 'home',
      component: HomeView,
      meta: {
        index: 1
      }
    },
    {
      path: '/about',
      name: 'about',
      // route level code-splitting
      // this generates a separate chunk (About.[hash].js) for this route
      // which is lazy-loaded when the route is visited.
      component: () => import('../views/AboutView.vue'),
      meta: {
        index: 2
      }
    }
  ]
})

export default router
2.3 HomeView.vue文件源码
<script setup lang="ts">
</script>

<template>
  <div class="bg1">
    <h1>home page</h1>
    <router-link to="/about">About</router-link>
  </div>
</template>
2.4 AboutView.vue文件源码
<script setup lang="ts">
import { RouterLink } from 'vue-router';

</script>

<template>
  <div class="bg2">
    <h1>This is an about</h1>
    <RouterLink to="/" text="Home" />
  </div>
</template>
3. 展示效果
4. 特别说明
- 在
vue3中使用slide-left-enter-from代替slide-left-enter,两者不能混用,不然不生效 - 初写文档,有很多地方需要学习,不喜勿喷
本文含有隐藏内容,请 开通VIP 后查看