目录
一、效果图
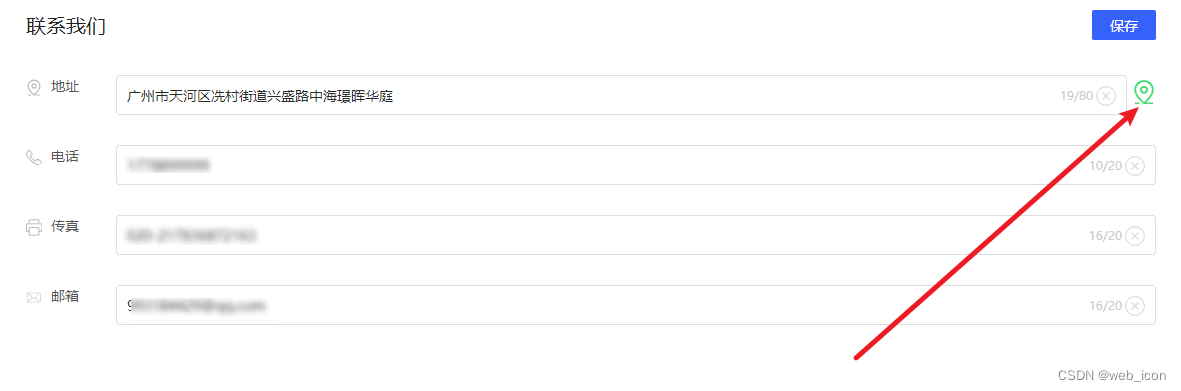
二、加载地图弹窗的显示隐藏
1.先实现地图弹窗的显示隐藏、添加点击事件改变状态(我这边用的自己封装的组件、可以自行更改,使用的是mobx状态管理、在store里面写方法、异曲同工)
  <span
     className="icon-map"
     onClick={() => this.store.addMapItem()}
     >
  <Trans>
   <ReIcon className="icon" icon="tour" />
   </Trans>
 </span>
三、显示地图弹窗的回调
//地图选址模块
@o location = {
lng: null, //经度
lat: null, //纬度
};
@o showMapModalDialog = false; //map弹窗状态
@o mapAddress = "";//地图显示的input值
@o mapAddState = false;//确认后显示新的经纬度的状态
addMapItem() {
//弹窗的状态、可以在state里面声明一个状态值
this.showMapModalDialog = true;
//弹窗输入框的值回显外面的地址 也可以绑定一个onchange 这样就不用重新去赋值
this.mapAddress = this.address;
//点击弹窗加载地图经纬度
this.showMapByLocation(this.location);
//确认后再次点开回显的最新经纬度的状态
this.mapAddState = true;
}
//取消弹窗的回调
closeMapDialog(e) {
e.preventDefault();
this.showMapModalDialog = false;
this.mapAddress = this.contactInfo.address;
if (!this.mapAddState) {
this.location.lat = this.contactInfo.lat;
this.location.lng = this.contactInfo.lng;
}
}
//获取地图搜索输入框的值回调
confirmAddMapValue() {
//判断校验经纬度
if (!this.location.lat && !this.location.lng && !this.mapAddress) {
return stores.Frame.warning("请选择地址坐标再确认");
} else {
this.showMapModalDialog = false;
this.address = this.mapAddress;
}
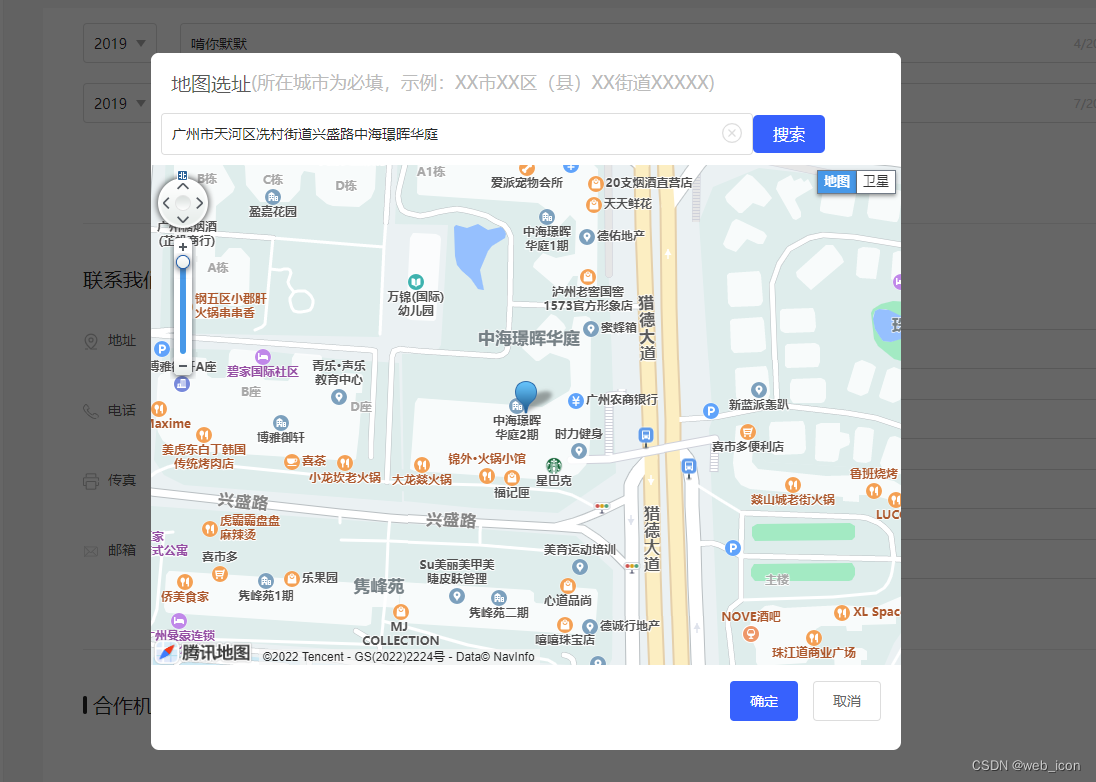
}四、加载地图的样式结构
renderAddMapDialog() {
//控制弹窗显示隐藏的状态显示
    return (
      <div
        className={
          this.store.showMapModalDialog
            ? "map-prise-mask show"
            : "map-prise-mask hide"
        }
      >
        <div className="prise-wrapper">
          <div className="prise-box">
            <div className="prise-header">
              <p>
                <Trans>地图选址</Trans>
              </p>
              <p className="tips">
              <Trans>(所在城市为必填,示例:XX市XX区(县)XX街道XXXXX)</Trans>
              </p>
            </div>
            <div className="search-box">
              <ReTextField
                label=""
                isLabel={false}
                type="text"
                className="region-input"
                //   tipLeft={true}
                closeIcon={true}
                CN={true}
                maxLength="50"
                notfullWidth={false}
                //获取输入框值得onchange事件
                onChange={(e, v) => this.store.addressMapChange(v)}
                value={this.store.mapAddress}
                placeholder={"请输入地址搜索"}
              />
              <span className="search-tex" onClick={()=>this.store.getLocationByAddress()}>
                搜索
              </span>
            </div>
            //加载腾讯地图的div
            <div id="mapContainer"></div>
            <div className="prise-footer">
              <ReButton
                className="assign-btn"
                label={"确定"}
                onClick={(e) => this.store.confirmAddMapValue(e)}
              />
              <ReButton
                className="cancel"
                label={"取消"}
                onClick={(e) => this.store.closeMapDialog(e)}
              />
            </div>
          </div>
        </div>
      </div>
    );
  }
五、 加载腾讯地图api回调、腾讯地图要申请key加载
  //获取地图移动选址的经纬度
  setLocations(data) {
    console.log(data);
    this.location = data;
  }

// 根据地址搜索获取坐标
  async getLocationByAddress() {
    let _that = this;
    var callbacks = {
      complete: function (result) {
        console.log(result);
        _that.setLocations(result.detail.location);
        _that.showMapByLocation(result.detail.location);
      },
    };
    new qq.maps.Geocoder(callbacks).getLocation(_that.mapAddress);
  }

  // 根据坐标生成marker
  showMapByLocation = (location) => {
    console.log(location);
    let that = this;
    const center = new qq.maps.LatLng(location.lat, location.lng);
    // 初始化地图
    const map = new qq.maps.Map(document.getElementById("mapContainer"), {
      center,
      zoom: 20,
      draggable: true,
      scrollwheel: true,
      disableDoubleClickZoom: true,
    });

    const marker = new qq.maps.Marker({
      position: center,
      map: map,
    });
    //marker移动选址
    qq.maps.event.addListener(map, "click", function (event) {
      marker.setPosition(event.latLng);
      that.setLocations(event.latLng);
      new qq.maps.Geocoder({
        complete: function (result) {
          console.log(result.detail);
          const { nearPois, addressComponents } = result.detail;
          const streetNumber = addressComponents.streetNumber;
          const street = addressComponents.street;
          const city = addressComponents.city;
          const district = addressComponents.district;
          const town = addressComponents.town;
          const point = nearPois[0].name;
          //获取到当前定位的位置文本并赋值到搜索框中
          that.mapAddress = `${city ? city : ""}${district ? district : ""}${
            town ? town : ""
          }${streetNumber ? streetNumber : street}${point ? point : ""}`;
        },
      }).getAddress(new qq.maps.LatLng(event.latLng.lat, event.latLng.lng));
    });
  };
六、react项目加载腾讯地图key
<div id="root">
    <script src="//map.qq.com/api/js?v=2.exp&key=换成自己的key值"></script>
 </div>
本文含有隐藏内容,请 开通VIP 后查看