7 OpenFeign:Spring Cloud声明式服务调用组件
7.1 Netflix Feign 介绍
- Netflix Feign 是 Netflix 公司发布的一种实现负载均衡和服务调用的开源组件。Spring Cloud 将其与 Netflix 中的其他开源服务组件(例如 Eureka、Ribbon 以及 Hystrix 等)一起整合进 Spring Cloud Netflix 模块中,整合后全称为 Spring Cloud Netflix Feign。
- feign是声明式的web service客户端服务调用组件,它让微服务之间的调用变得更简单了,类似Controlleri调用service。SpringCloud集成了Ribbon和Eureka,利用 Ribbon 维护了一份可用服务清单,并通过 Ribbon 实现了客户端的负载均衡,在 RestTemplate 的基础上做了进一步的封装,可在使用Feign提供负载均衡的http客户端。
- 因此,我们只需要声明一个接口并通过注解进行简单的配置(类似于 Dao 接口上面的 Mapper 注解一样)即可实现对 HTTP 接口的绑定,像调用本地方法一样来调用远程服务,而完全感觉不到这是在进行远程调用。
- 虽然Feign 支持多种注解,例如 Feign 自带的注解以及 JAX-RS 注解等,但Feign 本身却不支持 Spring MVC 注解并在2019 年 Netflix 公司宣布 Feign 组件正式进入停更维护状态,于是 Spring 官方便推出了一个名为 OpenFeign 的组件作为 Feign 的替代方案。
- Feign :主要是社区版,大家都习惯面向接口编程。是很多开发人员的规范。所以引出调用微服务访问两种方法
-
- ribbon:微服务名字
- feign:接口和注解
7.2 OpenFeign介绍
- OpenFeign 全称 Spring Cloud OpenFeign,它是 Spring 官方推出的一种声明式服务调用与负载均衡组件,它的出现就是为了替代进入停更维护状态的 Feign。
- OpenFeign 是 Spring Cloud 对 Feign 的二次封装,它具有 Feign 的所有功能,并在 Feign 的基础上增加了对 Spring MVC 注解的支持,例如 @RequestMapping、@GetMapping 和 @PostMapping 等。
- Feign旨在使编写引ava Http客户端变得更容易
- 前面在使用Ribbon+RestTemplate时,利用RestTemplate对Http请求的封装处理,形成了一套模板化的调用方法。但是在实际开发中,由于对服务依赖的调用可能不止一处,往往一个接口会被多处调用,所以通常都会针对每个微服务自行封装一些客户端类来包装这些依赖服务的调用。所以,Feign在此基础上做了进一步封装,由他来帮助我们定义和实现依赖服务接口的定义,在Feign的实现下,我们只需要创建一个接口并使用注解的方式来配置它(类似于以前Dao接口上标注Mapperi注解,现在是一个微服务接口上面标注一个Feign注解即可。)即可完成对服务提供方的接口绑定,简化了使用Spring Cloud Ribbon时,自动封装服务调用客户端的开发量。
- 值得注意的是Feign在Ribbon的基础上加了一层,运行效率相比Ribbon会低一些。
7.3 OpenFeign 常用注解
- 使用 OpenFegin 进行远程服务调用时,常用注解如下表。
| 注解 | 说明 |
|---|---|
| @FeignClient | 该注解用于通知 OpenFeign 组件对 @RequestMapping 注解下的接口进行解析,并通过动态代理的方式产生实现类,实现负载均衡和服务调用。 |
| @EnableFeignClients | 该注解用于开启 OpenFeign 功能,当 Spring Cloud 应用启动时,OpenFeign 会扫描标有 @FeignClient 注解的接口,生成代理并注册到 Spring 容器中。 |
| @RequestMapping | Spring MVC 注解,在 Spring MVC 中使用该注解映射请求,通过它来指定控制器(Controller)可以处理哪些 URL 请求,相当于 Servlet 中 web.xml 的配置。 |
| @GetMapping | Spring MVC 注解,用来映射 GET 请求,它是一个组合注解,相当于 @RequestMapping(method = RequestMethod.GET) 。 |
| @PostMapping | Spring MVC 注解,用来映射 POST 请求,它是一个组合注解,相当于 @RequestMapping(method = RequestMethod.POST) 。 |
Spring Cloud Finchley 及后续版本一般使用 OpenFeign 作为其服务调用组件。由于 OpenFeign 是在 2019 年 Feign 停更进入维护后推出的,因此大多数 2019 年及以后的新项目使用的都是 OpenFeign,而 2018 年以前的项目一般使用 Feign。
7.4 对比Feign和OpenFeign
相同点:Feign 和 OpenFegin 具有以下相同点:
-
- Feign 和 OpenFeign 都是 Spring Cloud 下的远程调用和负载均衡组件。
- Feign 和 OpenFeign 作用一样,都可以实现服务的远程调用和负载均衡。
- Feign 和 OpenFeign 都对 Ribbon 进行了集成,都利用 Ribbon 维护了可用服务清单,并通过 Ribbon 实现了客户端的负载均衡。
- Feign 和 OpenFeign 都是在服务消费者(客户端)定义服务绑定接口并通过注解的方式进行配置,以实现远程服务的调用。
不同点:Feign 和 OpenFeign 具有以下不同:
-
- Ribbon维护了microservice-cloud-provider-dept-800X的服务列表信息,并且通过轮询实现了客户端的负载均衡,而Fegn只需要定义服务绑定接口且以声明式的方法,优雅而且简单的实现了服务调用。
- Feign 和 OpenFeign 的依赖项不同,Feign 的依赖为 spring-cloud-starter-feign,而 OpenFeign 的依赖为 spring-cloud-starter-openfeign。
- Feign 和 OpenFeign 支持的注解不同,Feign 支持 Feign 注解和 JAX-RS 注解,但不支持 Spring MVC 注解;OpenFeign 除了支持 Feign 注解和 JAX-RS 注解外,还支持 Spring MVC 注解。
7.5 OpenFeign 远程服务调用
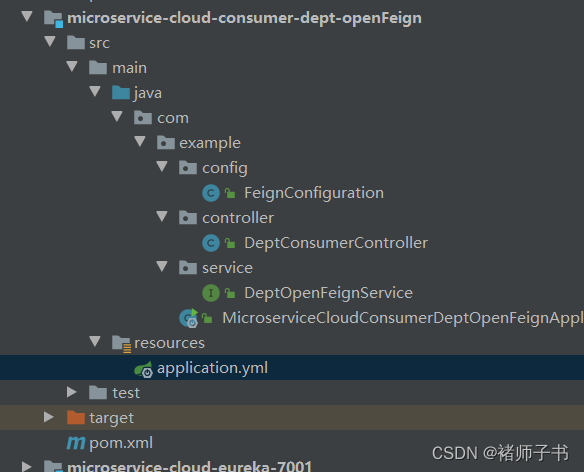
- 在基础工程下再创建一个消费者服务microservice-cloud-consumer-dept-openFeign的maven工程,来测试OpenFeign 远程服务调用。项目结构如下图

- 在其 pom.xml 中补充引入所需的依赖Spring Cloud Eureka/OpenFeign的依赖.由于Eureka集成了ribbon且openfeign自带的负载均衡所以可以不用配置ribbon
<?xml version="1.0" encoding="UTF-8"?>
<project xmlns="http://maven.apache.org/POM/4.0.0"
         xmlns:xsi="http://www.w3.org/2001/XMLSchema-instance"
         xsi:schemaLocation="http://maven.apache.org/POM/4.0.0 http://maven.apache.org/xsd/maven-4.0.0.xsd">
    <!--引入父工程pom-->
    <parent>
        <artifactId>spring-cloud-microservice</artifactId>
        <groupId>org.example</groupId>
        <version>1.0-SNAPSHOT</version>
    </parent>
    <modelVersion>4.0.0</modelVersion>

    <artifactId>microservice-cloud-consumer-dept-openFeign</artifactId>
    <!--实体类API+web-->
    <dependencies>
        <!--引入公共子模块-->
        <dependency>
            <groupId>org.example</groupId>
            <artifactId>microservice-cloud-api</artifactId>
            <version>1.0-SNAPSHOT</version>
        </dependency>
        <!--web-->
        <dependency>
            <groupId>org.springframework.boot</groupId>
            <artifactId>spring-boot-starter-web</artifactId>
            <exclusions>
                <exclusion>
                    <groupId>org.springframework.boot</groupId>
                    <artifactId>spring-boot-starter-tomcat</artifactId>
                </exclusion>
            </exclusions>
        </dependency>
        <!--devtools 开发工具 这个热部署重启得更快-->
        <dependency>
            <groupId>org.springframework.boot</groupId>
            <artifactId>spring-boot-devtools</artifactId>
            <scope>runtime</scope>
            <optional>true</optional>
        </dependency>
        <!--logback -->
        <dependency>
            <groupId>org.projectlombok</groupId>
            <artifactId>lombok</artifactId>
            <optional>true</optional>
        </dependency>
        <!--springboot-test-->
        <dependency>
            <groupId>org.springframework.boot</groupId>
            <artifactId>spring-boot-starter-test</artifactId>
            <scope>test</scope>
        </dependency>
        <!--jetty-->
        <dependency>
            <groupId>org.springframework.boot</groupId>
            <artifactId>spring-boot-starter-jetty</artifactId>
        </dependency>
        <!-- 修改后立即生效,热部署 -->
        <dependency>
            <groupId>org.springframework</groupId>
            <artifactId>springloaded</artifactId>
            <version>1.2.8.RELEASE</version>
        </dependency>
        <!--日志-->
        <dependency>
            <groupId>org.apache.logging.log4j</groupId>
            <artifactId>log4j-core</artifactId>
        </dependency>
        <dependency>
            <groupId>ch.qos.logback</groupId>
            <artifactId>logback-core</artifactId>
        </dependency>
        <!--Spring Cloud Eureka 客户端依赖-->
        <dependency>
            <groupId>org.springframework.cloud</groupId>
            <artifactId>spring-cloud-starter-netflix-eureka-client</artifactId>
            <version>2.2.10.RELEASE</version>
        </dependency>
        <!--Spring Cloud openfeign 依赖-->
        <dependency>
            <groupId>org.springframework.cloud</groupId>
            <artifactId>spring-cloud-starter-openfeign</artifactId>
            <version>3.1.3</version>
        </dependency>
    </dependencies>

    <build>
        <plugins>
            <plugin>
                <groupId>org.springframework.boot</groupId>
                <artifactId>spring-boot-maven-plugin</artifactId>
                <configuration>
                    <excludes>
                        <exclude>
                            <groupId>org.projectlombok</groupId>
                            <artifactId>lombok</artifactId>
                        </exclude>
                    </excludes>
                </configuration>
            </plugin>
        </plugins>
    </build>

</project>
- 在 microservice-cloud-consumer-dept-openFeign 下的类路径(即 /resources 目录)下,添加一个 application.yml,配置内容如下。
server:
  port: 80
  servlet:
    context-path: /
#Jetty specific properties
  jetty:
    threads:
      acceptors: -1                   #Number of acceptor threads to use. When the value is -1, the default, the number of acceptors is derived from the operating environment.
      selectors: -1                   #Number of selector threads to use. When the value is -1, the default, thenumber of selectors is derived from the operating environment.
    max-http-form-post-size: 200000   #Maximum size of the form content in any HTTP post request.

eureka:
  client:
    register-with-eureka: false #false表示不向注册中心注册自己。
    fetch-registry: true #指示此客户端是否应从 eureka 服务器获取 eureka 注册表信息
    service-url: #监控页面地址
      #defaultZone: http://${eureka.instance.hostname}:${server.port}/eureka/ #发布的服务注册中心地址,单机
      defaultZone: http://eurekaserver7001.com:7001/eureka/,http://eurekaserver7002.com:7002/eureka/,http://eurekaserver7003.com:7003/eureka/ #集群版 将当前的 Eureka Server 注册到 7003 和 7003 上,形成一组互相注册的 Eureka Server 集群
- 在java.com.example.service目录下新建接口DeptOpenFeignService,也可以建在公共子模块microservice-cloud-api内方便基础工程内的其他消费者使用,在该接口上使用 @FeignClient 注解实现对服务接口的绑定,调用机制一样所以代码接口位置两个都可以,代码如下。
package com.example.service;

import com.zk.springcloud.entity.Dept;
import org.springframework.cloud.openfeign.FeignClient;
import org.springframework.stereotype.Service;
import org.springframework.web.bind.annotation.GetMapping;
import org.springframework.web.bind.annotation.PathVariable;
import org.springframework.web.bind.annotation.PostMapping;
import org.springframework.web.bind.annotation.RequestBody;

import java.util.List;

/**
 * @Service添加为容器内的一个组件
 * @FeignClient value服务提供者提供的服务名称,即 application.name
 */
@Service
@FeignClient(value = "MICROSERVICE-CLOUD-PROVIDER-DEPT")
public interface DeptOpenFeignService {

    //对应服务提供者(8001、8002、8003)Controller 中定义的方法
    @PostMapping("/dept/add")  //GET跟安不安全没关系的,RESTful规范问题
    boolean addDept(@RequestBody Dept dept);

    @GetMapping("/dept/get/{deptNo}")
    Dept getDeptByID(@PathVariable("deptNo") Integer deptNo);

    @GetMapping("/dept/list")
    List<Dept> queryAll();
}
注意:
在 @FeignClient 注解中,value 属性的取值为:服务提供者的服务名,即服务提供者配置文件(application.yml)中 spring.application.name 的取值。
接口中定义的每个方法都与服务提供者(即 microservice-cloud-provider-dept-8001 等)中 Controller 定义的服务方法对应。
使用新版的feign(spring-cloud-starter-openfeign)时@FeignClient注解会自动加入到spring容器中,如果服务提供者有请求路径前缀,尽量使用@FeignClient的path属性指定,不要使用RequestMapping,否则会产生冲突
绑定提供者服务机构使用动态代理机制,实际上每个方法都执行了invoke 里面是请求
- 在java.com.example.controller目录下新建控制类DeptConsumerController提供客户端服务
package com.example.controller;

import com.example.service.DeptOpenFeignService;
import com.zk.springcloud.entity.Dept;
import org.springframework.beans.factory.annotation.Autowired;
import org.springframework.web.bind.annotation.GetMapping;
import org.springframework.web.bind.annotation.PathVariable;
import org.springframework.web.bind.annotation.RequestMapping;
import org.springframework.web.bind.annotation.RestController;
import org.springframework.web.client.RestTemplate;

import java.util.List;

/**
 * @author CNCLUKZK
 * @create 2022/9/7-22:34
 */
@RestController
public class DeptConsumerController {

    @Autowired
    private DeptOpenFeignService deptOpenFeignService;  //deptOpenFeignService是null,由于是声明式的注解绑定服务接口,没有真正的service实现类

    //不同于rpc那种DubboReference引用服务提供者的service,rpc是 接口调用 通过 反射
    //获取指定部门信息
    @GetMapping("/consumer/dept/get/{id}")
    public Dept getDeptById(@PathVariable("id") Integer id){
        return deptOpenFeignService.getDeptByID(id);
    }
    //获取部门列表
    @GetMapping("/consumer/dept/list")
    public List<Dept> getDepts(){

        return deptOpenFeignService.queryAll();
    }

    @RequestMapping("/consumer/dept/add")
    public boolean addDept(Dept dept){
        return deptOpenFeignService.addDept(dept);
    }
}
- 在java.com.example目录下新建新建主启动类MicroserviceCloudConsumerDeptOpenFeignApplication,在主启动类上添加 @EnableFeignClients 注解开启 OpenFeign 功能,代码如下。
package com.example;

import org.springframework.boot.SpringApplication;
import org.springframework.boot.autoconfigure.SpringBootApplication;
import org.springframework.cloud.netflix.eureka.EnableEurekaClient;
import org.springframework.cloud.openfeign.EnableFeignClients;

//OpenFeign和Eureka整合以后,容户端可以直接调用用,不用关心服务的IP地址和端口号
@SpringBootApplication
@EnableEurekaClient
@EnableFeignClients //开启 OpenFeign 功能
public class MicroserviceCloudConsumerDeptOpenFeignApplication {

    public static void main(String[] args) {
        SpringApplication.run(MicroserviceCloudConsumerDeptOpenFeignApplication.class, args);
    }

}
服务在启动时,OpenFeign 会扫描标有 @FeignClient 注解的接口生成代理,并注人到 Spring 容器中。
EnableFeignClients可以配basePackages扫描包属性,当然不配置也可以
- 依次启动服务注册中心集群、服务提供者以及 microservice-cloud-consumer-dept-openFeign,启动完成后,使用浏览器访问“http://localhost/consumer/dept/get/1”,结果如下图。

- 而多次访问上述链接时,数据会在三个服务间轮询,说明在OpenFeign 集成了 Ribbon实现了客户端的负载均衡,默认的策略是轮询策略。
- 重启 microservice-cloud-consumer-dept-openFeign,启动完成后,使用浏览器访问“http://localhost/consumer/dept/get/1”,结果如下图。


- 使用feign报错:Caused by: java.io.FileNotFoundException: class path resource [org/springframework/boot/autoconfigure/web/ServerPropertiesAutoConfiguration.class]

- 加入与cloud/spoot相匹配的版本。
<dependency>
    <groupId>org.springframework.cloud</groupId>
    <artifactId>spring-cloud-starter-openfeign</artifactId>
    <version>3.1.3</version>
</dependency>
下一篇:SpringCloud-18-OpenFeign超时控制和日志增强
本文含有隐藏内容,请 开通VIP 后查看